

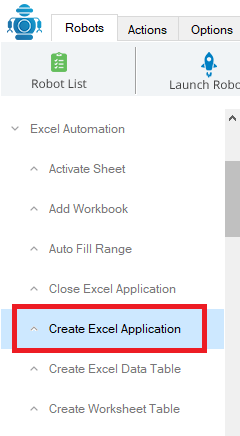
1.Introduction To DWmaker
2.How to Register and Download Process BOT DWmaker
- To download Process Bot DWmaker, first we have to go to the link intelgic.com
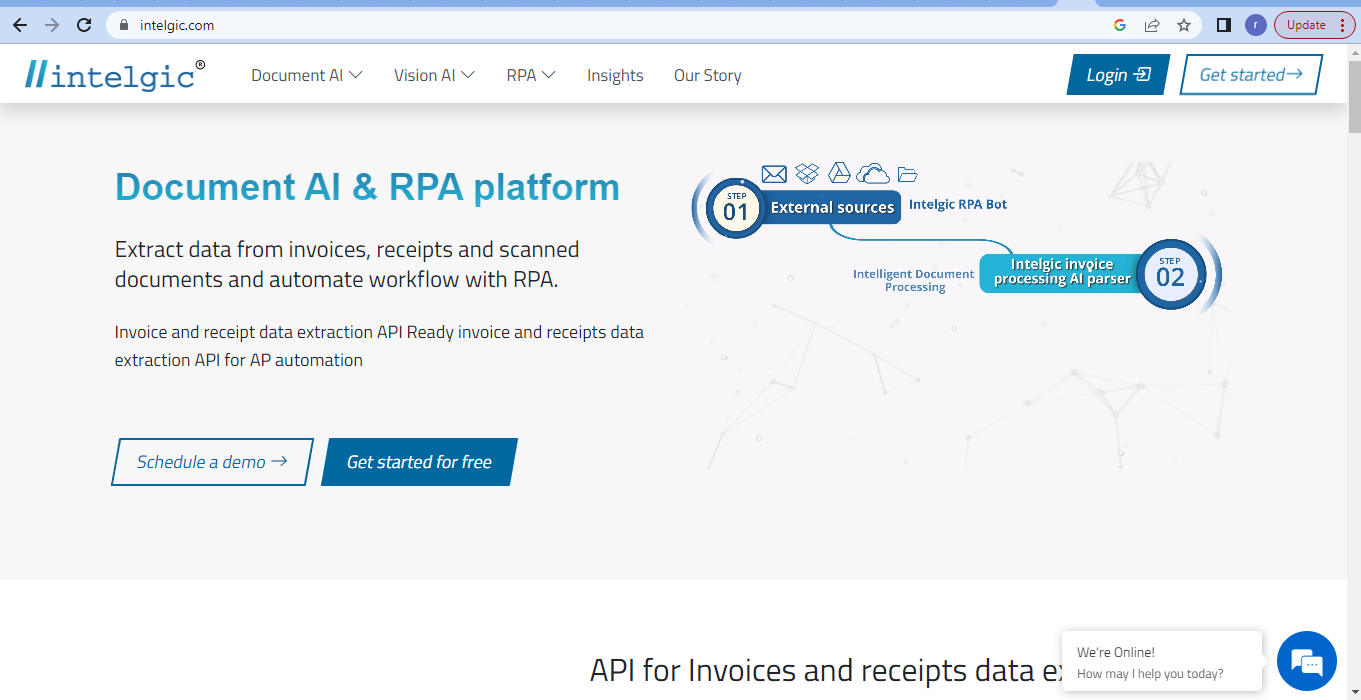
- Then click on the login button to sign up for your intelgic account.
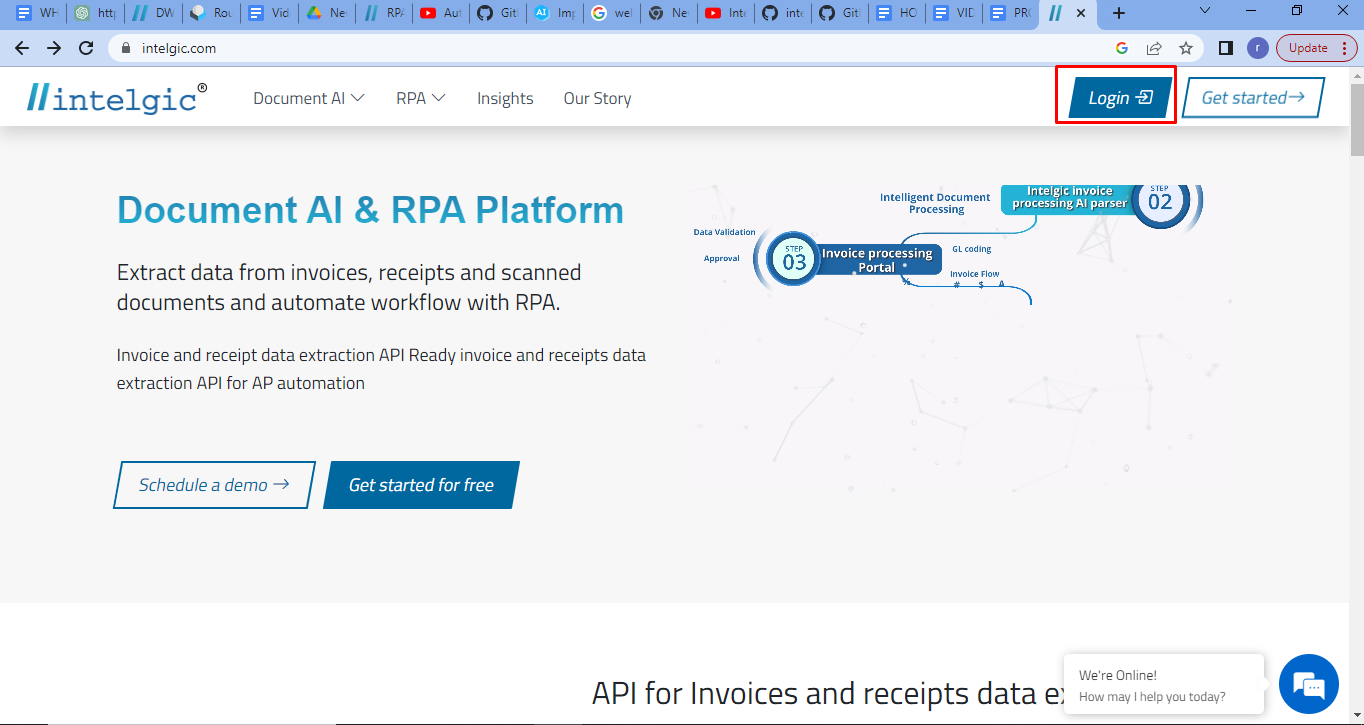
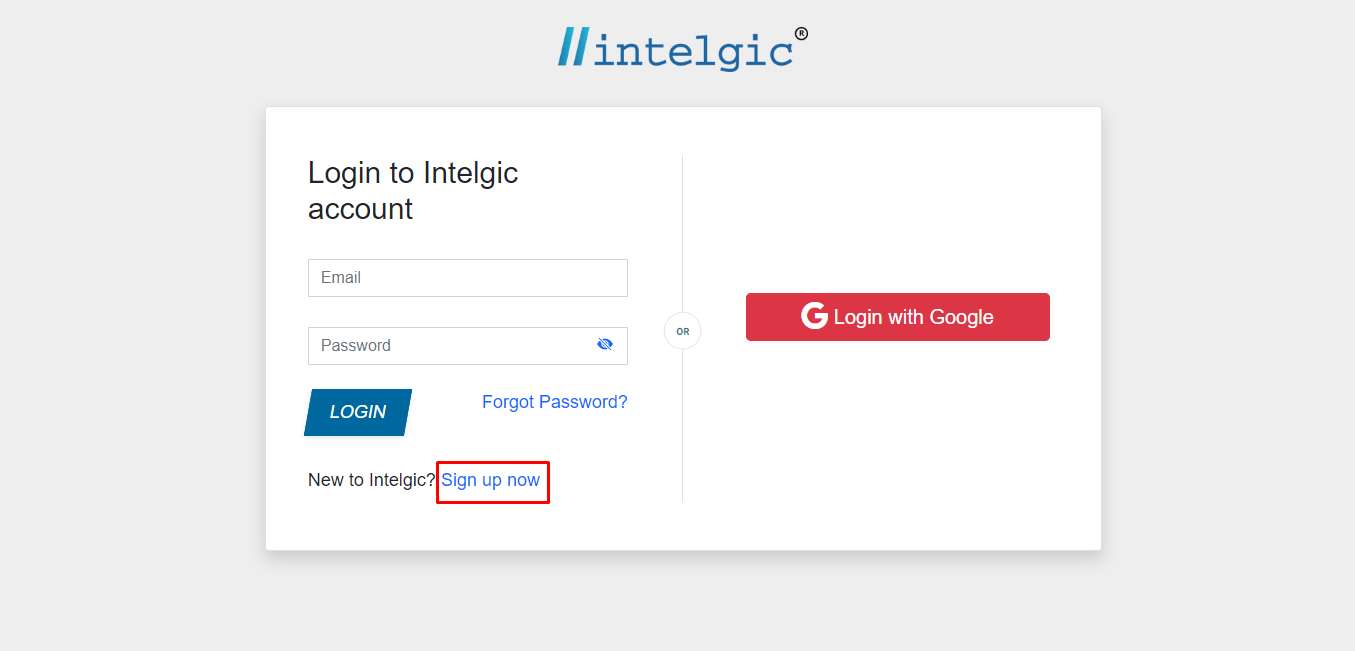
- You can sign up to your intelgic account by using your email id or your Google account.

- If you want to sign up with an email id, click on the Sign up now button. You will go to the bellow page.
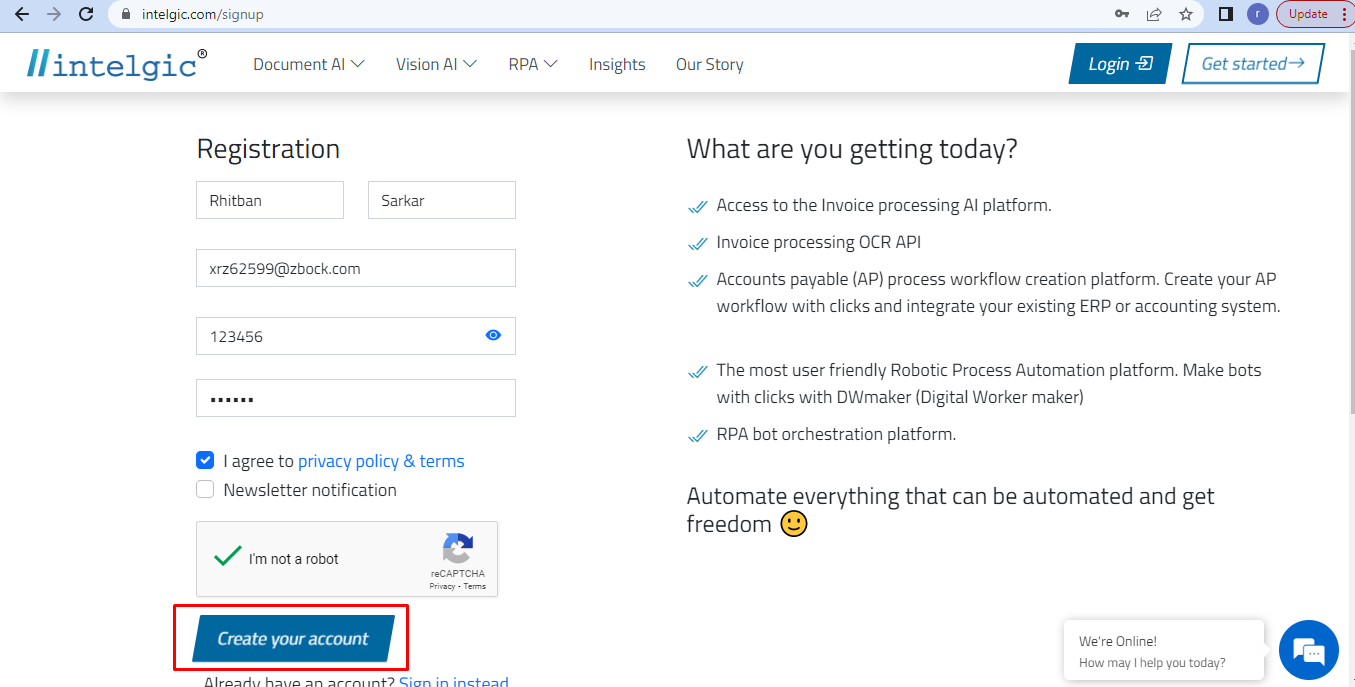
- Register your name, mail id and password then click on the “Create your account” button. Don’t forget to check the “I’m not a robot” box.
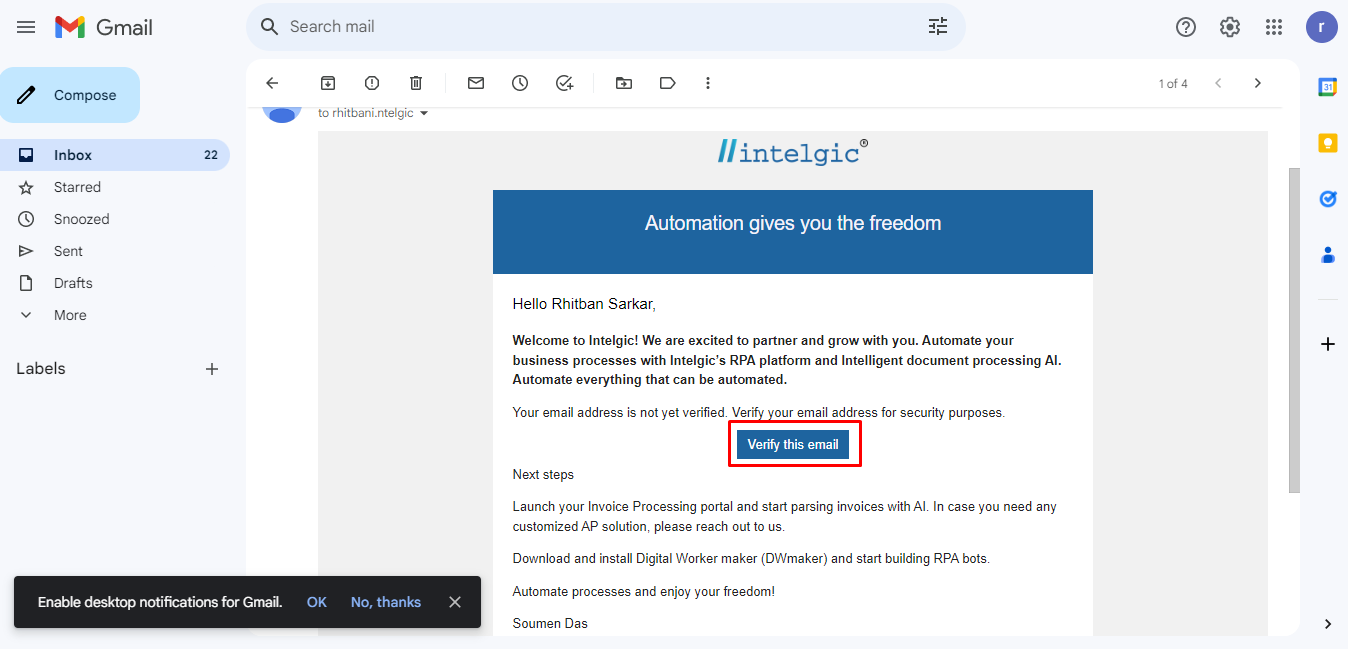
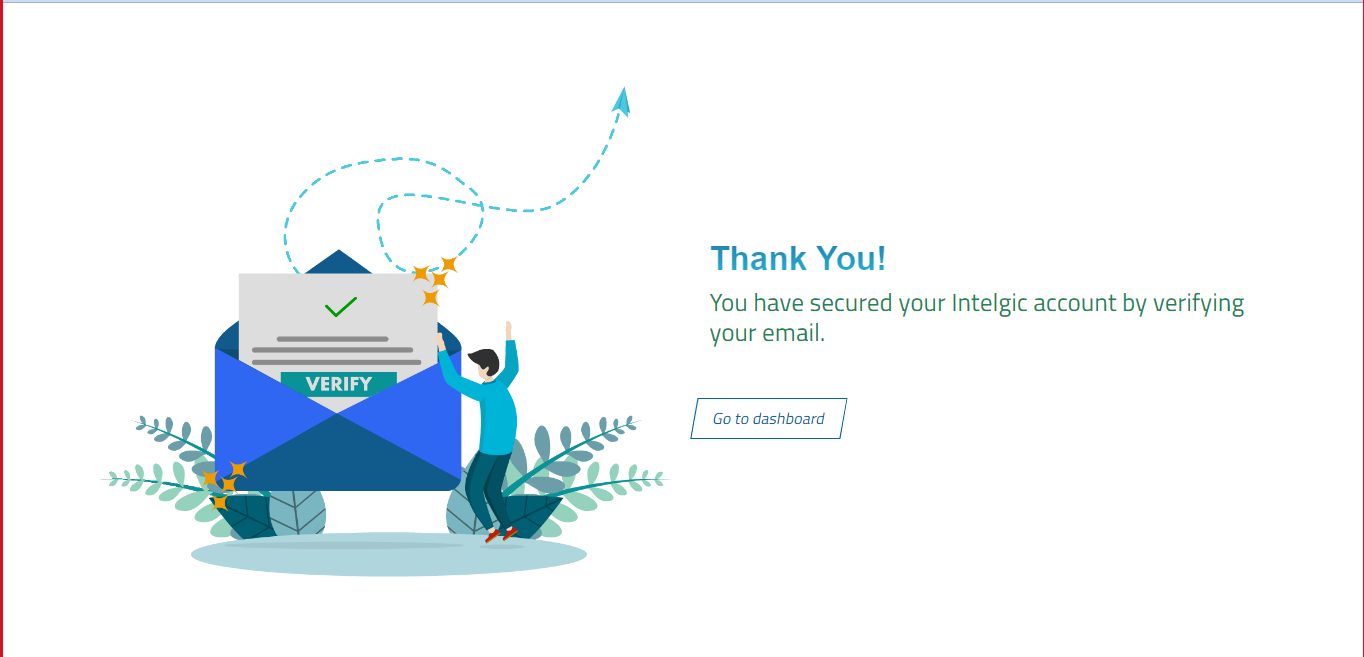
- You will get a mail on your registered email id to verify the email. Click on the “Verify this email” button.
- Now you will be logged in to your intelgic account.
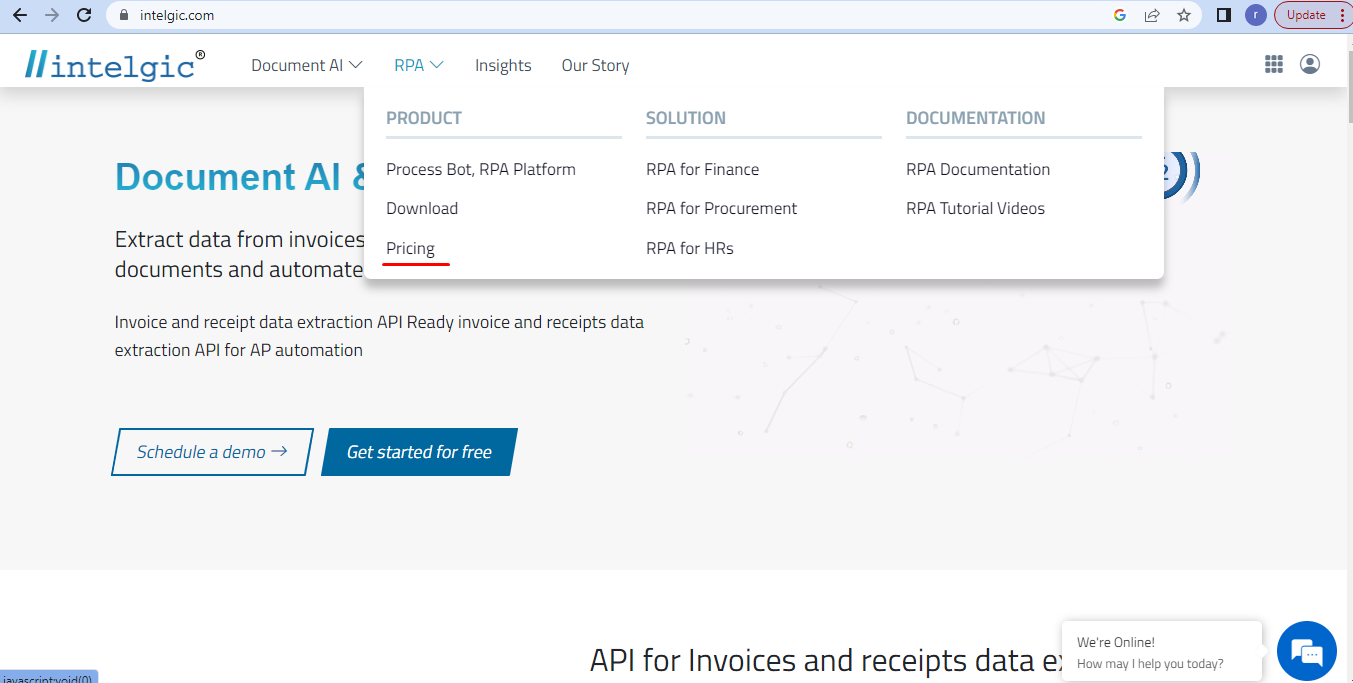
- Now click on the pricing under RPA.
- Choose the pricing option you like.
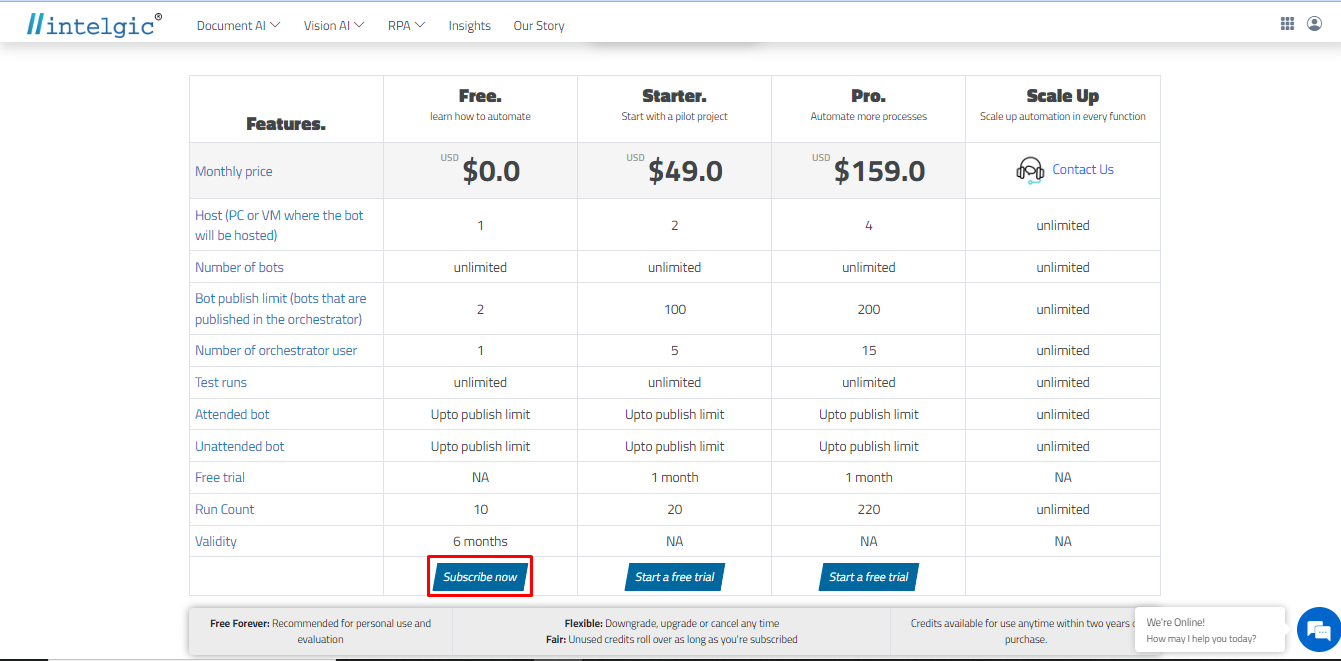
- You will be redirected towards the intelgic dashboard, where you will see that your plan has been activated.
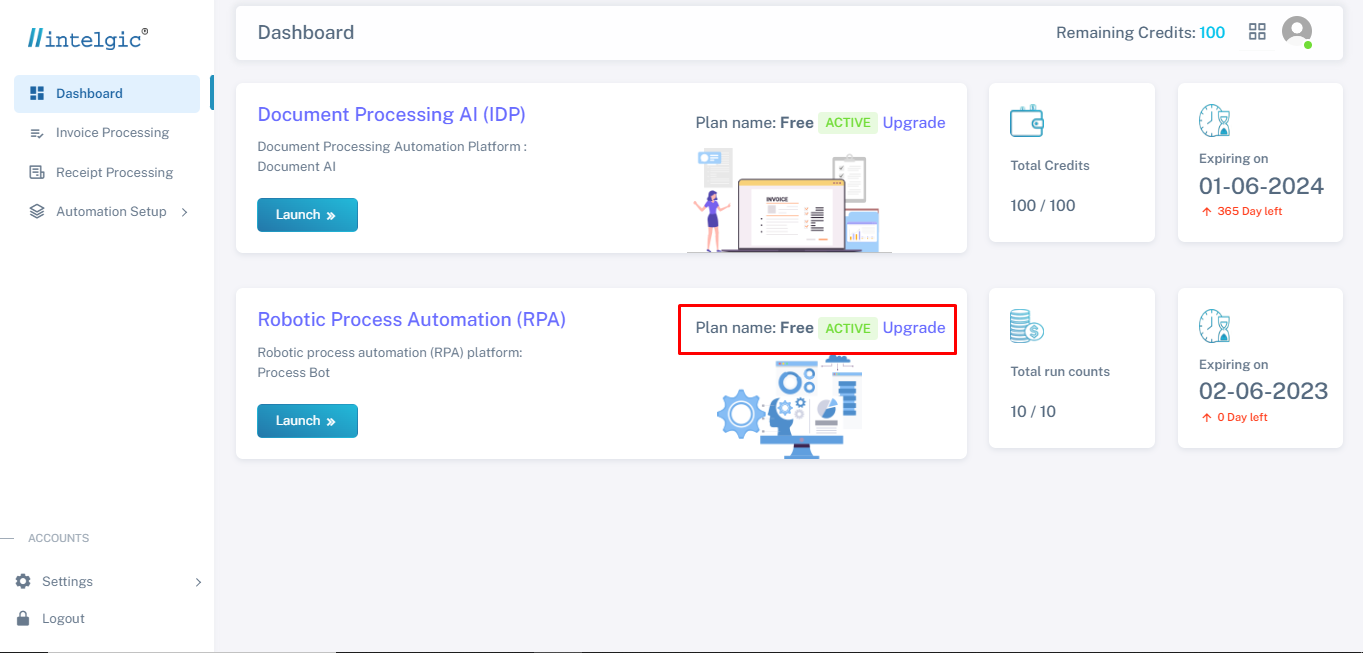
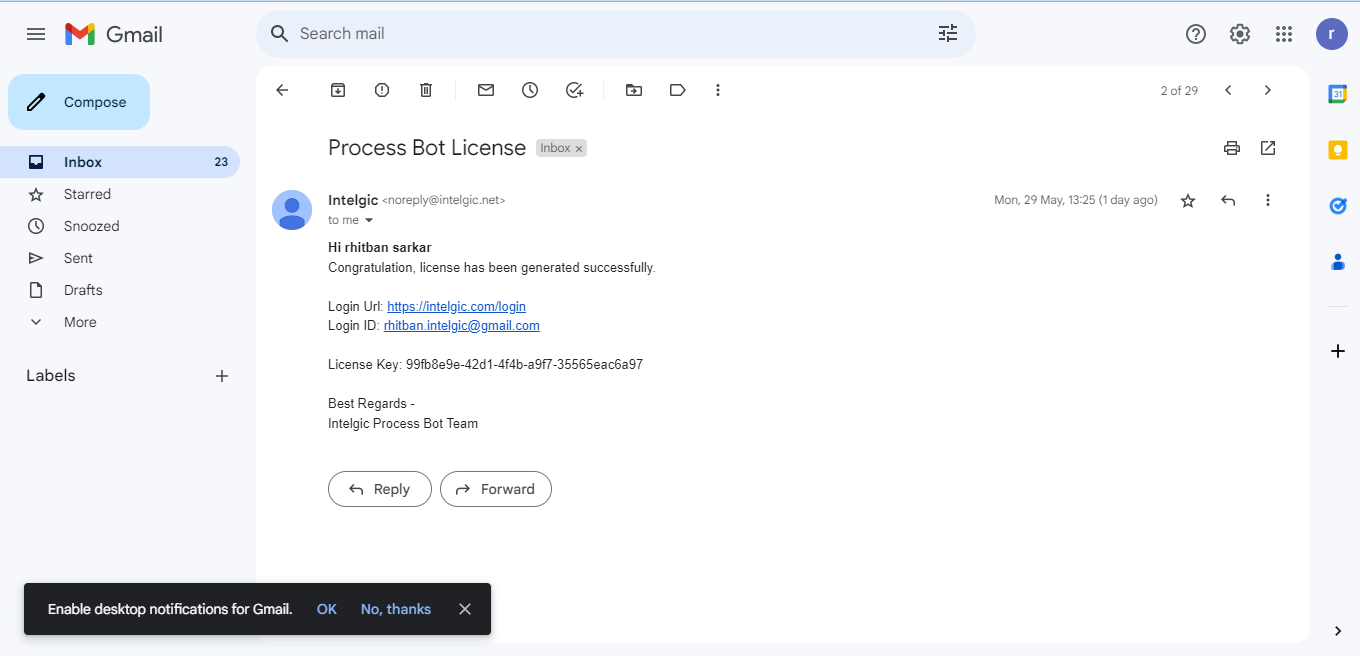
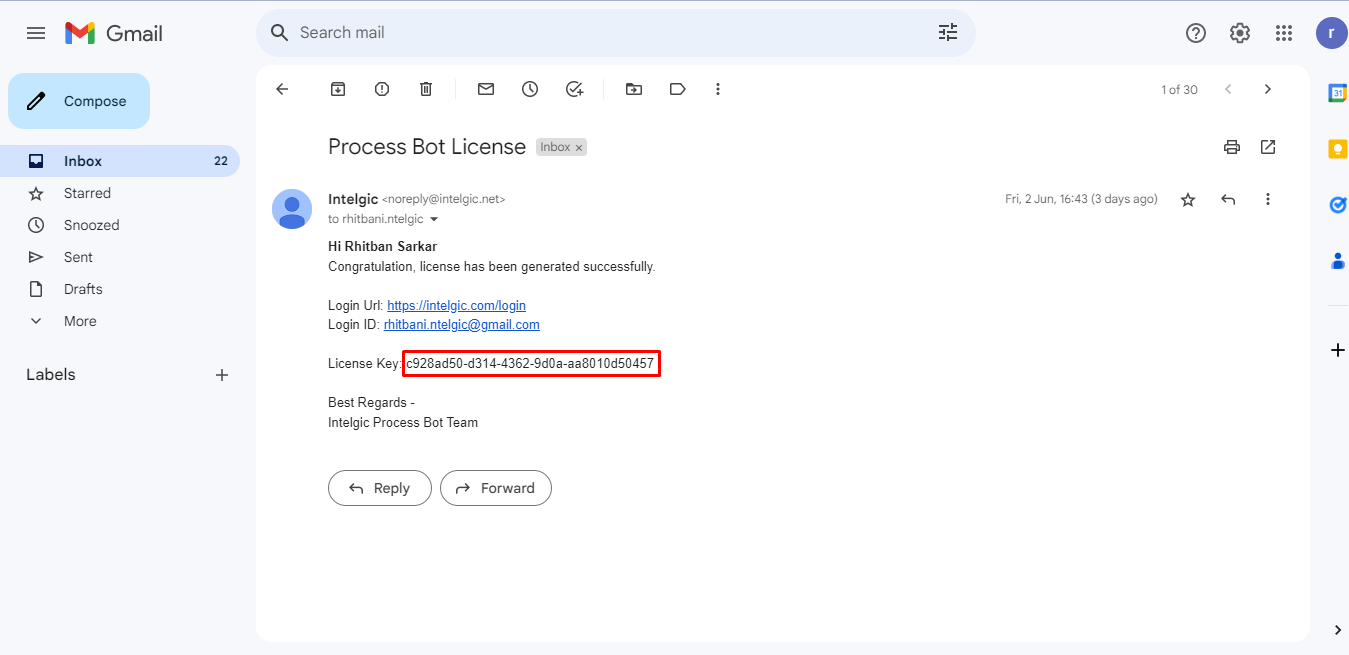
- Now check your mail, you will get a mail on your registered mail id with the details of license key with login id and login Url.
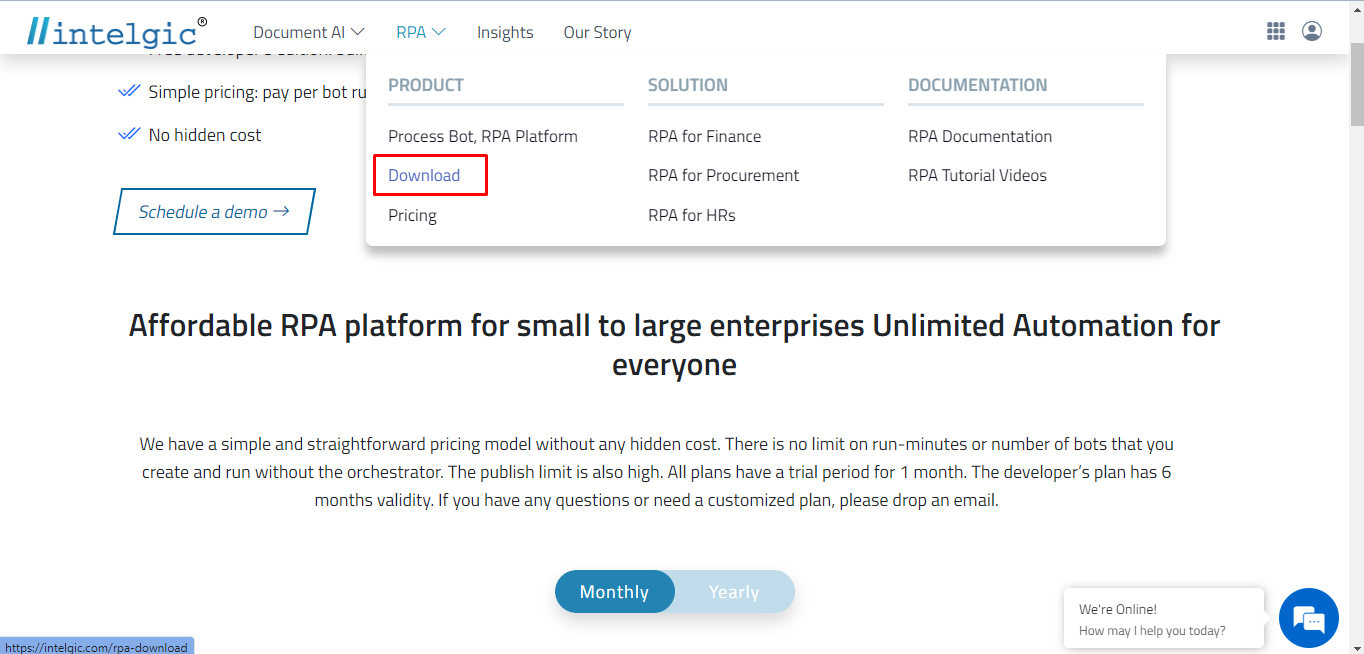
- Now click on the download option under RPA.
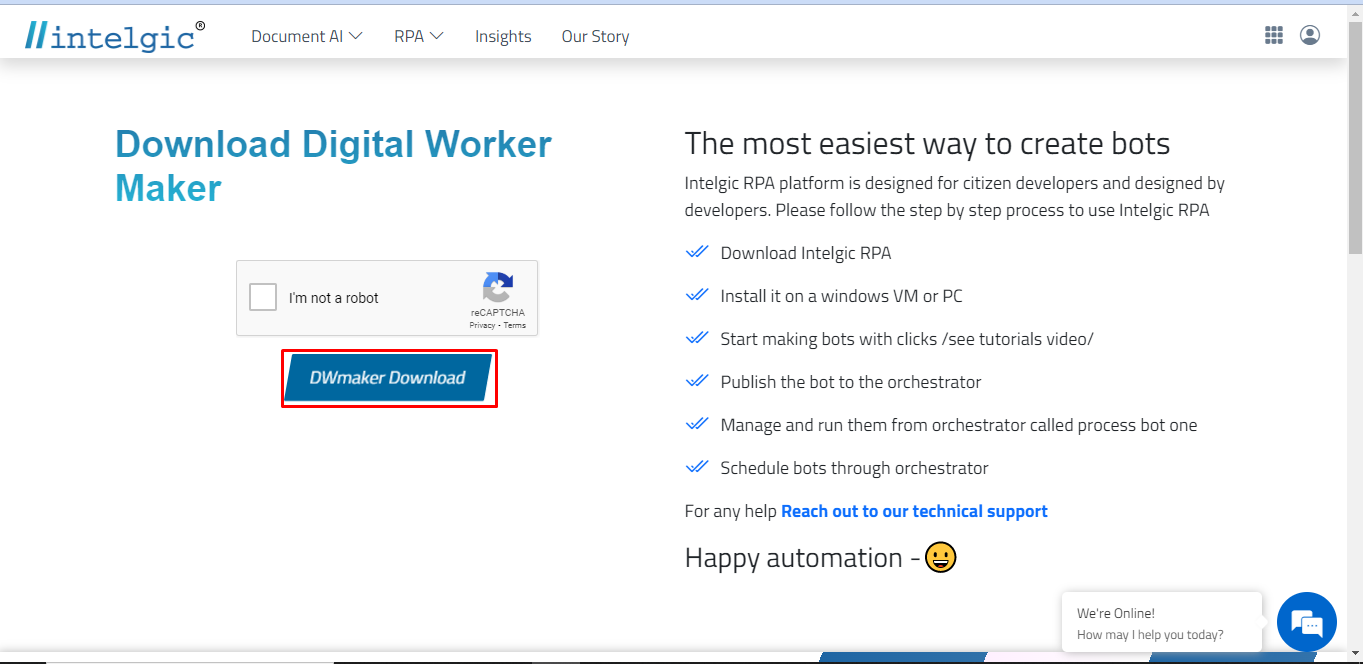
- Now you need to click on the DWmaker Download button.
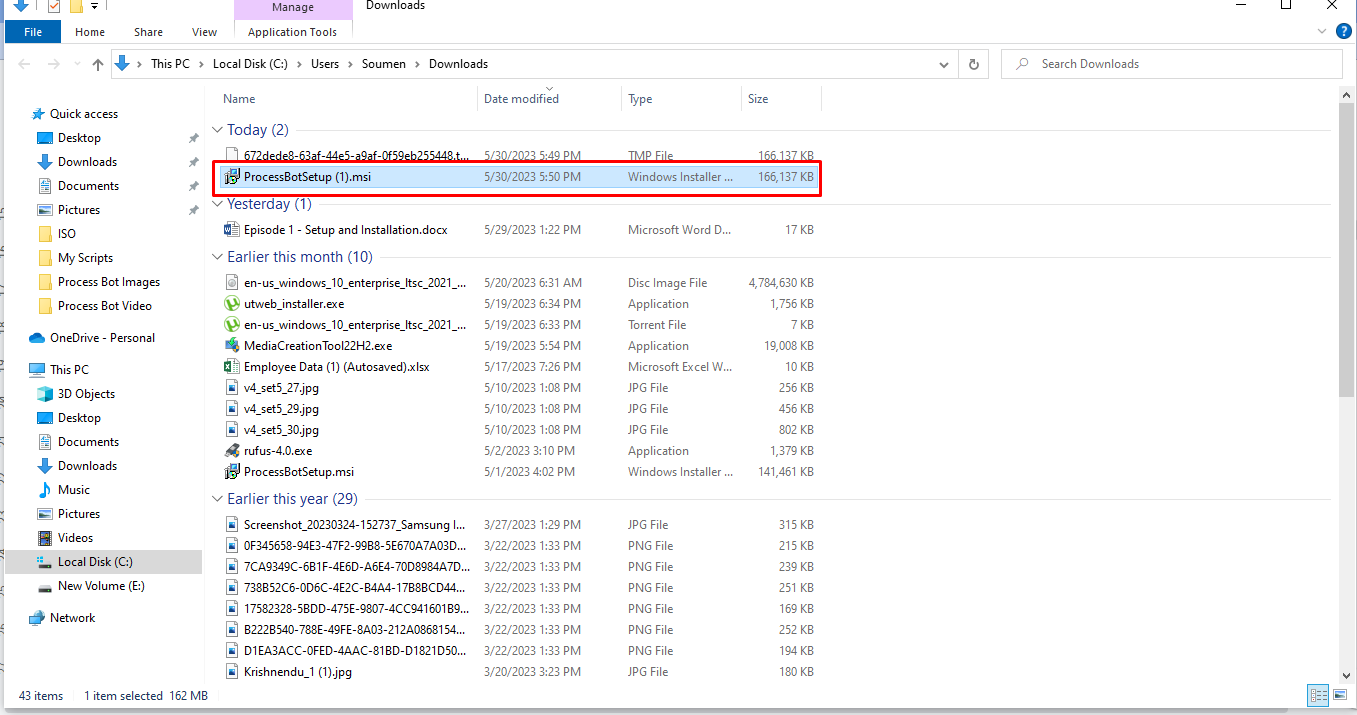
- After successfully downloading the DWmaker check your Downloads folder and double-click “Process Bot Setup” to start the installation process
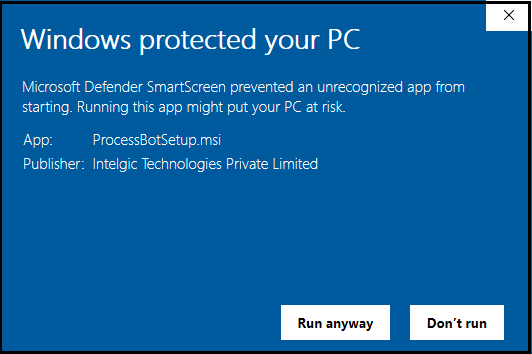
- It will give you the below dialogue box, click on the “Run anyway” option.
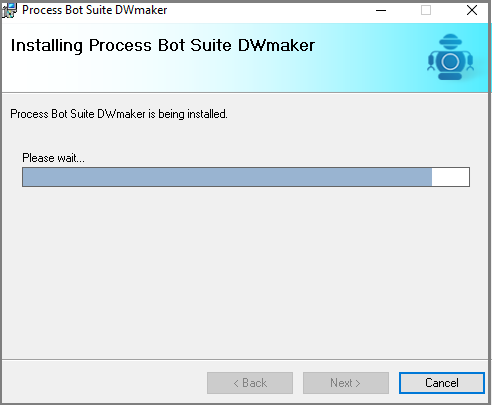
- Next your DWmaker installation process will start.
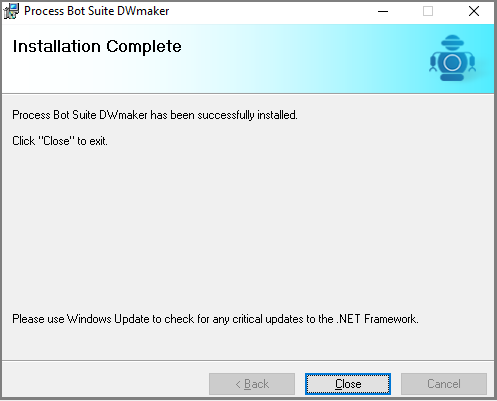
- Once the Process Bot DWmaker is installed successfully, click on the “close” button.
- Now you will find the DWmaker in your windows menu or in your desktop.
 or,
or, 
- Double click on DWmaker, now it will ask you for your activation code.
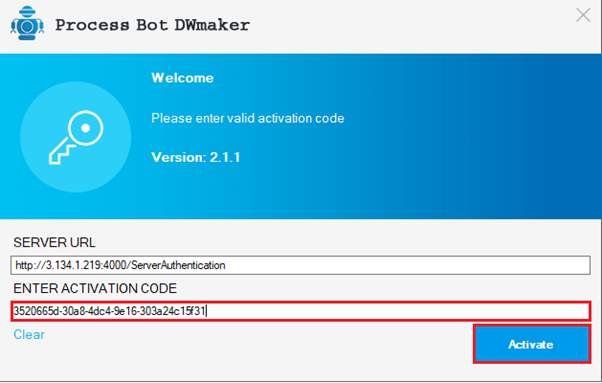
- You will find both the ACTIVATION CODE in your registered mail id. Copy the License Key and paste it in the ACTIVATION CODE box.
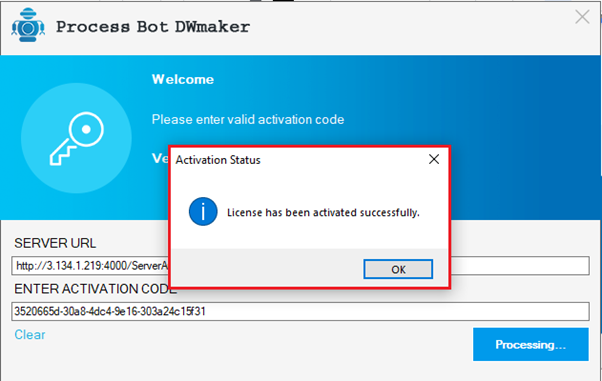
- Now you will receive notification as “your license has been activated successfully” in a pop window.
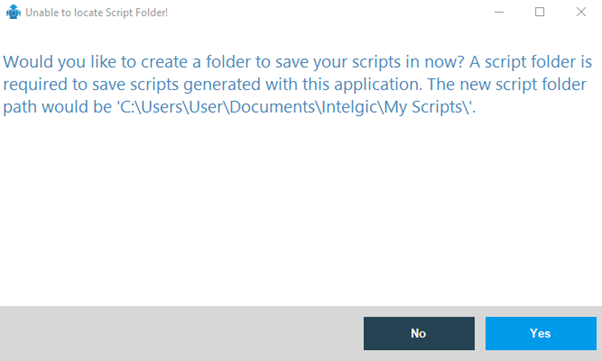
- The DWmaker will ask you to create a folder to save your script, click on Yes.
- Now your DWmaker is ready to open.This is how your DWmaker dashboard looks like.
3.How to Connect Process Bot One with Process Bot DWmaker
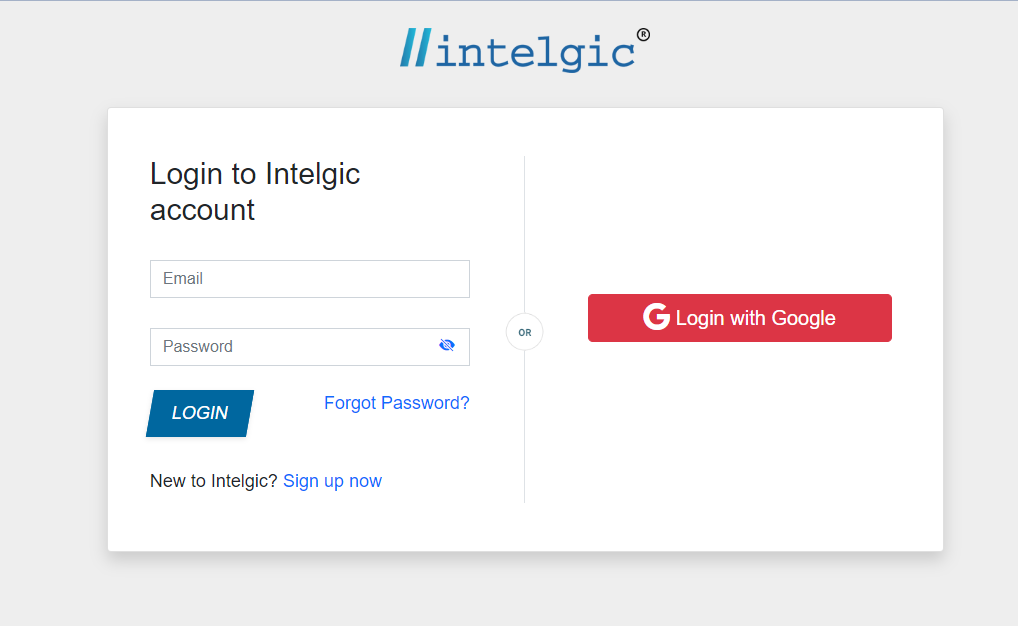
- To login into Process bot one first you have to check your registered email id. Copy the Login ID. Then go to the Login URL and open the URL

- The URL will navigate you to the below page. Paste the copied Login ID and put the password you set for your Intelgic account.
- After login you will be navigated towards the below page. Click on the Robotic Process Automation (RPA).

- It will navigate you to the below page. Login with your registered Intelgic mail id and password.

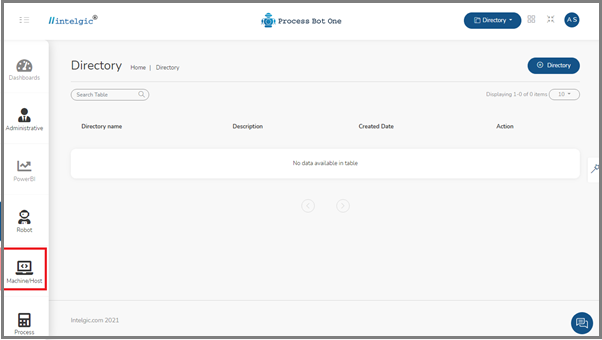
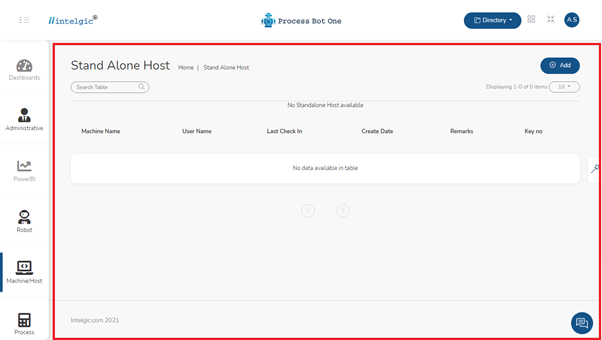
- Once you logged in, You will be navigated to the Process Bot One window, which is as shown below. Click on the Machine/Host in the left side corner.
- As soon as you click on Machine/Host, we have two options under it.
- Standalone Host: In this environment one system can perform one task at a time. This service is available at Free Edition.
- Server: In this environment, multiple systems can perform multiple tasks at a time. This service is available at Pro and Starter Edition.
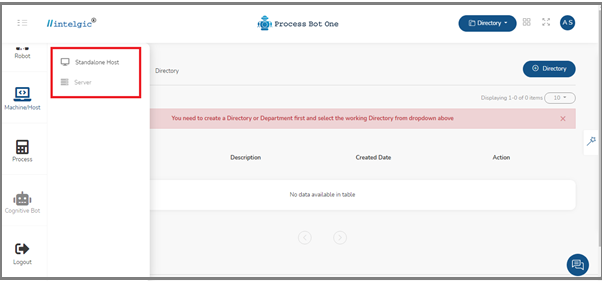
- The connection procedure for both options is the same.
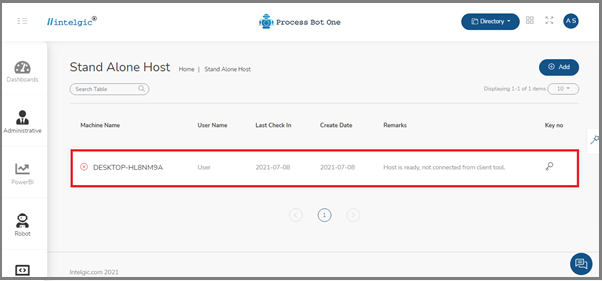
- Once you click on Standalone Host, the Standalone Host window will appear, which is as shown below.
- Click on the Add option. You will get a pop-up window.

- Now go to the DWmaker that you have installed previously and click on the options button.
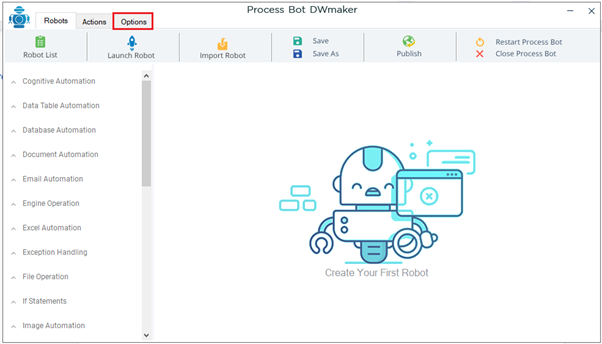
- Next, click on Settings Manager under Options.

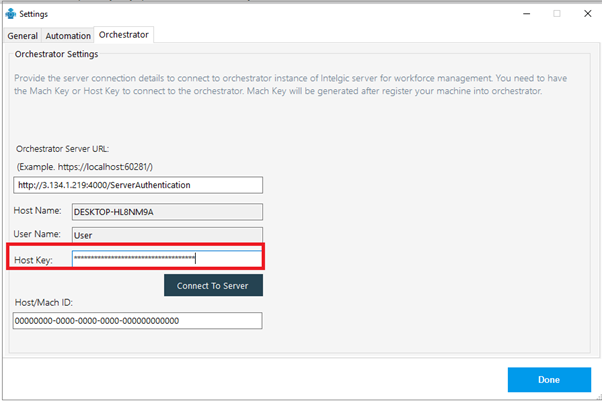
- A Settings window will appear, click on the Orchestrator, it will take you to the Orchestrator settings window.
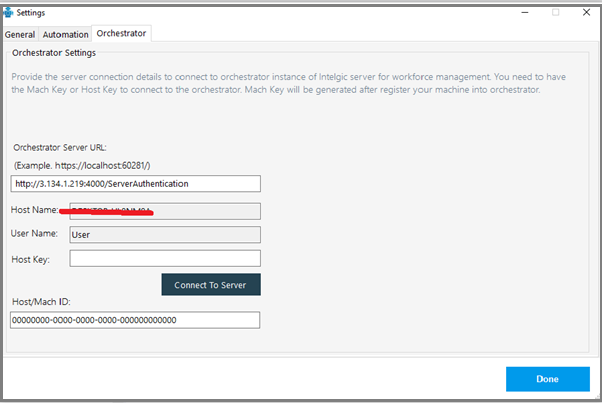
- You will find the Host Name and User Name here, copy and paste it in the Machine Name and User Name of the pop-up window of the Standalone Host and click on the Save button.
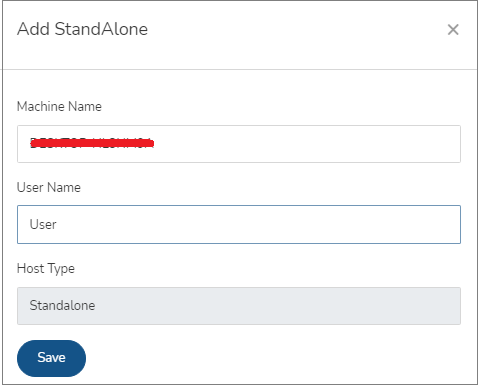
- Once you click on the Save button, your host will be created. Also a key number will be generated.
- Click on the key symbol and copy the number. Paste the number in the Host Key of the Orchestrator settings of DWmaker and click on the Connect To Server button. And click on the ok button of the pop-up window.
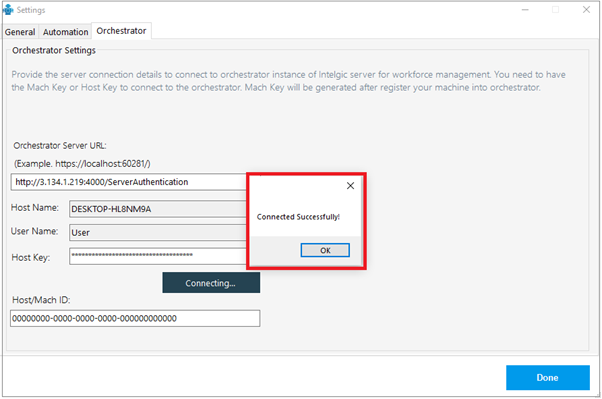
- Once, the Process Bot One is connected with Dwmaker, you can see a green right mark before the Machine Name as shown below.

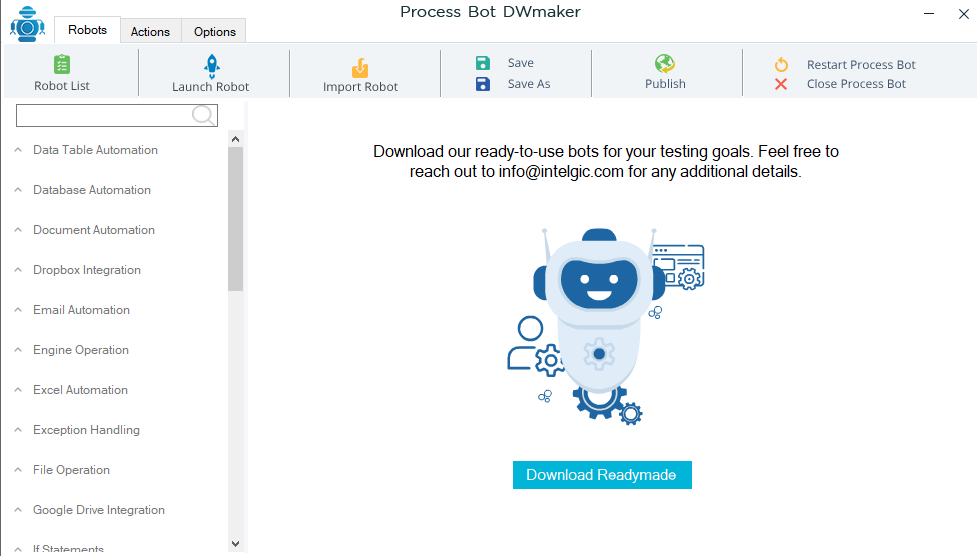
4.Process Bot DWmaker Dashboard
- In the Process Bot DWmaker, we have three buttons, such as Robots, Actions, and Options.
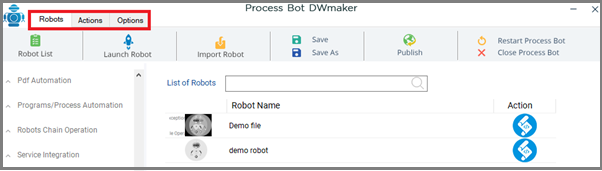
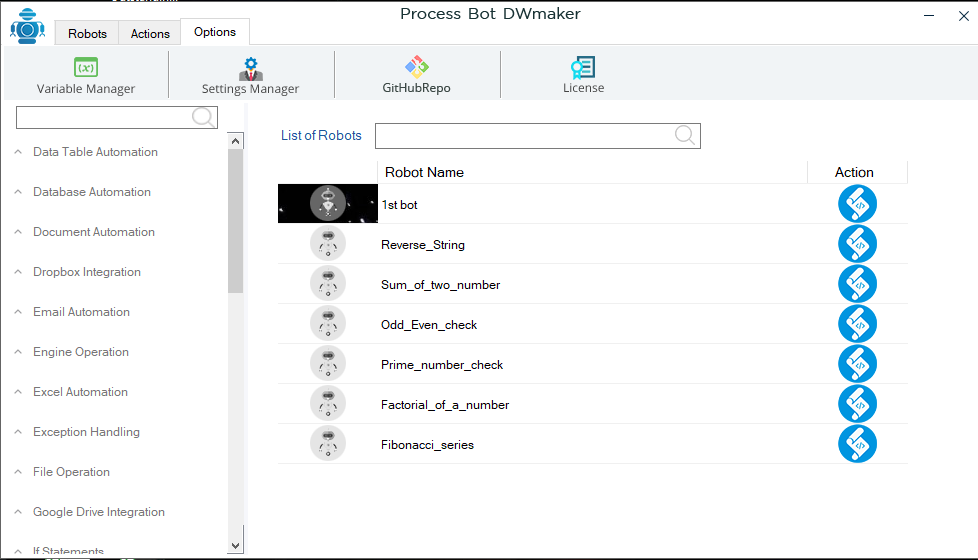
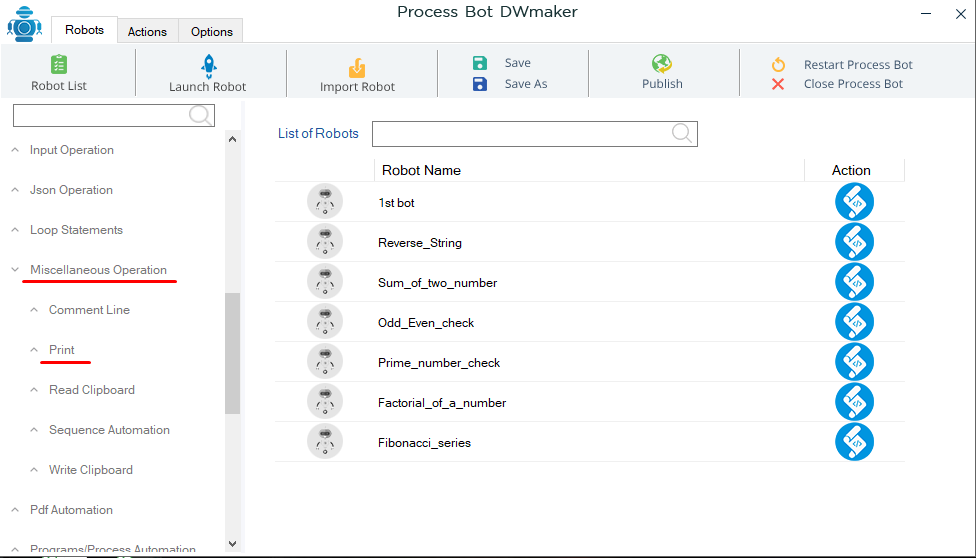
- Once you click on the Robot button, you will get the Robot List, Launch Robot, Import Robot, Save And Save As, Publish, Restart Process Bot, And Close Process Bot.
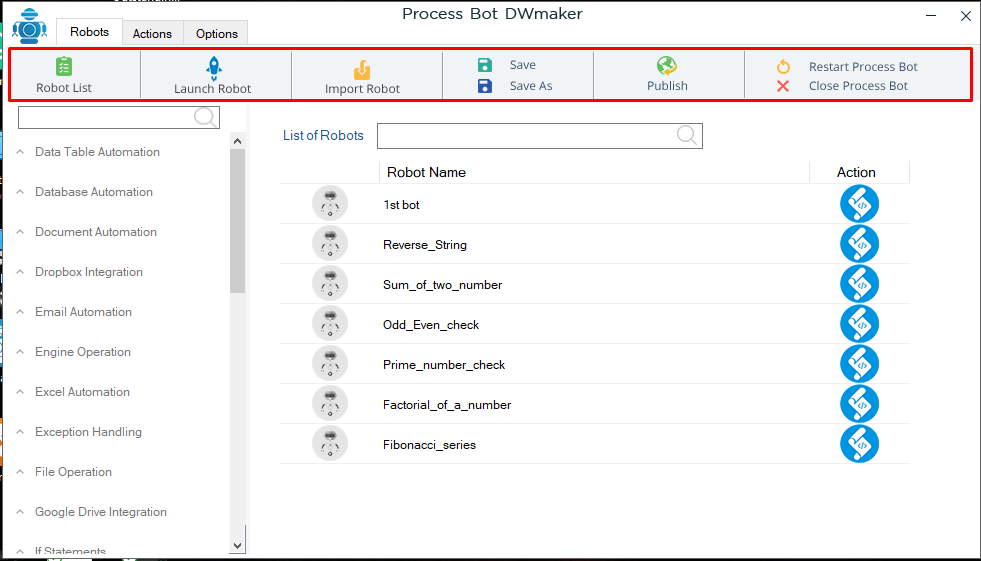
- Robot List: If you click on the Robot List it will give the list of bots in your DWmaker.
- Launch Robot: If you click on Launch Robot it will take you to the script files to launch your bots.
- Import Robot: This option allows you to import the bots from script files to your workbook.
- Save, Save As: This option allows you to save the automation command for your bots.
- Publish: This will help to publish your robots.
- Restart Process Bot, Close Process Bot: It helps to restart and close your process bot DWmaker.
- Next is the Action
- Once you click on the Action button, the DWmaker navigates you to its sub-categories such as Record, Schedule, and Run.
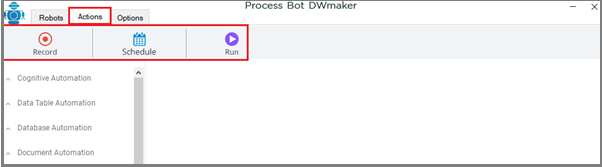
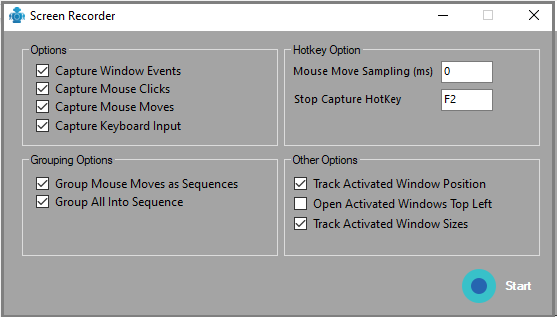
- Once you click on the Record button, the Screen Record pop-up window will open, it helps you to record the screen which is as shown below.
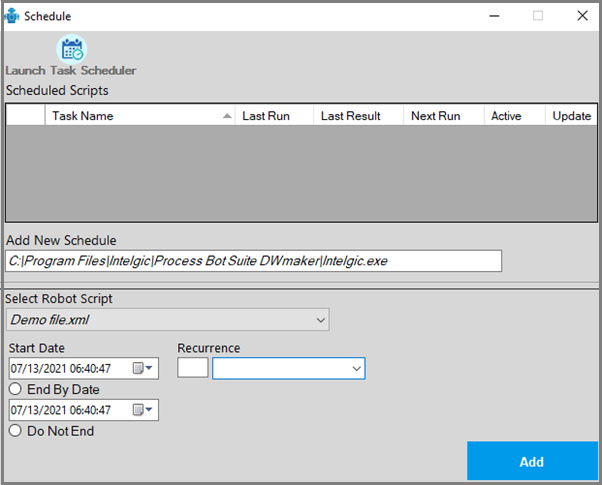
- Once you click on the schedule button, a schedule pop-up window will open, which helps you with the scheduling of time for triggering the bot.
- The Run button helps to run the scheduled robot.
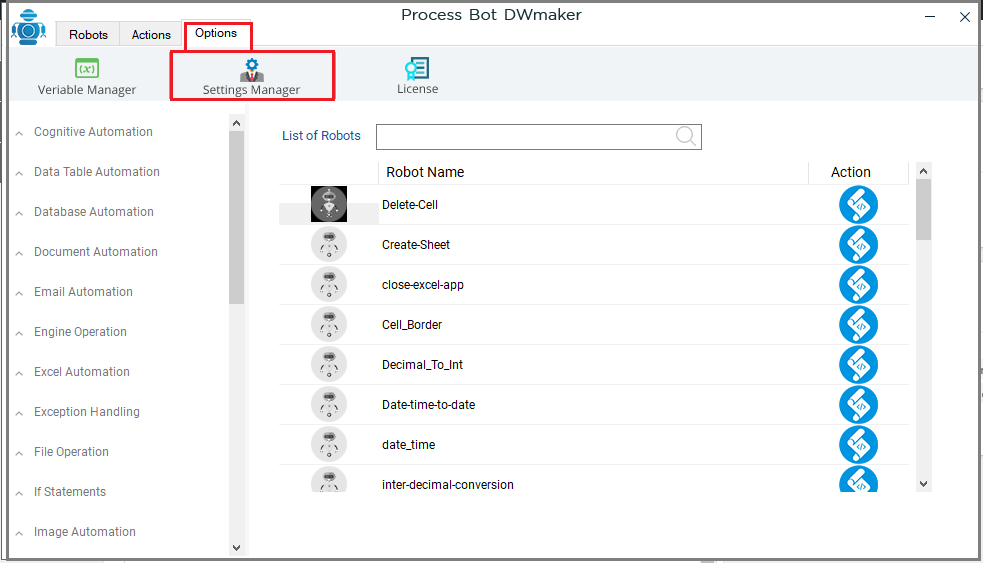
- Now if you click on the Options button, you will get Variable Manager, Settings Manager, GitHubRepo and License.
Variable Manager is used, if you want to define a variable before you start to write your automation command. You can do it by clicking on User Defined Variable and clicking on the Add option.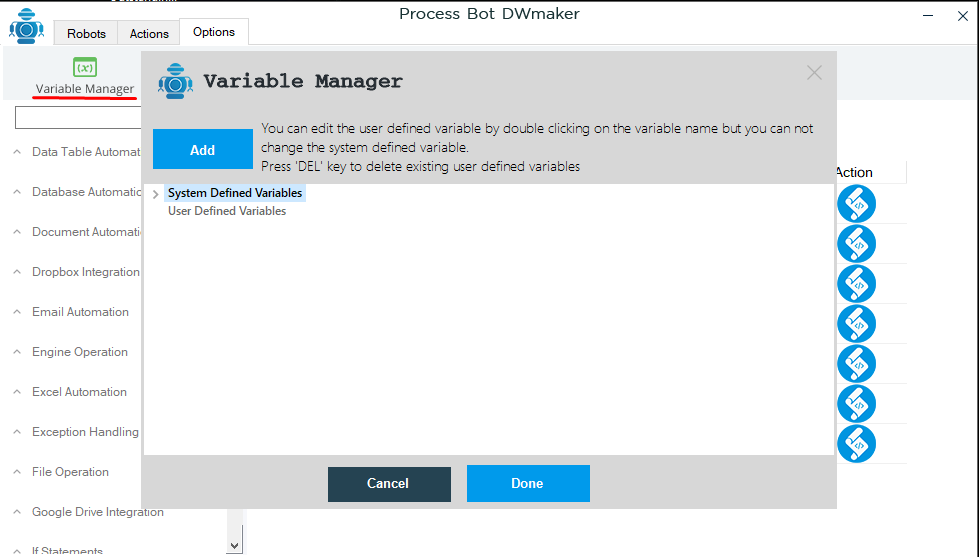
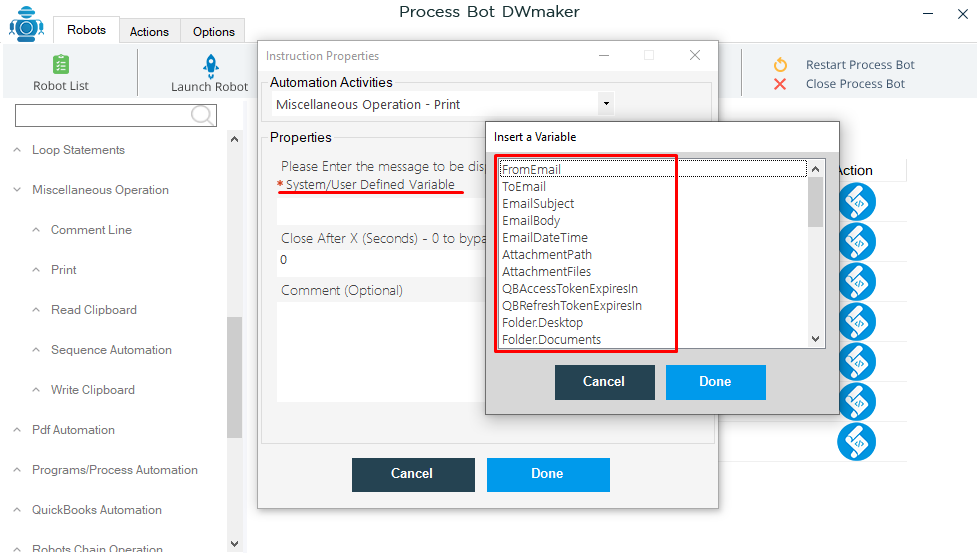
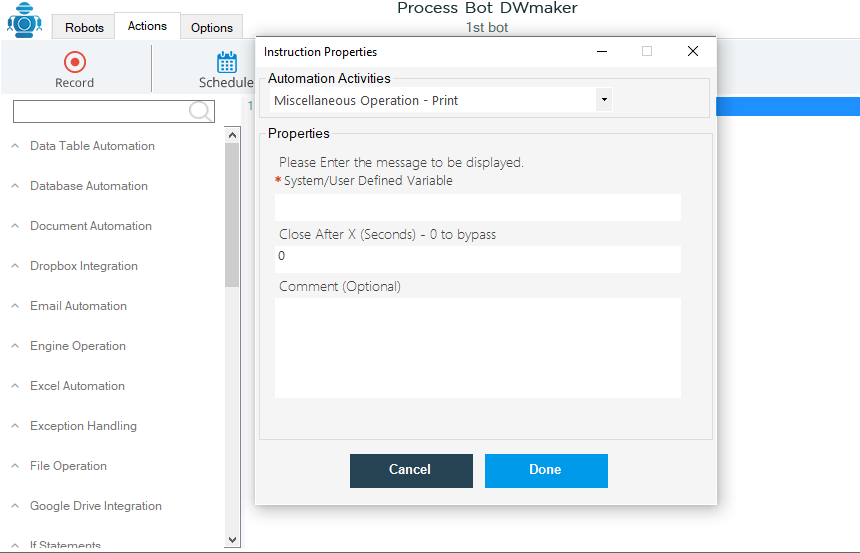
- There are also System Defined Variables which are predefined variables that already exist in the DWmaker.To see the System Defined Variables we have to click on the Print button under Miscellaneous Operation. A pop-up window will open. Click on the System/User Defined Variable.A list will appear, this is your System Defined Variable.
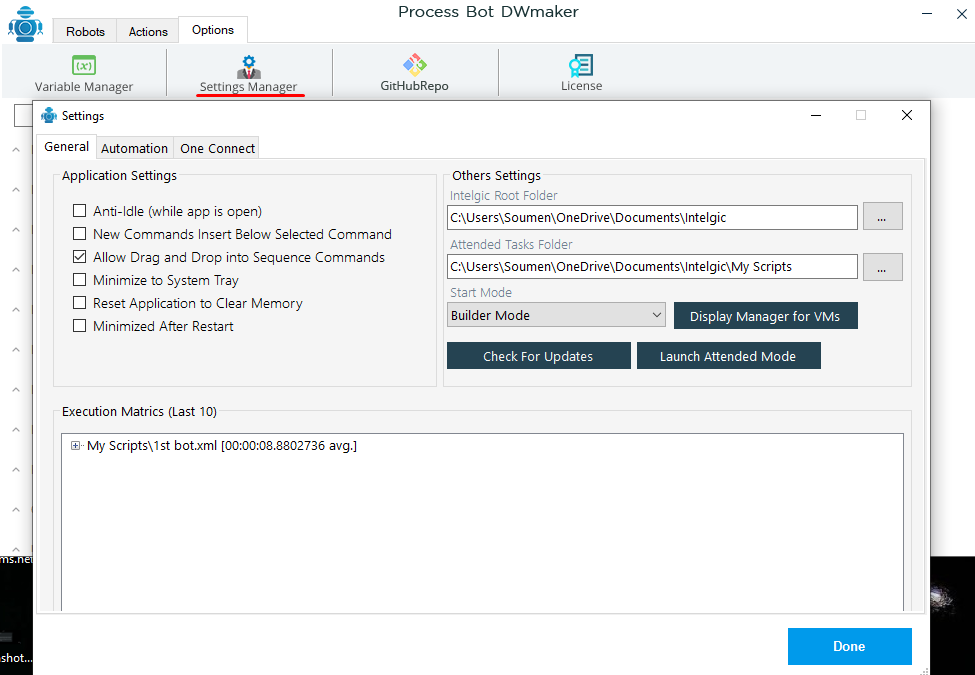
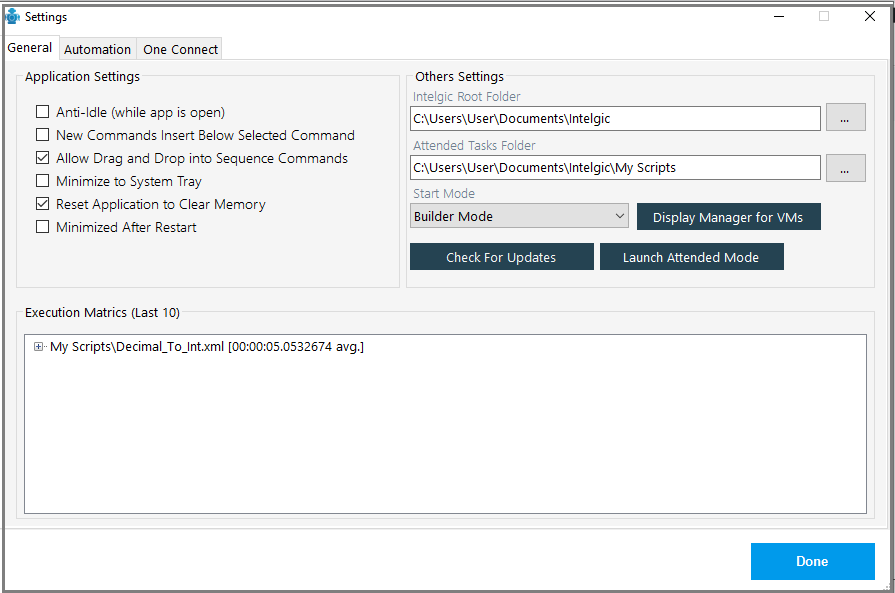
- Settings Manager is used for your DWmaker settings.
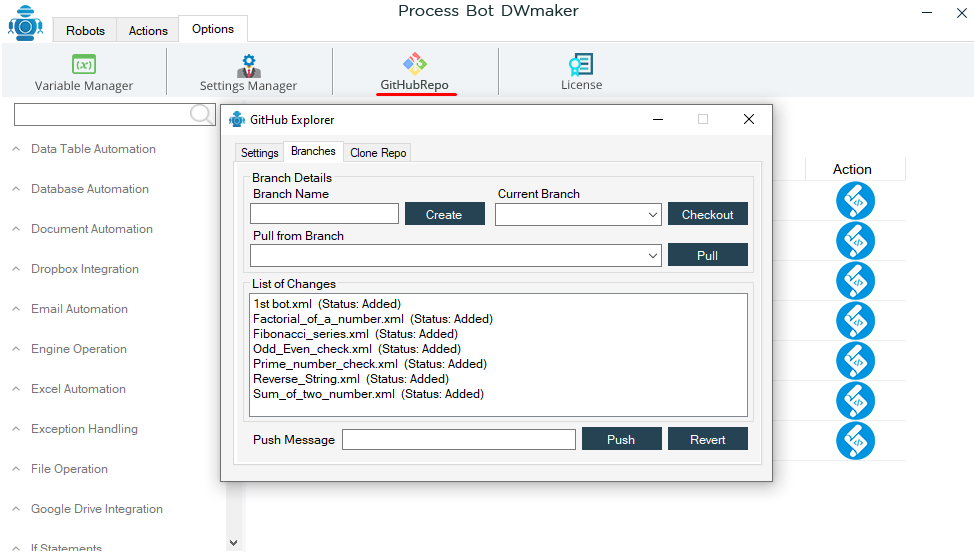
- GitHubRepo is used for tracking all our activity and doing modifications.
- And License button is for giving you information about your DWmaker

5.How to Update DWmaker
You can update the DWmaker every month, to get the updated version of the software.
Now, let us see the step-by-step process of updating DWmaker.
- Open the DWmaker application, click on the Options tab
- Next, click on the General tab, in the Settings pop-up window.
- Next, click on Check for updates.
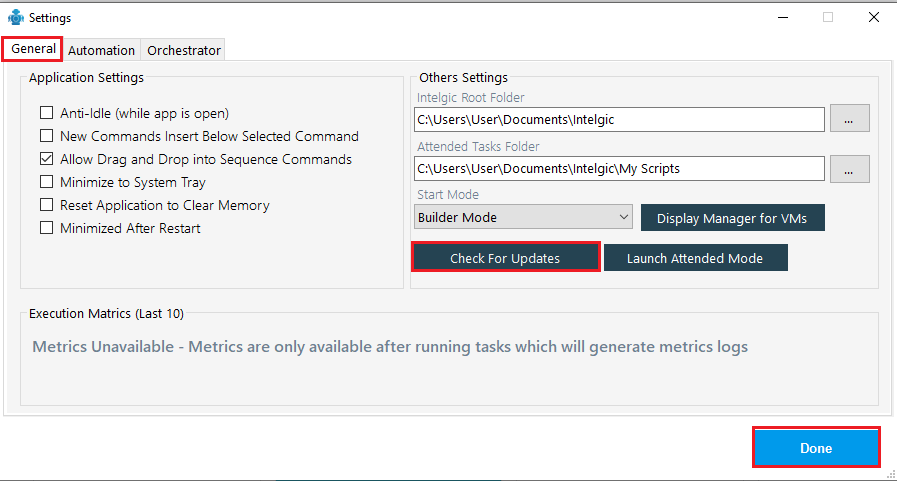
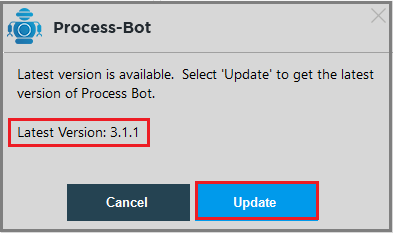
- If the new version is available, then the DWmaker will show you the new version, click on the Update button as shown below.
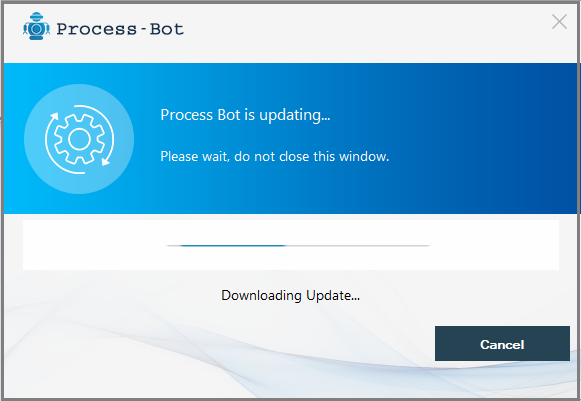
- Once you click on the update button, the DWmaker will start updating.
- Once your DWmkaer is updated, you can see the updated version.
6.How to create your first Robot?
- It will create a pop-up window.
- Now write something that you want to print in the box
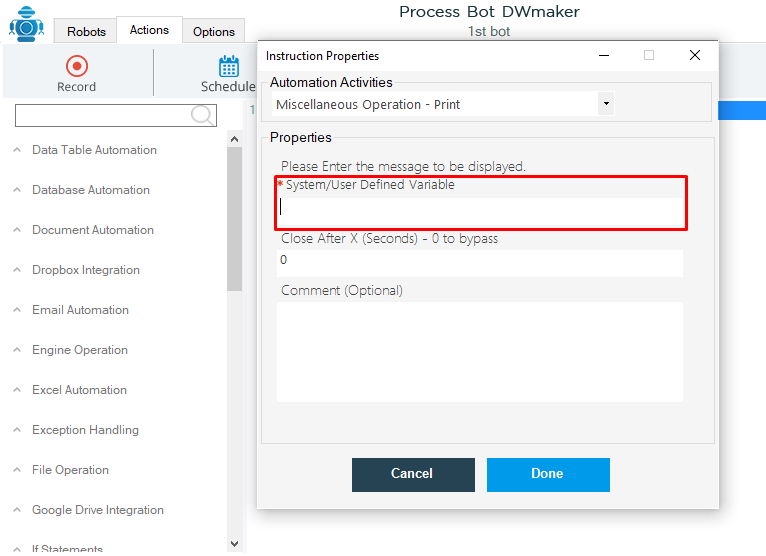
- Here I will show you how to print “ Hello World”
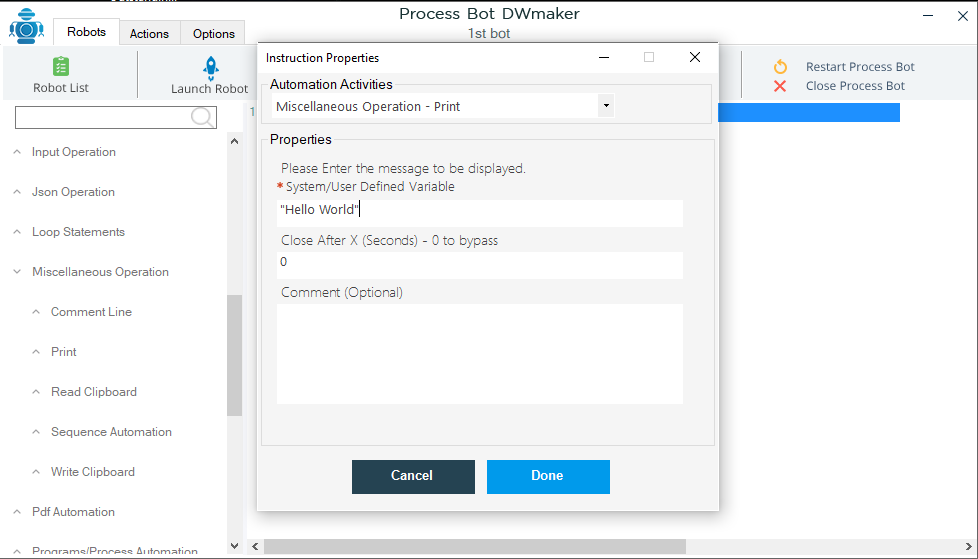
- Then press on the Done button.
- Now go to the Save option and click it.
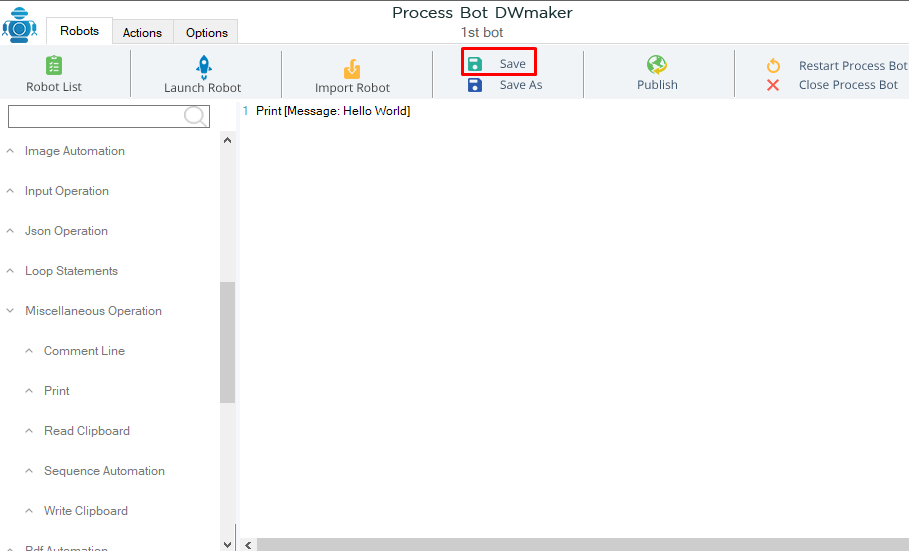
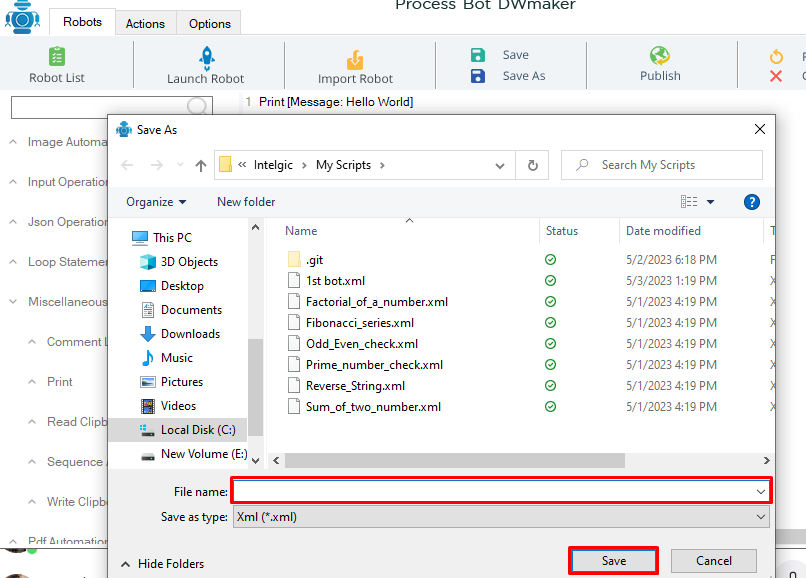
- It will create a pop-up window, give the name of your bot in File Name and click on the Save button. Your bot will be saved.
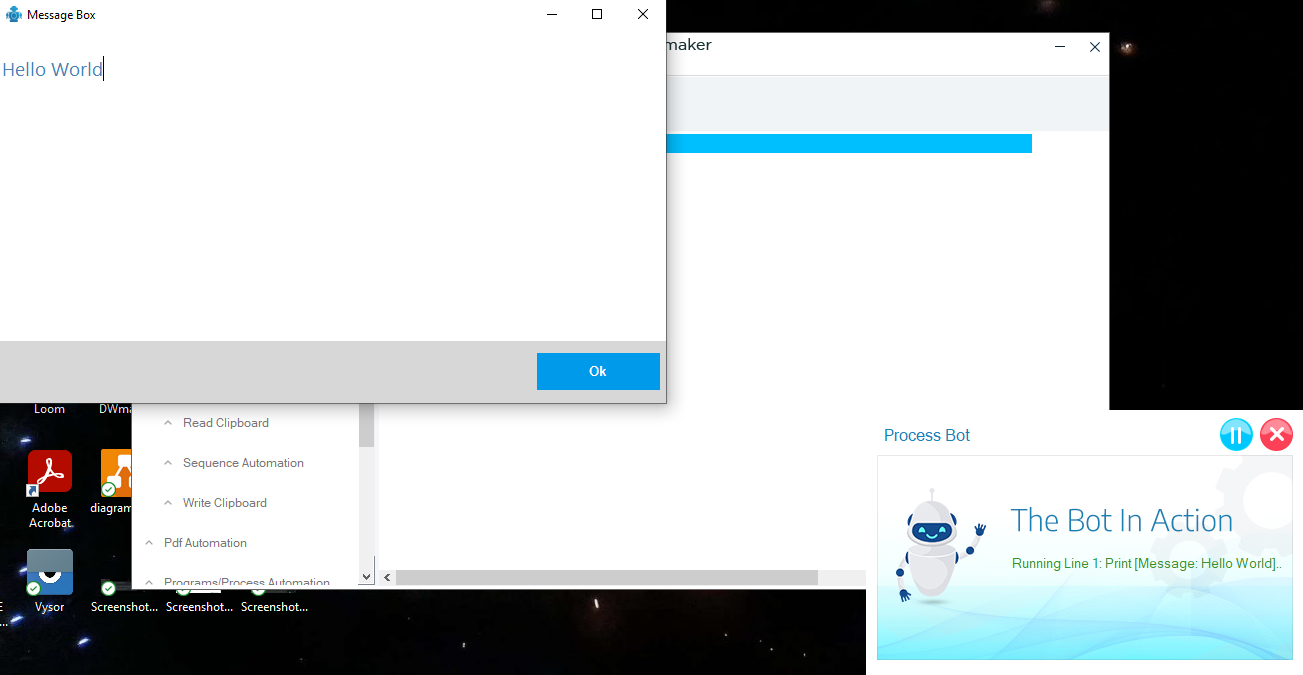
- Now go to the Action window and click on the Run button
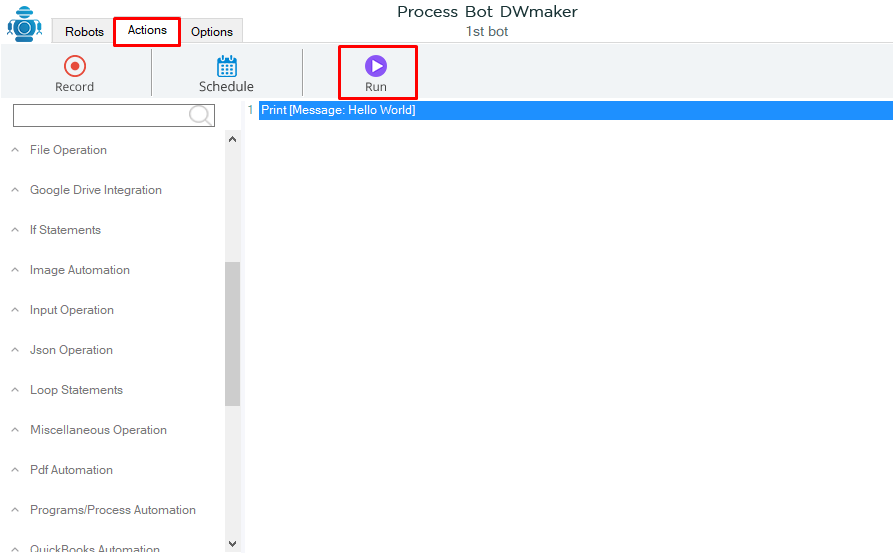
- Our bot will start to run and print us the message “Hello World”
- This is how you will create your first bot very easily.
7.Variable
Variables are used to store and manipulate dynamic data, whether it is numeric or alphabetic. In simple terms, a variable is a name given to a storage location where data can be temporarily held for further use.
A variable is associated with a specific type, which determines the size and layout of its memory allocation, the range of values it can store, and the operations that can be performed on it.
The name of a variable can consist of letters, digits, and underscores, forming a valid combination.
7.1.What is a variable?
A variable is a named storage location used to hold a value. It serves as a means for programmers to store and manipulate data. Variables can store various data types, including numbers, strings, and Boolean values.
The name of a variable can consist of letters, digits, and underscores, allowing for a valid combination.
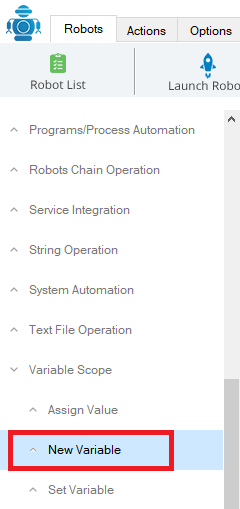
7.2.New Variable
To represent a specific value using DWmaker, you can utilize its variable command. To do this, you need to navigate to the DWmaker dashboard and select the “Variable” command option by clicking on it. See the image.
How to Create a new variable:
To create a new variable in DWmaker, you need to click on the “New Variable” command within the “Variable” section.
It will open a new property window. In this window, you can assign a variable name by entering it in the “Variable Name” box, and specify the variable value by entering it in the “Set variable with a value” box.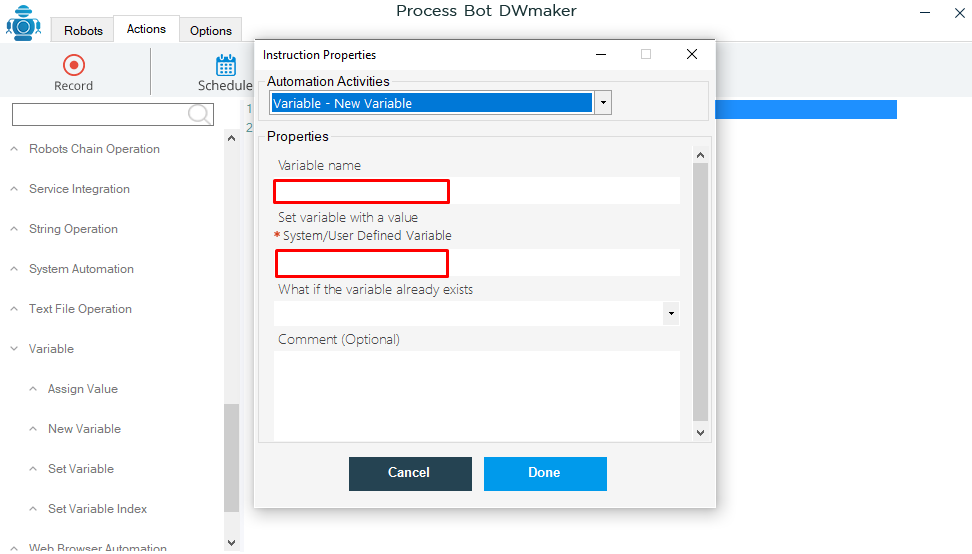
For example: Here, I will take a variable named “X” and assign a value of 25 to it.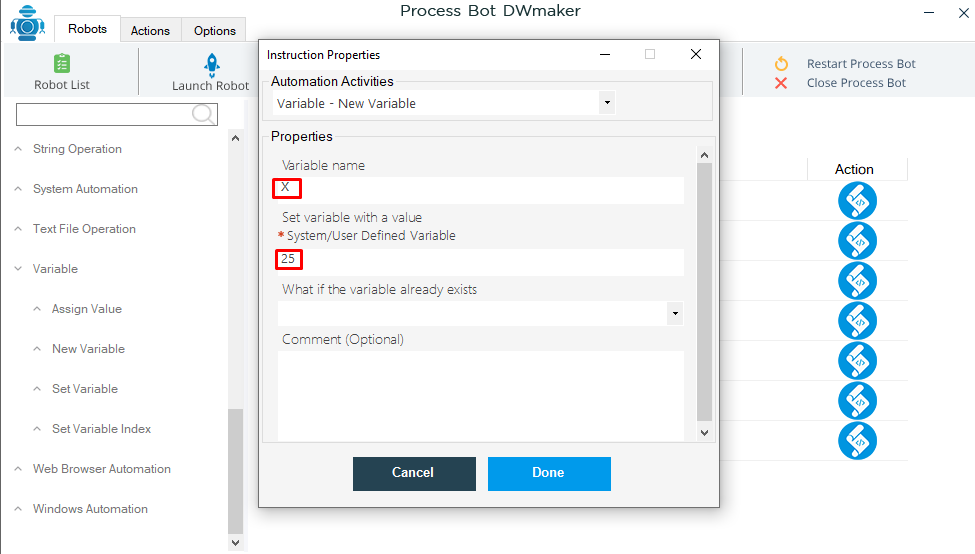
After filling the required fields, click on Done. It will automatically generate the code line on the code window.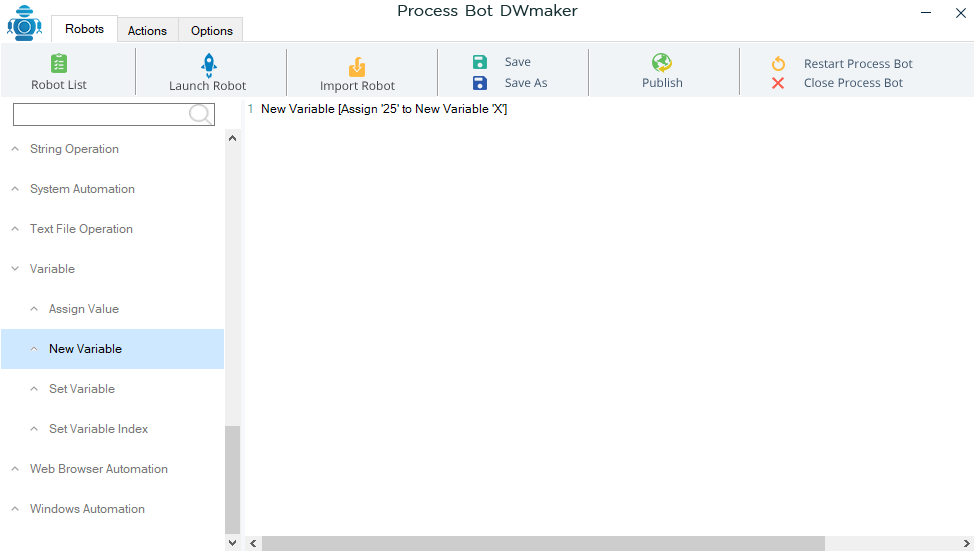
Print Variable
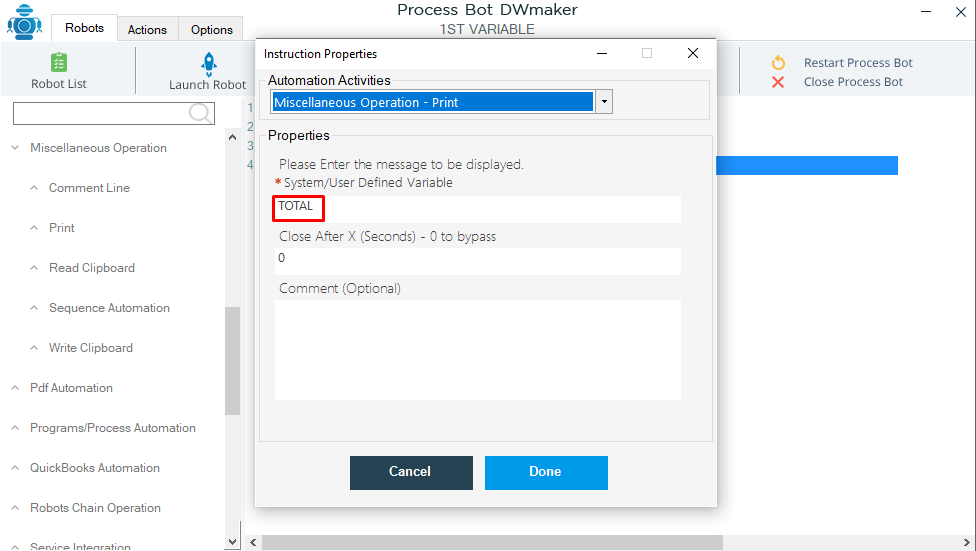
Now if you want to print X , bot will show you the value of the X that you just assigned.
For that click on the “Print” button under “Miscellaneous operation” button.
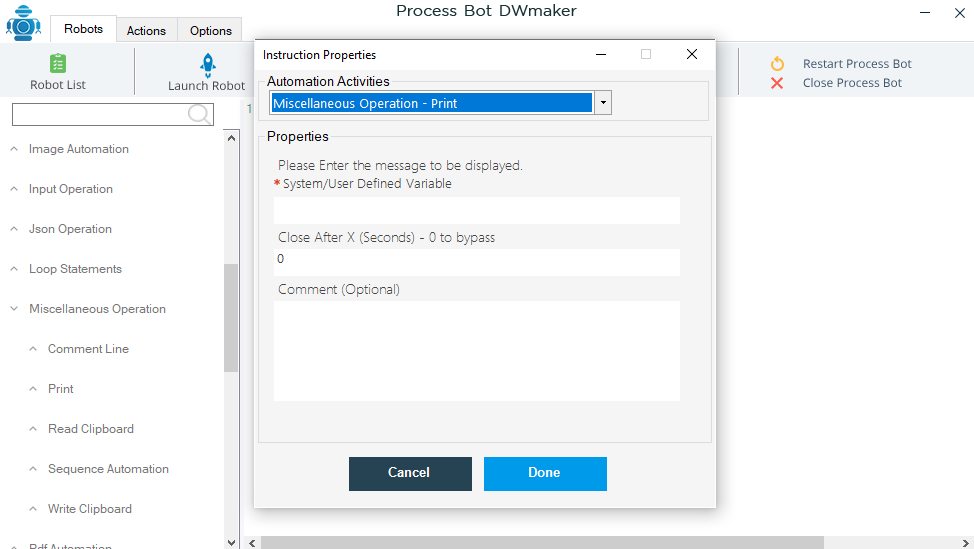
On the above screen, there is a property field “Please Enter the message to be displayed” where you need to input the name of the variable that you have created and whose value you want to print, and press “Done”.
Now click on the “Run” button under “Action” button.
It will show you 25.
Here’s another use case for the use of variables:
Here, we will take two variables, X and Y, and assign them values of 25 and 35 respectively. We will then perform the addition operation to calculate the sum of their values. See the image below.
Now, we will create a new variable named “TOTAL” and assign it the value of the sum of X and Y. To achieve this, we need to use square brackets “[ ]” to enclose the variables and use the plus sign “+” to perform the addition.
Now if you want print TOTAL, it will show the value.
Your code window will look like this.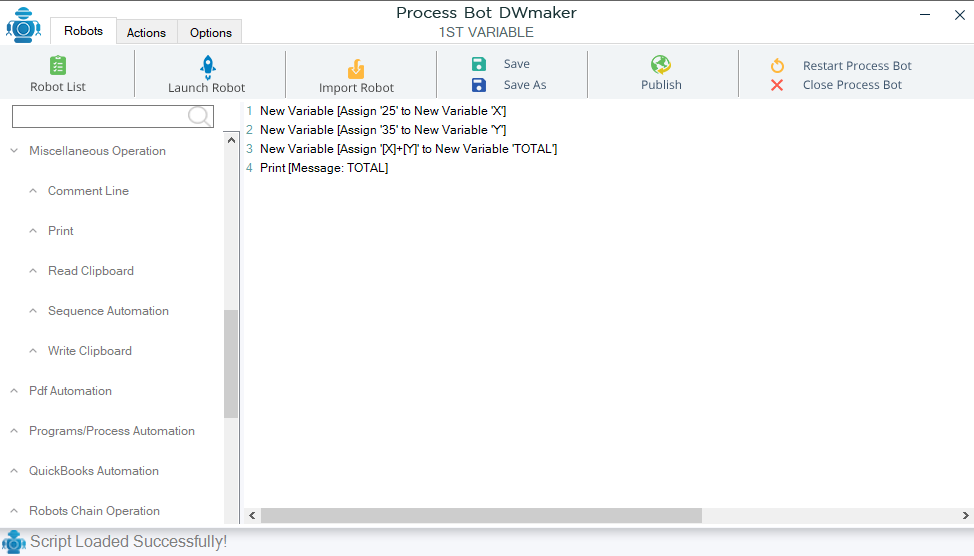
After clicking the “Run” button, which is located under the “Action” section, the result will be displayed.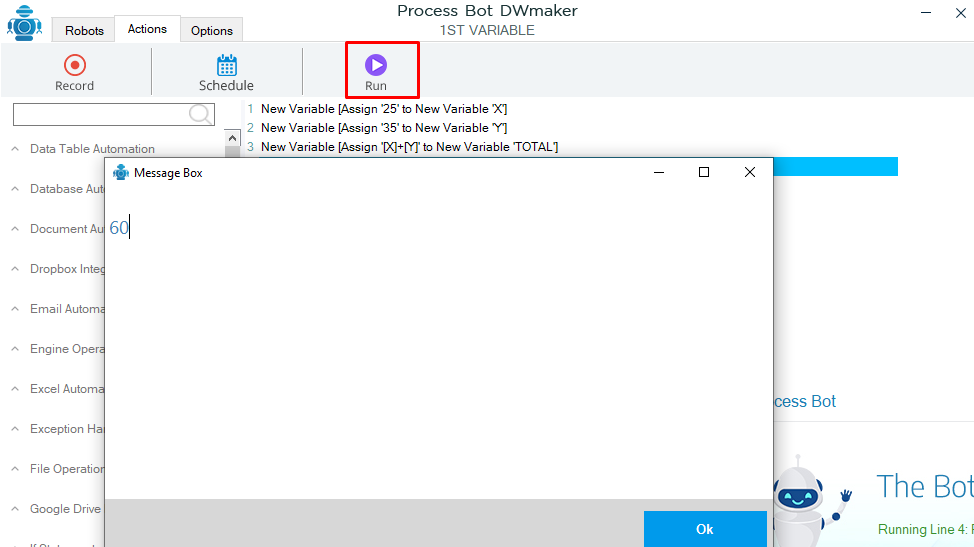
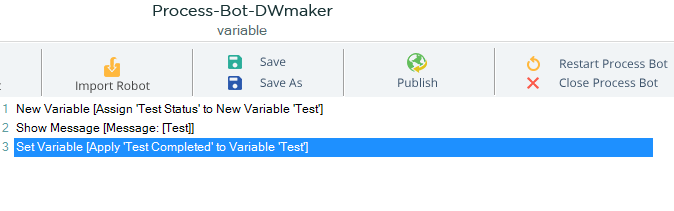
7.3.Set Variable
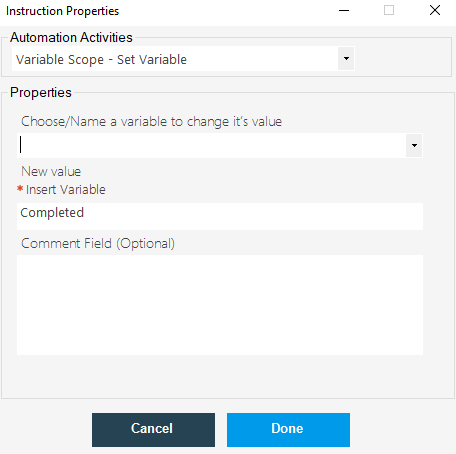
On the above screen, you need to provide a variable name, whose value you want to replace. while, on the second column, insert a new value that you want to replace with the already existing value.
For example: Here, I am replacing my previously assigned value “Test Status” of the variable “Test” with the new value “Test Completed”. See the below image.

Post filling the variable name and the new value. Click on the Done. Now, you have another code line on the code window.
Now, copy and paste the show message code, below to the set variable code on the code window.
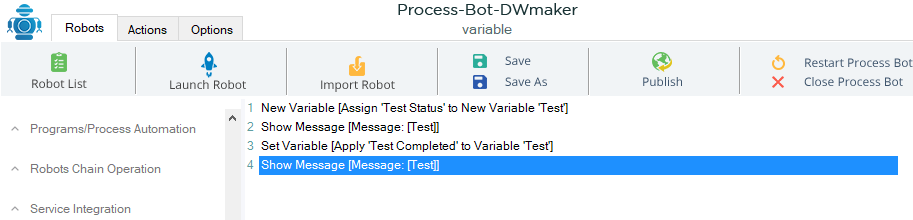
Save the process and proceed to check it in action.
Run the Program
To see the result of the variable replacement program, again click on the Run under the Actions tab, then you can see it will print and show the old value first.

While, if you click on the Ok, it will show the result with the replaced value. As shown in the below image.

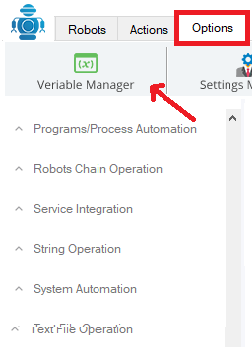
7.4.Variable Manager
If you do not have any predefined variable in your program, then you can create it using the “Variable Manager” utility under the “Options” tab.
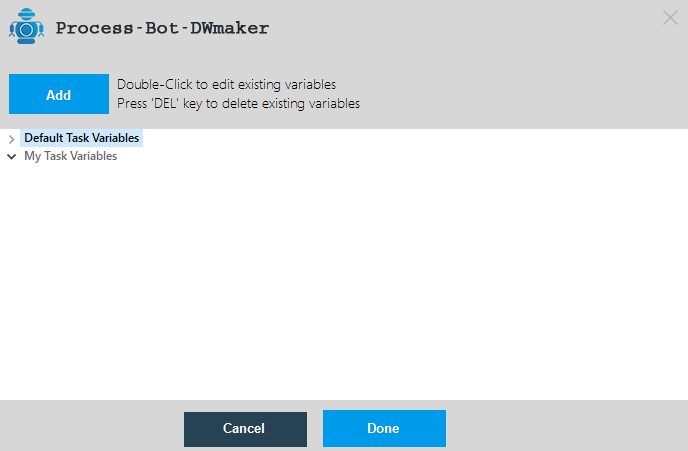
Once you click on the “Variable Manager”, a new pop-up window will be open.
Now Select “My Task Variables” from here, and then press the “Add” button. See the below image.
Now, you can see a new dialogue box will be open and ask you to fill up the default variable name and value. See the image.

For example: Here I input “Test Score” as Variable Name and “Passed” as the Variable Value.
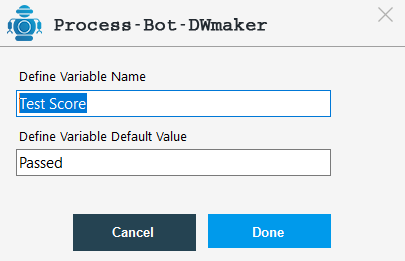
Post filling the variable name and value, press the “Done” button.
Now, you can see the variable is successfully created and displayed on the “Variable Manager” window.

Here, I use ‘Passed’ as the default value of the variable “Test Score”.
Now press the “Done” button, to add this to the list of variables, and to check if it is successfully added or not, go to the “Set Variable” command and check it in the “Name a Variable” field. See the image.
With this process, you have successfully added the variable, now let’s learn how to use it?
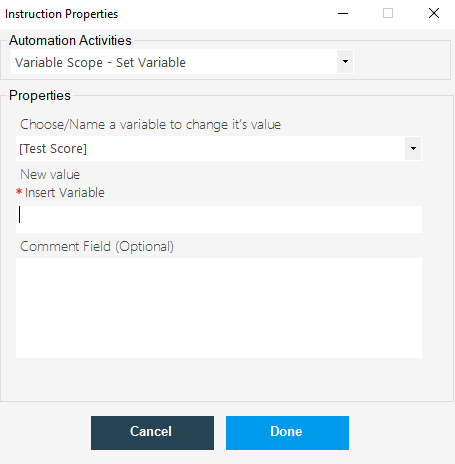
To use the predefined variable, go to the “Set Variable” command under the variable Scope. It will open a property window.
Now, select the predefined variable from the dropdown whose default value you want to change, and press the “Done” button.
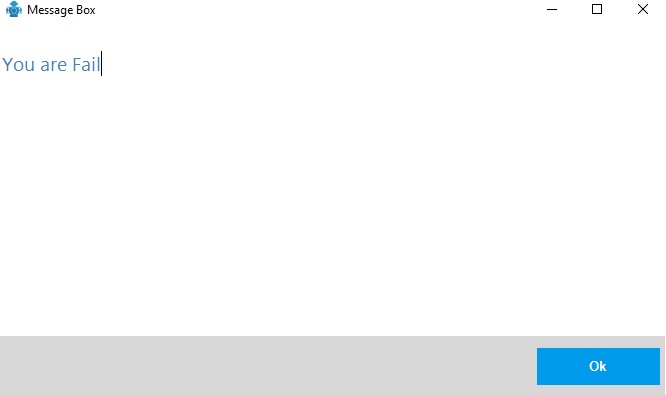
For example: Here, I select my predefined variable “Test Score” and giving it a new value as “You are Fail”.

Now, print the message, using the “Show Message” Command, as we did earlier.
Run the Robot
Save the process, and press the “Run” button. Now, you can see that the predefined variable is showing the new value, instead of its default value.
Meanwhile, if you want to print the predefined variable with its default value, then you need to disable the “Set Variable” code line from the code window.

After disabling the “Set Variable” code line from the code window. Save and Run the program once again. Then it will show the predefined variable with its default value.

That’s the entire process to use the variables within the Process Bot. Try this easy tutorial and learn to use and implement variables in your program.
Continuing the DWmaker tutorial, now we are moving to learn the next command as Data Types and Data Casting.
8.Conditional Statements
8.1.What is a Conditional Statement
8.2.How to use Conditional Statements in DWmaker
For example, here I take a variable as “Flower color” and the variable value as “Pink”. See the image.

Press the “Done” button and save the process.
Now, to add “if condition” in the program refer to the next part If Statement of the tutorials.
8.3.If Statement
To implement the if condition in a program, select the “if statement” command. See the below image.

Now click on “Begin if” and fill in the details in the property window.
Here, on the property window drop-down, there is a list of multiple options for comparison. Such as value, date comparison, and more.
As I want to check if the value is true or false, I selected the option “value” here. In the next, we have parameters with two value options. Where, in the value1 field, we need to insert that value which we want to compare with another value.
Here, the “Operand” column in the property, is a list of operations, you can select an operation as per your comparison needs.

Press “Done” and move ahead to print the message using the “Show Message” command under “Miscellaneous Operations”.
Now the code window will look like this:

Save the process, and run the program.

In case if the condition is not matched, then the program will not be executed.
8.4.Else Statement
When the if statement is not true in the program then, it will execute with the else statement and print the result with the value of the else statement.
For this, go to the “Else” statement and press the “Done” button.
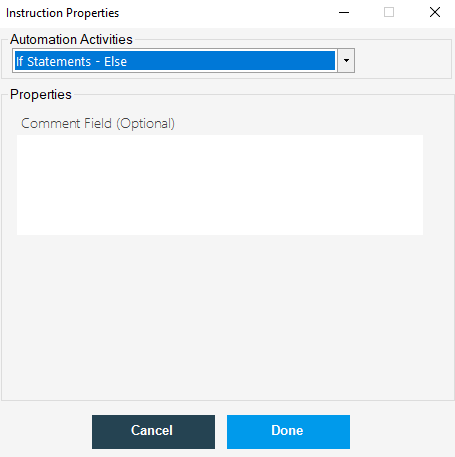
Put the else statement code within the end of the statement. As shown in the below image.

Now if the condition is true, the program will be executed with the if statement value. While, if the condition is not matched, then the program will return the value of the “else statement”.
To check the “else statement” in action, print the message with another value, under the else condition.
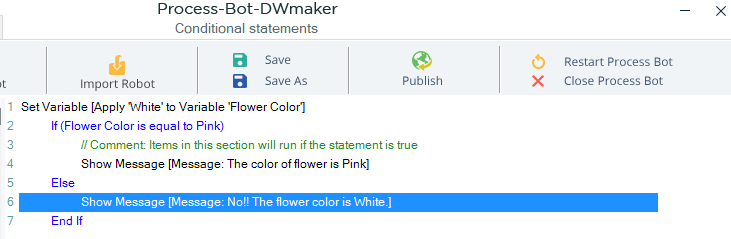
When the program runs, it will return the value of the else condition. As shown in the below image.

This is how you can easily implement conditional statements in a robotic program with the DWmaker.
9.Loop Statements
What is Loop?
A loop is a set of instructions that is repeatedly executed until a given condition is met in computer programming. Typically, a process is carried out, such as obtaining and altering data, and then a condition is verified, such as whether a counter has reached a certain value. If it hasn’t, the following instruction in the sequence is a command to go back to the first instruction and repeat the process. The next instruction “falls through” to the next sequential instruction or branches outside the loop if the condition is met. A loop is a basic programming concept that is often utilized in program development. A loop is a sequence of statements that executes multiple times until the mentioned condition of a program becomes false.
Types of loops:
Basically, the programming languages have Loops of Various Types:
- A for loop is a loop that repeats itself a specified number of times.
- A while loop is one that repeats itself as long as an expression is true. A statement with a value is called an expression.
- A do-while loop, also known as a repeat till loop, repeats an expression until it turns false.
- A loop that repeats endlessly because it has no ending condition, the exit condition is never satisfied, or the loop is commanded to restart from the beginning is known as an infinite or endless loop.
- Although it is possible for a coder to employ an endless loop on purpose, novice programmers frequently make this error.
- Within any other for, while, or do-while loop, a nested loop occurs.
The DWmaker has the following commands:
- End Loop
- Exit Loop
- Loop Continues
- Loop Data Table
- Loop List
- Loop Number of Times
9.1.End Loop and Exit Loop
What is End Loop:
The forms end loop statement ends loops established by the begin/end program blocks associated with numerous forms statements, including unloading table, formdata, and table data.
endloop only terminates the loop in which it is run; no outside loops are ended if loops are nested. Following the ended loop, control is restored to the first statement. As a result, the end loop statement must be syntactically within the loop it is intended to end.
endloop cannot be used to specifically end a display loop. If a display loop is nested within a loop defined by a begin/end block, however, stopping the begin/end block stops the nested display loop.

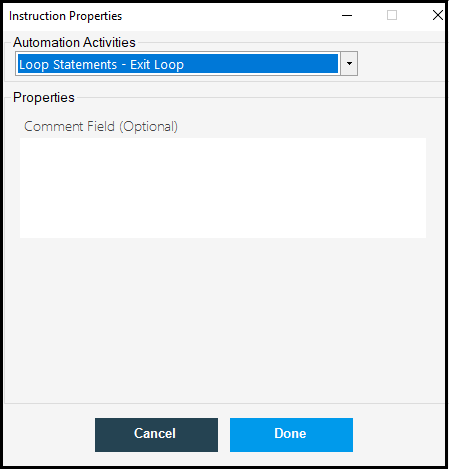
What is Exit Loop:
If the condition of an iteration statement (for, while, or do-while statement) is removed, the loop will not finish until the user expressly quits it using a break, continue, goto, or another less visible manner, such as a call to exit().
The Dwmaker has an option called ExitLoop command, Whenever you want to exit the loop, you can click on the Exit Loop command under If Statements.
9.2.Loop Continues
What is Loop Continues:
Inside loops, the continue command is utilized. When a continuous statement appears inside a loop, control goes to the beginning of the loop for the next iteration, bypassing the execution of statements within the loop’s body for the current iteration.
The Dwmaker has Loop Continuous command which can be used to continuos execution.
Click on the Loop Continuous command under Loop Statements

9.3.Loop Data Table
What is Loop Data Table:
The Loop Data Table command is used to loop each iteration of the given data table.
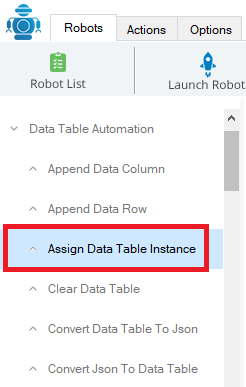
Additionally, to fetch any data from the excel file, using DWmaker, first, we need to access the “Data Table Automation” command, in addition, to creating an “Instance name” See the image.

Once you click on the “Data Table Automation” command, it will open a list of a few more sub-commands, from which you need to select “Assign Data Table Instance”. As shown in the below image.
Now, in the “Assign Data Table Instance” property window, provide a “Data Table Name” and an “Instance Name” and then press the “Done” button. See the below image.

Moving ahead, to read the data from an XML file. First, you need to create a table, where you can store the fetched record of a file.
To create a table, click on the “Excel Automation” command, and then select and click on the “Create Excel Data Table” option.

Now, fill the “Create Excel Data Table” property window with the required details as data table name, the path of the file that you want to read, and the specific sheet name of the respective excel file. See the below image.

Once inserting all the details in the property window, press the “Done” button.
Note: Use the same data table name and the instance name every time in the process.
Now, in the next step, to read the entire data of a table one after one, you need to implement a loop in it. For the successful implementation of a loop first, you need to set a new variable in the program.
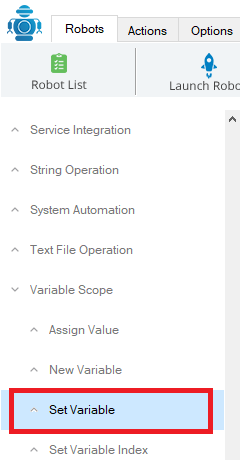
To set a variable, go to the “Set Variable” command under the “Variable Scope”. See the below image.

Here, in the “Set Variable” property window you will be asked to insert a variable name and a variable value. See the below image.

Once providing the variable name and value, press the “Done” button.
Post setting a variable name and value, now it’s the time to apply a loop. For this, you need to go to the “Loop Statement” command and then click on the “Loop Data Table” option.

Now, input your table name in the respective field of the “Loop Data Table” property window, and then press the “Done” button.

In the next step to add conditions to the program, you need to apply a conditional statement in it. For this, go to the “If statements” command and select the option as “Begin if”.
Once clicking on the “Begin If” command option, you must provide some details in its property windows, such as the type of if command and the parameter value.
Now, press the “Done” button and see the code window, where you need to put the entire if statement code within the loop statement. You can do it by simply cutting and pasting the code. See the below image.

Now, in addition, to read the table, you need to access the “Read Table” command option, which you can get under the “Data Table” command. See the image.

In the “Read Table” property window, provide all the required details. See the below image.
Here, in the “column identification name” field, select column identification type as per your need to read the data.
In the “specify column name” field, insert the specific name of the column from where you want to read the excel. In our suggestion, you need to insert “0” here, as it reads the entire data of the sheet from start to end.
Provide a variable name where you want to receive the fetched data, in the third field of the property window. Once providing all the details, press the “Done” button.

Now, prior to moving towards the next step, cut the read table code line and paste it within the “if statement” code line, as shown in the below image.

Moving forward, to print the data, go to the “Miscellaneous Operations” and click on the “Show Massage” command.

Insert the variable in the “Show Message” property window where you want to fetch the data, and then press the “Done” button. See the below image.

Now, cut and paste the Show Message code line just below to the Read Table code line within the “If Statement” code. See the below image.

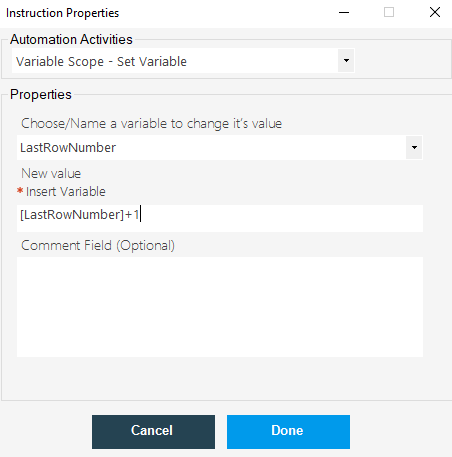
Now, to increase the count of the prior created variable value, you again need to set a new variable value. For this, again go to the “Variable Scope” and select the “Set Variable” command option, like previous.
Now, provide the required details in the “Set Variable” property window.
Here, I inserted [VCount]+1 as the new variable value, because it helps the program to increase the variable count by 1 at each iteration.
Now press the “Done” button and put the respective command line within the loop code. See the below image.

Now save the process by clicking on the “Save” button and clicking on the “Run” button under the “Actions” tab, to see the robot in action.
Now you can see your robot will show all the data of the respective excel sheet one by one.
9.4.Loop List
The Loop List command is used to loop the list items. Let us see, how to perform this operation with an example.
- The Get Workbook Sheets command returns the list of sheet names one by one in a message box as an output. Let us see the steps one by one.
- First, create an excel instance, Click on Create Excel Application under Excel Automation.
- And, enter the instance name and then click on Done.

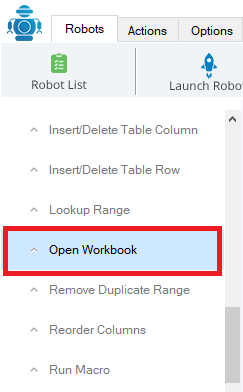
- Next, click on the Open Workbook command under Excel Automation, once the Instruction Properties pop-up window will open enter the instance name and select the file path location, then click on Done.

- Next, click on the Get Workbook Sheets command under Excel Automation, once the Instruction Properties pop-up window will open enter,
- Instance name
- Create an output list variable and then click on Done.

- To get the name of sheets one by one we have to create a loop using the loop statement command.
- Click on the Loop List command under Loop Statement and enter the loop variable name and then click on Done.

- Now, we have to print this output in a message box, click on the Show Message command under Miscellaneous Operation, once the Instruction Properties pop-up window will open, enter the output variable name and then click on Done.

- Click on Save to save this code.

- Now, go to the Action tab and click on Run.
- Once the robot runs, the sheet names will be printed on the message box one by one.

- Once you click on Ok, the next sheet name will be displayed.

- Again if you click on Ok, the third sheet name will be displayed, which is as shown below.

- In the same way, you can print any number of sheet names by using the Get Workbook Sheets command.
9.5.Loop Number of Times
The Loop Number of Times command is used to loop the given variable in the number of times.
Let us see how to perform this operation by using the DWmaker automation tool.
Click on the Loop Number of Times command, once the instruction properties pop-up window will open enter how many times you want to loop the variable, and then click on Done.
Next, click on the Show Message command, once the Instruction Properties pop-up window will open, enter the variable or text you want to loop a number of times, and then click on Done.

Now, save the code and run, once the robot runs successfully, the given variable will be looped given number of times.
The output is as shown below.
Click on Ok, the next loop will be displayed again in the message box.
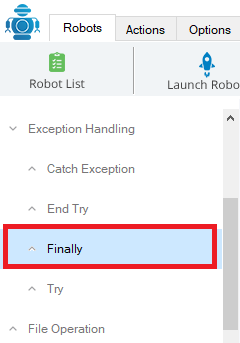
10.Exception Handling
10.1.How does Exception Handling work?
For example, here in the process bot suite DWmaker tool, to check the process of try-catch exception, first, go to the “Exception Handling” command. See the image.
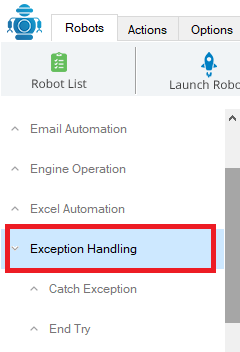
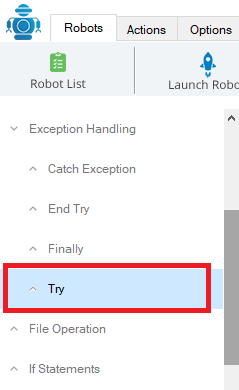
The Exception Handling command is integrated with a few sub-command options from them you need to select and click on the “Try” option. See the image.
When you will click on the “Try” option, it will open a property window, as shown in the below image.

Now press the “Done” button on the property window and then you can see the code line created and are appeared on your DWmaker code window like the below image.
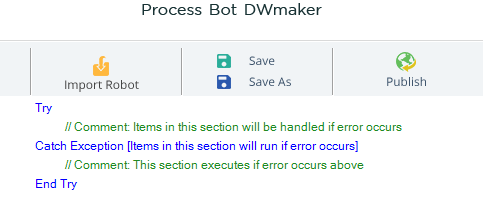
Here, if everything is good in the code, as whatever code you will mention under the ‘Try’ then the program will simply execute the Try command, while, if there is any issue in the code under ‘Try’, then the program will be automatically redirected to the next step and execute the code mentioned in the Catch Exception.
Along with this, there is one more exception handling command option, which is “Finally”. See the image.
In the property window of “Finally” exception option, you can add a comment for the program if you want, and then click on the “Done” button. See the image.
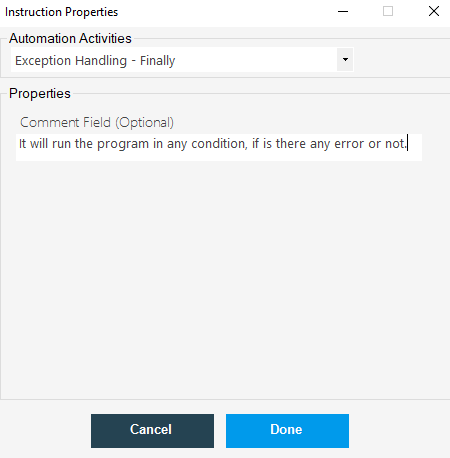
Although the program has any error or not, this Finally exception command will always execute, either with the Try or with Catch exception.
The above is the simple use cases for exception handling in DWmaker.
11.Excel Automation
11.1.What is Excel Automation?
11.2.Read Table
Additionally, to fetch any data from the excel file, using DWmaker, first, we need to access the “Data Table Automation” command, in addition, to creating an “Instance name” See the image.
Once you click on the Data Table Automation command, it will open a list of a few more sub-commands, from which you need to select “Assign Data Table Instance”. As shown in the below image.
Now, in the “Assign Data Table Instance” property window, provide a “Data Table Name” and an “Instance Name” and then press the “Done” button. See the below image.
Moving ahead, to read the data from an XML file. First, you need to create a table, where you can store the fetched record of a file.
To create a table, click on the “Excel Automation” command, and then select and click on the “Create Excel Data Table” option.
Now, fill the “Create Excel Data Table” property window with the required details as data table name, the path of the file that you want to read, and the specific sheet name of the respective excel file. See the below image.
Once inserting all the details in the property window, press the “Done” button.
Note: Use the same data table name and the instance name every time in the process.
Now, in the next step, to read the entire data of a table one after one, you need to implement a loop in it. For the successful implementation of a loop first, you need to set a new variable in the program.
To set a variable, go to the “Set Variable” command under the “Variable Scope”. See the below image.
Here, in the “Set Variable” property window you will be asked to insert a variable name and a variable value. See the below image.
Once providing the variable name and value, press the “Done” button.
Post setting a variable name and value, now it’s the time to apply a loop. For this, you need to go to the “Loop Statement” command and then click on the “Loop Data Table” option.
Now, input your table name in the respective field of the “Loop Data Table” property window, and then press the “Done” button.
In the next step to add conditions to the program, you need to apply a conditional statement in it. For this, go to the “If statements” command and select the option as “Begin if”.
Once clicking on the “Begin If” command option, you must provide some details in its property windows, such as the type of if command and the parameter value.
Now, press the “Done” button and see the code window, where you need to put the entire if statement code within the loop statement. You can do it by simply cutting and pasting the code. See the below image.
Now, in addition, to read the table, you need to access the “Read Table” command option, which you can get under the “Data Table” command. See the image.
In the “Read Table” property window, provide all the required details. See the below image.
Here, in the “column identification name” field, select column identification type as per your need to read the data.
In the “specify column name” field, insert the specific name of the column from where you want to read the excel. In our suggestion, you need to insert “0” here, as it reads the entire data of the sheet from start to end.
Provide a variable name where you want to receive the fetched data, in the third field of the property window. Once providing all the details, press the “Done” button.
Now, prior to moving towards the next step, cut the read table code line and paste it within the “if statement” code line, as shown in the below image.
Moving forward, to print the data, go to the “Miscellaneous Operations” and click on the “Show Massage” command.
Insert the variable in the “Show Message” property window where you want to fetch the data, and then press the “Done” button. See the below image.
Now, cut and paste the Show Message code line just below to the Read Table code line within the “If Statement” code. See the below image.
Now, to increase the count of the prior created variable value, you again need to set a new variable value. For this, again go to the “Variable Scope” and select the “Set Variable” command option, like previous.
Now, provide the required details in the “Set Variable” property window.
Here, I inserted [VCount]+1 as the new variable value, because it helps the program to increase the variable count by 1 at each iteration.
Now press the “Done” button and put the respective command line within the loop code. See the below image.
Now save the process by clicking on the “Save” button and clicking on the “Run” button under the “Actions” tab, to see the robot in action.
Now you can see your robot will show all the data of the respective excel sheet one by one.
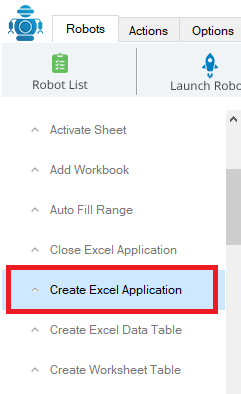
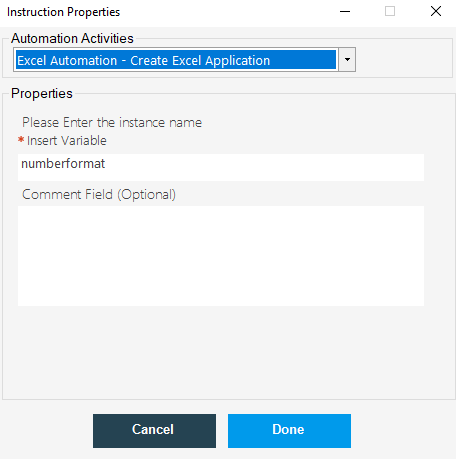
11.3.Create Excel Application
To write something in an excel file, first, go to the “Excel Automation” command on the Process Bot Suite DWmaker tool, and then click on the “Create Excel Application” option under it. See the image.

Next, create an instance name in the “Create Excel Application” property window, and then press the “Done” button. See the image.

Now, to write in an excel sheet, first, you need to create a workbook, which you can simply create by clicking on the “Add Workbook” command under “Excel Automation”. See the below image.

Now, again provide your instance name in the “Add Workbook” property window, and then press the “Done” button.

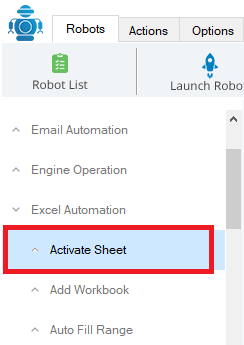
In the next step, you need to activate an excel-sheet/workbook in which you want to write. To do this, go to the “Activate Sheet” command, under the “Excel Automation.

In the “Activate Sheet” property window provide the instance name and the specific sheet name of the excel file that you want to activate to write within.

Now Press the “Done” button, and move to the next step, in which you need to select a cell within the excel sheet where you want to write.
To select a cell within the excel sheet, go to the “Set Cell” command under the “Excel Automation”. See the below image.

Now, provide the instance name, text to write, and the cell location where you want to write the next in your workbook, in the “Set Cell” property window, and then press the “Done” button.

Likewise, you can write multiple texts in an excel sheet using the “Set Cell” command as prior.
Now, you have to save this workbook, for this go to the “Save Workbook As” command under “Excel Automation”. See the image.

On the “Save Workbook As” property window, provide your instance name and the location where you want to save the file.

To get the file path, simply select and open the particular file then it will get the file path, then copy it.
Now paste it on the location field of the “Save Workbook As” property window. See the image.

Once done inserting all the details, press the “Done” button.
Now save the entire process using the “Save” button of the DWmaker tool and move towards running it by clicking on the “Run” button under the “Actions” tab.

Once you press this “Run” button, the robot will start working and show you the result.
For example, I created this program to write the text as “Shannon” in the excel sheet. Thus, it prints the result with the given text as shown in the below image.

Using the above-mentioned simple steps you can easily write in an excel sheet.
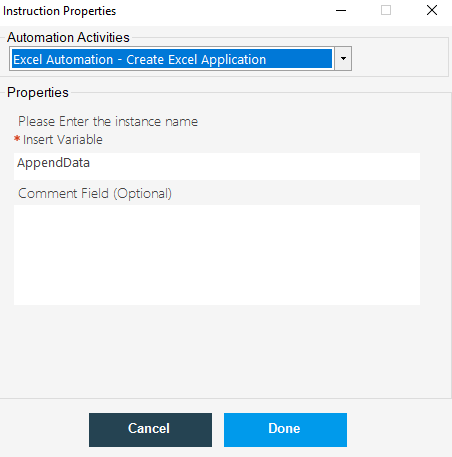
11.4.Append Data
To append data in an existing excel sheet accessing the DWmaker tool. First, you need to create an instance that you can create using the “Create Excel Application” option under the “Excel Automation” command. See the image.

Give a unique instance name in the “Create Excel Application” property window, and then press the “Done” button. See the image.
Once creating an instance, open a workbook in which you can write.
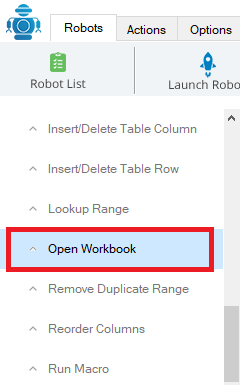
To open a workbook, go to the “Open Workbook” option under “Excel Automation”. See the image.

Now, in the “Open Workbook” property window, provide your instance name and the path of the respective excel file in which you want to write or append any data.

Press the “Done” button, and move to the next step, in which you need to call the particular sheet name of an excel file in which you want to append any data.
To provide a sheet name, go to the “Activate Sheet” option under the “Excel Automation” command.
Now insert the instance name and the specific sheet name of the excel file in the “Activate Sheet” property window, and then press the “Done” button. See the image.

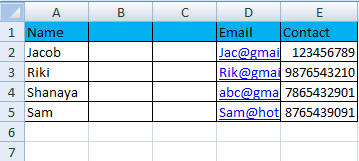
In the next step, to append the data you need to get the last row index count. For this, click on the“Get Last Row Index” option, and fill the property window with the required details. See the image.

Once providing all the details in the property window, press the “Done” button.
Moving ahead to increase the variable count by one, go to the “Variable Scope” command and click on the “Set Variable” option. See the below image.
In the “Set Variable” property window, provide the variable name that you have created prior, and then increase its count by 1 in the next field, as shown in the below image.
Now, press the “Done” button and then, click on the “Set Cell” command. See the image.

Now, provide all the required details in the “Set Cell” property window and then press the “Done” button. See the below image.

Now click on the “Save Workbook” option under the “Excel Automation” command. See the below image.

In the “Save Workbook” property window, insert your instance name in the respective field and then press the “Done” button. See the below image.

Now, save the process, by pressing the “Save” button, and run it by clicking on the “Run” button under the “Actions” tab.
Once you click on the “Run” button, your robot will start working and you can see the result in the respective excel file. See the below image.

Using the above steps you can easily append data in an excel sheet using the DWmaker.
11.5.Insert/Delete Column
How to insert columns in an excel sheet?
Additionally to insert columns in an excel file using the DWmaker tool, first, you need to access the “Excel Automation” command.

Now select and click on the “Create Excel Application” command option under the “Email Automation” and fill up the respective property window with the required details.

In the property window of “Create Excel Application”, provide an ‘instance name’ and then click on the “Done” button. See the image.

Here is the first code of your program to insert and delete a row and column of an excel sheet.

Now you need to open an excel sheet or excel workbook that you want to read. For this, go on to the “Open Workbook” command option under “Excel Automation”.

This “Open Workbook” command will open a property window, where you are required to provide the required details as for instance name and the path of the workbook that you want to read. See the below image.

Once filling in all the details, press the “Done” button.
Now in the next step, you need to activate the excel sheet, for that you need to access the “Activate Sheet” option under the “Excel Automation” command.

Fill up the “Activate Sheet” property window with the required details, as the instance name and the name of the respective excel sheet that you want to access.

Press the “Done” button and then the activate sheet code will be displayed on your code window.
Moving further to insert a new column in the excel sheet, select the “Insert delete columns” options under the “Excel Automation” command.

Now fill up the property window of the “Insert/Delete Columns” command, as shown in the image below.

Note: In the column range file of the “Insert/Delete Columns” command property window, you need to input the range of the specific column in the sheet, where you are looking to add a new column, and then press the “Done” button.
Here, in the “Select action to perform” field, I have selected the option “Insert” because here I am adding a new column in the sheet. Likewise, if we want to delete a column from the sheet we will then select the option “delete”.
Now, save the process using the “Save” button.
Once successfully saving the process, click on the “Run” button under the “Actions” tab, to check the program in working action.
Once running the program, see the respective excel sheet, as now it has two new columns.
In the above steps, you have learned to insert new columns in an excel sheet, likewise, we can delete columns from the excel sheet in a few simple steps.
How to delete Columns in an Excel Sheet?
To delete columns from an excel file using the DWmaker tool, first, you need to access the “Excel Automation” command.
Now select and click on the “Create Excel Application” command option under the “Email Automation” and fill up the respective property window with the required details.
In the property window of “Create Excel Application”, provide an ‘instance name’ and then click on the “Done” button. See the image.
Here is the first code of your program to insert and delete a row and column of an excel sheet.
Now you need to open an excel sheet or excel workbook that you want to read. For this, go on to the “Open Workbook” command option under “Excel Automation”.
This “Open Workbook” command will open a property window, where you are required to provide the required details as for instance name and the path of the workbook that you want to read. See the below image.
Once filling in all the details, press the “Done” button.
Now in the next step, you need to activate the excel sheet, for that you need to access the “Activate Sheet” option under the “Excel Automation” command.
Fill up the “Activate Sheet” property window with the required details, as the instance name and the name of the respective excel sheet that you want to access.
Press the “Done” button and then the activate sheet code will be displayed on your code window.
To delete columns, for the first, again you need to go to the “Insert delete Columns” option under the “Excel Automation” command and fill the property window with the required details. See the image below.

Sheet Name: It will be the specific sheet within an excel file, in which you want to perform the delete column operation.
Column Range: It will be the single column or the range of multiple columns that you want to delete from an excel sheet.
Select action to perform: In this field, you need to select a specific option as insert or delete.
Here, I have selected the ‘Delete’ option in the “Select action to perform” field, because here I want to delete a column from the excel sheet.
Press the “Done” button, once successfully filling the property window, and then save the process using the “Save” button.
Now, your robot is ready to delete a column from the excel sheet, to check it in working status, run the robot using the “Run” button under the “Actions” tab.
As a result, you can see it has successfully deleted the respective column from the sheet.

These are the easy steps to delete columns from an excel sheet using DWmaker.
11.6.Insert/Delete Row
To insert rows in an excel file using the DWmaker tool, first, you need to access the “Excel Automation” command.
Now select and click on the “Create Excel Application” command option under the “Email Automation” and fill up the respective property window with the required details.
In the property window of “Create Excel Application”, provide an ‘instance name’ and then click on the “Done” button. See the image.
Here is the first code of your program to insert and delete a row and column of an excel sheet.
Now you need to open an excel sheet or excel workbook that you want to read. For this, go on to the “Open Workbook” command option under “Excel Automation”.
This “Open Workbook” command will open a property window, where you need to provide the required details as instance name and the path of the workbook that you want to read. See the below image.
Once filling in all the details, press the “Done” button.
Now in the next step, you need to activate the excel sheet, for that you need to access the “Activate Sheet” option under the “Excel Automation” command.
Fill up the “Activate Sheet” property window with the required details, as the instance name and the name of the respective excel sheet that you want to access.
Press the “Done” button and then the activate sheet code will be displayed on your code window.
To insert a new row in the particular excel sheet using the process bot suite DWmaker tool, go to the “Insert/Delete Rows” command under the “Excel Automation”, as shown in the below image.

Now fill the property window. See the image below.

In the above property window, fill the number of the row in the “Enter the start position” field, where you are looking to insert new rows. While in the “Enter the number of rows” field, provide a specific number that shows how many rows you want to insert.
Now, press the “Done” button and save the process, to check the robot in action.
After successfully saving the robot, when you will run it using the “Run” button under the “Actions” tab, you can see there are new rows inserted in the sheet.

Using the above-mentioned simple steps, you can easily insert rows in an excel sheet.
Additionally to delete rows from an excel file using the DWmaker tool, first, you need to access the “Excel Automation” command.
Now select and click on the “Create Excel Application” command option under the “Email Automation” and fill up the respective property window with the required details.
In the property window of “Create Excel Application”, provide an ‘instance name’ and then click on the “Done” button. See the image.
Here is the first code of your program to insert and delete a row and column of an excel sheet.
Now you need to open an excel sheet or excel workbook that you want to read. For this, go on to the “Open Workbook” command option under “Excel Automation”.
This “Open Workbook” command will open a property window, where you are required to provide the required details as for instance name and the path of the workbook that you want to read. See the below image.
Once filling in all the details, press the “Done” button.
Now in the next step, you need to activate the excel sheet, for that you need to access the “Activate Sheet” option under the “Excel Automation” command.
Fill up the “Activate Sheet” property window with the required details, as the instance name and the name of the respective excel sheet that you want to access.
Press the “Done” button and then the activate sheet code will be displayed on your code window.
To delete rows from an excel sheet, click on the “Insert/Delete Rows” command under the “Excel Automation”, and fill the property window. See the image.

Now, save the process and run the robot to see it in action, as it has now deleted the particular rows from the excel sheet.

With the above steps, you have learned how easily you can delete rows from an excel sheet using the DWmaker tool.
11.7.How to Create an Excel Table and filter data using the DWmaker
Here on the “Create Excel Application” property window, give a unique instance name and then click on the “Done” button.

Now, in the next step, you need to open a workbook, for this, click on the “Open Workbook” option under the “Excel Automation” command. See the image.
In the ”Open Workbook” property window, insert your instance name and the specific excel file path in the respective fields, and then press the “Done” button. See the image.

Now, click on the “Create Worksheet Table” option which is also listed under the “Excel Automation” command. See the image.

Now, the “Create WorkSheet Table” property window, will ask you to provide some details in it, where:
Sheet Name: This is the name of a particular worksheet within an excel file that you want to operate.
Enter the Range: This is the specific range including entire rows and columns within the excel sheet to which you want to access.
Table Name: In this field give a unique table name. Each excel table has a unique table name.

Moving ahead, press the “Done” button and save the process by simply clicking on the “Save” button.
Once successfully saving the file, go to the “Actions” tab and press the “Run” button under it.
Once you click on the run button, the robot will start working, and the result will be seen like the below image.

In the above image, you can see a dropdown icon, which is marked as read. Every column of the sheet has a separate dropdown icon. While by clicking on any particular dropdown, you will become able to apply some additional filters in the specific column of the sheet.
For example, here I want to show the details of “designers” only, so I will just click on the dropdown icon and uncheck the other data except “Designers” in the “Text Filter” option. See the image.

Now, by pressing the “Ok” button, it will show the result only with the details of the “Designers. See the image.

In case, to show all the columns, simply click on the “Select All ” checkbox, and then press the “Ok” button, then it will show the entire data again.
To implement the same filter in an excel sheet, using the Process Bot Suite DWmaker, go to the “Filter WorkSheet Table” under the “Excel Automation” command. See the image.

Now, insert all the required details in the “Filter Worksheet Table” property window. Where:
Sheet Name: This is the name of a particular sheet within an excel file.
Table Name to be Filtered: This is the name of your table in an excel sheet.
Column Number to Add Filter: This is the specific column in an excel sheet which you want to operate with this process.
Filter Options: This is the particular value in the excel sheet that you want to filter. Here you can insert single and multiple values as well to filter.

Now, press the “Done” button and save the process, and move forward to run it by clicking on the “Run” button which is listed under the “Actions” tab.
The robot will start working once you press the “Run” button and show the result only with the selected filtered values.

Using the above steps you can create an excel table and filter the excel sheet data in an easy way.
11.8.Remove Duplicate Range
An excel sheet holds huge data, and sometimes we found some repeated or duplicate values in it. As you can see there are a few duplicate values in my excel sheet that are marked in red. See the image.

To resolve this, we manually remove these duplicate values from a sheet.
To remove these repeated or duplicate values from an excel sheet, using the process bot suite DWmaker tool, first, create an instance by accessing the “Create Excel Application” option under the “Excel Automation” command.

Now in the “Create Excel Application” property window, provide a unique instance name, and then click on the “Done” button. See the image.

Now, open the excel file from which you want to remove the duplicate values. For this go to the “Open Workbook” option under the “Excel Automation” command.

Insert your instance name and the file location which you want to operate and then press the “Done” button.

Moving forward with the process, now click on the “Remove Duplicate Range” option which is listed under the “Excel Automation” command.

Now, the “Remove Duplicate Range” property window ask you to insert some required details in the respective fields, where;
Sheet Name: This is the particular sheet in the excel file form in which you want to remove the duplicate values.
Enter the Range: This is the column range in an excel sheet from which you want to remove the duplicate values.

Now, click on the “Done” button and save the process by pressing the “Save” button.
To check the result of the process, go to the “Actions” tab and press the “Run” button.

Now, when you click on the “run” button the robot will start working and show the result by removing all the repeated values. See the image.
So, these are the simple steps to remove the duplicate values from an excel sheet using the DWmaker tool.
11.9.Sort Worksheet Table
To arrange or sort the excel sheet data in ascending, descending and alphabetic manner using the DWmaker, first go to the “Excel Automation” and click on the “Create Excel application” option. See the image.

Now provide a unique instance name in the respective field in the “Create Excel Application” property window. See the image.

Now click on the “Done” button and move ahead to open the excel file whose values you want to arrange in ascending and descending order.
To open a file, go to the “Excel Automation” command and click on the “Open Workbook” option. See the image.
Insert the instance name and the specific excel file path in the respective fields of the “Open Workbook” property window, and then click on the “Done” button.

In the next step, you need to access the “Sort Worksheet Table” option under the “Excel Automation” command. See the image.

In the “Sort Worksheet Table” property window, provide a few required details, where;
Sheet Name: This is the name of the particular sheet within an excel in which you want to perform sorting.
Sort Option: Here, either you can choose a single sorting option as “Table” or “Entire Sheet” by clicking on the dropdown. This selection just depends on your sorting requirement.
Column Number to Sort: This is the specific column number within the sheet that you want to sort.
Table Name: You only want to insert the name of your excel table if you choose the “Table” in the Sort Option field.
Action to Perform: Here you can select either Ascending or Descending action as per your requirement to sort the excel sheet data.

Now click on the “Done” button and save the process by pressing the “Save” button.
Once you successfully save the process, move ahead to run the robot, by pressing the “Run” button which is listed under the “Actions” tab.
On pressing the “Run” button, the robot will start working and show the sorted result. See the image.

With the above process, now you know how easily you can sort the data of an excel sheet or excel table using the DWmaker.
11.10.Reorder Columns
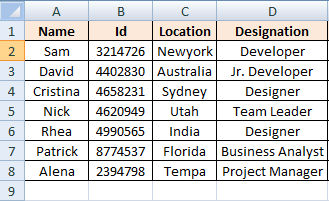
In order to arrange the columns in an excel sheet by re-ordering them, from one location to another, for example, here I have an excel sheet,
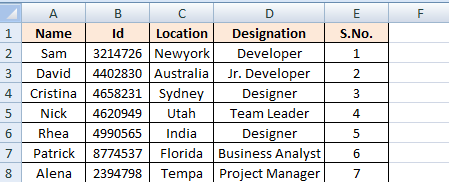
Now, you can see the column arrangement in the sheet is not proper, as the column “E” with S.No, should be the first column in the sheet, that means at column “A”. To resolve this we need to reorder the column location.
To re-order the location of any single or multiple columns in an excel sheet using the Process Bot Suite DWmaker, first, go to the “Create Excel Application” option under the “Excel Automation”. See the image.
Now create an instance by giving a unique instance name here on the “Create Excel Application” property window. See the image.

Moving forward, open the excel-sheet/workbook, by simply accessing the “Open Workbook” command option, which is listed under the “Excel Automation”.
Provide your instance name and the excel file path in the “Open Workbook” property window, and then click on the “Done” button.

Now, click on the ”Reorder Columns” option under the “Excel Automation” command. See the image.

Now, insert all the required details in the “Reorder Columns” property window, where;
Enter Sheet Name: This is the name of the particular excel sheet, in which you want to implement the column reorder operation.
Enter Source Range: This is the present column range that you want to re-ordered.
Enter Designation Range: This is the specific column range in the sheet where you want to put the re-ordered column.
Select Source Column Shift Direction: This is the location where you want to shift the source column.

Now, press the “Done” button and move towards saving the process by clicking on the “Save” button.
Once saving the process, press the “Run” button under the “Actions” tab.

With the click of the “Run” button, the robot will start working and you can see the result in your excel file. See the image.

So, the above is the easy steps with which you can easily re-order columns in an excel sheet.
11.11.Format Cells
Cell formation is also a part of formatting in an excel sheet. To proceed with the cell formatting process in an excel sheet using the. First, let’s learn why we need this type of formatting implementation in an excel sheet?
Basically, an excel sheet accepts numbers individually, which means without any decimal point, as shown in the below image.

This happens due to the default setting of the excel sheet. Meanwhile, to insert numbers with decimal in an excel file, we have to make some manual changes in the formatting of the file, so that it can allow us to insert decimal values in an excel sheet, as seen in the below image.

To get such results in an excel sheet, first, select the entire range of the rows or columns in an excel sheet that you want to edit with decimal, and then click on the “Format” option. See the image.

Now, click on the “Format Cells” option and then go to the “Number” in its property pop-up.

Here, the by-default decimal place is 2, which we can set in the excel sheet as per our requirement.
Now, to do the same thing in the Process Bot Suite DWmaker, create an instance by accessing the “Create Excel Application” option under the “Excel Automation” command.
Once providing a unique instance name in the respective field, press the “Done” button.
Now go to the “Open Workbook” option and provide the instance name and the file path in which you want to implement the cell formatting command, in its property window. See the image.

Press the “Done” button and move to the next step.
Now, click on the “Format Cells” option, under the “Excel Automation” command. See the image.

The “Format Cells” property window will require you to provide some details, where,
Sheet Name: This is the name of the specific excel sheet in which you want to perform the cell format operation.
Enter the Range: Here, enter the range of the cells or rows of an excel sheet whose formatting you want to edit.
Select Cell Range Format Type: In this field, select an option as text or number that you want to edit with decimal.
Enter the Number Format: Here, provide the number format as how many digits you want to enter after a decimal. For example: 0.00, 0.0000, etc.
Select Horizontal Alignment Type: It’s ‘Left’ by default, while you can also select ‘Right’, ‘Center’, ‘Jutify’, etc, as you want.
Select Vertical Alignment Type: It’s ‘Top’ by default, while you can also select as ‘Right’, ‘Center’, ‘Justify’, etc, as you want.

Press the “Done” button and proceed to save the process, by simply clicking on the “Save” button.
Once successfully save the process, click on the “Run” button under the “Actions” tab to see the result.
When you run the robot it will start working and you can see the result in your excel sheet.

With the above steps, now you know how easily you can edit the formatting of cells in an excel sheet.
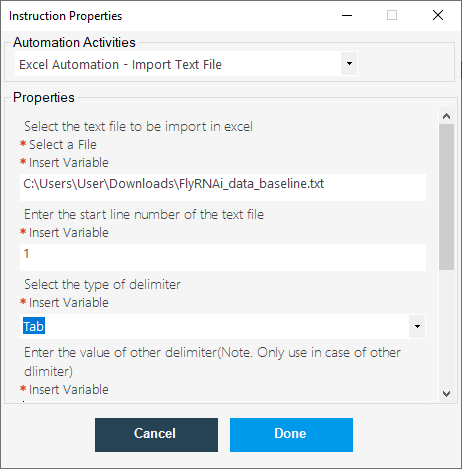
11.12.Import Text File
The Import Text File command is used to import the Data from text file to excel worksheet. The fields in the text file has been separted by the delimeters. usually, the delimeters include Tab, Space, and comma.
Let us see how to perform automation of Import Text File by using Dwmaker.
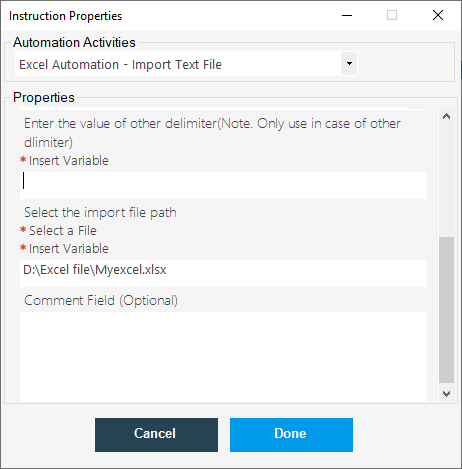
- Click on the Import Text File command under the Excel Automation in the Dwmaker.
- Once the Instruction Properties pop-up window will open,
- Click on Select the text file to be import in Excel
- Next, enter the start line number of the text file.
- Select the type of Delimeter.
- Next, enter the value of other delimeter, this will be applicable, only, if your text file contains more than one delimeter in it.
- Next, click on the Select a File under the Select the Import file Path and select the workbook file path location in which excel file you want to import the text file. and then click on Done.
- Here , after running the robot, a new excelwill be created with the given name and new sheet has been added to it in the name of the text file.
- Next, click on Save under the Robots tab and then go to the Actions tab and click on Run button.
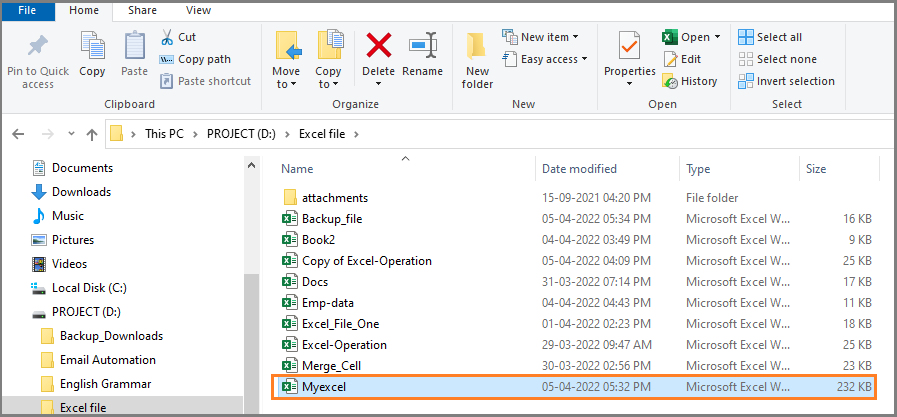
- Once the robot run successfully, therobot will craete a new excelfile in the given location and craetes a new sheet with the name of the text file and import all the data which is present in the text file.
- Once the robot runs successfully, go to the given file path and verify, a new file has been created which is as shown below.
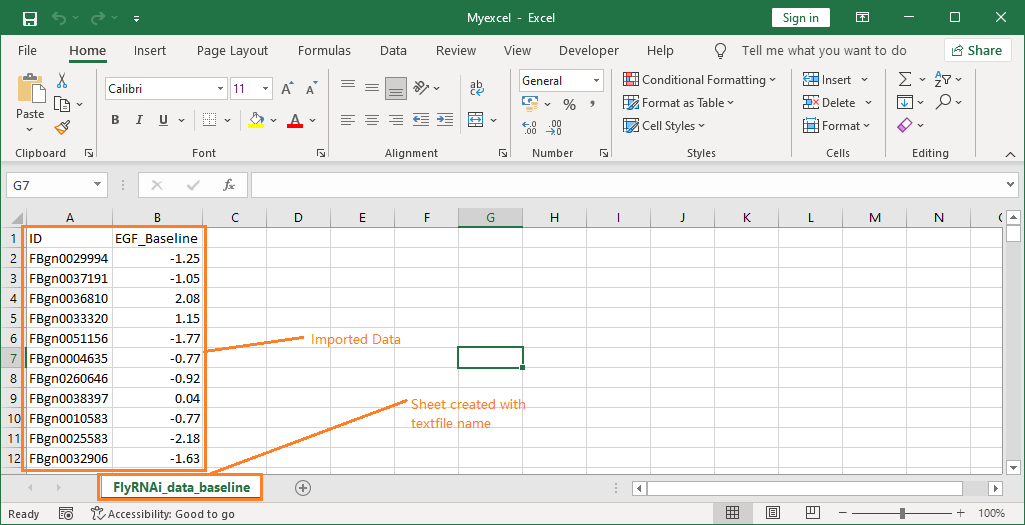
- Now, click on the Myexcel file and open it,you can see the imported data in it which is as shown below.
- This is how we can import data from text file to Excel worksheet.
11.13.Autofill Range
In order to autofill any range of data in an excel sheet using the DWmaker tool, first, go to the “Excel Automation” command and then click on the “Create Excel Application” option. See the Image.

Now, provide a unique instance name in the “Create Excel Automation” property window. See the image.

Press the “Done” button and then click on the “Open Workbook” option, in order to open a respective excel sheet in which you want to autofill the data in the particular range. See the image.

Provide your instance name and the excel file path that you want to auto-fill in the “Open Workbook” property window, and then press the “Done” button. See the image.

Now, click on the “Auto Fill Range” option under the “Excel Automation” command. See the image.
Now, fill the “Auto Fill Range” property window, with the required details, where;
Source Range: This is the specific cell range within the excel sheet, from where you start entering the data, basically Source Range is Starting Point, in the Source Range field we have to provide a starting point.
Fill Range: Here in the fill range field, you have to provide a cell range up to which you want to enter the data in an Excel Sheet.

Now, press the “Done” button and save the process by clicking on the “Save” button.

Once successfully save the robot, click on the “Run” button under the “Actions” tab. Then the robot will start working and you can see the result in your excel file.

So, the above is the most simple and easy process to autofill the data in a particular excel sheet, using the DWmaker tool.
11.14.Copy Sheet
- Our Process Bot DWMaker has provided a command called Copy Sheet using which we copy an excel sheet.
- In this section, let us see how we can copy an excel sheet from one excel file to another excel file or in the same excel file.
- Our first step is to open the Process Bot DWMaker.
- Select the Copy Sheet command under Excel Automation.

- Next, Instruction Properties pop-up window will open,
- Enter the file name under the select a file,
- Enter the sheet name under Entering the sheet name from where you want to copy
- Click on the drop-down list under the copy to the same file? Select yes, if you want to copy to the same file else select No.
- Next, enter the Destination file name.
- And, enter the name of the new sheet file and then click on Done as shown below.


- Now you can see a code written on the code window.

- Now, click on the Save to save this automation code, Once you click on the save you will navigate to the My Scripts folder, enter the name for this automation and then click on Save.

- Now, go to the Actions Tab and then click on the Run button.

- Here, I have copied the Myexcel.xlsx file from sheet1 to Contents written file to sheet4. Which is as shown below.

- In the same way, we can copy the sheet from one sheet to another sheet in the same file.
11.15.Lookup Range
Lookup range stands for searching for a value in the middle of a range of possibilities.
Let us see how to search for a value in the given range step by step. Our first step is to create a workbook.
- Open DWmaker and then click on the Create Excel Application under Excel automation.
- Next, you will navigate to the Instruction properties window, enter the name of the Instance you want to create, under the Please enter the instance name.
- And then click on Done.

- Here, I have created an instance called Search_Instance.
- Our next step is to open a created workbook.
- Click on the Open Workbook under Excel Automation.
- As soon as you click on Open Workbook, you will navigate to the Instructions Properties
- Enter the Instance name which you have created early(Search_Instance)
- Next, click on the Insert Variable and select the file, in which file you want to open your search instance.

- Our next step is to look for the value in the given range, for that we have to use the Lookup range command.
- Click on the Lookup Range under Excel Automation.
- As soon as you click on the Lookup range, you will navigate to the Instructions Properties
- Enter the,
- Instance name.
- Enter the sheet name, in which sheet you want to search for the value.
- Enter the range, for example, if you want to search for an apple in between A1 row to A4 row, then enter range as A1:A4
- Enter the name of the value you want to search for.
- Select the Search for All option, this will search for your value in the given range.
- Enter the output variable name, this variable will store your value. And, it is always good practice to declare the variable as
- Click on Done.

- Next, We have to display the output using the show message
- Click on the Show Message under Miscellaneous Operations.
- Enter the variable name which you have already created to store your search value.
- Click on Done.

- Now, click on save to save this code and the complete code will look like below.

- Now, click on the Action tab and then click on Run to run the above code.

- Once you run the code, the cell number of the corresponding search value will be displayed in the Message Box pop-up window.

- I was searching for Mango in the excel file, and hence the A4 is the right cell number where my search value is present.

- If you have duplicate values in the excel file, and, if you select the First Occurrence under the Select Search For in the Lookup-Range Instructions Properties window, then the bot will display only the first occurrence of the search value.
- In the below excel file, I have two duplicate values as A2 and A4.

- Now, save and run the robot, you can see, only the first occurrence of the duplicate value will be print in the output message box.Note: After every edition of the code, you to save the code before running the code.

- In the same way, if you select All in the Select Search For option in the Lookup Range Instructions Properties window.

- Now save and run the robot, in the out you can see both the duplicate values will be displayed in the output Message Box.

- Once you click on Ok, the next cell number will be displayed as shown below.

- So, this is how we can find the value between a given range using the lookup range command.
11.16.Merge Cells
- Merge Cells is a Microsoft Excel add-in, that merges values from columns, cells, and rows.
- Merge Cells is the finest aid for you if you need to get one cell out of multiple, merge columns row by row or rows column by column.
- Now let us see the process of merging cells step by step.
- Our first step is to create an instance, click on the Create Excel Application under Excel Automation.
- Enter the instance name under the Inert Variable in the Instruction Properties pop-up window and click on Done.

- Next, click on Open Workbook under Excel Automation and enter the instance name and click on Select a File and select the file path in which you want to merge the cells, and then click on Done.
- Next click on the Merge cells under Excel Automation, and then,
- Enter the instance name.
- Enter the sheet name in which sheet you want to merge the cells.
- Enter the cell range to merge the cells, and then click on Done.

- Now click on save to save this code.
- Next, go to the Action Tab and then click on Run.
- Now, go to the file and see, the given range cells are merged as shown below.

- Now you can enter the text inside the merged cells.

- This is how we can merge cells using excel automation.
11.17.Set Cell
The Set Cell command is used to replace the current cell value with the new cell value.
Let us see how to perform this operation step by step.
- First, we need to create an instance, click on Create Excel Application command under Excel Automation.
- Once, the Instruction Properties pop-up window will open,
- Enter Instance name

- Enter Instance name
- Next, click on Open Workbook, once the Instruction Properties pop-up window will open, enter the instance name and select the file and then click on Done.

- Next, we need to activate the sheet, in which we are performing the Set cell operation. I am using the below excel sheet which is as shown below.
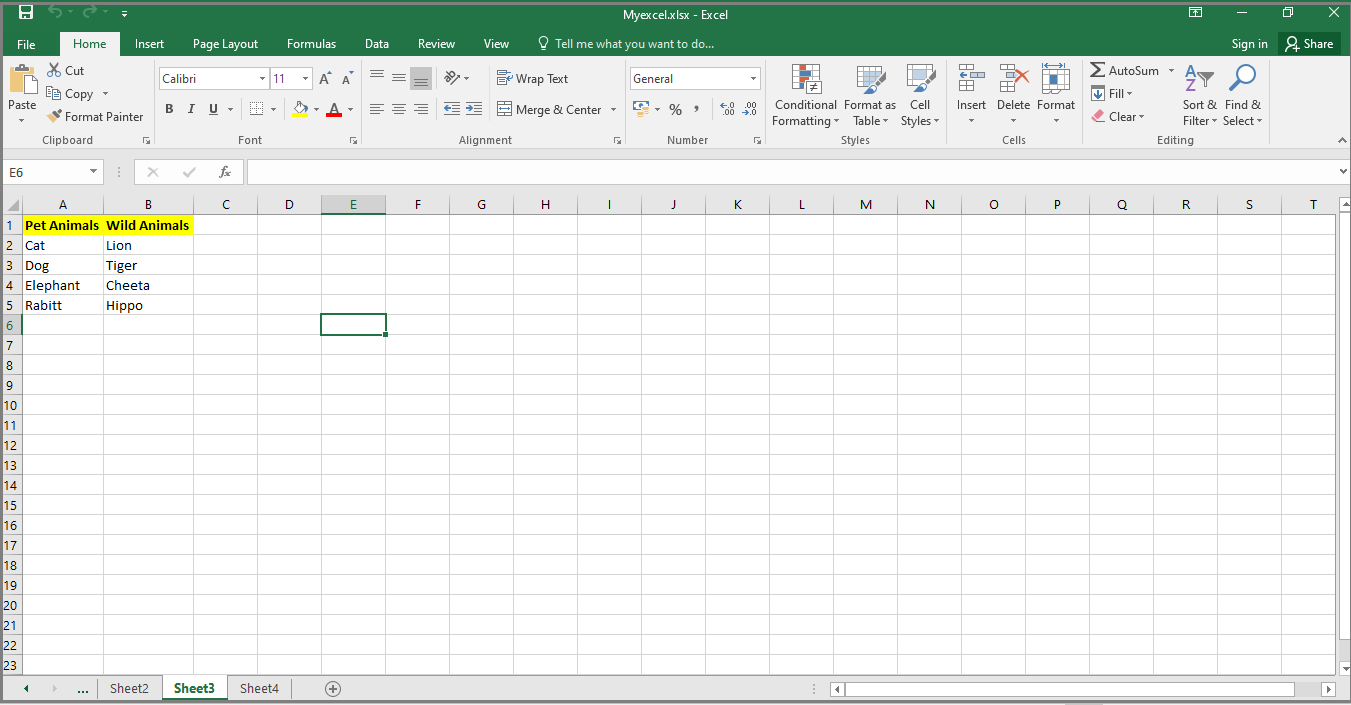
- Next, click on Activate Sheet command, once the Instruction Properties pop-up window will open, enter instance name, sheet name, and click on Done.

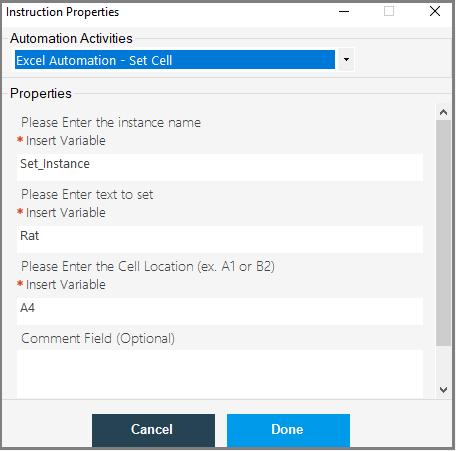
- Next, click on the Set Cell command, once the Instruction Properties pop-up window will open, enter the below details which are present in the image.
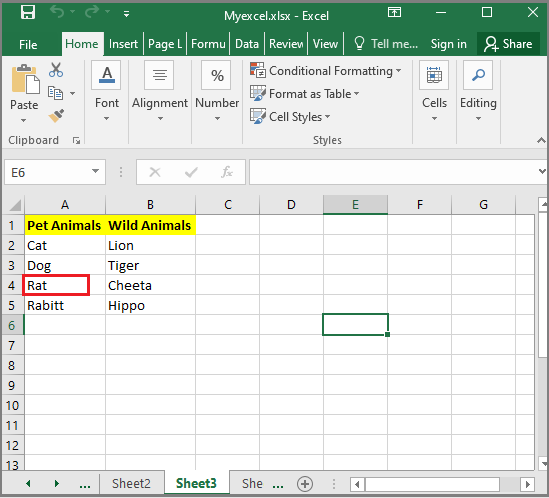
- Now, save the code and go to the Actions tab and click on Run.
- Once the robot runs, successfully, the cell value of A4 (Elephant) will be replaced with Rat.
11.18.Set Cell Range
Sets the values of all cells in a specified range on a specified sheet in an Excel file, sets the data format for each column in the range and defines range column headers.
Let us see how to perform a set cell range using robot automation.
- Our first step is to create a data table instance, click on the Assign Data Table Instance under Create Data Table Automation.
- Next, the Instruction Properties pop-up window will open,
- Enter the data table name and instance name, and then, click on Done.

- Next, click on Create Excel Data Table under Excel Automation and
- Enter data table name.
- The workbook file path, and
- Enter the sheet name which sheet you want to open and then click on Done.

- Now, we have to check whether the data table has been created or not, for that we have to preview it.
- Click on Preview Data Table under Data Table Automation and enter the required details.

- Now, we have to write the data from the data table to an excel sheet, for that we need to create an excel sheet.
- Click on the Create Excel Application, and enter the details in the Instruction Properties pop-up window.

- We can enter the data into a new workbook or in our old workbook, here I am using my old workbook only.
- Click on the Open Workbook command under Excel Automation and enter the following details

- Now, we have to set the cell range to enter the data in the workbook, for that, click on the Set Cell Range under the Excel Automation and,
- Enter the instance name.
- Enter the source data table name.
- Enter the sheet name in which sheet you want to enter the data. If you mention the sheet name which is already having data in it, then the data will be over-written.
- Enter the start cell name, that from which cell you want to enter the data for example A/B/C/D..etc.
- Enter the start row number, you can also choose from which row you want to start entering the data.
- Next, click on Done.

- Now, save the code and go to the Action tab and click on Run.
- Once the robot starts running, the excel will open which contains the data, which is as shown below.

- If you verify the above image, the data has been started from A cell 8th row.
- This is how we can set the cell range to enter the data table.
- Enter the data table name and instance name, and then, click on Done.
11.19.Set Font
The appearance of individual characters in the text is altered by using the Set Font command.
Let us see how to set font using excel automation step by step.
- Our first step is to create an excel instance.
- Click on the Create Excel Application command under Excel Automation, and enter the instance name and then click on Done.

- Next, we have to open a workbook, click on the Open Workbook under Excel Automation.
- As soon as you click on Open Workbook, the Instruction Properties pop-up window will open, Enter,
- Instance name
- Enter the workbook file path.
- Click on Done.

- After selecting the workbook, click on the Set Font command under Excel Automation.
- As soon as you click on Set Font, the Instruction Properties pop-up window will open. Enter the Instance name, Sheet name, Enter cell range, for example, A1:D1

- Next, click on the Select Font Style drop-down and select which font style you want.

- Next, select the size of the font by clicking on the Select Font Size drop-down and select the Yes/No from the Select Underline Option and then click on Done.

- Now, Click on Save to save the code and then go to the Action tab and click on Run.
`
- In the above image, you can see that the cell from A1 to D1, font style, and font size have been changed as we had given in the Instruction Properties Window.
11.20.Set Range Color and Set Range Highlight Color
- Set Range Colour: The set range colour changes the colour of the text in the given range.
- Set Range Highlight colour: This command highlights the background colour of the given cell range.
- Let us see how we can perform these operations using excel automation.
- Our first step is to create an instance, so, click on the Create Excel Application under Excel Automation.
- And, enter the instance name and then click on Done.

- Next, we have to open a workbook, click on the Open workbook under Excel Automation, enter the instance name and file path location and then click on Done in the Instruction Properties pop-up window.

- Now, click on the Set Colour Range under Excel Automation.
- The Instruction Properties pop-up window will open, enter,
- Instance name
- Sheet name
- Cell range
- And the colour and then click on Done.

- Now save the code and go to the Action tab and then click on Run.
- Once the robot will runs, you will get the below output.

- Now, click on the Set Range Highlight Colour, under Excel automation and enter the required details.
- Enter the instance name
- Sheet name
- Enter the cell range to highlight the background colour.
- Enter the name of the colour to highlight.
- And then click on Done.

- Now, Save and go to the Action tab and click on Run.
- Once the robot executes the code, open the excel sheet, you will find the output which is as shown below.

11.21.Get Cell
- The Get Cell command returns the value of the given cell number.
- Let us see how to get the value of the given cell by using excel automation.
- Our first step is to create an excel instance, click on the Create Excel Application command under Excel Automation.
- And, enter the instance name and then click on Done.

- Next, we have to open the workbook, click on the Open Workbook command under Excel Automation and then enter,
- Instance name
- Click Select File and select the file path location, from which file you want to get the cell value.
- And then click on Done.

- Next, click on the Get Cell command and enter the following details in the Instruction properties pop-up window.
- Enter the instance name, and enter cell location, which means the cell number from which cell you want to get the cell value. For example, A1, B2, C3, etc.
- For example, look at the below image. I have an excel sheet. I want to print the cell value “Technical Content Writer” so that I am giving the cell location as B2.

- Next, create a variable, which will hold the cell value in it.
- Click on Done.

- Our next step is to print this call value on the output screen.
- So, click on the Show Message command under Miscellaneous Operations and enter the variable name you have created to hold the cell value in it. Click on Done.

- Now, click on Save to save this code.
- Go to the Action tab and click on Run.

- Once the robot runs, the cell value will be printed in a pop-up message box window. Which is as shown below.

11.22.Get Last Row Index
The Get Last Row Index command gives us the last row number. Let us see how to perform this operation step by step.
- Our first step is to create an excel instance.
- Click on the Create Excel Application under Excel Automation.
- Enter the instance name and then click on Done.

- Next, we have to open the workbook, click on the Open Workbook command under Excel Automation.
- Once the Instruction Properties window will open, enter the instance name, and then select the file path.

Note: If your excel file is having more than one sheet and if you want to get the index value in the particular sheet, then you can add the Activate sheet command after Open Workbook.
- My excel file has two sheets in it, so I am using the Activate sheet command to get the last row index in a specified sheet.
- Click on Activate sheet under Excel Automation, in the Instruction Properties pop-up window, enter the below details.
- Enter the instance name
- Enter the sheet name
- Click on Done.

- Next, click on the Get Last Row Index under Excel Automation.
- Once the Instruction Properties window will open, enter the instance name, enter the column number to get the index number of the same.
- And, create a variable to hold the index number. Click on Done.

- Now, we have to print the last row index number in the message box as an output.
- Click on the Show Message command under Miscellaneous Operations.
- Once the Instruction Properties window will open, enter, Variable name which you have created, and then click on Done.

- Now, save the code and then go to the Action tab and click on Run.

- So my last row index value is 10.
- You can verify by opening your excel sheet.

11.23.Get Range Color
The Get Range color returns the name of the given cell color. Let us see how to perform this operation using excel automation.
- Our first step is to create an instance, click on Create Excel Application under Excel Automation.
- Once, the Instruction Properties pop-up window will open, enter the instance name and click on Done.

- Next, click on the Open Workbook command under Excel Automation, and enter the instance name and select the file path location and then click on Done.

- Here I am using the below excel sheet.

- Next, click on Get Range Colour, under Excel Automation, once the Instruction Properties pop-up window will open, enter,
- Instance name
- Sheet name
- Enter the cell range
- Enter the output variable name to get the color name, click on Done.

- Now we have to print the output in the message box, so click on the Show Message under Miscellaneous Operations and then enter the variable name in the Instruction Properties pop-up window and then click on Done.

- Now, click on Save to save the code.
- Go to the Action tab and then click on Run.

- Once the robot runs, you can see the output in the Message box as shown below.

- This is how we can perform Get Range Colour.
11.24.Get Workbook Sheet by Index
The Get Workbook Sheet by Index command will return the sheet name with respect to the given index value.
-
- Let us see the steps to perform this operation using excel automation.
- Our first step is to create an instance, click on the Create Excel Application under Excel Automation and enter the instance name and then click on Done.

- Next, click on Open Workbook and then enter the instance name and then enter the file path location and then click on Done.

- Here I am using the below excel file, which has three sheets namely, January, February, and March.

- I am going to print the March by giving the sheet index as 3.
- Next, click on the Get Workbook by sheet Index under Excel Automation, Once the Instruction Properties window will open enter,
- Instance name
- Enter the Index of Sheet, which means, you need to enter the Index of the sheet which you want to print in the output.
- If you have three sheets in your excel file, and you want to print the 2nd sheet name, then enter the sheet of the index as 2.
- Next, create a variable to hold the output value.
- Click on Done.

- Next, click on Show Message under Miscellaneous Operations.
- Once the Instruction Properties pop-up window will open, enter the output variable and then click on Done.

- Now, click on Save.
- Next, go to the Action tab and then click on Run.

- Once the robot runs, the index of the sheet will be displayed on the Message Box.

11.25.Get Workbook Sheets
The Get Workbook Sheets command returns the list of sheet names one by one in a message box as an output. Let us see the steps one by one.
-
- First, create an excel instance, Click on Create Excel Application under Excel Automation.
- And, enter the instance name and then click on Done.
- Next, click on the Open Workbook command under Excel Automation, once the Instruction Properties pop-up window will open enter the instance name and select the file path location, then click on Done.
- Next, click on the Get Workbook Sheets command under Excel Automation, once the Instruction Properties pop-up window will open enter,
- Instance name
- Create an output list variable and then click on Done.
- To get the name of sheets one by one we have to create a loop using the loop statement command.
- Click on the Loop List command under Loop Statement and enter the loop variable name and then click on Done.
- Now, we have to print this output in a message box, click on the Show Message command under Miscellaneous Operation, once the Instruction Properties pop-up window will open, enter the output variable name and then click on Done.
- Click on Save to save this code.
- Now, go to the Action tab and click on Run.
- Once the robot runs, the sheet names will be printed on the message box one by one.
- Once you click on Ok, the next sheet name will be displayed.
- Again if you click on Ok, the third sheet name will be displayed, which is as shown below.
- In the same way, you can print any number of sheet names by using the Get Workbook Sheets command.
11.26.Get Worksheet Table Range
The Worksheet Table Range command returns the worksheet table range.
Let us see, how we can perform this operation in Excel Automation.
- First, we need to create an excel worksheet table.
- Open your excel file and then select data present in the table and then go to the Insert and click on the Table symbol.
- Or you can also use Ctrl+T as a shortcut.

- Now, go to the DWmaker and click on the Create Excel Application command under Excel Automation, Once the Instruction Properties window will open, enter the instance name and click on Done.

- Next, we need to open the workbook, click on the Open Workbook command, once the Instruction Properties window will open, enter,
- Instance name
- Select the file path location

- Next, Click on the Get Worksheet Range under Excel Automation, once the Instruction Properties window will open, enter,
- Instance name
- Sheet name
- Worksheet Table name
- Output variable name
- Click on Done.

- Next, click on the Show Message under Miscellaneous Operations, Once the Instruction Properties pop-up window will open, enter, output variable name.

- Now, save the code and go to the Action tab and then click on Run.

- Once the Robot runs, the worksheet table range will be print on the Message Box.

- You can verify by looking at the below excel file.

11.27.Go To Cell
The Go-To Cell command takes you to the given cell location.
Let us see, how to perform this operation step by step.
- Our first step is to create an excel instance, click on the Create Excel Application under Excel Automation, once the Instruction Properties pop-up window will open, enter,
- Instance name
- Select the file path location.
- Click on Done.

- Next, click on the Open Workbook under Excel Automation, Once the Instruction Properties pop-up window will open, enter the instance name and select the file path location, and then click on Done.

- Next, click on Activate Sheet under Excel Automation, Once the Instruction Properties window will open, enter the instance name and sheet name and then click on Done.

- Next, click on Go To Cell command under Excel Automation, Once the Instruction Properties pop-up window will open, enter the instance name and enter the cell location.
- And, then click on Done.

- Now, click on the Save to save this code.
- Next, go to the Action tab and then click on Done.

- Once the robot runs, open the excel file, you can see that the robot is pointing to the given cell location.

11.28.Create Worksheet Table
The Create Worksheet Table command creates a worksheet table with the given table name in the given sheet.
Let us see how to perform this operation step by step.
- Our first step is to create an instance.
- Click on the Create Excel Application under Excel Automation, Once the Instruction Properties pop-up window will open, enter the instance name and click on Done.

- Here, I am using the below data which is present in the excel sheet.
- To create a worksheet table, the data must be present in the given sheet, or else you will end up with an error.
- Next, click on the Open Workbook command under Excel Automation, once the Instruction Properties pop-up window will open, enter the instance name and select the file path location.

- Next, click on the Activate Sheet command under Excel Automation, once the Instruction Properties pop-up window will open, enter the instance name and sheet name, in which sheet you want to create a worksheet table.

- Next, click on the Create Worksheet Table under Excel Automaton, once the Instruction Properties pop-up window will open, enter,
- Instance name
- Sheet name
- Enter the range (Example: A1:D8)
- And, enter the table name to be created.
- Click on Done.

- Now, click on Save to save the code.
- Go to the Action tab and then click on Run.

- Once the robot runs, the worksheet table will be created in the given range.

11.29.Cell Border
The Cell Border command adds a border to the individual or to the whole table according to the given cell range.
Let us see, how to perform this operation in DWmaker using Excel Automation.
- The first step is to create an Instance.
- Click on Create Excel Application under Excel Automation.
- Once, the Instruction Properties window will open, enter the instance name and click on Done.

- Next, click on the Open Workbook command, once the Instruction Properties window will open, enter the instance name, click on select a file and select the excel file, in which file you want to put cell border.

- Our next step is, click on the Cell Border command, once the instruction properties pop-up window will open, enter the required details as shown in the below image.

- Now, save the code and go to the Actions tab and click on Run.
- Once the robot runs successfully, open the excel file and see, the given cell range cells’ color has been changed to red color.

11.30.Delete Cell
The Delete Cell command is used to delete a single cell or multiple cells in the given range.
- Our first step is to create an excel instance, click on the Create Excel Application under Excel Automation.
- Once, the Instruction Properties pop-up window will open, enter the instance name and click on Done.

- Next, click on the Open Workbook command under Excel Automation, Once the Instruction Properties pop-up window will open, enter the instance name and click on the Select a File and select the file path location.

- Now, click on Activate Sheet under Excel Automation, Once the Instruction Properties window, enter the instance name and sheet name within the workbook, you want to delete the cell.

- Now, click on Delete Cell, under Excel Automation, Once, the Instruction Properties window will open, enter the below details which are present in the image.

- Now click on Save and then go to the Actions tab and click on Run.
- Once the robot runs successfully, the given range cell will be deleted from the workbook.

11.31.Insert or Delete Table Column
The Insert or Delete Table Column command is used to insert or delete columns in the worksheet table.
Let us see what are the steps involved in this process.
- Here we can create a new worksheet and perform an insert or delete table column action or
- We can insert/delete table columns from your old worksheet table.
- Here I am using my old worksheet table which is as shown below.
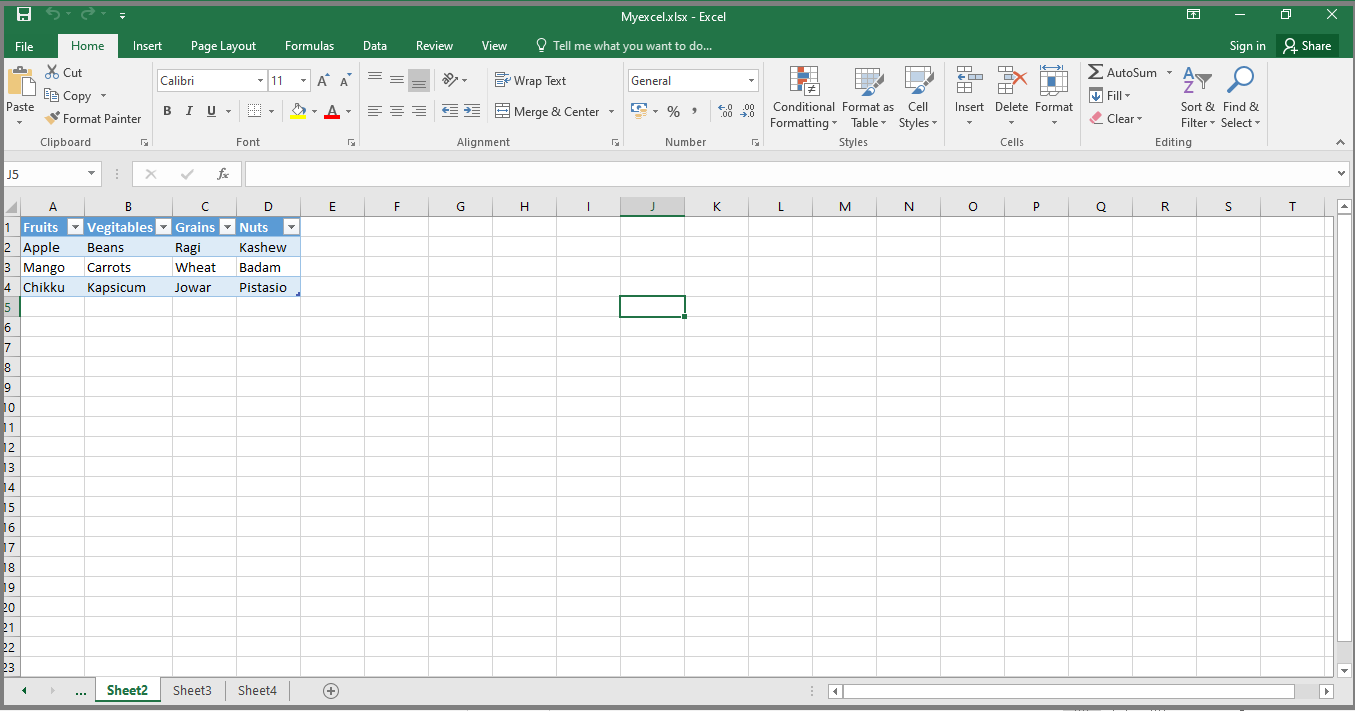
- Our next step is to create an excel instance, click on the Create Excel Application, Once the Instruction Properties pop-up window will open, enter,
- Instance name and click on Done.

- Instance name and click on Done.
- Next, Click on the Open Workbook command under Excel Automation, once the Instruction Properties pop-up window will open, enter the instance name and click on Select a File and select the file path location.
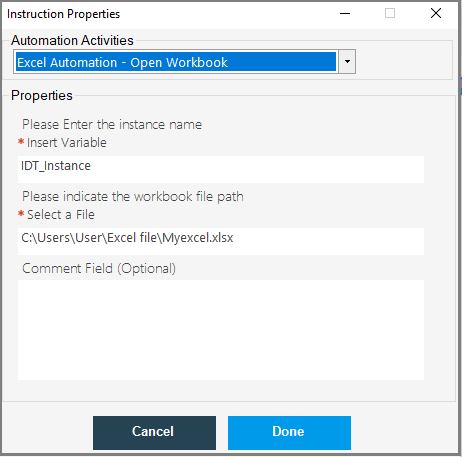
- Next, click on Activate Sheet, once the Instruction Properties window will open, enter the instance name and sheet name and click on Done.
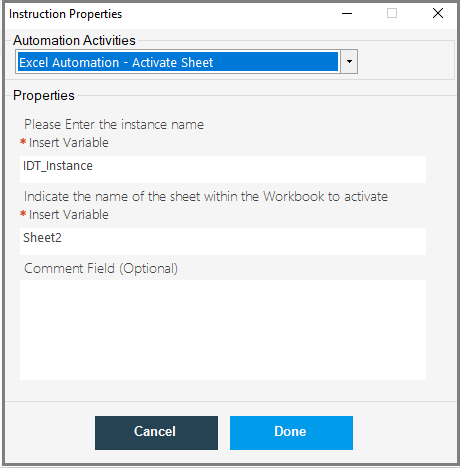
- Next, click on Insert/Delete Table Column command under Excel Automation, Once the Instruction Properties pop-up window will open, enter,
- Instance name
- Sheet name
- Column number position(for example A column means 1, B means 2, etc…)
- Column Header name
- Table Name
- Select action to be performed(Insert/Delete)
- Click on Done.
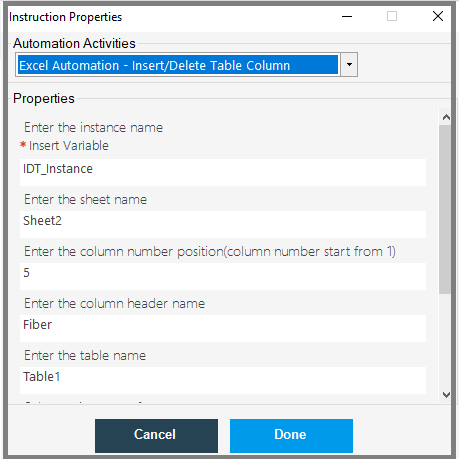
- Now save the code and go to the Action tab and click on Run.
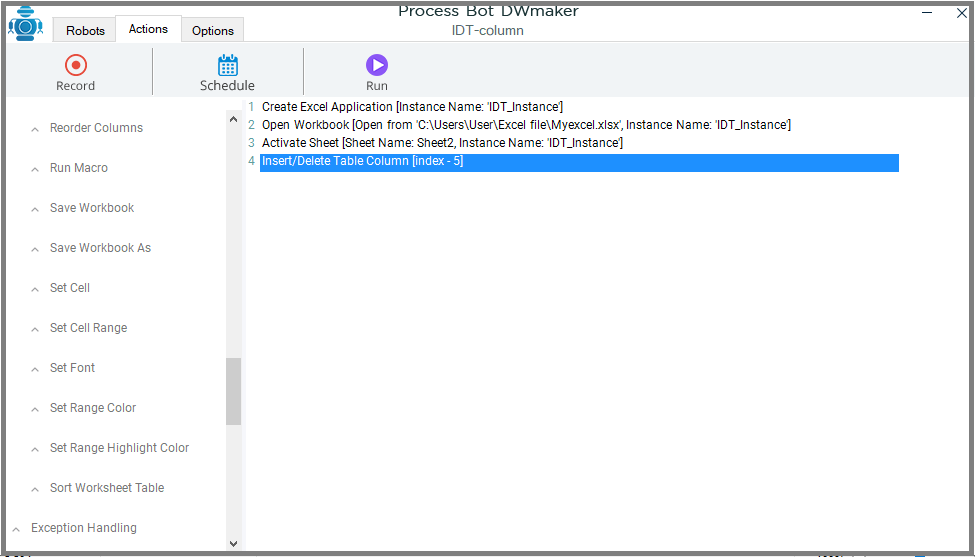
- Once the robot runs successfully, the new column has been inserted into the given worksheet table.

- In the same way, we can also delete the column from the worksheet table.
- Click on the Insert/Delete table column code line in the DWmaker, select the Delete option from the Action to perform, and select the column name.
- Here I want to delete the Fiber column, so enter the column name as Fiber as shown below.
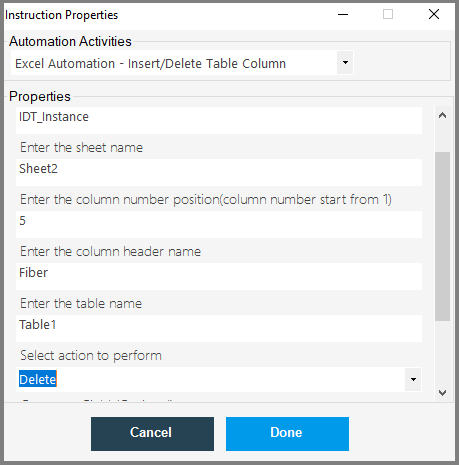
- Now, save the code and run.
- Once the robot runs successfully, the given column will be deleted from the worksheet table.
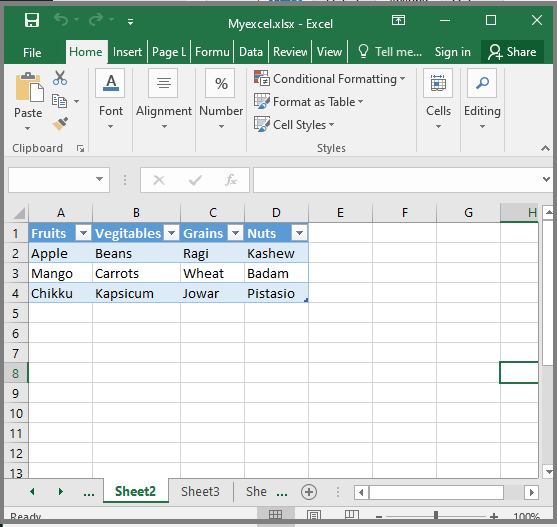
11.32.Insert/Delete Table Row
The Insert or Delete Table Row command is used to insert or delete rows in the worksheet table.
Let us see what are the steps involved in this process.
- Here we can create a new worksheet and perform an insert or delete table row action.
- We can insert/delete a table row from your worksheet table.
- Here I am using my old worksheet table which is as shown below.
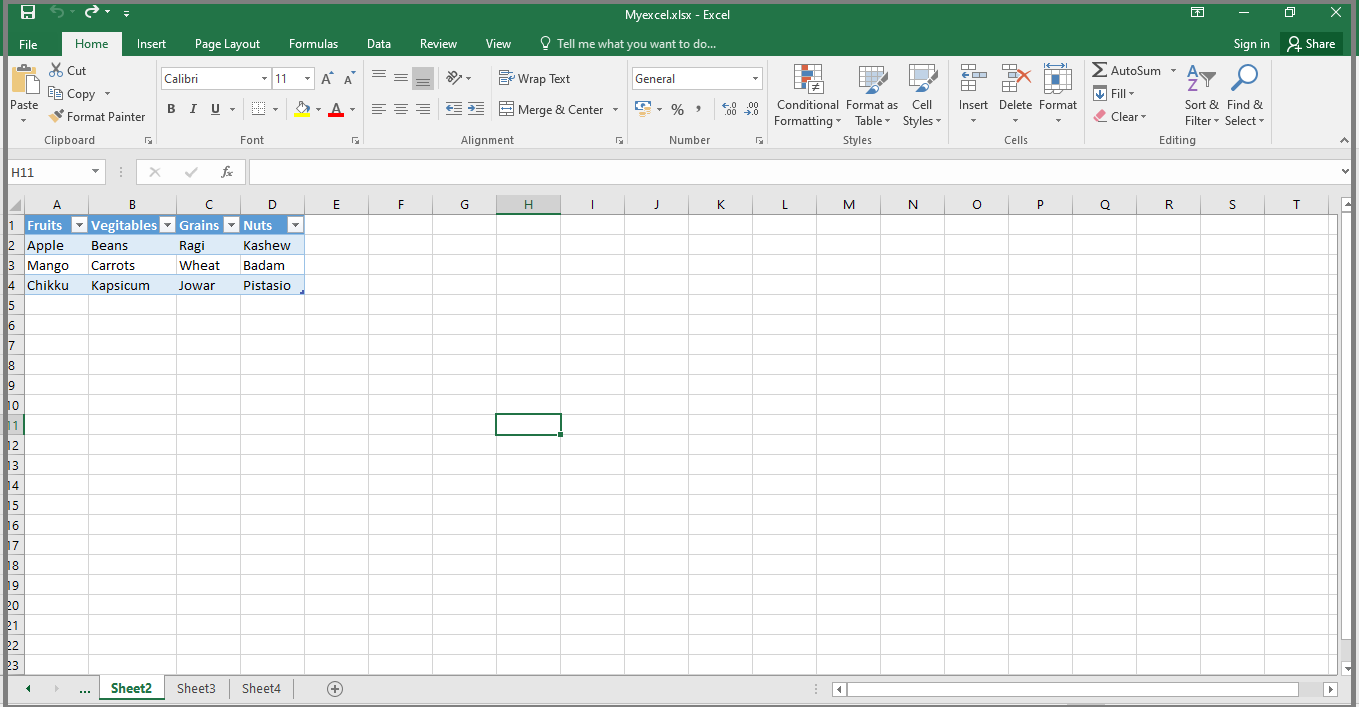
- Our next step is to create an excel instance, click on the Create Excel Application, Once the Instruction Properties pop-up window will open, enter,
- Instance name and click on Done.
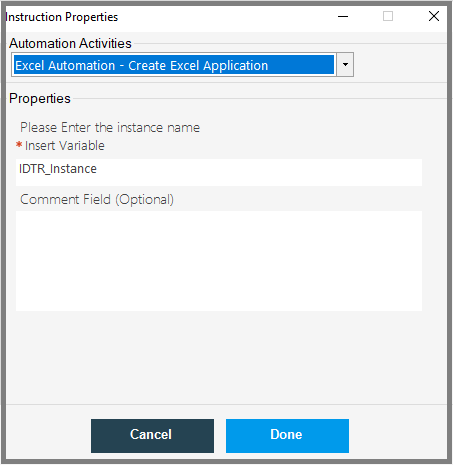
- Instance name and click on Done.
- Next, click on the Open Workbook command under Excel Automation, once the Instruction Properties pop-up window will open, enter the instance name and click on Select a File and select the file path location
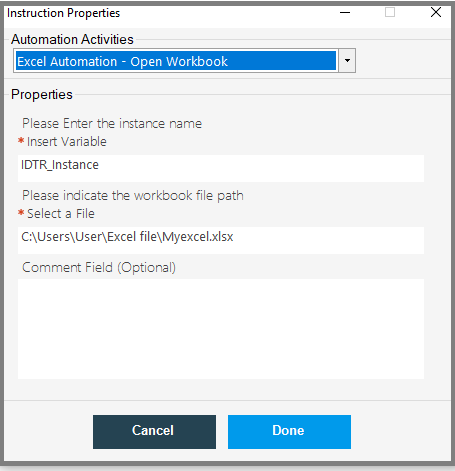
- Next, click on Activate Sheet, once the Instruction Properties window will open, enter the instance name and sheet name and click on Done.
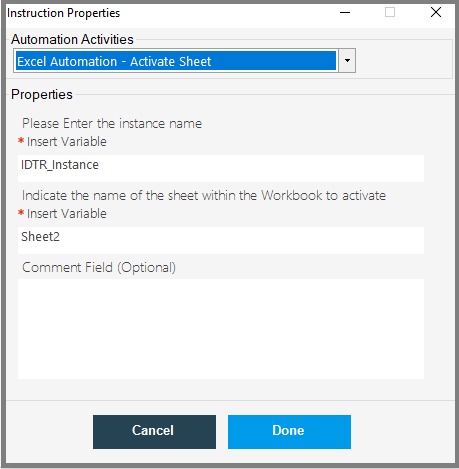
- Next, click on Insert/Delete Table Row command under Excel Automation, once the Instruction Properties pop-up window will open, enter,
- Instance name
- Sheet name
- Row index position
- Table Name
- Select action to be performed(Insert/Delete)
- Click on Done.
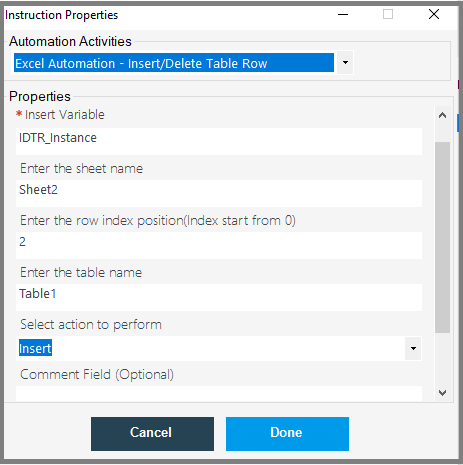
- Now save the code and go to the Action tab and click on Run.
- Once the robot runs successfully, the new row has been inserted into the given worksheet table.

- The row number will always be started from zero(0), so, the row will be added to the 3rd row.

- In the same way, we can also delete the row from the worksheet table.
- Click on the Insert/Delete table row code line in the DWmaker, select the Delete option from the Action to perform, and select the row name.
- Here I want to delete the 2nd row, so, enter the row index number.
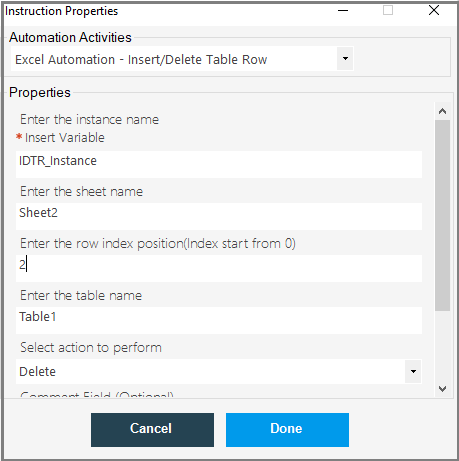
- Now, save the code and run.
- Once the robot runs successfully, the given row will be deleted from the worksheet table.
11.33.Save Workbook
The Save Workbook command is used to save the workbook. Let us see what are steps are involved in this operation.
First, create an instance, click on Create Excel Application. Once an Instruction Properties pop-up window will open, enter the instance name and click on Done.
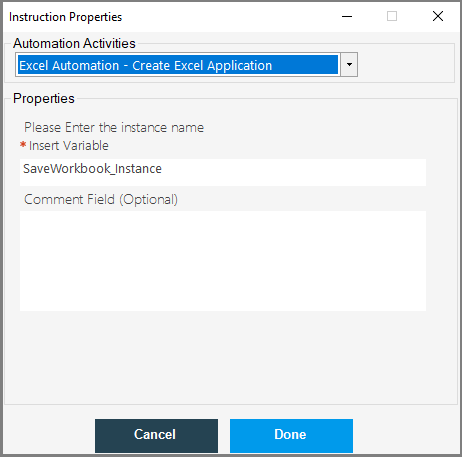
- Next, click on the Open Workbook command, once the Instruction Properties window will open, enter the instance name, and select the file path location.
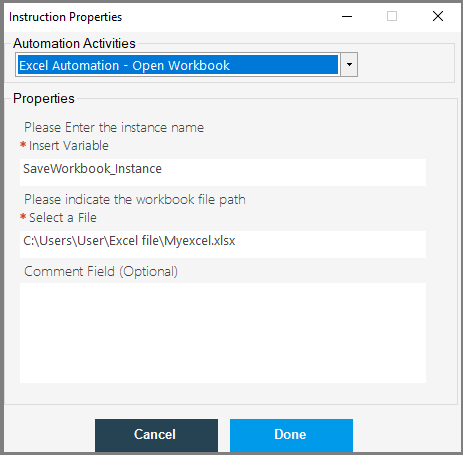
- Next, click on Activate Sheet command under excel automation, once, the Instruction Properties pop-up window will open, enter, instance name, and sheet name, which you wanted to activate.
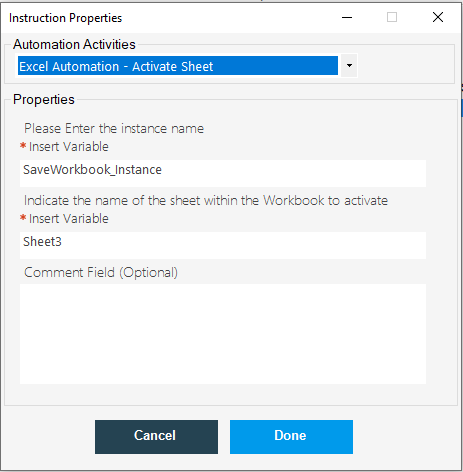
- Next, click on the Save Workbook command under, Excel Automation, once the Instruction Properties pop-up window will open, enter the instance name and click on Done.

- Now, save the code and go to the Actions tab, and click on Run, once the robot runs successfully, the excel file will be saved with its original name after editing.
11.34.Create Pivot Table
The Create Pivot Table command is used to create a pivot table. Where a pivot table in Microsoft Excel is a tool that allows you to quickly summarise large datasets (with a few clicks). You can utilize a Pivot Table even if you’re completely unfamiliar with Excel. Creating reports is as simple as dragging and dropping row/column headers.
Let us automate this process using the DWmaker automation tool.
- Our First step here is to create an excel application, click on Create Excel Application command, once the Instruction Properties pop-up window will open, enter the Instance name and them click on Done.
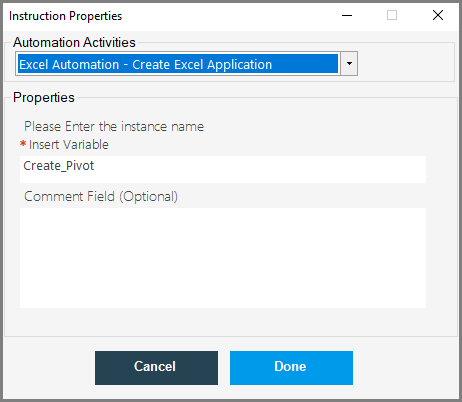
- Next, click on Open Workbook command, once you navugate to the Instruction Properties pop-up window, enter the workbook file path location and then click on Done.

- In this example i am using below data table to create a pivot table.
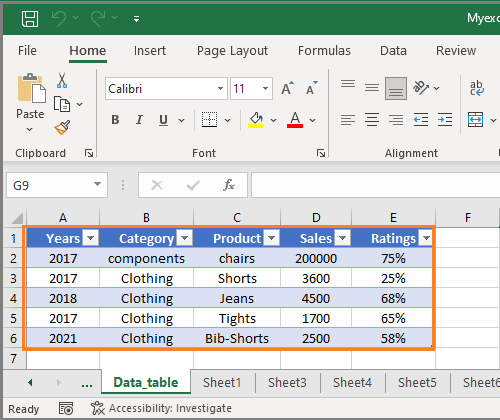
- Next click on Active Sheet command, once you navigate to the Instruction Properties pop-up window, enter the sheet name from which sheet your extracting data from the data table to carete a Pivot table.

- Next, click on Create Pivot Table command, once the Instruction Properties pop-up window will open, enter:
- Instance Name
- Enter the source Data Cells Rnage
- Enter the sheet name.
- Next, ener the column name and function, here you can add column which you wanted to create a pivot table and you can ignore rest column names.
- Next, enter the destination sheet name. Which is as shown below.
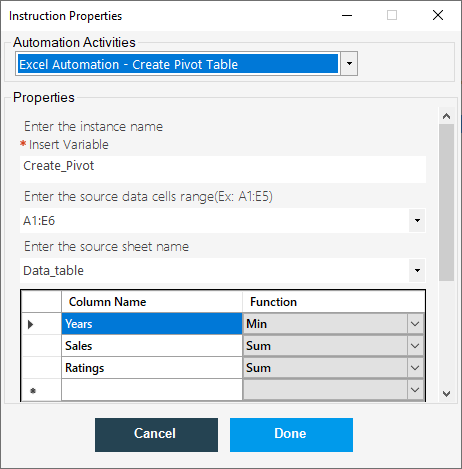
- Next, click on Done.
- Click on Save Workbook command, once the Instruction Properties pop-up window will open enter teh instance name and then click on done.
- In this example i am going to create pivot table for Years, sales and ratings.
- Where I wnat the min of the year which is present in the table and Wants to get the sum of the total sales and Sum of the total ratings
- Now save the robot and run.
- Once the robot run successfully, the robot will craete a pivot table in the destination sheet by using the data prsent in the given data table from the given sheet name which is as shown below.
- This is how we can create a pivot table by using the data which vailable in the data table and can summerise the values easily.
11.35.Save Workbook As
The Save Workbook As command is used to save the current workbook with a new name. Let us see what are steps are involved in this operation.
- First, create an instance, click on Create Excel Application. Once an Instruction Properties pop-up window will open, enter the instance name and click on Done.
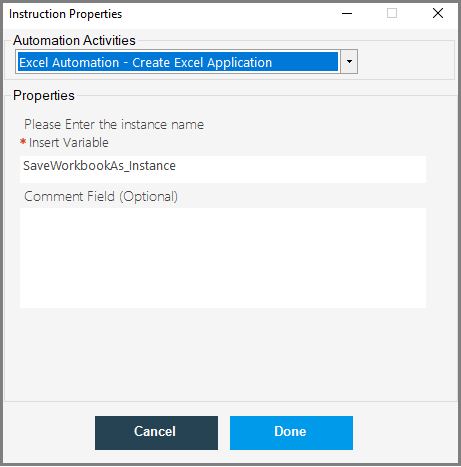
- Next, click on the Open Workbook command, once the Instruction Properties window will open, enter the instance name, and select the file path location.
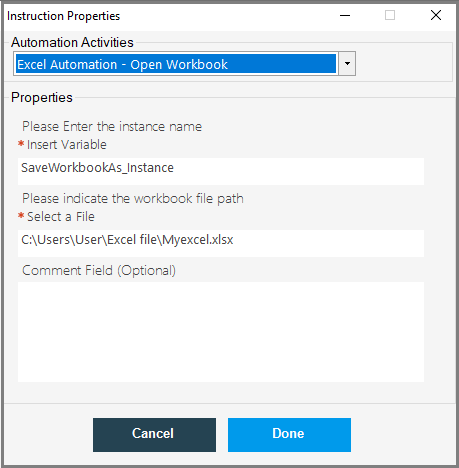
- Next, click on Activate Sheet command under Excel Automation, once, the Instruction Properties pop-up window will open, enter the instance name, and sheet name, which you wanted to activate.
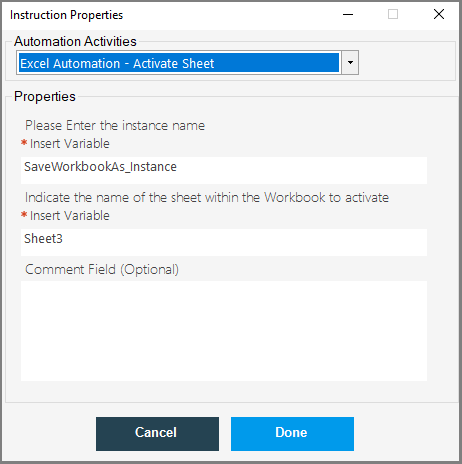
- Next, click on the Save Workbook As command under, Excel Automation, once the Instruction Properties pop-up window will open, enter the instance name and enter the file path location with the new file name and then click on Done.
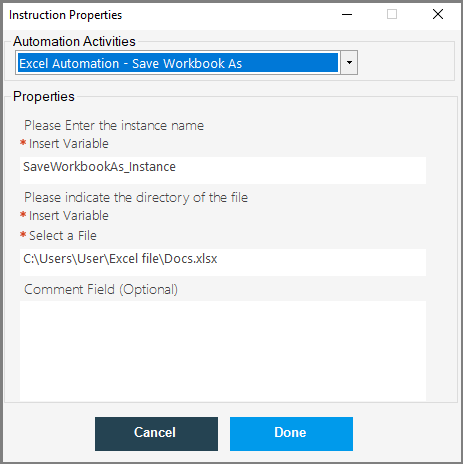
- Now, save the code and go to the Actions tab, and click on Run, once the robot runs successfully, the excel file will be saved with its new name after editing.
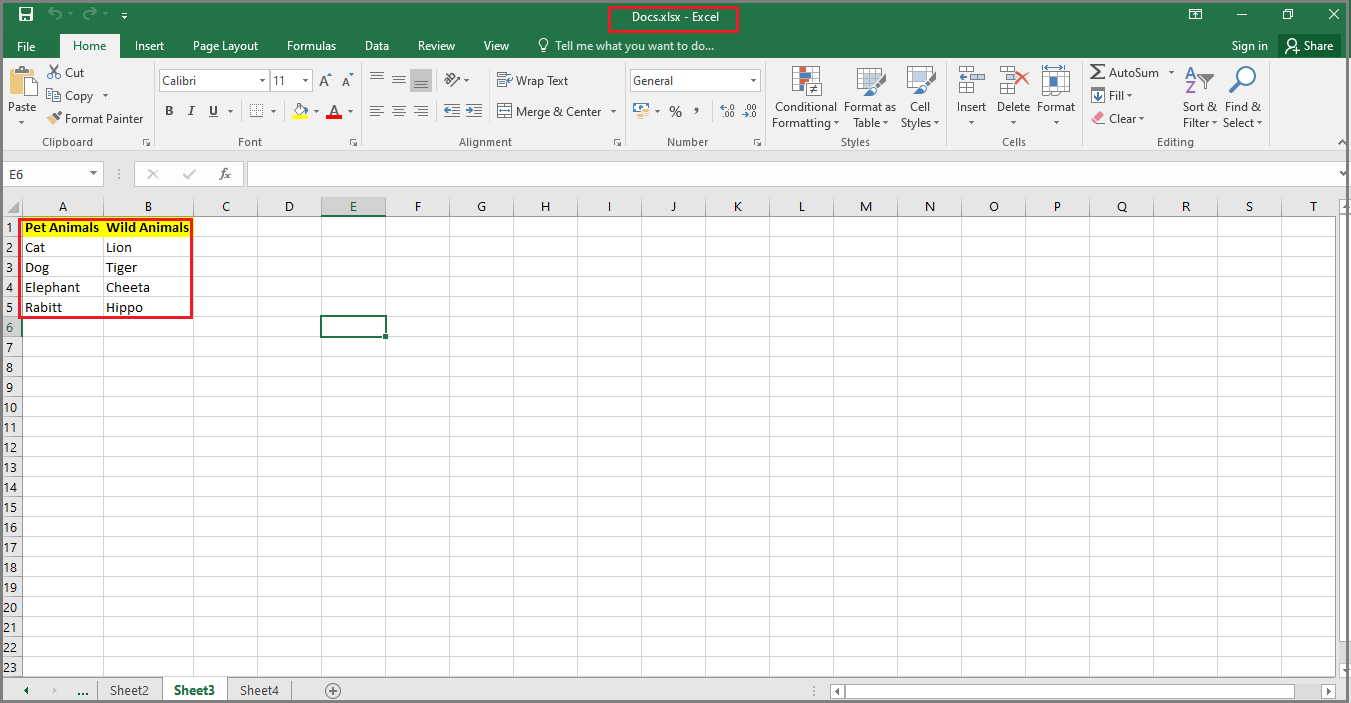
12.Cognitive Automation
Cognitive Automation Process is a pre-trained automation technology, it automates specific business processes and accepts less data before making an impact.
Say “No Manual” to manual document processing. Our cognitive technology is ready to take over your manual and boring document processing work. It can capture data from any unstructured documents like invoices.
Invoice capture (also known as invoice data extraction or invoice OCR) is the process of obtaining structured data from invoices to process them mechanically/Automatically. For most businesses, invoice capture was the first back-office operation to be automated with AI.
For Example, Employee onboarding bots and other cognitive automation tools can aid by automating a variety of tasks in a rapid, efficient, predictable, and error-free manner. Before they even sit at their desk for the first time, this can entail generating computer credentials and Slack logins automatically, enrolling new recruits in department-specific pieces of training, and organizing recurrent meetings with their managers.
12.1.Parse Invoice
The Parse Invoice command is used to create an Invoice Instance in the Process Bot One. Now let us see, how to create an instance of invoice and train your bot:
- Login to your Process Bot One using your login credentials.
- Click on the Cognitive Bot.
- Once you click on the Cognitive Bot, you will navigate to the Invoice Instance List, which is as shown below.
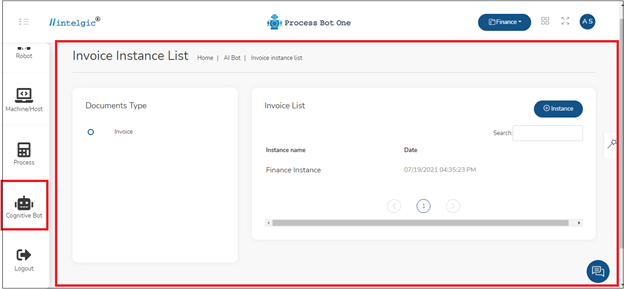
- To create a new instance, click on the + Instance
- Next, Add invoice instance page will open, which is as shown below.
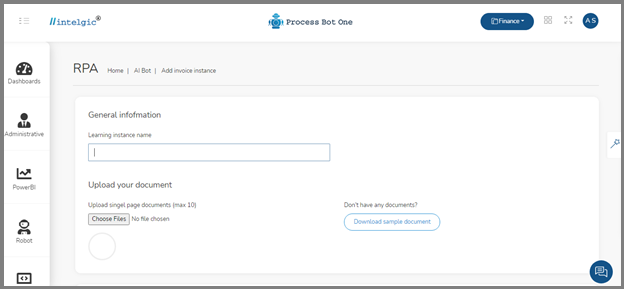
- Enter the name of the instance under the Learning Instance Name.
- Next, upload the sample invoice document, which you want to train to your bot.
- You can upload a maximum of 10 invoice documents at once to train your bot.
- In the image below, I have uploaded one invoice document.
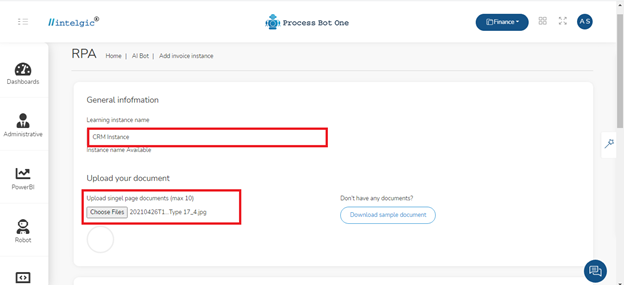
- Scroll down the Add invoice instance page, you will find Standard Form Fields and Standard Table Fields
- Where the standard form fields are related to the invoice and the standard form field values are always unique. For example, Invoice Number, Invoice date, Invoice Owner, etc.
- And, the Standard table fields are related to the item/product. For example, Item description, Item quantity.
- Now, select the standard form fields which are present in your invoice document.
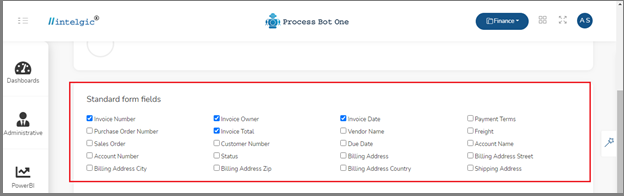
- In the below image I have selected the fields, which are present in my invoice document.
- In the same way, I have selected the standard table fields, which are as shown below.

- In case your invoice is having any standard form fields or standard table fields and if the option is not present in the orchestrator then you can mention that in the other fields(optional) and click on the Add as Form/ Add as Field
- After adding all the details click on the Create instance and analysis button, as shown in the image below.
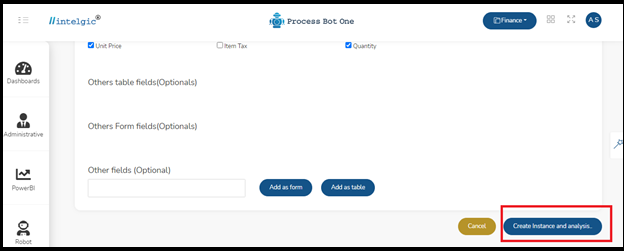
- Next, the Data page will open, which contains three parts as Fields, Fields Value, and an Invoice image that we have uploaded. Which is as shown below.

- Here, we are going to train our bot by creating an invoice instance. The first step is to select the field under the fields list.
- Next, select the field from the Fields list and,
- Then move your cursor on the invoice,
- And select the same field value in the image and draw a rectangle box,
- So that the value will be automatically added under the respective field in the Fields Values drop-down list.
- For example, if you select Invoice Number in the fields, then you have to draw a rectangle box on the invoice number in the invoice.
- In the below image you can see that I have selected the Invoice number and drawn a rectangle box on the invoice number in the invoice image, then automatically, the invoice number will be copied to the invoice number in the values of the field.
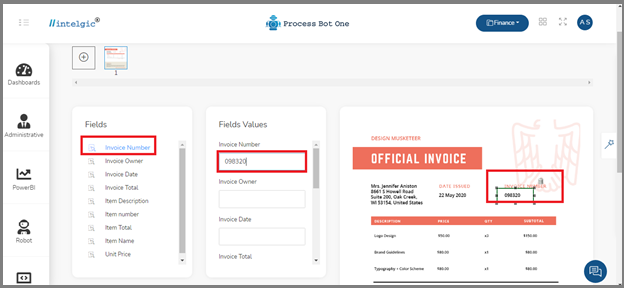
- As soon as you draw a rectangle on the invoice number, automatically the numbers will be captured under the Fields Values.
- Next, click on the Instance and Analysis, so that the details will be added to your bot.
Note: If you have multiple items in your invoice then, you can select either first or second row items to train your bot.
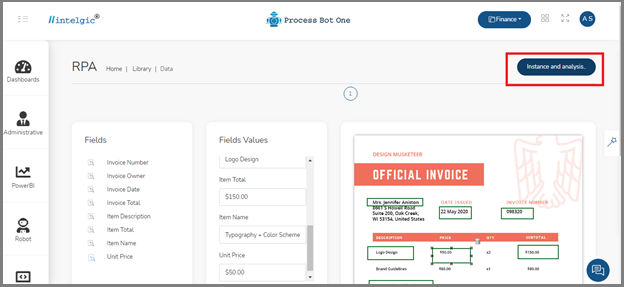
- Now, you can see the list of instances created. This is as shown in the below image.
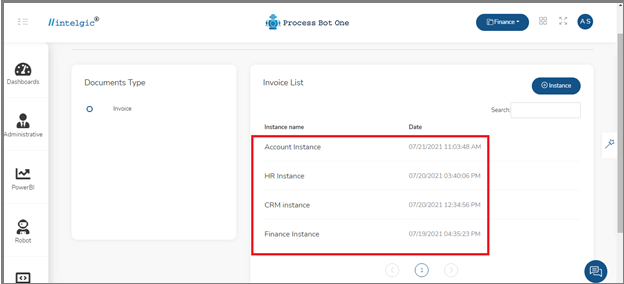
- This is how you can create and train your bots.
- Our next step is to parse the created instance and extract the parsed data from the Process Bot One to Process Bot DWmaker.
- What is parsing: The process of examining a string of symbols, whether in normal language, computer languages, or data structures, according to the principles of formal grammar is known as parsing, syntax analysis, or syntactic analysis.
- To obtain an invoice parse, the Process Bot One should be always connected with the Process Bot DWmaker.
- Now, open the Process Bot DWmaker and click on the Parse Invoice under the Cognitive Automation drop-down list, which is as shown in the below image.
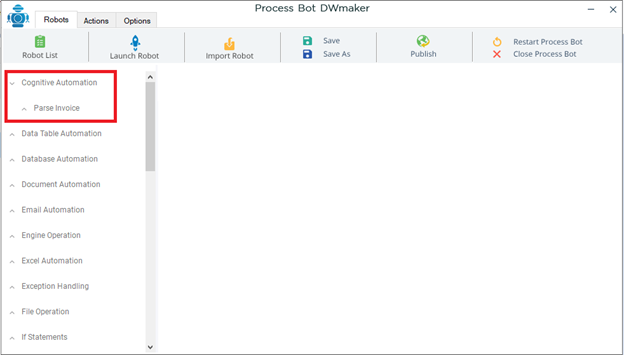
- Once you click on the Parse Invoice, the Instruction Properties pop-up window will open which is as shown in the below image.
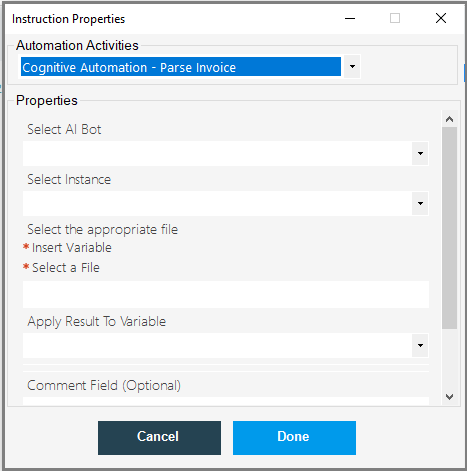
- Now, click on the Select AI Bot drop-down list and select the Invoice as shown below.
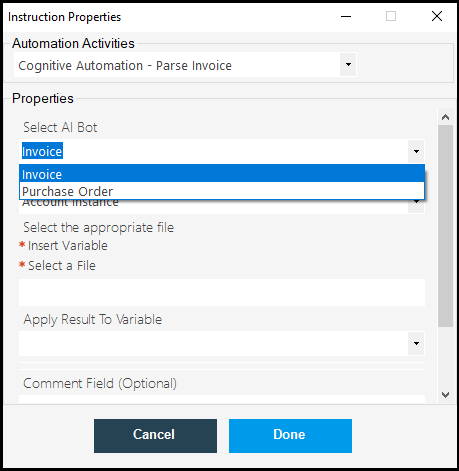
- Next, click on the Select Instance drop-down and select an Instance from the drop-down list, to which instance data you want to parse.
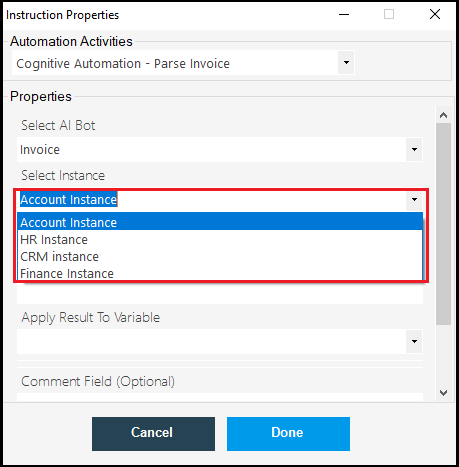
- Next, we have to select a file(a sample Invoice document) to parse data. So, click on the Select a File under Select the appropriate file.
- Enter variable name(The variable name should not contain space), In the below image I have created a variable name asParsed_Data.
Note: It is always good practice to declare a variable in the below syntax format.
v.Variable_Name
- And then click on the Done button.

- Next, select the Show Message option under Miscellaneous Operation.

- As soon as you click on the Show Message, and Instruction Properties pop-up window will open, enter the variable name under the insert variable and click on Done.
Note: The variable name should be always enclosed in a square bracket[].
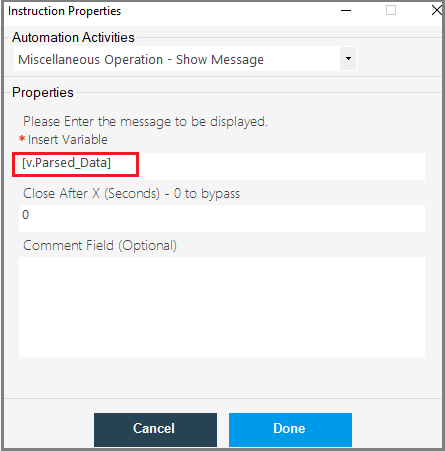
- Next, click on Save on the Process Bot DWmaker.

- Next, click on the Action Tab, and then click on the Run button.
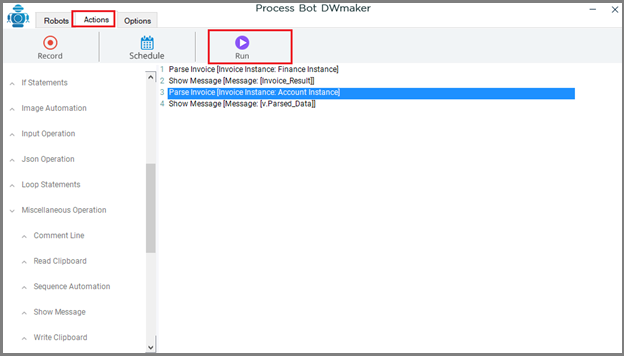
- Once you click on the Run, the robot will start working and the Message box pop-up window will open.
- Which contains the parsed data of the Invoice.
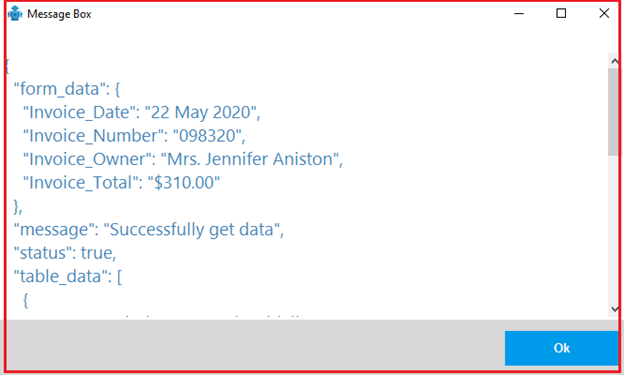
- You can also select which code you want to execute or if you don’t want to execute, then, you can disable the code from being executed.
- In the below image, I have three codes, right-click on the code which you want to disable and then, select the disable selected code option, then the selected code will not execute.
- In the same way, you can enable, disable or Pause Before Execution, Cut Selected action(s), Copy Selected Action(s), Paste Selected Action(s).
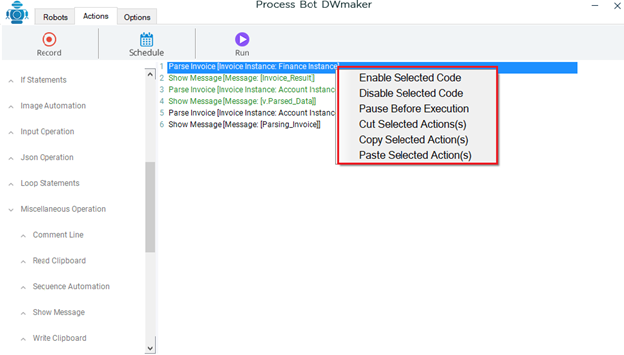
13.Email Automation
Email automation is the capability to send relevant information to subscribers via time or activity-driven emails. Email automation may be used for a variety of objectives.
Email automation makes email marketing more effective, customized, and relevant, whether it’s a triggered workflow that helps nurture new leads, birthday greetings that add a personal touch, or automatic blog updates that take the work out of staying in contact with your audience.
One of the most efficient techniques of interacting with prospective customers and followers who have a genuine interest in following a business or brand’s updates is to use automation for email campaigns. You won’t have to miss another chance to create leads, sales, or money using email automation solutions.
The DWmaker is associated with three Email automation commands. Which are listed below:
- IMAP Get Mail: This Command Permits the user to read all the emails in their inbox, these emails can be read or unread as well.
- POP3 Get Email: This command will allow users to read all the emails using a robotic process.
- Send SMTP Email: This command option will allow a user to send responses to the email.
- Outlook Get Email: This command option will read your email from outlook.
- Send Outlook Get Email: This command option will send an email to ur recipient.
Let us see how to use these commands in Email Automation:
13.1.IMAP Get Mail
The IMAP Get Mail command is used to check all the read or unread emails in your inbox. Now let us check for the new messages using the DWmaker tool. Click on Email Automation command, you can see the sub-commands which are as shown in the below image.
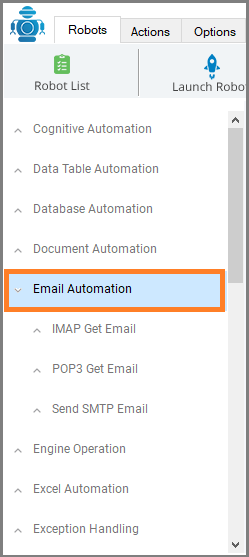
Click on the IMAP Get Email command, once you navigate to the Instruction Properties pop-up window, which contains the below details.
- IMAP Server Name: In this field, you need to insert the IMAP server name of your specific mailing domain whose emails you want to automate. Each email domain such as Yahoo, Hotmail, Gmail, etc, has its own IMAP server name.
- Port: Likewise, the server names each email domain as yahoo, Hotmail, Gmail, etc. has its own port. So, in the port field, you need to provide the port of the email domain whose emails you want to automate.
- SSL/TLS: Here, you need to select an option as SSL or TLS. This will indicate that the specific email domain is secured with SSL or not.
- Username: In this field, you need to insert the respective email id or username whose email you want to automate.
- Password: Here, insert the password for the specific email id.
- Select Message Option: Here, you can select what kind of email you want to automate either read, unread, or all.
- Select Message Format: In this field option, you need to provide as you want to read an email with text format or HTML, if you choose HTML here, you can simply read the email with newsletter or images as well.
- Filter by Subject: Here, enter an email subject, so that the tool will show you only the results with the respective email subjects. This email subject can be a sentence, reference code or id, a single word, etc.
- Email Datewise filter Options: This option helps you to filter emails according to the given date.
- Enter Date to filter/ Insert Variable: You can enter the date, which you wanted to filter or, click on the select file to create a variable to hold the given date.
- Save Attachment In: In this field, you need to input a path or location of a particular folder, in your computer system, where you want to save the attached files of the emails.
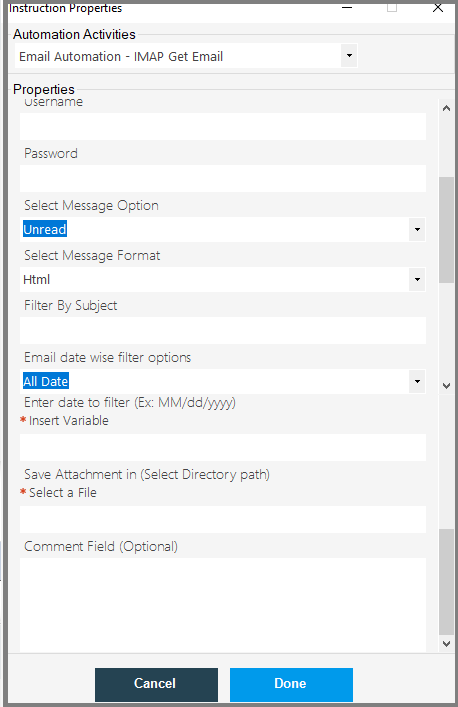
- Now enter all the details in the IMAP Get Email, instruction property window as shown below, and then click on Done.
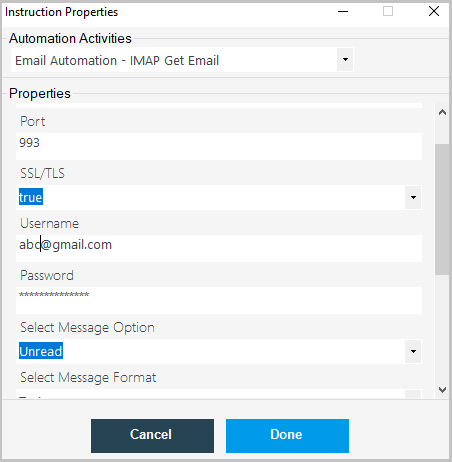

- Now we have to print the email in the output message box, click on Show Message options under Miscellaneous Operations, which is as shown below.
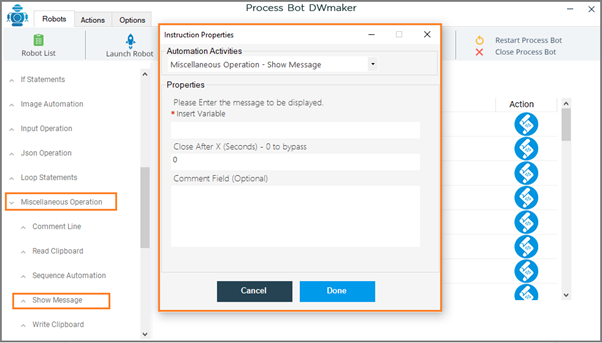
- Once the Instruction properties pop-up window will open, click on Insert Variable.
- Once you click on the Insert Variable, a pop-up window will open, which contains some predefined variables available in the dropdown list.
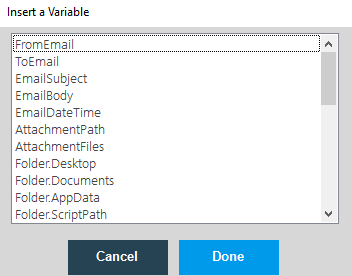
- By using these commands you can simply create single or multiple options separately.
- From Email: this predefined variable provides you the name or email of the email sender.
- To Email: This predefined variable helps you to get the email id of the receiver.
- Email Subject: with this, you will get the email subject.
- Email Body: This predefined variable will help you print the email content.
- Email Date Time: This predefined variable will help you to get the date and time of a particular email.
- Attachment Path: With this, you will get the path or location of the file or folder within your computer system from where you want to attach a file to an email.
- Attachment File: With this, you will get the attached file with an email.
- By using these commands you can simply create single or multiple options separately.
- Once done filling in all the required details and print the message using the “Show Message” property window, press the “Done” button.
- Now save the process by clicking on the “Save” button and run the program by pressing the “Run” button under the “Actions” tab
- Once you run the robot it will show you the required result in the sow message pop-up window.
13.2.POP3 Get Mail
Post Office Protocol (POP3) is an acronym for Post Office Protocol. It lets you utilize your email inbox like a post office, with emails being downloaded to your computer and then deleted from the mail server. When you use the POP3 protocol to access your emails, a copy of the emails is produced and saved locally on your computer.
- Similar to IMAP, the POP3 Get Email also helps to automate emails via a robotic process, but this POP3 allows users to read only “Unread” emails. To read an email with the POP3 Get Email method, select and click on the “POP3 Get Email” command option, which is listed under the “Email Automation”. See the image.
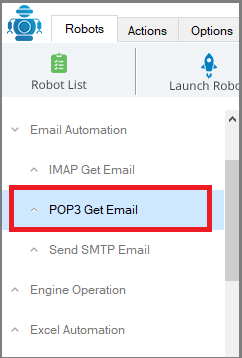
Once you click on POP3 Get Email, the Instruction Properties pop-up window will open, enter all the required details and then click on Done.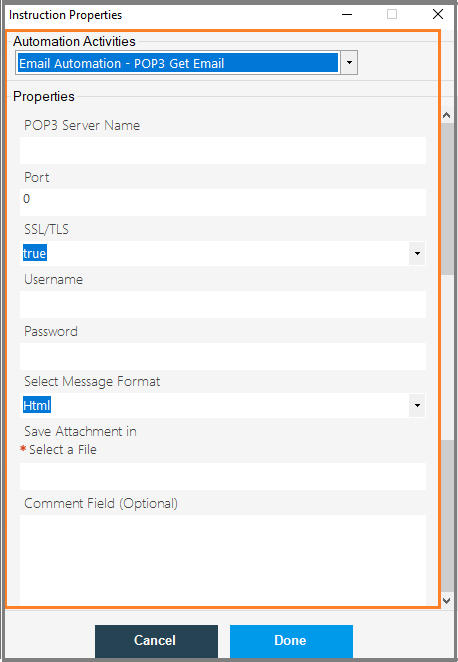
- Here on the “POP3 Get Email” property screen, we have:
- POP3 Server Name: In this field, you need to insert the POP3 server name of your specific mailing domain whose emails you want to automate. Each email domain such as Yahoo, Hotmail, Gmail, etc, has its own POP3 server name.
- Port: Likewise, the server names each email domain as yahoo, Hotmail, Gmail, etc. has its own port. So, in the port field, you need to provide the port of the email domain whose emails you want to automate.
- SSL/TLS: Here, you need to select an option as SSL or TLS. This will indicate that the specific email domain is secured with SSL or not.
- Username: In this field, you need to insert the respective email id or username whose email you want to automate.
- Password: Here, insert the password for the specific email id.
- Select Message Format: In this field option, you need to provide as you want to read an email with text format or HTML, if you choose HTML here, you can simply read the email with newsletter or images as well.
- Save Attachment In: In this field, you need to input a path or location of a particular folder, in your computer system, where you want to save the attached files of the emails.
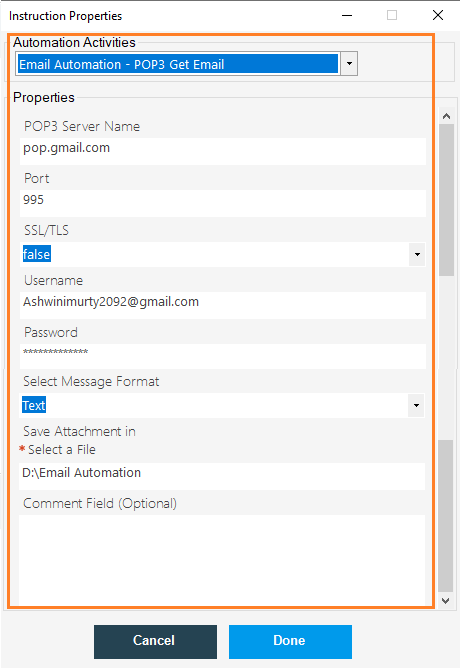
- Now save the code and go to the Actions tab and click on the Run
- Once the robot runs successfully, the robot will show you all the unread emails in your mail inbox.
13.3.Send SMTP Email
Simple Mail Transfer Protocol (SMTP) is an application used by mail servers to send, receive, and/or relay emails between senders and receivers. Let us see how to use Send SMPT Email command in DWmaker.
Click on the Send SMTP EMail command under Email automation, once the Instruction properties pop-up window will open, enter all the details and then click on Done.
The SMTP Instruction property window contains:
- Host Name: In this field, you need to insert the hostname of your specific mailing domain. Each email domain such as Yahoo, Hotmail, Gmail, etc, has its own host server name.
- Port: Likewise, the hostnames of each email domain as yahoo, Hotmail, Gmail, etc. have their own host server port. So, in the port field, you need to provide the port of the email domain whose emails you want to automate.
- Username: In this field, you need to insert the respective email id or username whose email you want to automate.
- Password: Here, insert the password for the specific email id.
- From Email: Here you need to insert the email address of the sender.
- To Email: In this field, you are required to insert the email address of an individual to whom you want to send a reply.
- Subject: Here, you need to insert the email subject.
- Body: In this field, you need to fill in the email content that you want to send in the reply.
- Attachment Path: In this field, you can add the location of the file that you add and send with the email.
- Enter all the details and then click on Done.
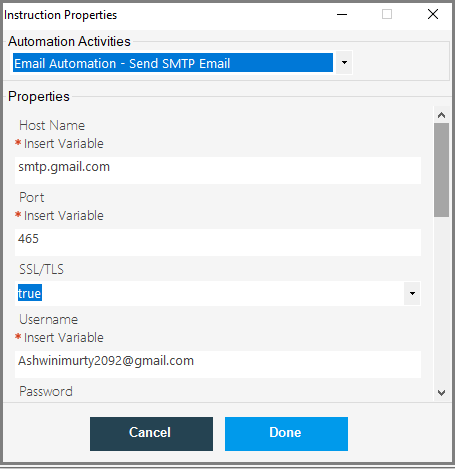
- Now, save the code and go to the Actions tab and click on Run.
- Once the robot runs successfully, the robot will send a replay to the given email.
13.4.Outlook Get Email
The Outlook Get Email command is used to read the email from your outlook. Let us see how to perform this operation using the DWmaker automation tool.
Click on the Outlook Get Email command under Email Automation, once the Instruction Properties pop-up window will open, enter the details as shown below:
- Enter the Outlook email account id: enter your outlook email id here.
- Enter the folder name(Default is Inbox): enter your email folder name, here, by default it will take folder name as Inbox.
- Enter the subfolder name.
- Select Message format: click on the drop-down list and select the HTML/ Text
- Next, click on the Mark as Read drop-down list and select whether yes/no, if you select yes, then the messages it will going to read will be marked as read, or else this will skip your read emails.
- And then, click on the Read unread emails only drop-down and then select yes/no.
- Next, enter the subject name to filter the email via subject, here you need to mention the exact subject line.
- Next, you have an email date wise filter option, which you can select from the below available options
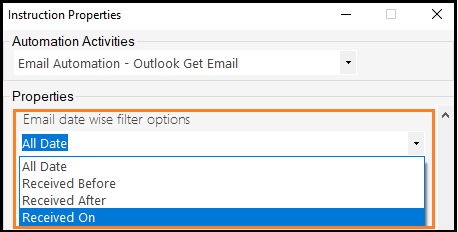
- Next, enter the date to filter.
- Next, click on the Select File /Insert File and select the file path location to save the attachments in your local drive.
- Now click on Done.

- You can see an unread mail in my outlook inbox which is as shown below.
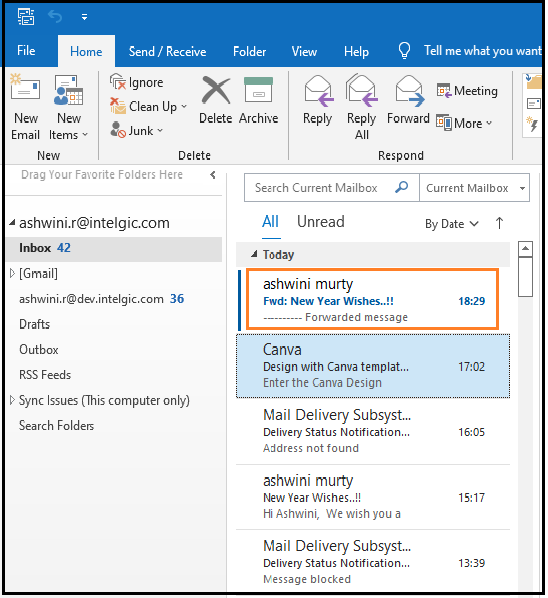
- Once you save the code, the automatic loop will be created which is as shown below.
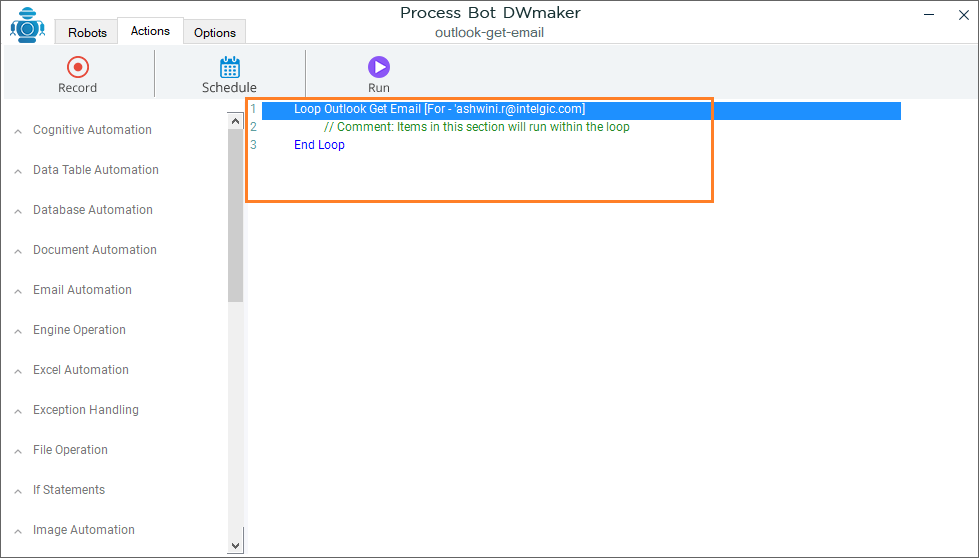
- Now click on the Run button.
- The core will be run successfully.
- Now, go to the outlook and verify, the email will now be marked as read.
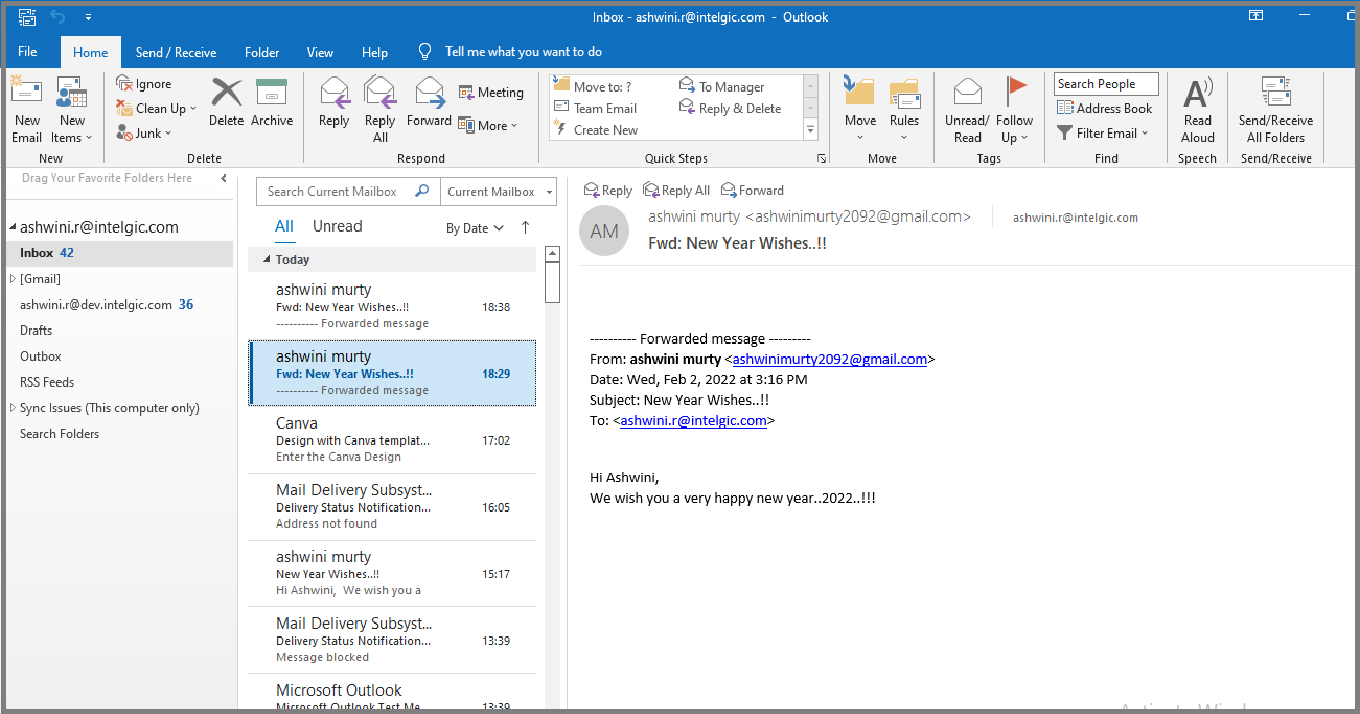
- This is how an outlook get email command helps users to perform tedious tasks.
13.5.Send Outlook Email
The Send Outlook Email command is used to send an email to single or multiple recipients with attachments.
Let us see how to perform this automation using the DWmaker automation tool.
- Click on the Send Outlook email command under the Email Automation command.
- Once the Instruction Properties pop-up window will open, enter the details as shown below.
- Enter the sender’s email address: Here you need to enter the outlook email address.
- Enter the recipient email address, if you want to send to multiple recipients, then you can separate email id with a semicolon(;)
- Next, you can enter the Cc, Bcc, subject line, and the Body of the email.
- Next, select the email body type from the drop-down list.
- Next, attach the files/documents if you have them, and then click on Done.
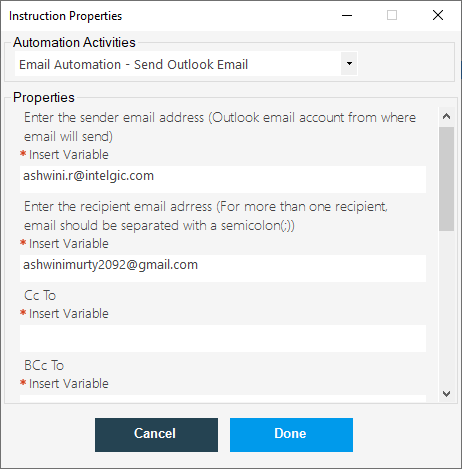
- Now save the code and click on run.
- Once the robot runs successfully, the email which you have written will be sent to the given recipient.
- To verify, check with your recipient’s email.

- This is how you can easily send emails to multiple recipients using Send outlook email command.
14.Text File Operation
A text file is a separate Notepad file kept on our computer system in which we may store and preserve any line of data (single or many). These text files can include data such as numbers, non-executable files including letters, symbols, and a combination of letters and numbers, and non-executable files containing letters, symbols, and a combination of letters and numbers. It allows you to create and save text files without any particular formatting, and these files may be saved using (.txt extension).
We can perform Read text files and Write text files operations using the DWmaker automation tool.
- The Write Text File is used to write the text in the given text file. Click on the Write Text File command under Text File Operation.
- Now the “Write Text File” property window will ask you to provide some details in the respective fields. Where, in the first field, you need to provide the file path or a file name in which you want to write some text. While in the second field you need to provide the text that you want to write in a file, and in the third field, you are requested to select a particular option as “Append” or “Overwrite”. Here;
- Append The new text that you want to write in a file. “Append” also keeps the previous text of the file as well and shows the result with the old text of the file along with the newly added text as well.
- Overwrite: If you select the overwrite option, then it will remove the old text and show results only for the new text.
- Once the Instruction Properties pop-up window will open,
- Indicate the file path location
- Indicate the text to be written
- Select the overwrite option
- And then click on Done.
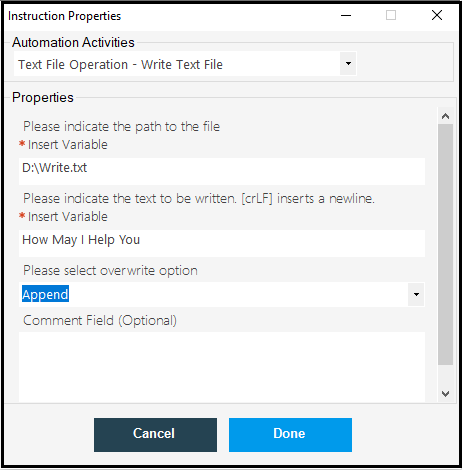
- Now, save the code and go to the Actions tab and then click on Run.
- Once the robot runs successfully, the given text will be written in the text file.
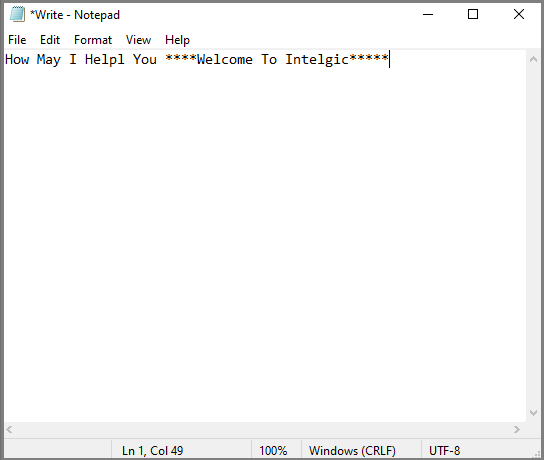
In the same way, if you select overwrite option, the current text will be replaced with the new text.
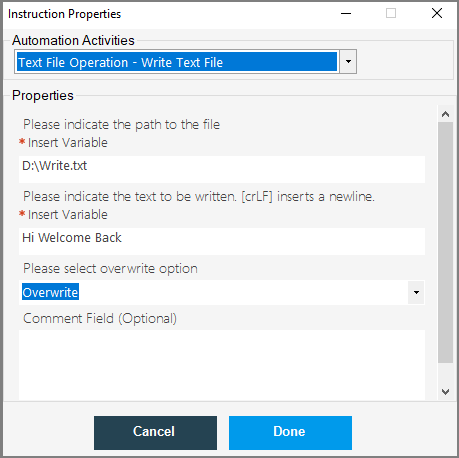
- Save the code and Run, the old text will be replaced with the new one.
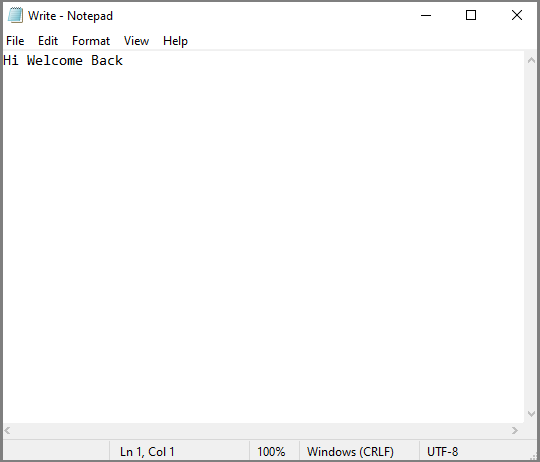
14.1.Read Text File
- The read text file is used to read the given text file. Click on the Read Text File under the Text File Operations, which is as shown below.
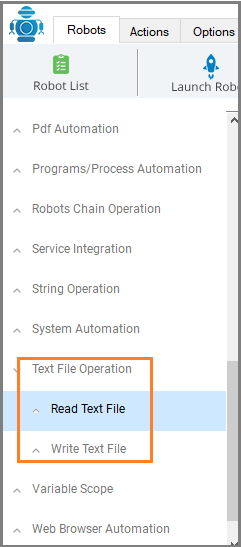
Once you click on Read Text File, An Instruction Properties pop-up window will open, click on Select File, and enter the file path location and then predefine a variable where the test file is present.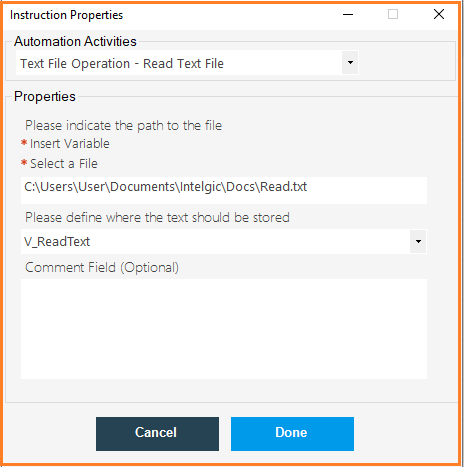
- Now, click on Show Message under Miscellaneous Operations, once the Instruction Properties window will open enter, a pre-defined variable name, and then click on Done.
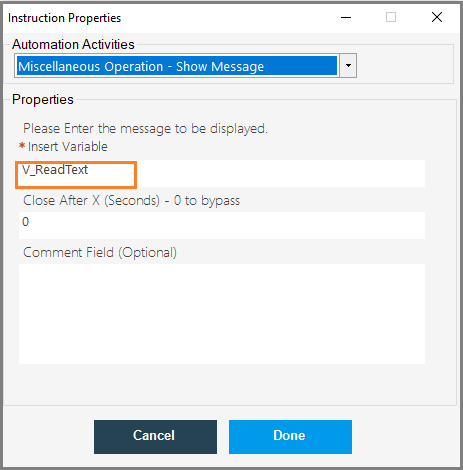
-
Now, save the code and then go to the Actions tab and click on Run.
-
Once the robot runs successfully, the text which is present in the text file will be displayed on the output Message Box.
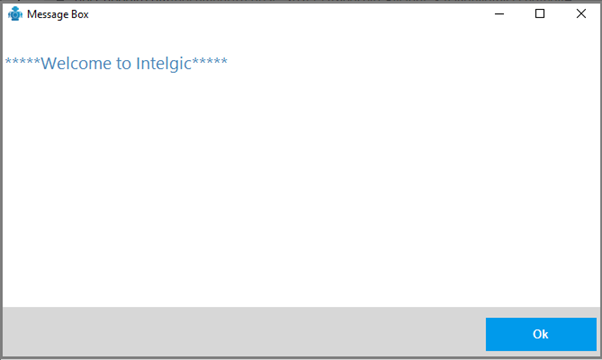
14.2.Write Text File
- The Write Text File is used to write the text in the given text file. Click on the Write Text File command under Text File Operation.
- Now the “Write Text File” property window will ask you to provide some details in the respective fields. Where, in the first field, you need to provide the file path or a file name in which you want to write some text. While in the second field you need to provide the text that you want to write in a file, and in the third field, you are requested to select a particular option as “Append” or “Overwrite”. Here;
- Append The new text that you want to write in a file. “Append” also keeps the previous text of the file as well and shows the result with the old text of the file along with the newly added text as well.
- Overwrite: If you select the overwrite option, then it will remove the old text and show results only for the new text.
- Once the Instruction Properties pop-up window will open,
- Indicate the file path location
- Indicate the text to be written
- Select the overwrite option
- And then click on Done.
- Now, save the code and go to the Actions tab and then click on Run.
- Once the robot runs successfully, the given text will be written in the text file.
In the same way, if you select overwrite option, the current text will be replaced with the new text.
- Save the code and Run, the old text will be replaced with the new one.
15.File Operations
A file is an abstract datatype. To correctly define a file, we must examine the actions that may be performed on it. File operation is the process of accessing the file within a computer system, a user can perform many operations in a file as create, delete, download, read, rename a file or so much. To perform such operations with a robotic automation process we have multiple command options in our DWmaker.
DWmaker is associated with the below commands to perform automation operations such as:
15.1.Check Path Exists
Check Path Exists:
- The Check Path Exists command helps us to verify whether the file path exists or not.
- Open Dwmaker and click on Check Path Exists under File Operations.
- Once the Instruction Property pop-up window will open, enter,
- File path location
- Insert a pre-defined variable name to hold the file path

- Next, we have to display the output in the output message box, if the given path exists then the robot will return True else return False.
- Click on the Show Message option under Miscellaneous Operations, once the Instruction properties pop-up window will open, enter pre-defined variable name inside the square bracket as shown below.

- Now save the code and, go to the Actions tab and click on Run.
- Once the robot runs successfully, the result will be displayed on the output message box.

- I will change the file path location, and execute the code.
- Now, save the code and run.
- The output is as shown below.
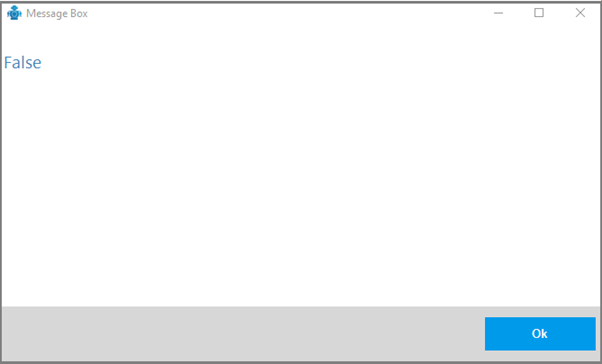
- This is how we can check whether the given file path exists or not using simple automation steps.
15.2.Create File
- The Create File command helps us to create a new file in the given location.
- Let us see, what are the steps involved in this process.
- Our first step is to click on Create File command under File Operations.
- Once the Instruction Properties pop-up window will open, enter,
- Folder path location to create a file.
- Enter the file name with extension
- Click on Done.
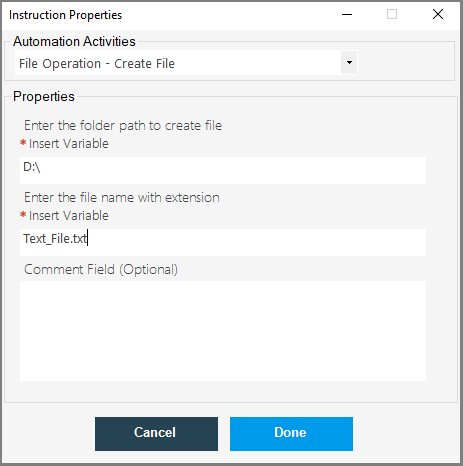
15.3.Create Folder
The create Folder command helps us to create a folder in the given location. Let us see what are steps need to be followed.
- Open DWaker and click on Create Folder under File Operation.
- Once the InstructionProperties pop-up window will open, enter
- Indicate the path to create a folder then click on Done.
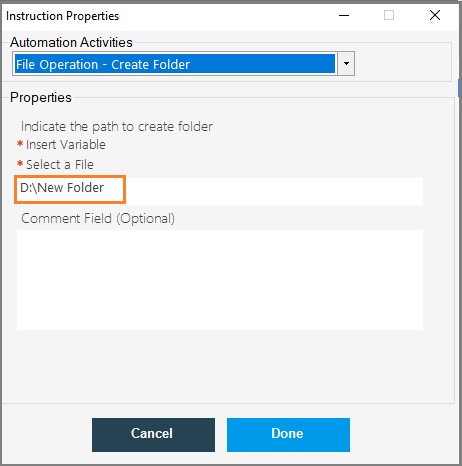
-
Now, save the code and go to the Actions tab and then click on Run.
-
Once the robot runs successfully, the new folder has been created in the given location.
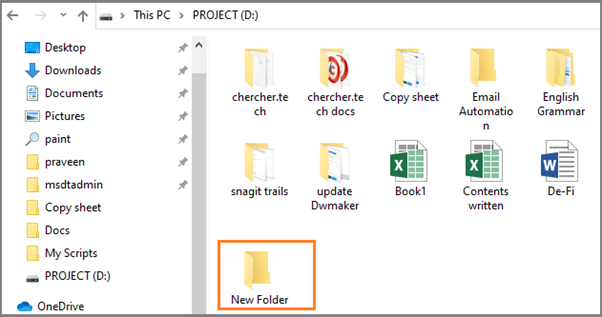
- This is how you can create a new folder using the DWmaker automation tool.
- Indicate the path to create a folder then click on Done.
15.4.Download File
The Download File command helps us to download the given file.
- Indicate the path of the source file URL: In this field, you need to insert the specific location or web URL of the file that you want to download.
- Indicate the download file directory path: Here, you need to insert a particular location of a directory or folder of your system, where you want to keep the downloaded file.
- Indicate the download file name with extension: Here, insert a unique name with which you want to save the file along with an extension such as “.txt”, “.pdf”, “.png”, etc, of a file that you are downloading.
- Select the variable to receive the download status: Here, insert a variable name in which you want to get the result.
-
Click on the Download File command under File Operations, once the Instruction Properties pop-up window will open, enter,
- Indicate the source file path
- Indicate the download file directory path
- Indicate the download file name with extension
- Select the variable to receive the download status.
- Next, click on Done.
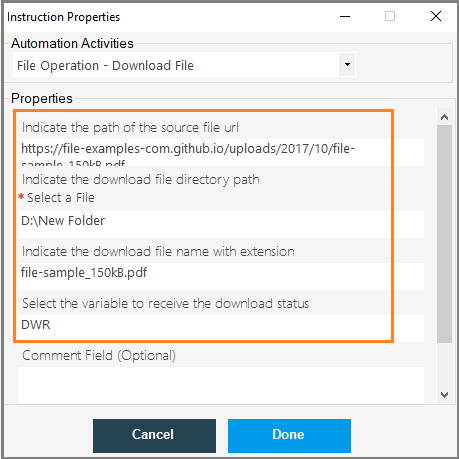
-
Now save the code and go to the Actions tab and click on Run.
Once the robot runs successfully, the file will be downloaded to the given location. Which is as shown below.
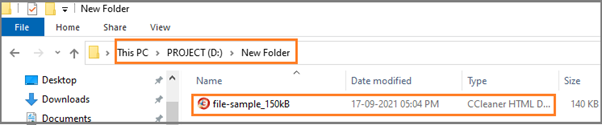
-
This is how we can easily download any file in the given location using the DWmaker automation tool.
15.5.Delete File
The Delete File command is used to delete files in the given folder.
- Click on the Delete File command under File Operation, once the Instruction Properties Pop-up window will open, enter the file path location and then click on Done.

-
Save the code and go to the Actions tab and then click on Run.
-
Once the Robot runs successfully, the given file will be deleted.
15.6.File Change Trigger
The File Change Triggers helps Either in private or nonprivate firms, sometimes individuals are required to work by sharing their PCs where they have to get in knowledge if there is any new activity that has been done in their system such as creating or deleting any particular file, etc.
So, to get such updates using the DWmaker, select and click on the “File Change Trigger” option listed under the “File Operation” command. See the image.
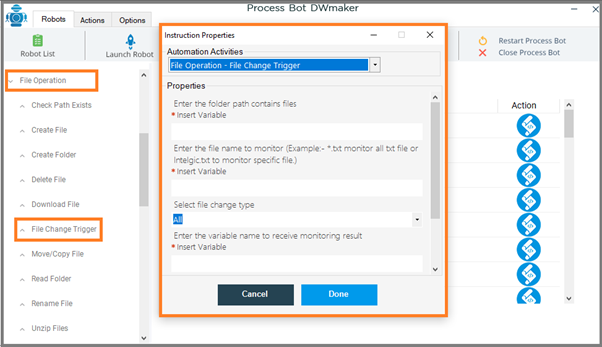
- Now, the File Change Trigger property window will ask you to insert some details in it, where:
- Enter the folder path containing files: Here, provide the directory/folder path of a file in your computer that you want to monitor.
- Enter the file name to monitor: Here, enter the name of a specific file/folder that you want to monitor. Also, make sure to insert a file name followed by a wildcard operation such as *. For example, (Filename*). Such operations indicate that the file name will start with specific text and are also allowed to read any files like doc file, notepad file, given to the case-sensitive Documentation, etc.
- Select file change type: Here, a few different options are listed in a dropdown, you can choose one as per your need.
- All: Selecting this option you will update each activity that has been done in the particular file/folder.
- Created: This option will update you only if a new file has been created.
- Deleted: This option will update you only if any file will be deleted from the directory.
- Changed: This option will update you only if something has been changed in the file.
- Renamed: This option will only update you if a file goes renamed.
- Enter the variable name to receive monitoring results: Here, provide a variable name in which you want to get the updates.
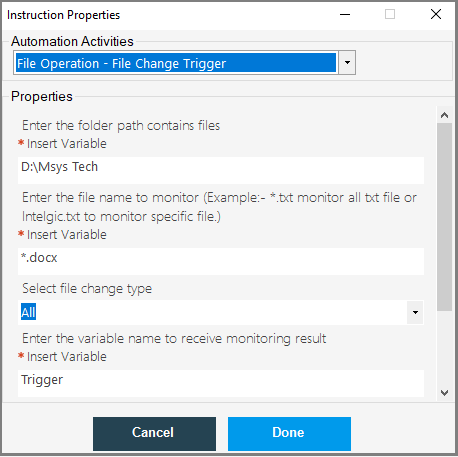
- Next, click on the Show Message command under Miscellaneous Operations, and enter the predefined variable name under the insert variable.
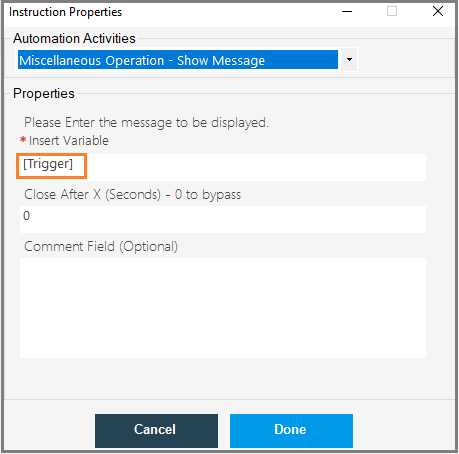
- Now, save the code and go to the Actions tab and then click on Run.
- Once the robot runs successfully, if you make any changes to the given file, you will get a notification in the output message box.

15.7.Move a File
- The Move/Copy file helps to move your file from one place to another file or copy file from one file to another place.
- Click on Move/Copy file under File Operation as shown below
- Once the Instruction Property window will open, enter the below details as shown in the below image and click on done.
-
Next, save the code and go to the Actions tab and then click on Run.
-
Once the robot runs successfully, the given has been moved to the given location.
-
This is how we can easily move or copy files from one location to another location using the DWmaker automation tool.
15.8.Read Folder
The Read folder command is used to read a given folder. To read a folder, using the DWmaker tool, first, we need to create a data table instance because the robot requires a virtual data table to return the list of files contained in a folder in the form of a well-managed table with including the file name, file size, and date of a file created.
- To create a data table instance, click on the Assign Data Table, under the Data Table Automation command, which is as shown below.

-
Once the Instruction Properties, a pop-up window will open, enter all the required details and click on Done.
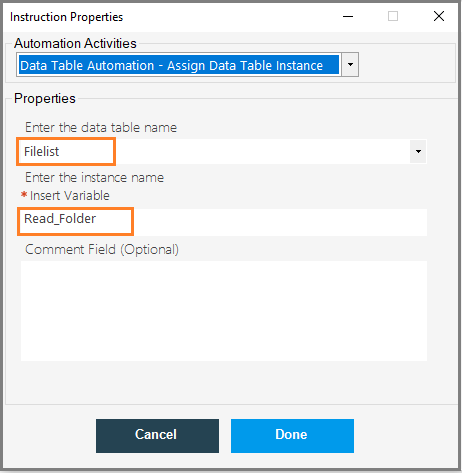
-
Next, click on the Read Folder command under File Operation and enter all the details and then click on Done.
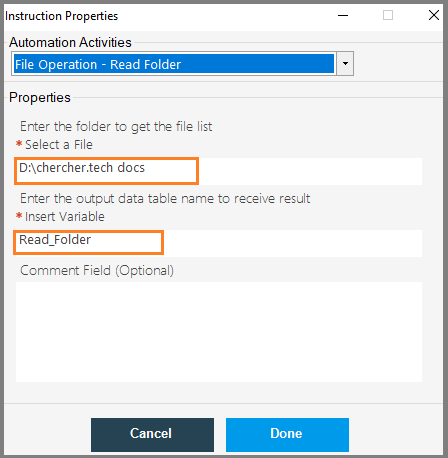
- Next, click on the Preview Data Table under Data Table Automation and enter the required details.
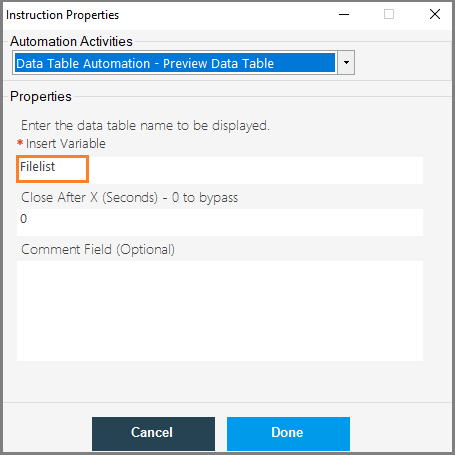
- Next, Save the code and go to the Actions tab and click on Run.
- Once the robot runs successfully, the preview data table will be printed as shown below.
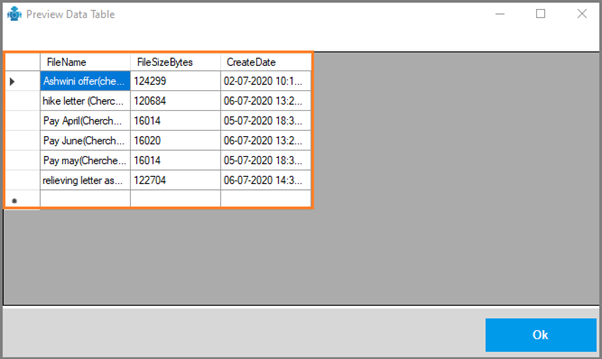
15.9.Rename File
The Rename File command is used to Rename or Change the name of a particular file using DWmaker automation. Click on the Rename File option under file operation, which is as shown below.
Once the Instruction Properties, a pop-up window will open, enter the required details as shown in the below image.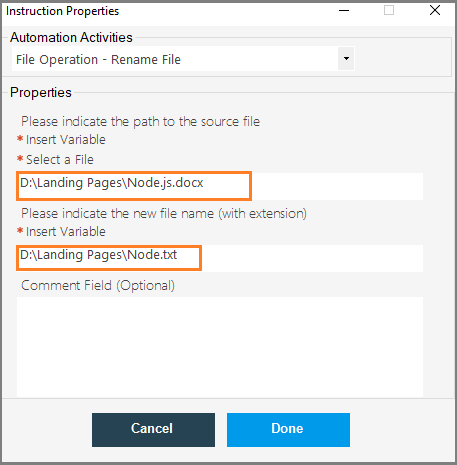
Next, click on Save and then go to the Actions tab and then click on Run.
Once the robot runs successfully, the file name will be changed to the given name.
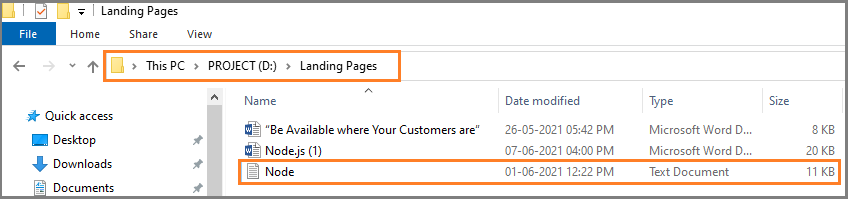
15.10.Zip/Unzip Files
The Zip/Unzip command is used to zip/unzip the given file. First will see how to zip a given file.
How to Zip File:
- Click on Zip file, under File Operation, once the Instruction Properties pop-up window will open, enter a file path to zip a file and then enter the file path to save the zipped file.
- And, then click on Done.
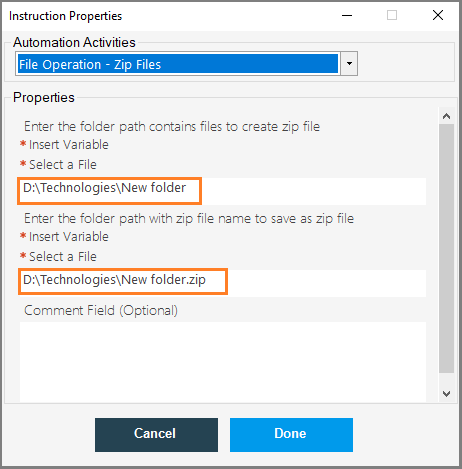
- Now, Save the code and then, go to the Actions tab and click on Done.
- Once the robot runs successfully, the given has been saved in the given location as a zipped file.
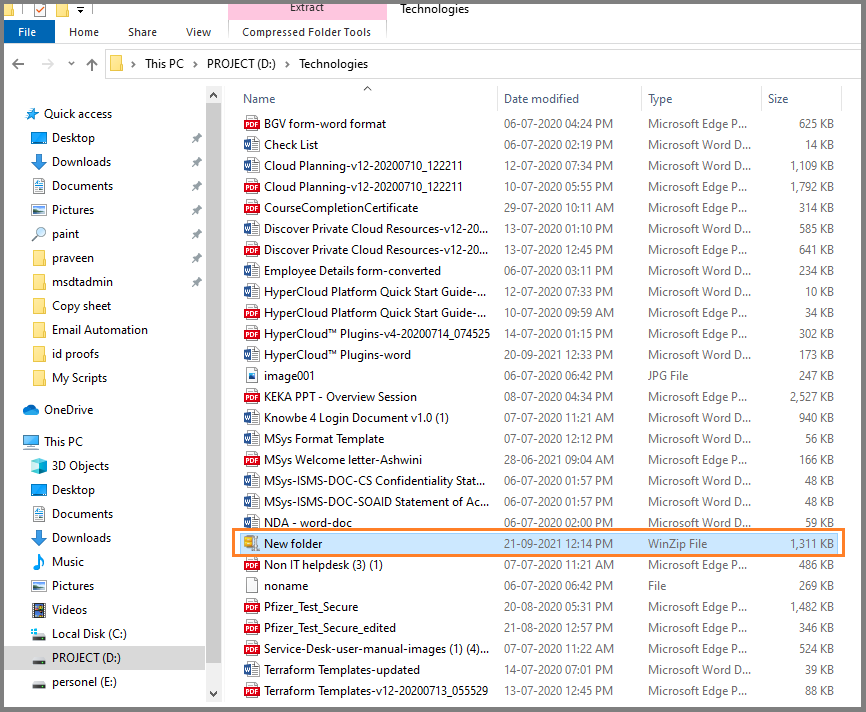
15.11.How to Unzip a File:
- The Unzips file is used to unzip the given file.
- Click on Unzip a File command under File Operation, once the Instruction Properties pop-up window will open, enter the file path location of the zip file and then enter the file path to extract the zipped file.
- And, then click on Done.
- Now save and code and go to the Actions tab and then click on Done.
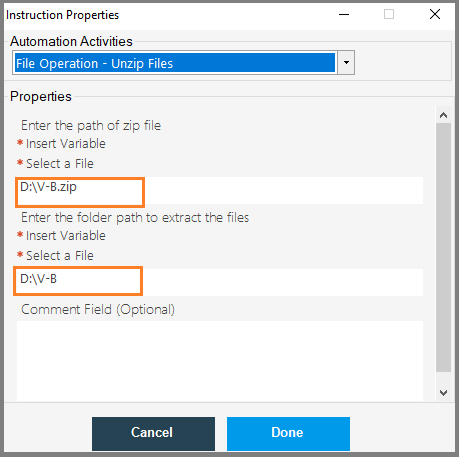
- Once the robot runs successfully, the zipped file has been extracted in the given file location as shown below.
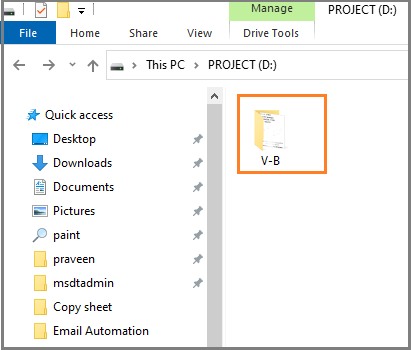
- Once the robot runs successfully, the zipped file has been extracted in the given file location as shown below.
15.12.Wait For File
The Wait for File is a signal-in activity that checks for file creation, modification, or deletion events during the process execution. The process instance suspends and waits for the specified change to occur before resuming when this activity is completed.
For example, whenever we open or download a file on the webserver then sometimes it may take a few times to open that particular file. This file loading time just depends on the size of that file.
While if a file is not available on the PC then it will not get opened by the robotic automation process. In such cases, we provide a specific time to the robot to check the computer system and then open it in the given time interval if it exists in the PC.
To use this operation in DWmaker, first, click on the Wait for File option under the File Operation command, which is shown below.
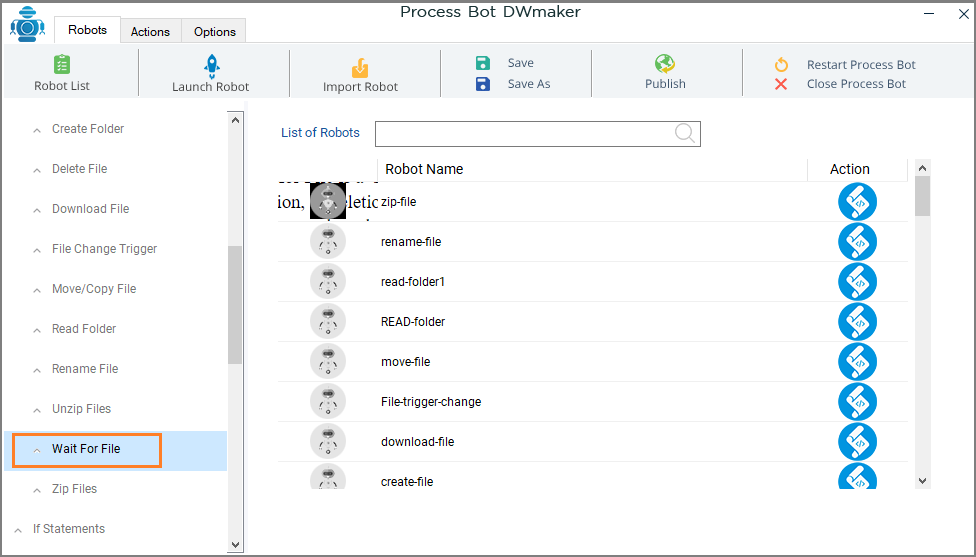
Once, the Instruction Properties pop-up window will open, enter, required details, and then click on Done.
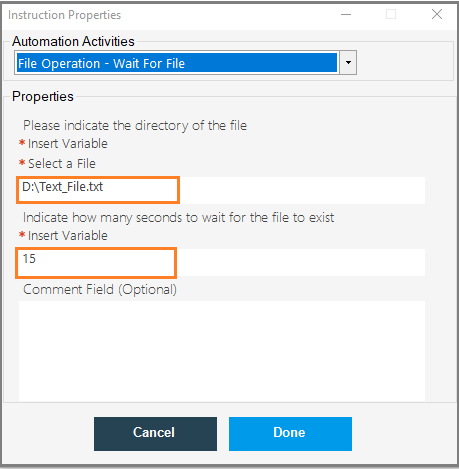
- Now save the code and go to the Actions tab and click on Run.
- Once the robot runs successfully, the given file will open after the given time of interval.
16.Document Automation
Document Automation works by pulling data and text from a variety of sources and inserting them into predefined areas of document templates (Word file).
Document Automation in DWmaker
Document Automation is actually a process to create and add required text formatting in a word document file using the robotic process. DWmaker tool has a list of multiple commands, to assist a user in regards to make any kind of required edits in the document file. This command mentions the following.
- Create a document
- Read and write a document
- Append Document data and more.
16.1.Read Document
The Read Document command is used to read given documents using the DWmaker automation tool.
Let us see what are the steps present in this process.
- First, click on the Read Document command under Document Automation. Once the Instruction Properties pop-up window will open, enter the file path location and then enter the user variable name to receive the extracted data.
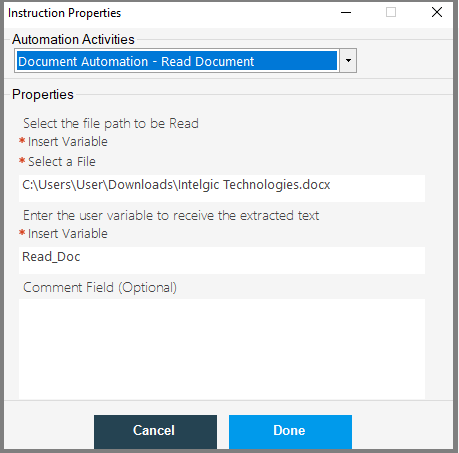
- Next, click on the Show Message command under Miscellaneous Operations, once the Instruction Properties pop-up window will open, enter the variable name in the square bracket[] and then click on Done.

- Next, save the code and then go to the Actions tab and then click on Run.
- Once the robot runs successfully, the content which is present in the given document will be displayed on the output message box
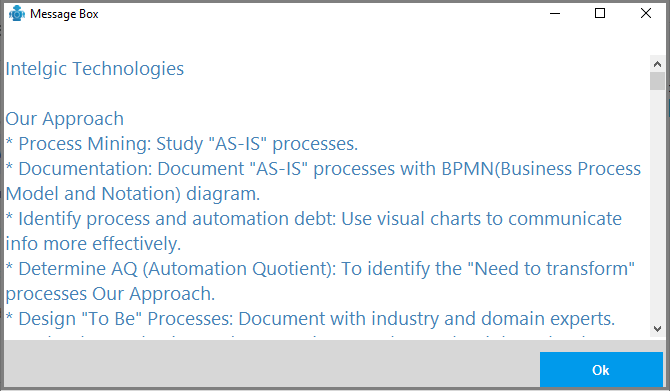
16.2.Write Document
The write document command is used to write the content into the given document.
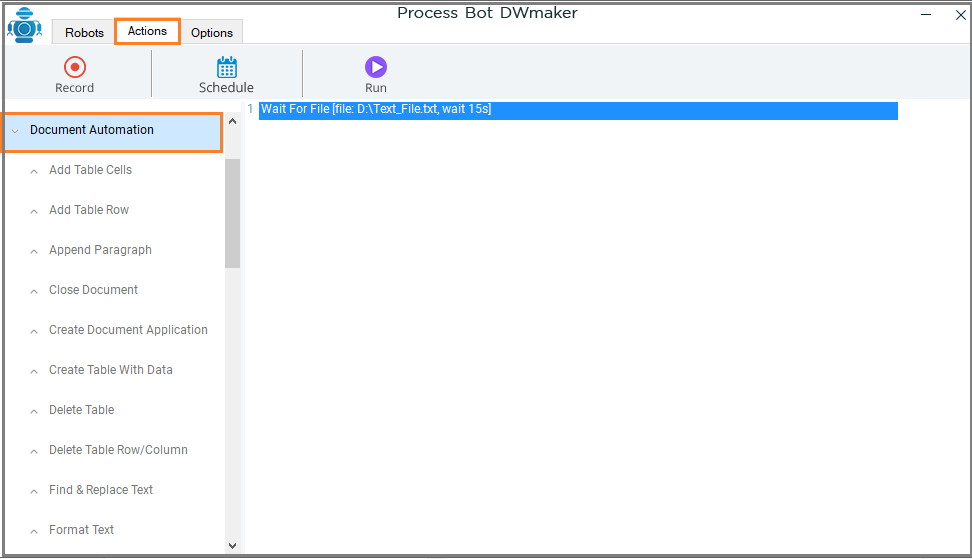
- Under the Document Automation command, you can see a list of sub-command available.
- From here, you need to select the Create Document Application command option, because, in order to write in a document file, first we need to create an instance for the document.
- Enter the Instance Name and then click on Done. Which is as shown below.
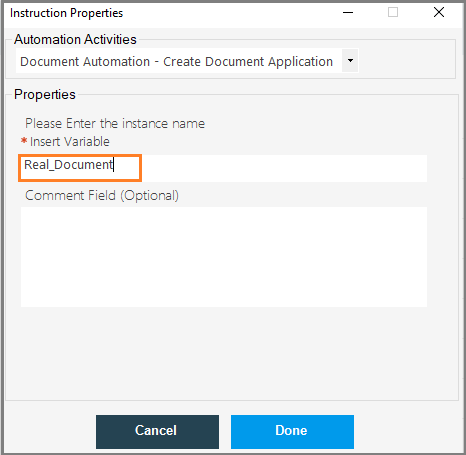
- Next, to write into the document, click on the Write Document command under Documentation Automation.
- Once the Instruction Properties pop-up window will open, enter
- The content Name
- Enter the Content
- Select Alignment
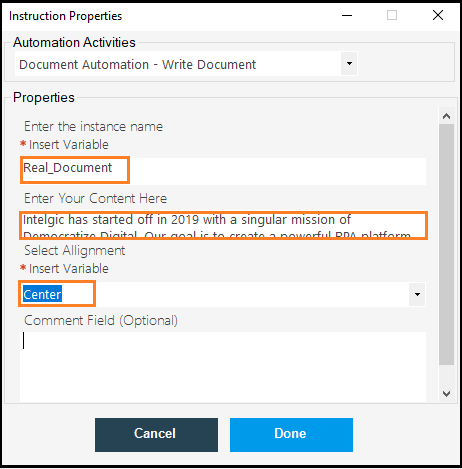
- Here, you can enter any number of content like a single word, a line of code, or a paragraph, etc.
- Next, we need to save this document, click on the Save Document command under Documentation Automation.
- Once the Instruction Properties pop-up window will open, enter
- The Instance name
- And, select the file path to save the document.
- And then, click on Done.

- Now, save the code and then go to the Actions tab and then click on Run.
- Once the robot runs successfully, the document has been created with the given content.
- This is how you can write into the document using DWmaker.
16.3.Append Paragraph
The Append Paragraph is used to append the current document with the new content. The append command will add new content to the document without replacing the old content.
- Here, first, we need to create an Instance to append the document.
- Click on the Create Document Application command under the Documentation Automation.
- Once the Instruction Properties pop-up window will open, enter,
- The Instance Name and then click on Done.
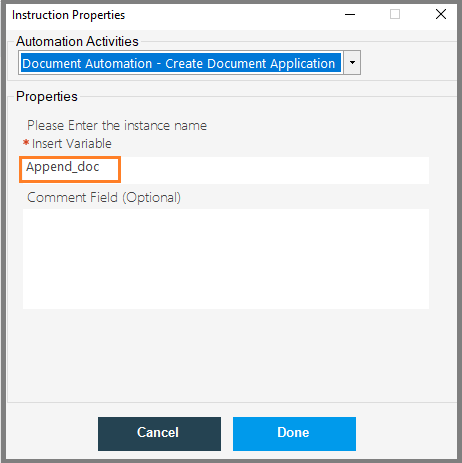
-
Next, We need to load the document to which we want to append the content.
-
Click on the Load Document command under the Document Automation, which is as shown below.
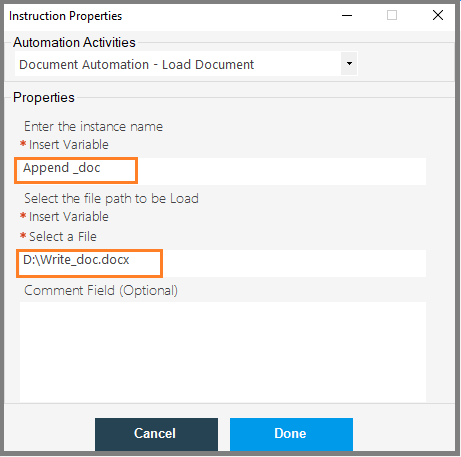
- Next, click on the Append Paragraph command under Documentation Automation and enter the required fields.
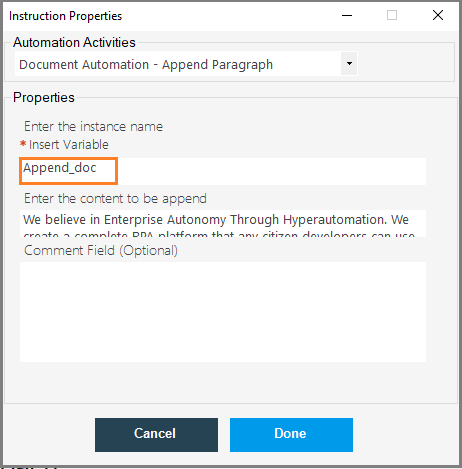
- Next, we need to save the document by clicking on Save Document under Documentation Automation and enter the instance name and enter the file path location and then click on Done.
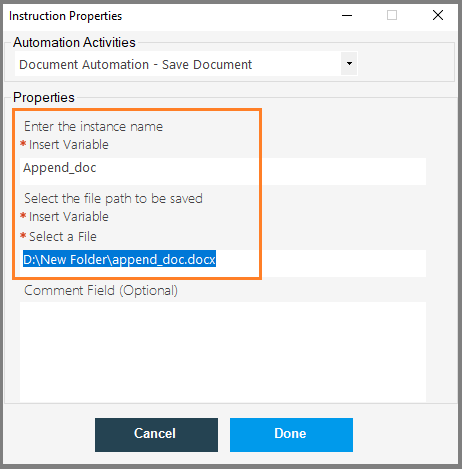
- Now, Save the code and then go to the Actions tab and then click on Run.
- Once the robot runs successfully, the document has been appended with the given content.
- Now, go to the document and open it, you can see the appended document, which is as shown below.

- Next, we need to save the document by clicking on Save Document under Documentation Automation and enter the instance name and enter the file path location and then click on Done.
- Now, Save the code and then go to the Actions tab and then click on Run.
- Once the robot runs successfully, the document has been appended with the given content.
- Now, go to the document and open it, you can see the appended document, which is as shown below.
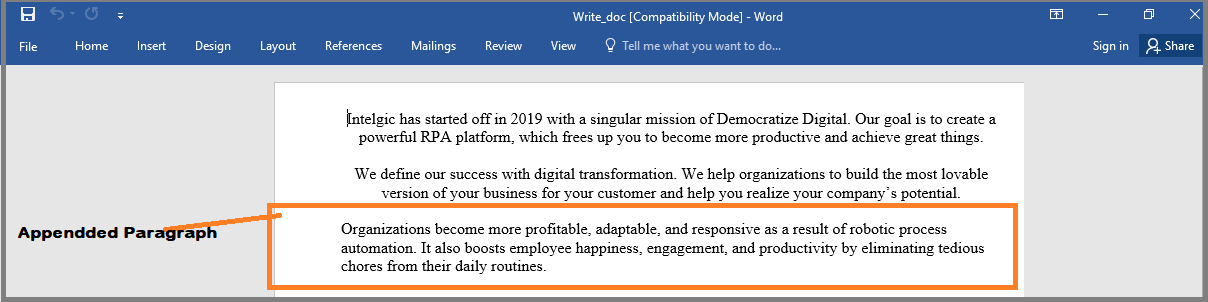
- The Instance Name and then click on Done.
16.4.Close Document
The Close Document command is used to close the opened documents at the given location. Whenever you are creating an instance in a Document Automation process, then it is required to close it every time. You can close it simply by accessing the Close Document command option.
- Click on the Close Document command under Document automation.
- Once the Instruction Properties pop-up window will open, enter
- The Instance name and then, click on Done.
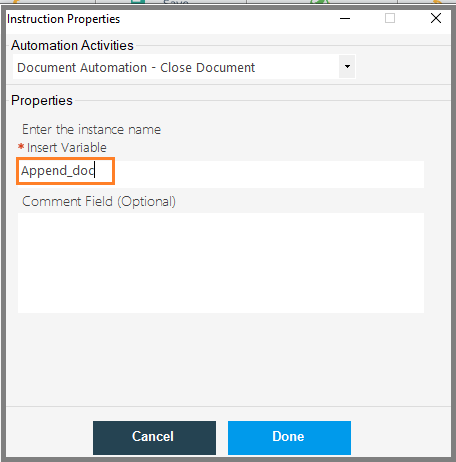
- The Instance name and then, click on Done.
16.5.Find and Replace Text
The Find and Replace Text command is used to replace the text in the given content.
First, we need to create an instance of the document, click on the Create Document Application.
Once the Instruction Properties pop-up window will open, enter an instance name and then click on Done.
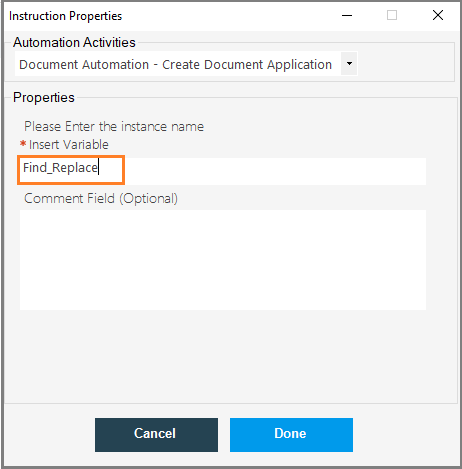
- Next, we need to load the document, in which you want to search and replace the text.
- Click on the Load Document command and enter the file path location and then click on Done.
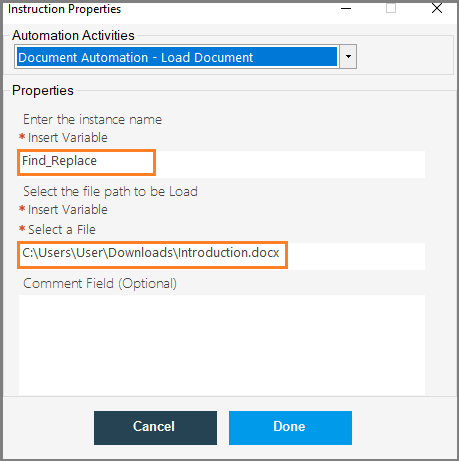
- Next, click on Find and Replace Text command under the Documentation Automation.
- Enter the instance name: Provide the instance name in the field.
- Enter the text to be searched: Here insert the text that you want to search in the document.
- Enter the text to be replaced: In this field, insert the new word that you want to replace with the old word.Once the Instruction Properties pop-up window will open, enter the following details:
- Is search text case sensitive: Here, either select “Yes” or “No” for the case sensitivity of the search term. If you select “Yes” then the robot will find and replace only the word/search term followed by the respective case-sensitive formatting within the document. While, if you choose, “No” then the robot will find and replace the respective word/search term in any particular text formatting in the entire document.
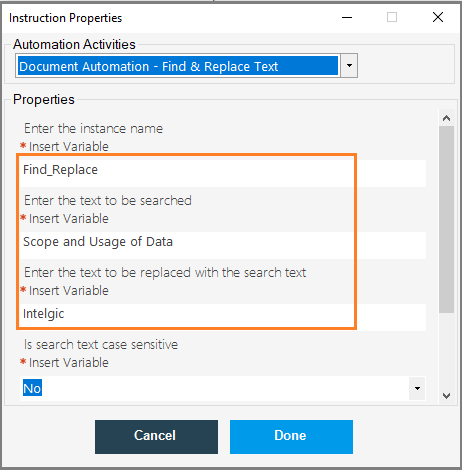
- Next, click on the Save Document command under the Documentation Automation.
- Once the Instruction Properties pop-up window will open, enter,
- Instance Name.
- File path location to save the and current has new. file.
- Click on Done.
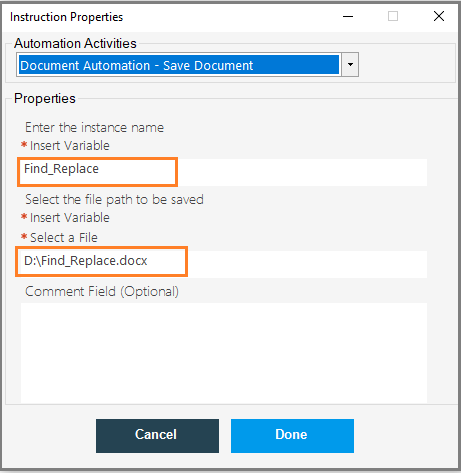
- Now, save the code and then go to the Actions tab and click on the Run.
- Once the Robot runs successfully, the New document has been created and the current text will be replaced with the given text. Which is as shown below.
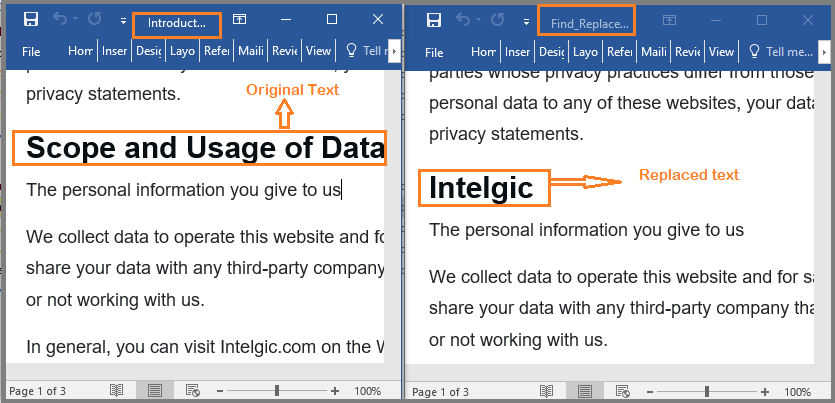
- Now, save the code and then go to the Actions tab and click on the Run.
- Once the Robot runs successfully, the New document has been created and the current text will be replaced with the given text. Which is as shown below.
16.6. Merge Document
The Merge Document command is used to merge two documents into one document. Click on the Create Document Application under Document Automation.
Once the Instruction Properties pop-up window will open, enter the Instance name and then click on Done.
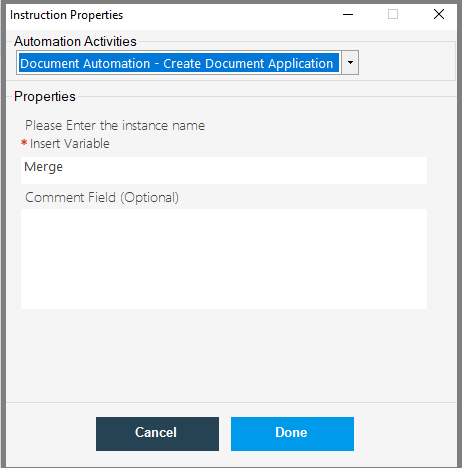
- Next, click on Load Document under Documentation Automation, once the Instruction Properties pop-up window will open, enter the instance name and then enter the file path location.
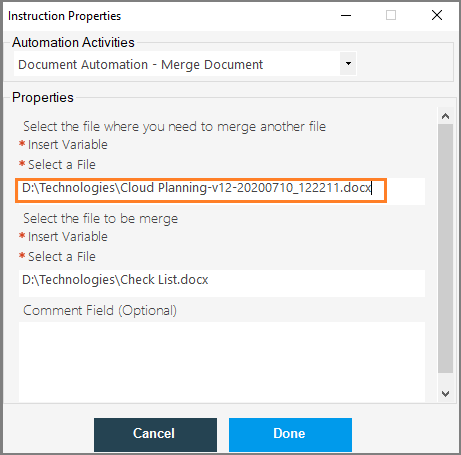
- Next, Save the code and then go to the Actions tab and then click on Run.
- Once the Robot runs successfully, the given documents have been merged into a single doc.
16.7.Create Table with Data
The Create Table With Data command is used to create a table in the word document using the data.
- First, we need to create an Instance, click on the Create Document Application.
- Once the Instruction Properties pop-up window will open, enter all the details and then click on Done.
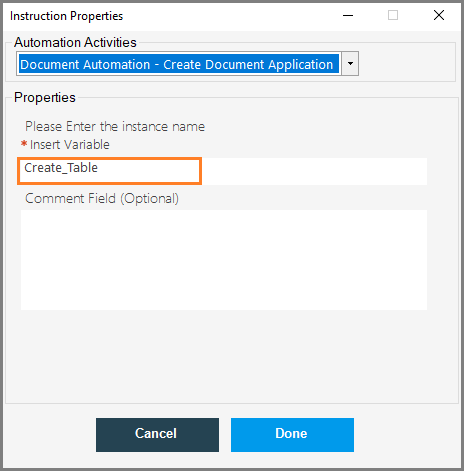
- Next, we need to load the document, in which you want to create a table.
- Click on the Load Document command under the Document Automation, once the Instruction Properties pop-up window will open, enter, Instance name and file name and then click on Done.
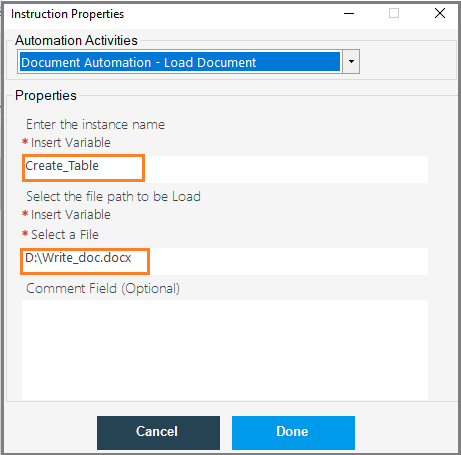
- Next, click on the Assign Data Table Instance under DataTable Automation.
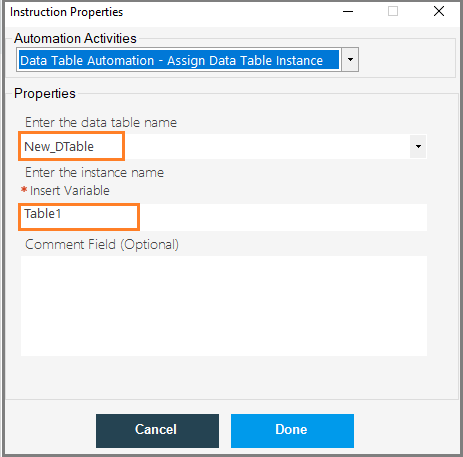
- Next, click on Create Excel Data Table under Excel Automation, once the Instruction Properties pop-up window will open, enter
-
- The data table name.
- Select the file path location, in which excel file you want to extract the data table.
- Enter the Sheet
- And then click on Done.
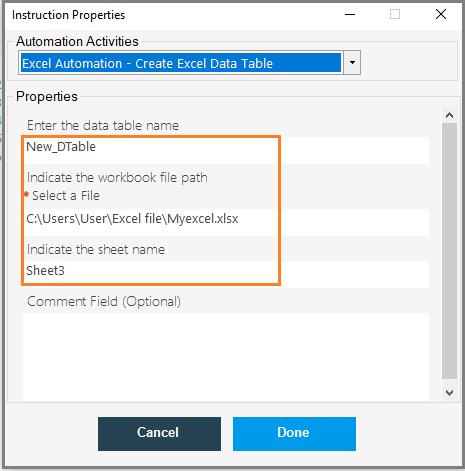
- Next, click on Create Data Table with Data under the Documentation Automation, Once the Instruction Properties pop-up window will open.
- Enter Instance name
- Enter the Data table name to get the data
- Select the Header vertical alignment, by default which is selected as Middle.
- Select the Header horizontal alignment, by default which is selected as Center
- Enter the Hight of the header row, by default which is selected as 20.
- Select the font name of the header text
- Select the font size of the header text
- Enter the header text color name
- Enter the header back color name
- Enter the data text color name
- Select the data row vertical alignment
- Select the data row horizontal alignment
- Enter the height of the data row
- Select the font size of the data text
- Enter the height of the data row
- Specify the source of the column name: Here, specify the Table column name as F1, F2,F3..etc. and Header column as your choice which related to the table items which is as shown below:
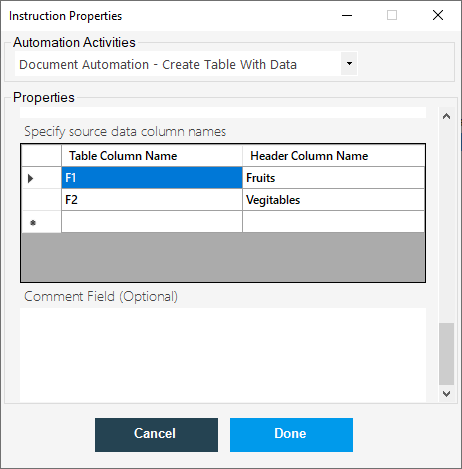
- Next, click on the Done as shown below.
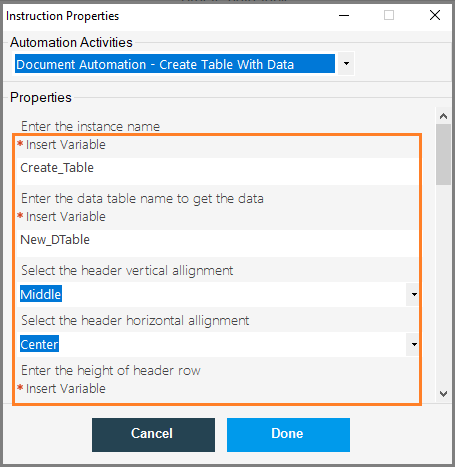
-
- Next, click on the Save Document command, Once the Instruction Properties pop-up window will open, enter the Instance name and the file path location in which you want to save the table.
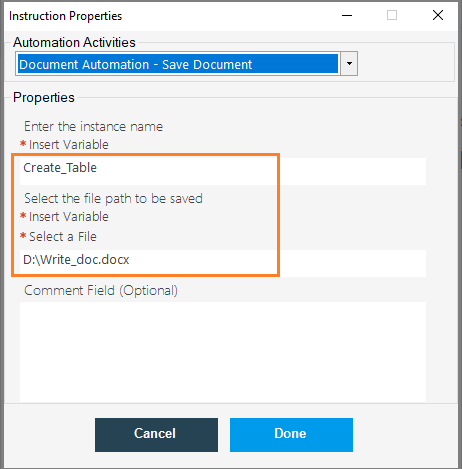
- Now, save the code and then go to the Actions tab and then click on Run.
- Once the robot runs successfully, the table has been created with the given data
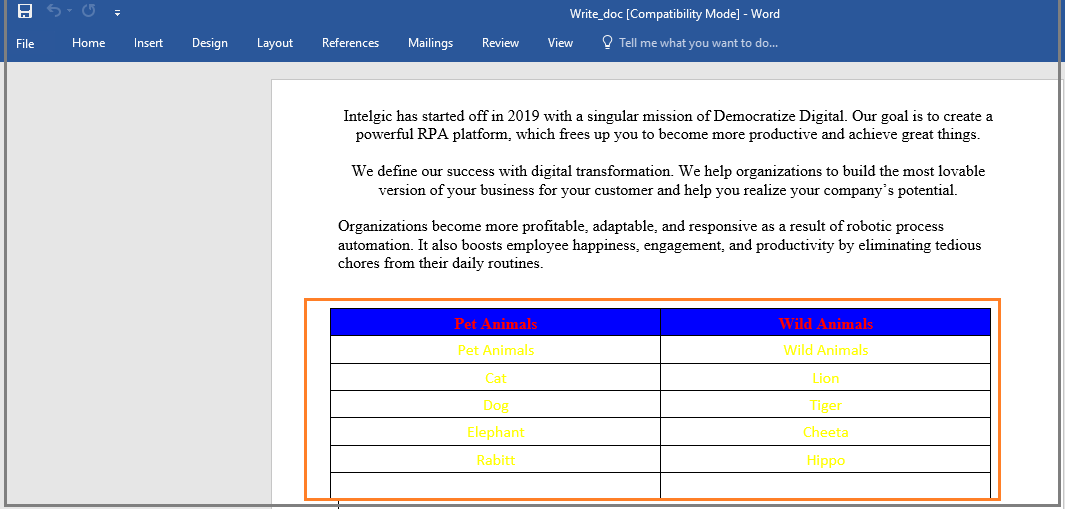
16.8.Add Blank Row/Column
The Add Blank Row/Column command is used to add a row/ column to the existing table in the given document.
Let us see what are the steps present in this process:
- Click on the Create Document Application command under Document Automation.
- Once, the Instruction Properties pop-up window will open, enter the Instance name and then click on Done.
- Next, click on the Load Document command, once the Instruction Properties pop-up window will open, enter the instance name and file name and then click on Done.
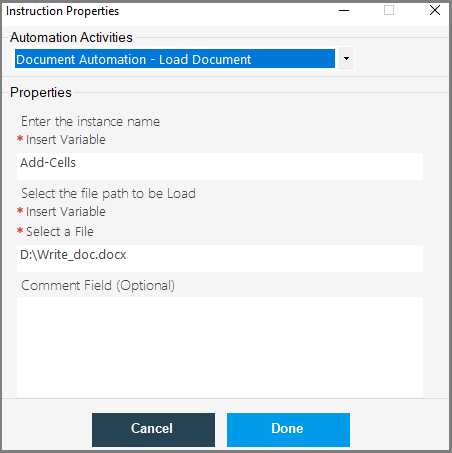
- Next, click on Add Blank Row/Column command under Document Automation, once, Instruction Properties pop-up window will open, enter,
- The Instance Name
- The index number of the Table(The Index number of the table will always start from 0)
- Select the Row/Column from the dropdown
- Enter the number of rows, This field is required only to enter rows.
- Enter the row or column index number where you want to add the new row/column
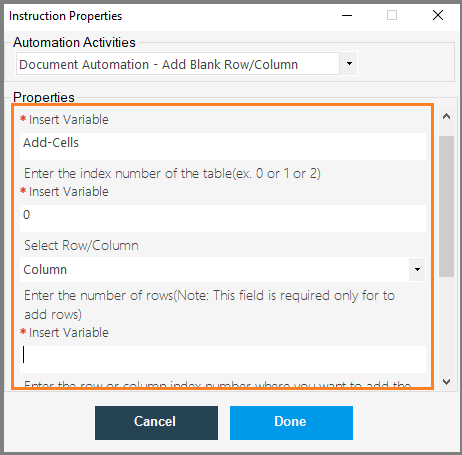
- Next, click on the Save Document command, once the Instruction Properties pop-up window will open, enter the Instance name and file name and then click on Done.

- Now save the code and then go to the Actions tab and then click on Run.
- Once the robot runs successfully, the column has been added at the 2nd position.

- In the same way, we can add a blank row to the table at the given location.
- Click on the Add Blank Row/Column, once the Instruction properties pop-up window will open, enter, all the details and then select the Row from the drop-down list and then enter the number of rows you wanted to add to the table and then select the index number where you wanted to add row or column in the table.
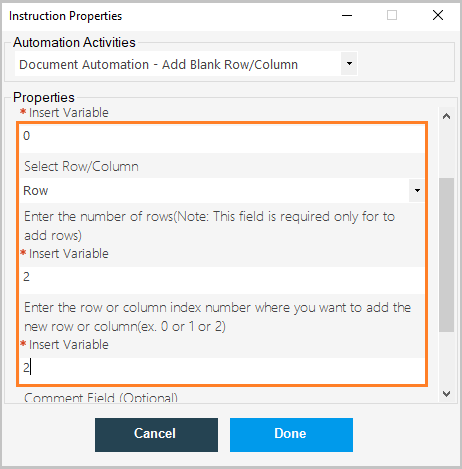
- Now, save the code and run the robot.
- Once the robot runs successfully, the blank row has been added to the table at the given index position.
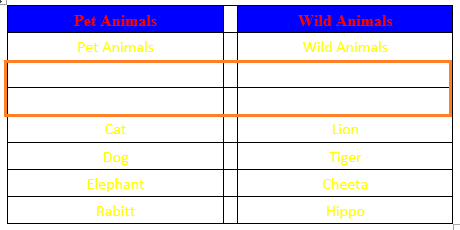
- As you see in the above image, the two blank rows have been added after the index position.
- This is how we add rows or columns to the given table using the Dwmaker automation commands.
16.9.Add Table Cells
The Add Table Cells command is used to add the column with data to the existing table which is present in the word document.
Let us see what are the steps present in the Adding table cells.
- Our first step is to click on the Create Document Application command under Document Automation, once the Instruction Properties pop-up window will open, enter the instance name and then click on Done.
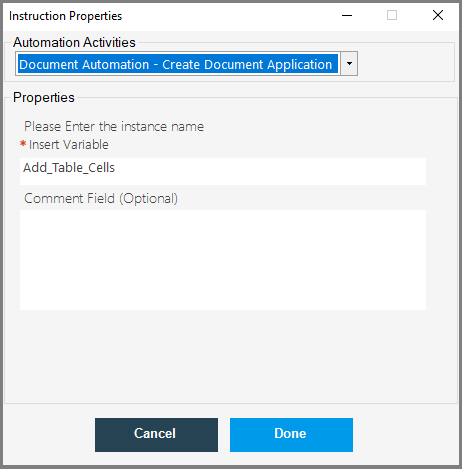
- Next, click on the Load Document command, once the Instruction Properties pop-up window will open, enter the Instance name and Select the file path to load, and then click on Done.
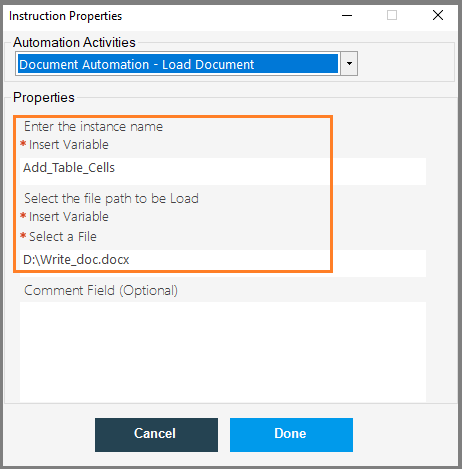
- Next, next we need to assign a data table instance to create a data table.
- Click on the Assign Data Table Instance under the Data Table Automation command.
- Once the Instruction Properties pop-up window will open, enter
- The Data Table Name
- The Instance Name
- And then click on Done.
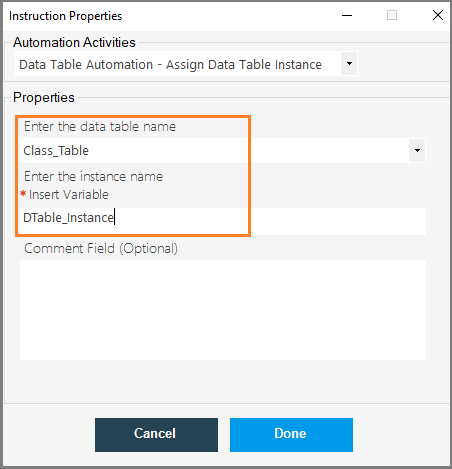
- Next, click on the Create Excel Data Table command under excel automation, once, the Instruction Properties pop-up window will open, enter,
- Instance Name
- Select the file path location
- Sheet name
- Click on Done.
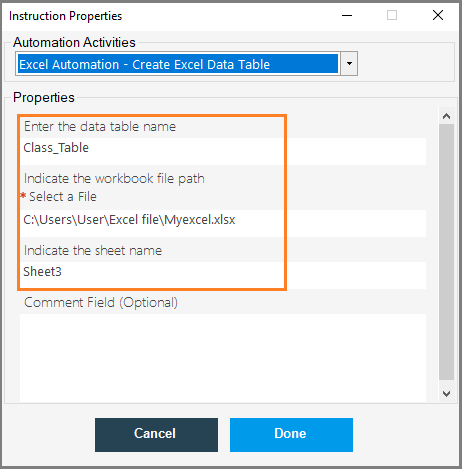
- Next, click on the Add Table Cells, once the Instruction Properties pop-up window will open, enter all the required details and then click on Done.

- Next, click on the Save Document command under the Document Automation, once the Instruction Properties pop-up window will open, enter the instance name and select the file path to save the table and then click on Done.
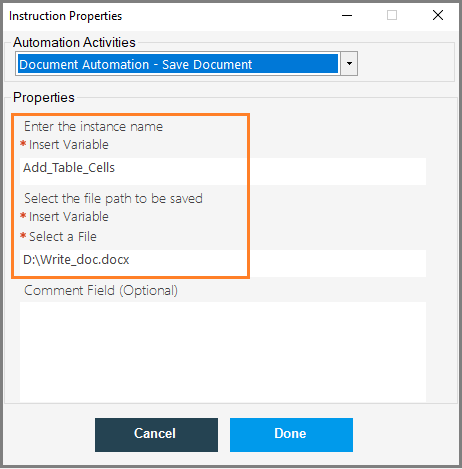
- Now, click on Save and then go to the Actions tab and click on Run.
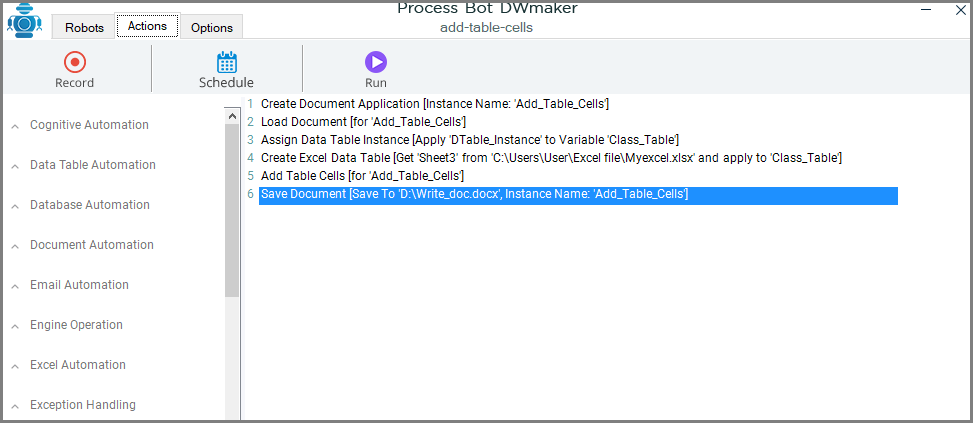
- Once the robot runs successfully, the new column will be added to the table.
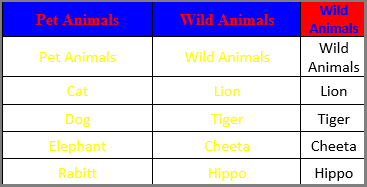
16.10.Add Table Row
The Add Table Row command is used to add Row to the existing table with data.
Let us see the steps present in this automation process.
- First, click on the Create Document Application command under Document Automation, once the Instruction Properties pop-up window will open, enter the Instance name and then click on Done.
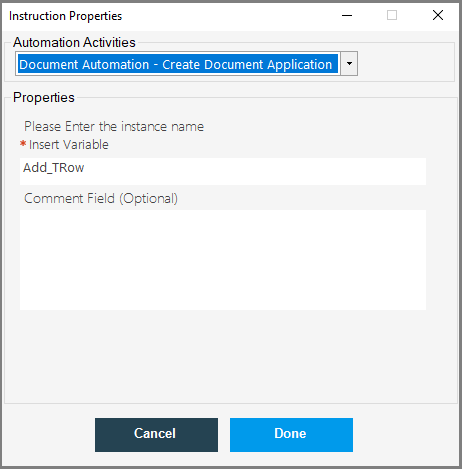
- Next, click on the Load Document command, once the Instruction Properties pop-up window will open, enter the instance name, and then select the file to load, and then click on Done.

- Next, click on the Assign Data Table command, once the Instruction Properties pop-up window will open, enter the data table name and then instance name, and then click on Done.

- Next, click on create Excel Data Table command, once the Instruction Properties pop-up window will open, enter the data table name, file path location, and then sheet name.
- And, click on Done.
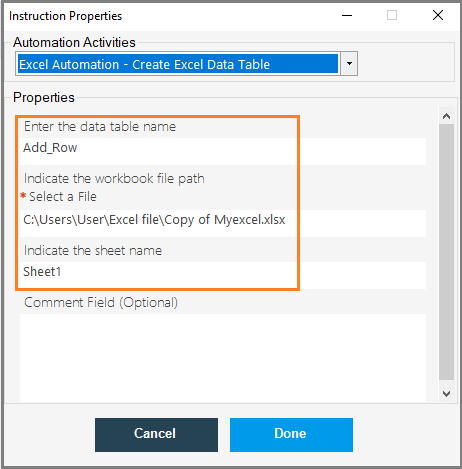
- Click on Add Table Row, once the Instruction Properties pop-up window will open, enter all the details required and then click on Done.
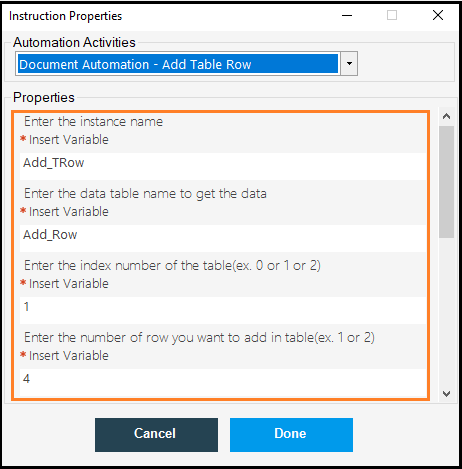
- Next, click on Save Document, once the Instruction Properties pop-up window will open enter the Instance name and the file name to save and then click on Done.

- Now save the code and then go to the Actions tab and click on Run.
- Once the Robot runs successfully, the new rows have been added to the table.
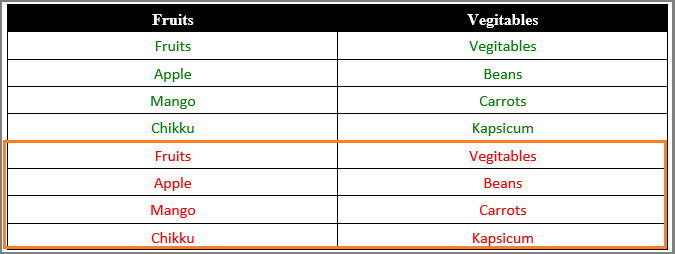
16.11.Format Text
The Format Text command is used to format the text in the given document.
The Format Text command has options to bold, italic, and you can also highlight the background of the given text and you can also highlight the color of the text.
Let us see what are the steps present in this process.
- First, click on the Create Document Application command under the Document Automation command, once the instruction properties pop-up window will open, enter the Instance name and then click on Done.

- Next, click on the Load Document command under the Document Automation, once the Instruction Properties pop-up window will open, enter the instance name and then select the file path location and then click on Done.
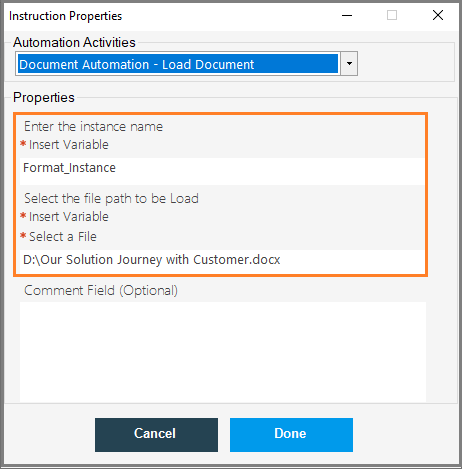
- Next, click on the Format Text command under the Document Automation, Once the Instruction Properties pop-up window will open, enter, Instance name and the text to format.
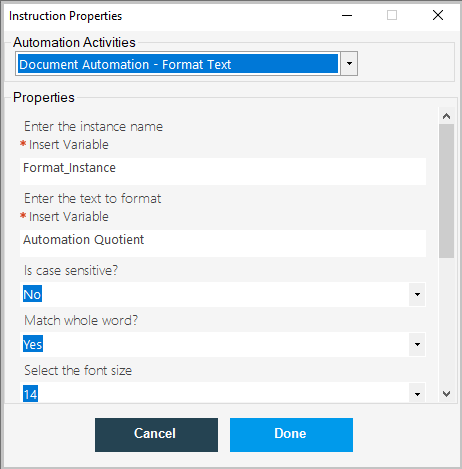
- Next, click on the Save Document command under Document Automation, once the Instruction Properties pop-up window will open, instance name and select file path location to save the file.
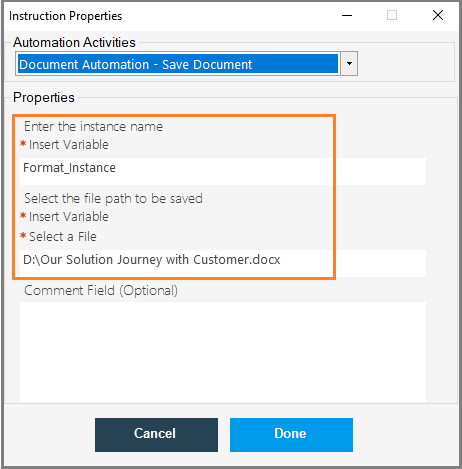
- Now, save the code and then go to the Actions tab and then click on Run.
- Once the robot runs successfully, the given text will be format as per the given standards.
16.12.Delete Table Row/Column
The Delete Table Row/Column command is used to delete the given table row or column.
Let us see what are the steps present in this process.
- Our First step is to click on Create Document Application command under Document Automation.
- Once the Instruction Properties pop-up window will open, enter the Instance name and then click on Done.
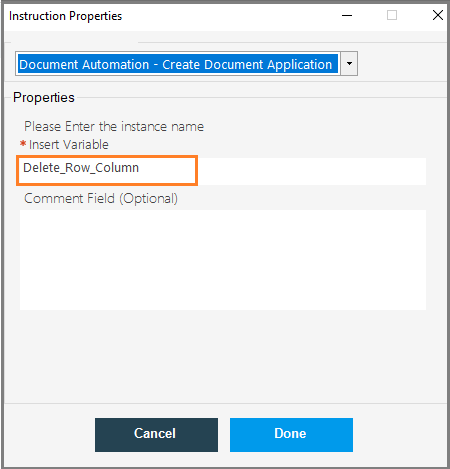
- Next, click on the Load Document command under Document Automation, once the Instruction Properties pop-up window will open, enter,
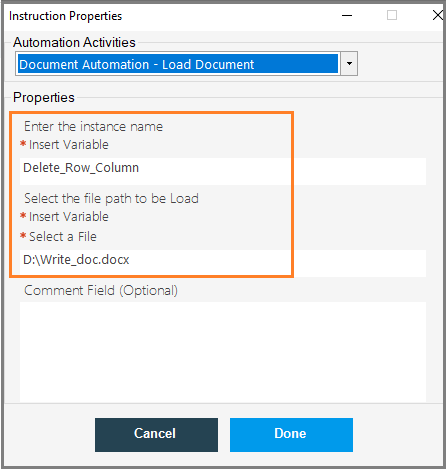
- Next, click on Delete Table Row or Column command under Document Automation, once the Instruction Properties pop-up window will open, enter all the required details which are as shown in the below image.
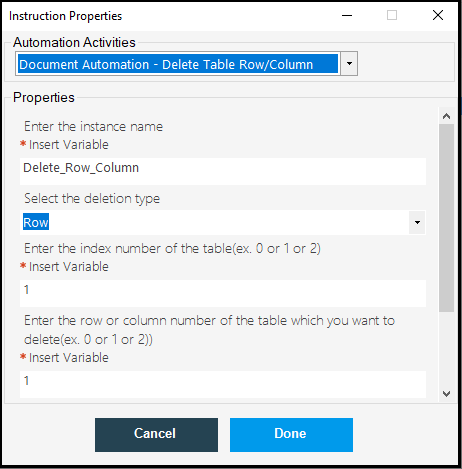
- Now save the code and then go to the Actions tab and click on Run.
- Once the robot runs successfully, the row will be deleted from the given table.
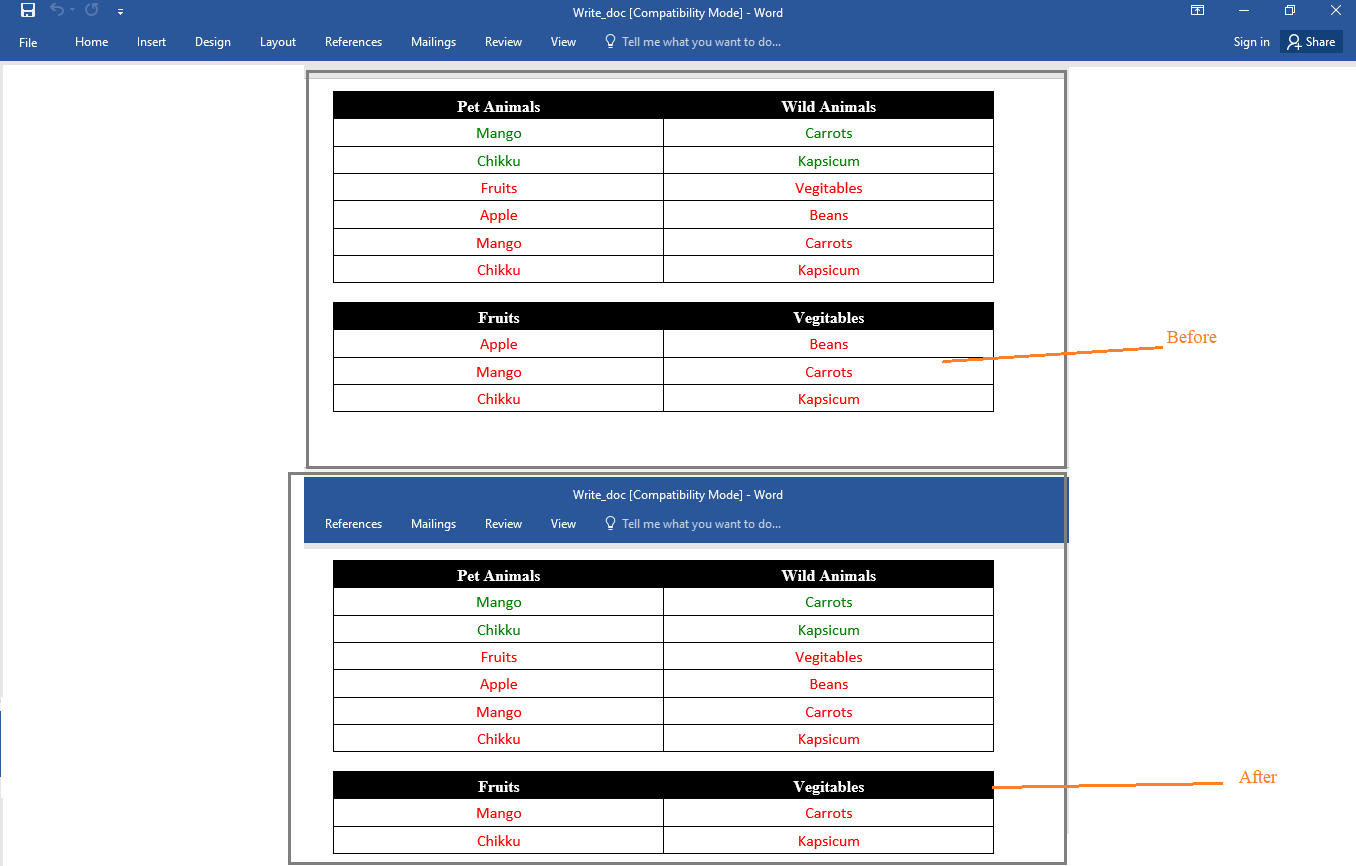 Next, let us see how to delete a column from the given table.
 - In the Delete Table Row or Column command, select Row under Select Detection Type.
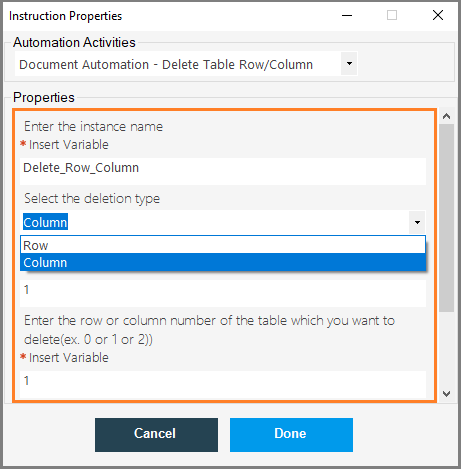
- Now save the code and run.
- Once the robot runs successfully the given table column will be deleted.
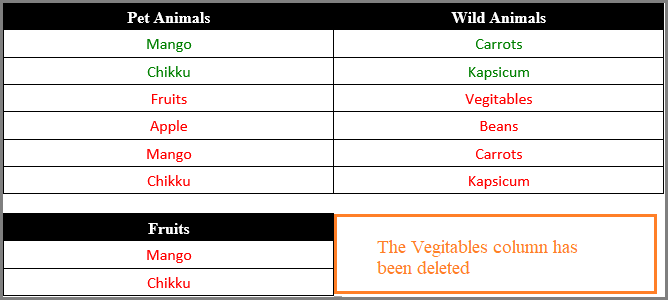
16.13.Delete Table
The Delete Table command is used to delete the existing table in the given document.
- First, click on the Create Document Application command under the Document Automation.
- Once the Instruction Properties pop-up window will open, enter the Instance name and then click on Done.

- Next, click on the Load Document command, once the Instruction Properties pop-up window will open, enter the instance name and then select file path location and then click on Done.

- Next, click on the Delete Table command, once the Instruction Properties pop-up window will open, enter the instance name and then enter the Index number of the table you want to delete.
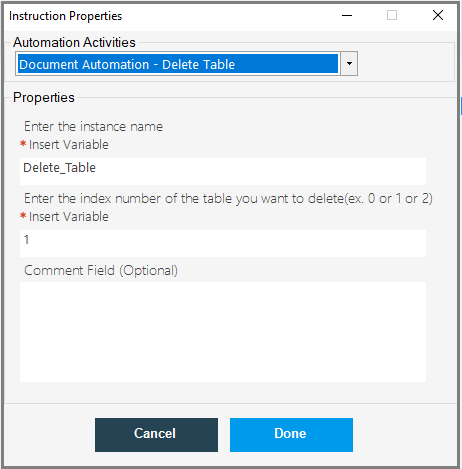
- Next, click on the Save Document, once the Instruction Properties pop-up window will open, enter the Instance name and then enter the file path location to save the change.
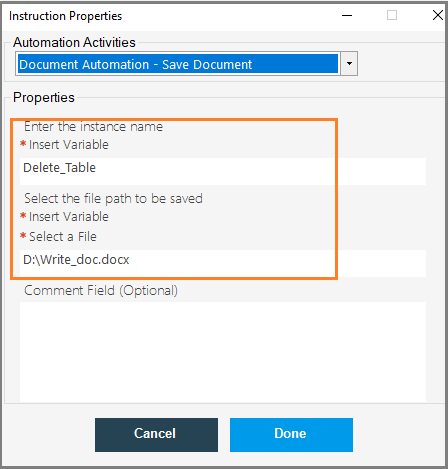
- Now save the code and run, once the robot runs successfully, the table will be deleted from the given document.
16.14.Merge Row/Column
The Merge Row/Column command is used to merge either row cells or column cells as given.
- Click on the Create Document Application under Document Automation.
- Once the Instruction Properties pop-up window will open, enter current the Instance name and then click on Done.
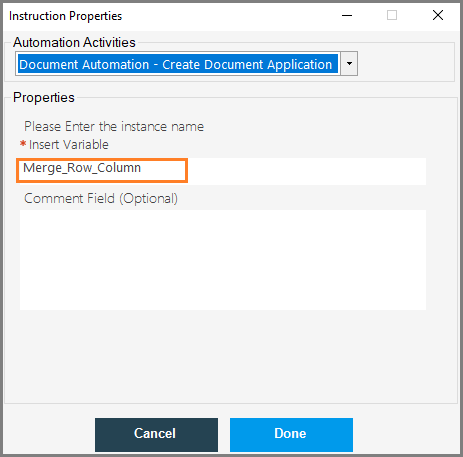
- Next, click on Load Document under Documentation Automation, once the Instruction Properties pop-up window will open, enter the instance name and then enter the file path location.
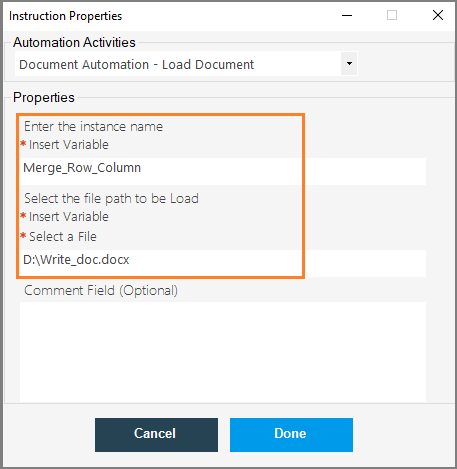
- Next, click on the Merge Row/Column command under Document Automation, once the Instruction Properties pop-up window will open, enter,
- Instance name
- The index number of the table
- Select the Merge type from the drop-down list
- Enter row or column index number
- Enter the strat cell index
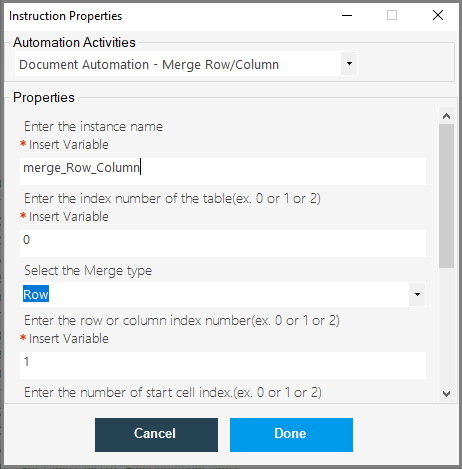
- Enter the end cell index
- And then click on Done.
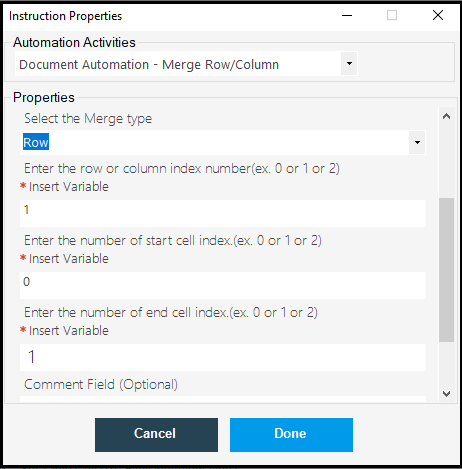
- Next click on the Save Document command, once the Instruction Properties pop-up window will open, enter the Instance name and then the file name to receive the file.

- Next, Save the code and then go to the Actions tab and then click on Run.
- Once the Robot runs successfully, the Given row cells have been merged, which is as shown below.
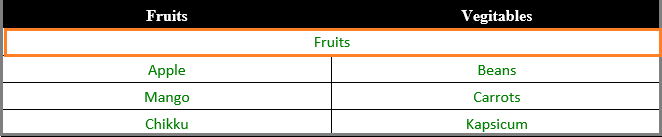
- In the same way, we can merge the column also, select Column under Select Merge Type, and enter the Index number of the column and enter the start cell and end cell number of the column and then click on Done.
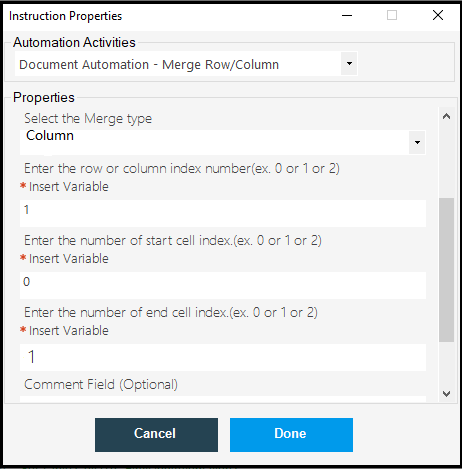
- Now, save the code and run, once the robot runs successfully, the given column range will be merged, which is as shown below.
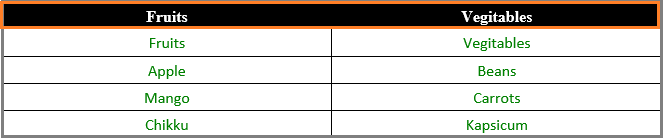
- This is how we can merge either row or column cells as we required.
16.15.Set Table Cell
The SEt Table Cell command is used to set the value in the given table cell. This command is useful to add values inside the blank table row or column cells.
If we performed this operation on any table cell which is already having a value in it, then, it will append the value to the given cell.
Let us see what are the steps present in this operation.
- Click on the Create Document Application under Document Automation.
- Once the Instruction Properties pop-up window will open, enter current the Instance name and then click on Done.
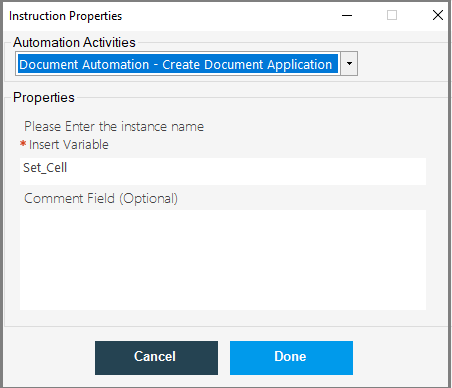
- Next, click on Load Document under Documentation Automation, once the Instruction Properties pop-up window will open, enter the instance name and then enter the file path location.
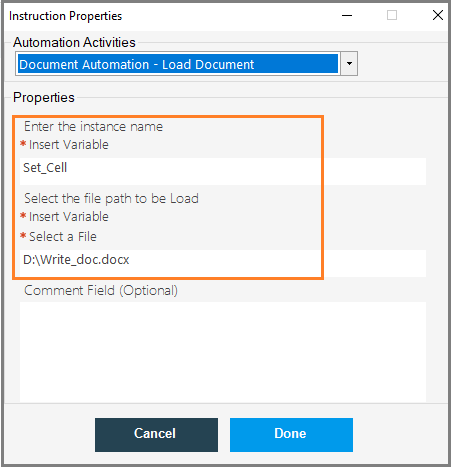
- Next, click on the Set Table Cell command under Document Automation, once the Instruction Properties pop-up window will open, enter,
- Instance name
- Table index number
- Row Index number
- Column Index number
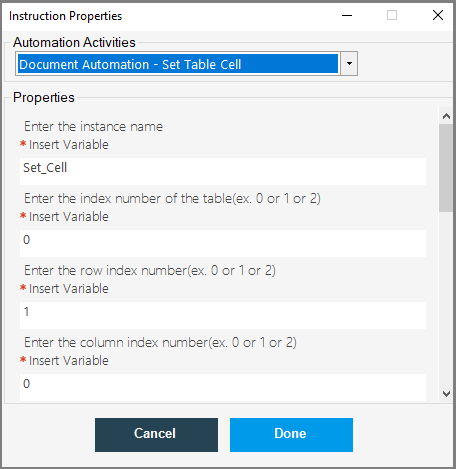
- Enter the Text to set in the Cell
- Enter the cell text color name
- Enter the cell back color name
- And then click on Done.
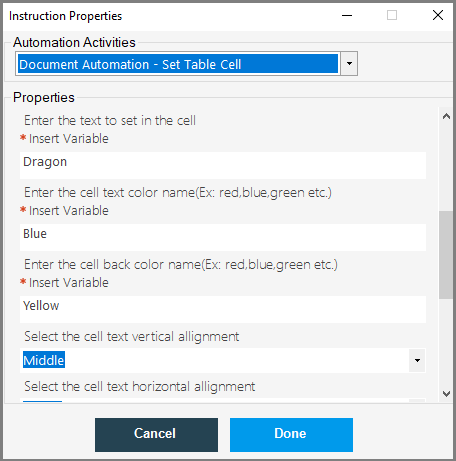
- Next click on the Save Document command, once the Instruction Properties pop-up window will open, enter the Instance name and then the file name to receive the file.
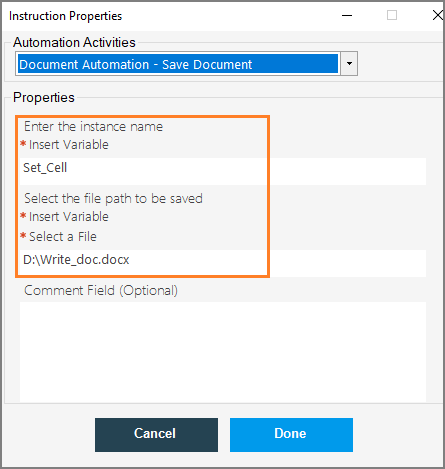
- Next, Save the code and then go to the Actions tab and then click on Run.
- Once the Robot runs successfully, the given text has been added to the blank cell, which is as shown below.
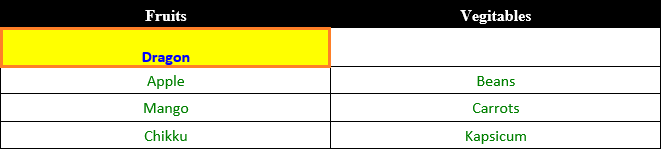
- In the same way, if give index value of the cell which is having text in it, then this command will append the cell with the given text, which is as shown below.
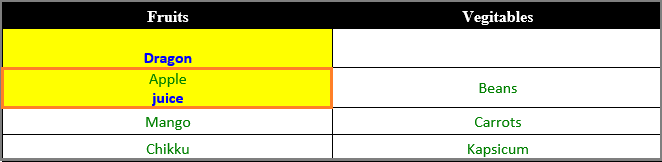
- This is how we can put text, or append text in the given table cell.
17.Web Browser Automation
Web automation refers to the process of allowing robots or web automation technologies to conduct activities and processes on an online browser or web application. Browser automation technologies, which automate your Web browser, are used to do repetitive and error-prone activities, such as filling out long HTML forms for any specific purpose such as online inquiry form, admission form, contact form filling, etc.
Web Browser Automation in DWmaker:
The Process Bot DWmaker tool has an inbuilt web browser automation set-up or commands along with a package of a few sub-commands, such as create a browser, element action, close browser, script execution, and much more, that help us to automate the web browser activities with a robotic process.
Let us see how to use Web Browser Commands to perform Web Browser Automation using the DWmaker tool.
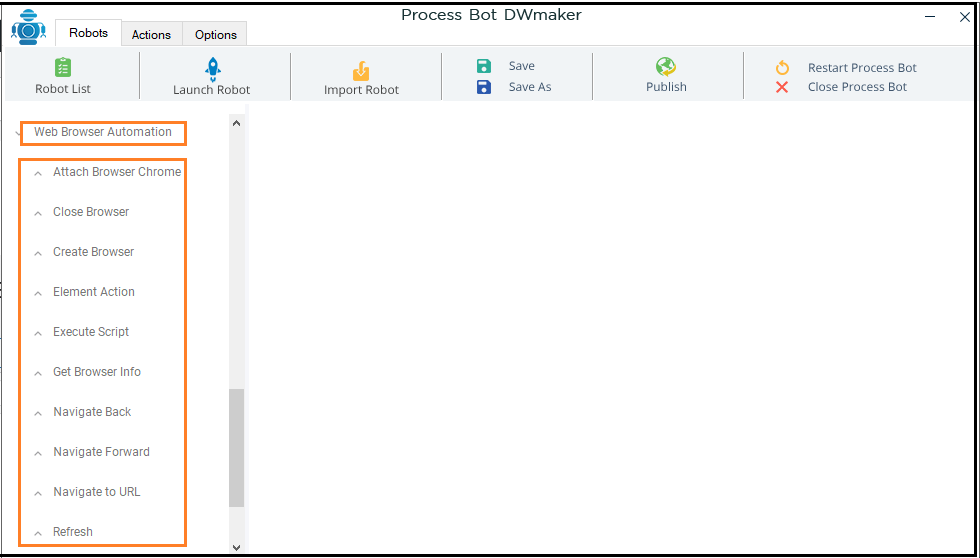
17.1.Create Browser
The Create Browser command is used to perform browser operations. It is having several browser engines, you can create a browser by using any of the given browser engines.
- Click on the Create Browser command under Web Browser Automation, once the Instruction Properties pop-up window will open, enter,
- Instance Name: Insert the instance name that you have created for this operation.
- Browser Engine Type: Here, you need to insert the version of your web browser. (Either you are using Chrome, Firefox, or any other web browser, each browser has its different version that you need to insert in this field.)
- Instance Tracking: In this field, you need to select one option as “Forget Instance” or “Keep Instance Alive”. If you choose “Forget Instance,” then your instance will be no longer available once the program is closed or completed. While, if you choose, “Keep Instance Alive,” that means your instance will be available every time, once created.
- Select a Window State: In this field, you can select a specific view for the window, as “Minimize” or “Normal”.
- Once providing all the required details, click on Done.
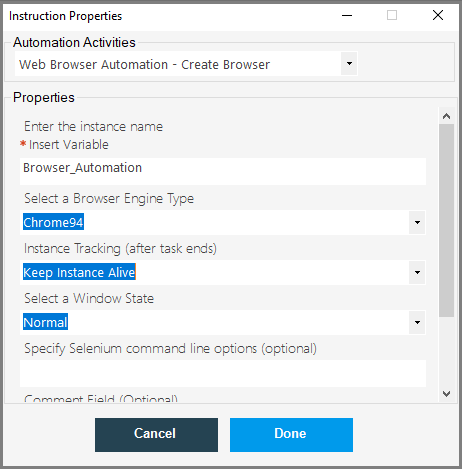
- Next, click on the Navigate to URL command under Web Browser Automation, once the Instruction Properties pop-up window will open, enter,
- Instance name
- Enter the URL to navigate to
- And then, click on Done.
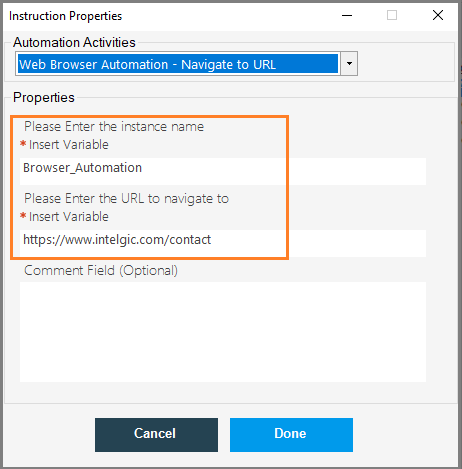
- Next, click on the Element Action command, which is used to create a web action on the given URL.
- Once the Instruction Properties pop-up window will open, enter,
- Instance Name: Insert the instance name that you have created for this operation.
- Element Search Method: In this field, you need to select an element search method, from the drop-down list. The search method you will select is just deepened on the enabled search element in the respective website that you are operating. This search method can be an ID, Name, XPath, etc. You can get the search method of the specific website, simply by inspecting the input field.
- Search Parameter: Here, provide a specific parameter or value for the search such as username, email, contact, etc. You need to enter the search parameter, similar to the one mentioned on the website, that you can get easily by inspecting it. See the image.
- Note: In Create browser, The Chrome will be installed in the 64 bit location by default C:\Program Files (x86)\ folder will continue to work and if it does find the 64 bit chrom file path then the error will occur.
- You may get an error if you are using 32 bit, so We recomend you to use attach Browser command instead of Create browsera nd Navigate URL command, this commnd performs actions which performed by create browser and Navigate URL command.
- Click on the Attach Browser command, once you navigate to the Instruction Properties pop-up window, then enter the deatils as shown in the below image.
- And, keep other deatials as deafult values only as shown below.
- Go to your given URL website and then click on the element that you wanted to inspesct, in this example I want to Navigate to the Intelic’s Contacts webpage which is as shown below:

- Here, I wnat to automate the contact details autofillup which is as shown above.
- So, keep your mouse on the Name and then right click, and select the Inspect option, and then click on Inspect.
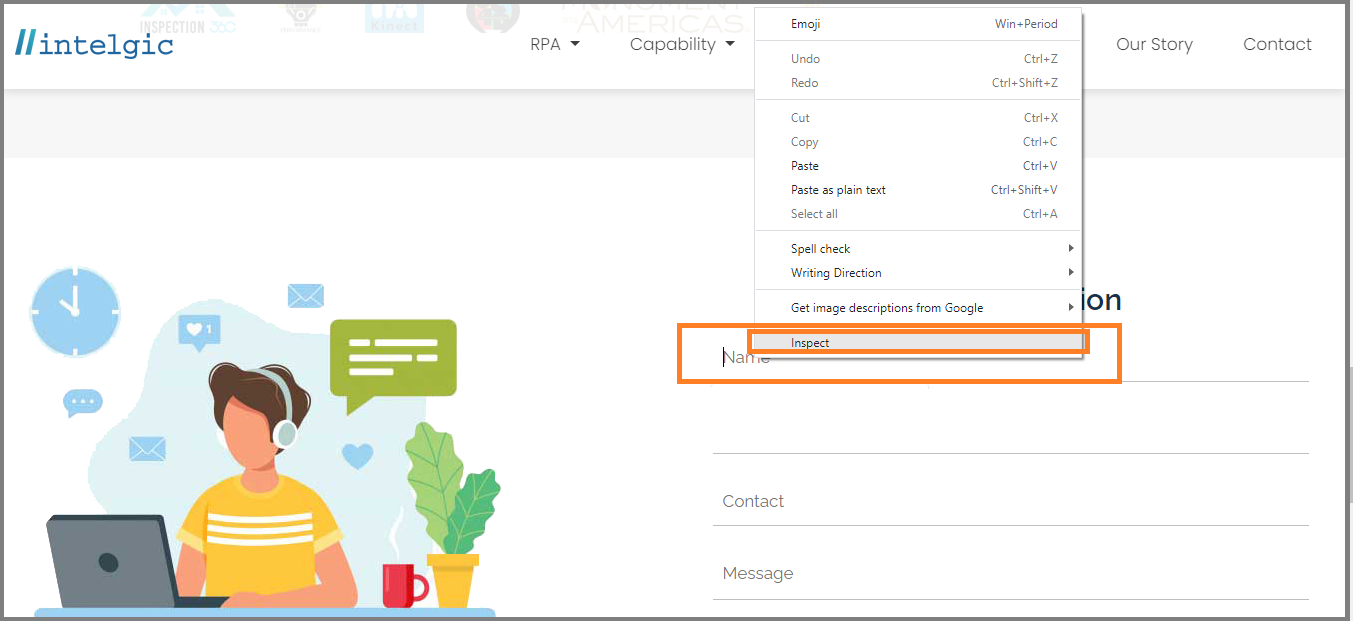
- Next, you will be navigated to the HTML page and then find the ID of the Name which is as shown below.
- And, repeate this step for all the elements on the contact deatils like, Email, Conatct Number and Message.
-

- Element Action: Once you click on the drop-down list, The Element action field is having several sub-options, you can select from this drop-down, what action you want to perform.
- If you want to fill any form then you can select Set Text.
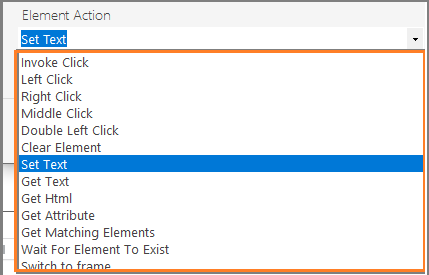
- If you want to fill any form then you can select Set Text.
- Additional Parameter: Here, you need to enter the Parameter text name and parameter value.
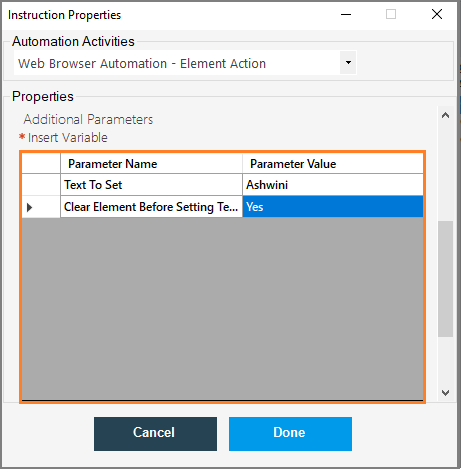
- Click on Done.
- Now, save the code and then go to the Actions tab and click on Run.

- Here, I am filling in contact details on the Intelgic website.
- Once the robot runs successfully, the robot will take you to the given URL and then enter the Name in the Name section, which is as shown below.
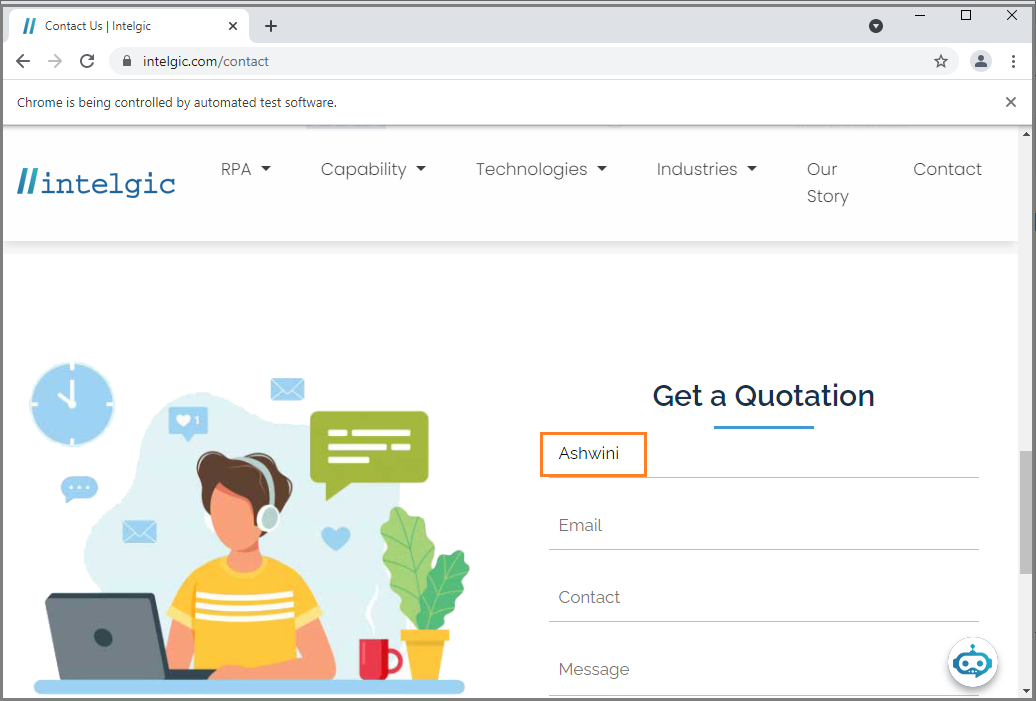
- Next, to enter the Email and Contact number, Click on the Element Action command, once the Instruction properties pop-up window will open, enter the Instance name and enter the element search method.
- And, then, enter the element search parameter.
- To add an element parameter, right-click on the Email on the Intelgic website and select Inspect.
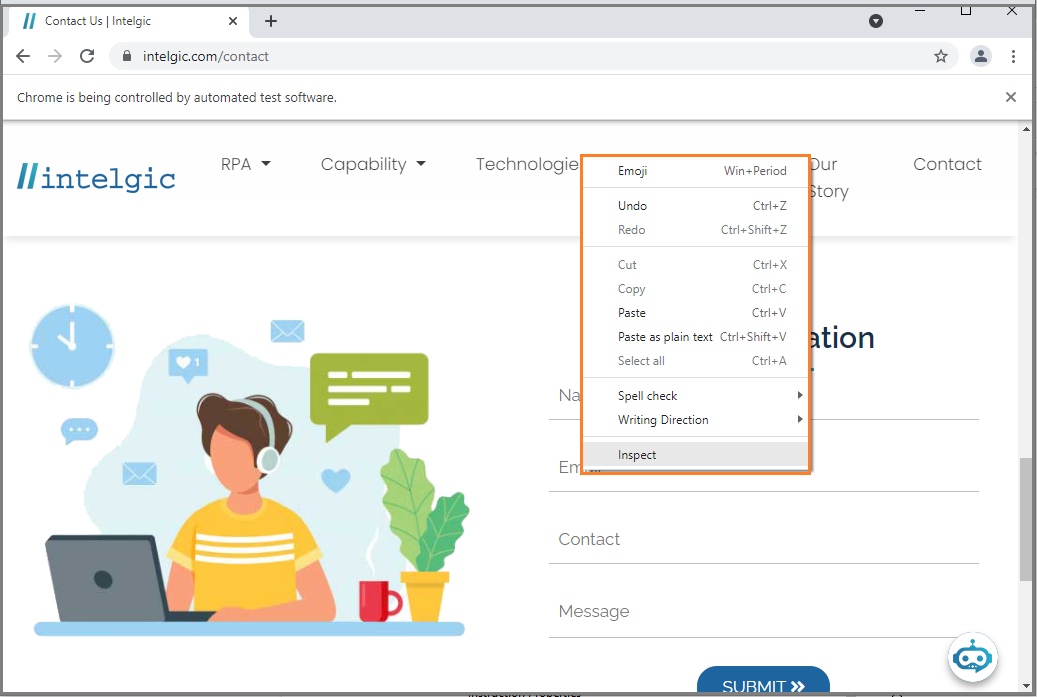
- Once the element window will open, copy the id of the email
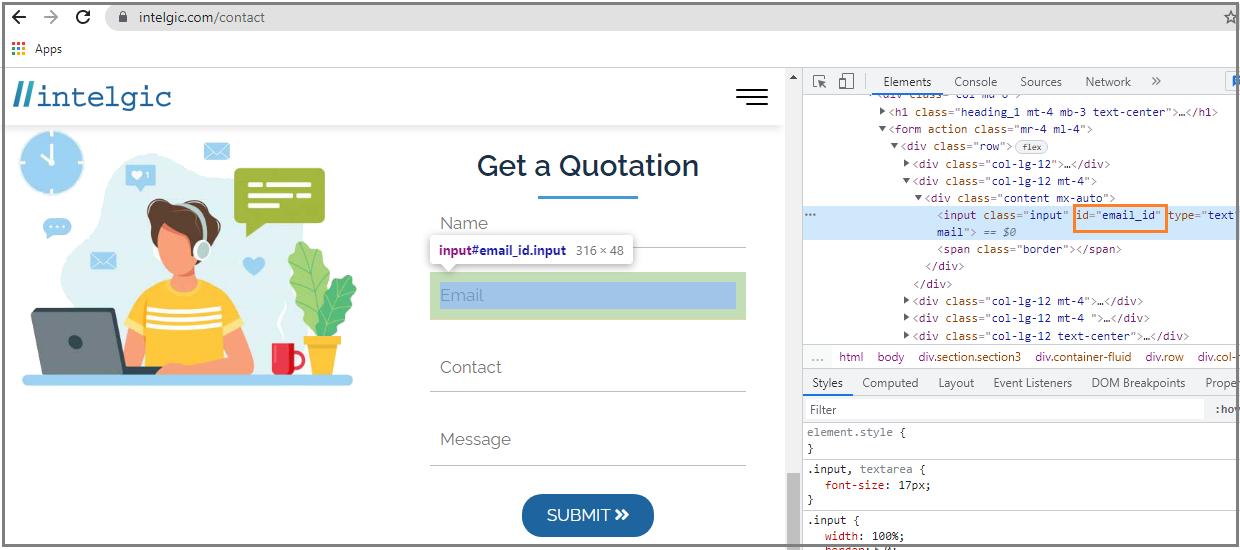
- Copy the element id of email and then paste it in the DWmaker tools under Element Search Parameter, which is as shown below.

- Next, click on Done.
- Enter the element text as Set Text.
- And then go to the Additional Parameters and enter your mail id in the Parameter Value.
n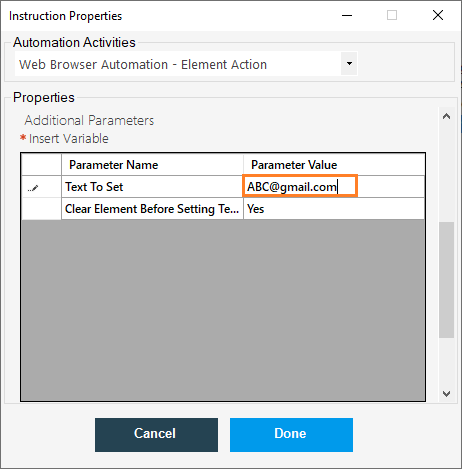
- Repeat the same steps to add Contact and Message details.
- Next click on the Close Browser command under Web Browser Automation, once the Instruction Properties pop-up window will open, enter the instance name and then click on the Done.
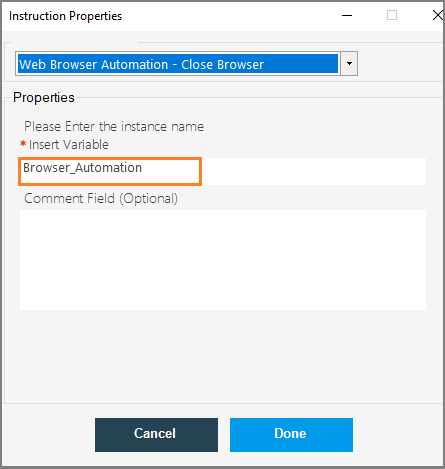
- Now save the code and then run the robot.
- Once the robot runs successfully, the given details will be added to the website and immediately the browser will be closed.
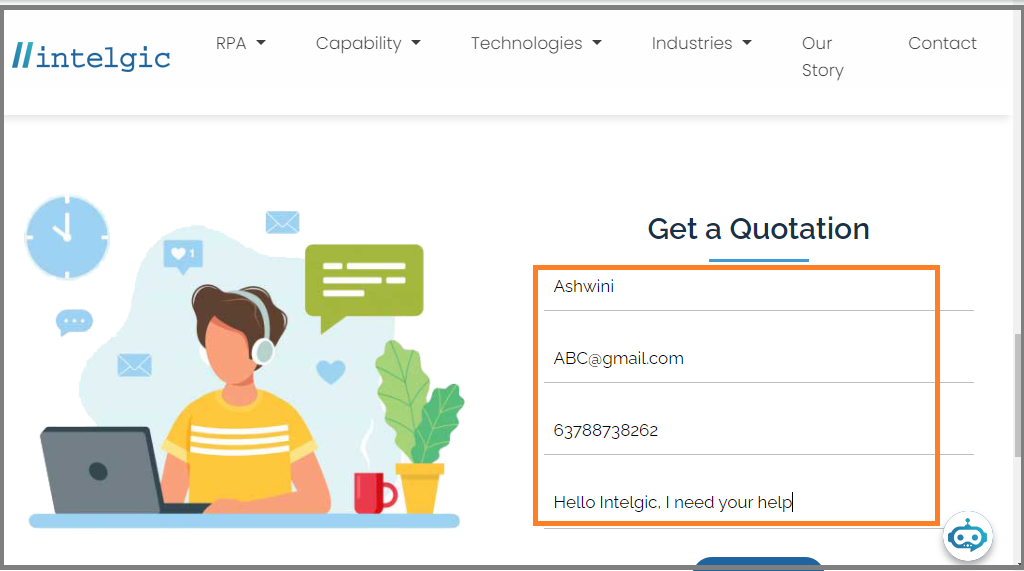
17.2.Navigate Back/Forward
The Navigate Back command is used to move back to its previous location in the web browser.
In the same way, the Navigate Forward command is used to move forward to the given URL.
- Let us see what are the steps present in this operation.
- Here, first, we need to create a browser, so click on Create Browser command under Web Browser Automation, once the Instruction Properties pop-up window will open, enter all the required details and then click on Done.

- Next, click on the Navigate to URL command, once the Instruction Properties pop-up window will open, enter,
- The instance name
- Enter the URL and then click on Done.
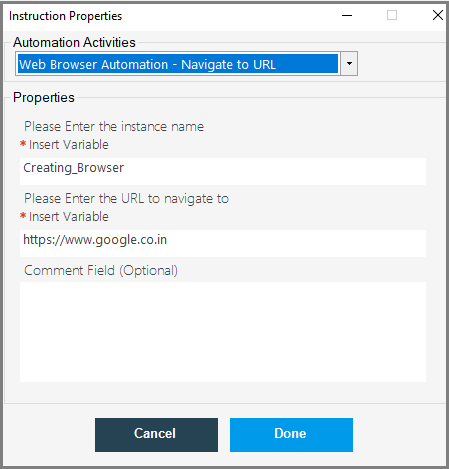
- Next, click on the Navigate to Forward command, once the Instruction Properties pop-up window will open, enter the instance name and then click on Done.

- Next click on the Navigate to URL command, once the Instruction Properties pop-up window will open, enter the instance name and then click on Done.

- Next, click on the Navigate to URL command, once the Instruction Properties pop-up window will open, enter the instance name and then click on Done.
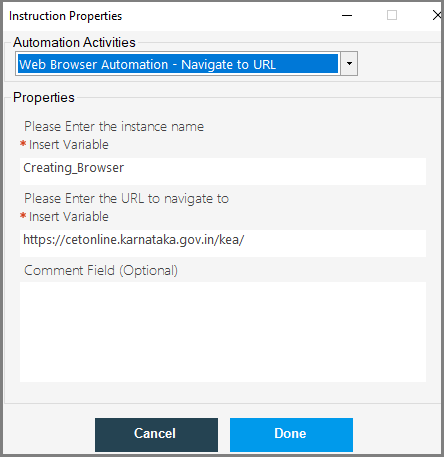
- Next, click on Navigate to Back command once the Instruction Properties pop-up window will open, enter, instance name and then click on Done.

- Now, save the code and then go to the Actions tab and click on Run.
- Once the robot runs successfully, the given URL window will open and then get back to the previous web page.
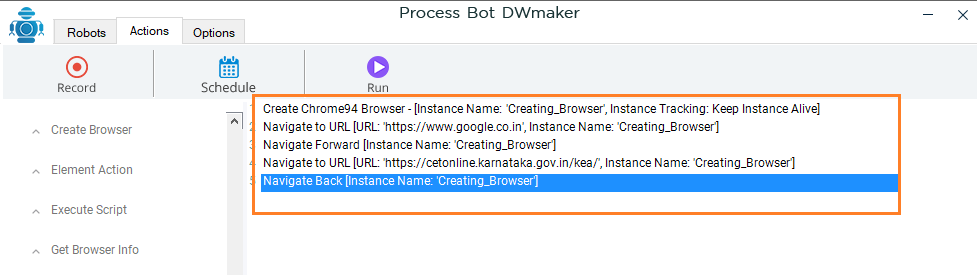
17.3.Refresh
The Refresh command is used to reload the current web page window. Let us see how to perform this operation using the DWmkaer automation tool.
Click on Create Browser command, once the Instruction Properties pop-up window will open, enter the instance name and then click on Done.
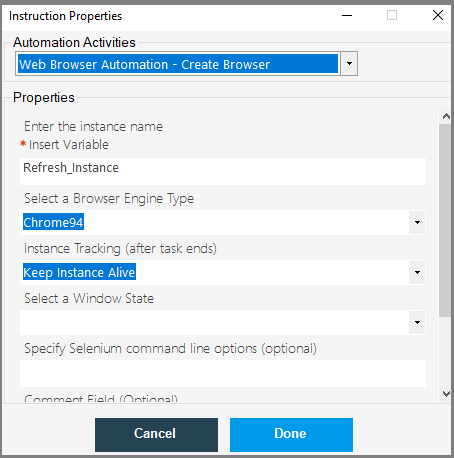
Next, click on Navigate to URL command, once the Instruction Properties pop-up window will open, enter the instance name and URL to navigate and then click on Done.

Next, click on the Refresh command, once the Instruction Properties pop-up window will open, enter the instance name and then click on Done.

Now save the code and go to the Actions tab, and then click on Run.
Once the robot runs successfully, the given web page window will be refreshed.
17.4.Execute Script
The Execute Script command is used to execute JSON, Javascript code in the context of the currently selected window.
The first step here is to create a browser.
- Click on the Create Window command, once the Instruction Properties pop-up window will open, enter the instance name and then click on Done.
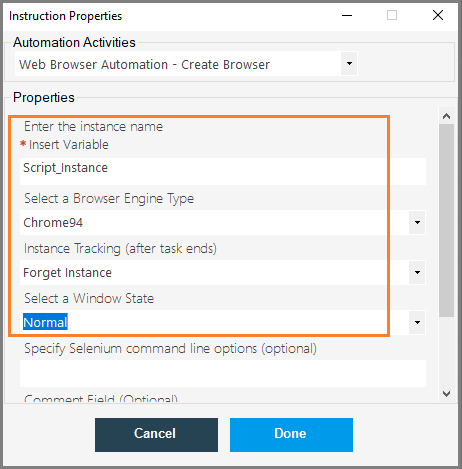
- Next, click on Navigate URL, once the Instruction Properties pop-up window, enter the Instance name and URL that you want to open, and then click on Done.
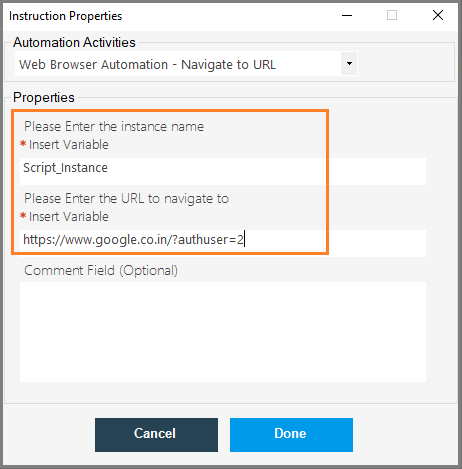
- Next, click on Execute Script command, once you navigate to the Intriction Properties pop-up window, enter instance name, enter script code and then click on Done.
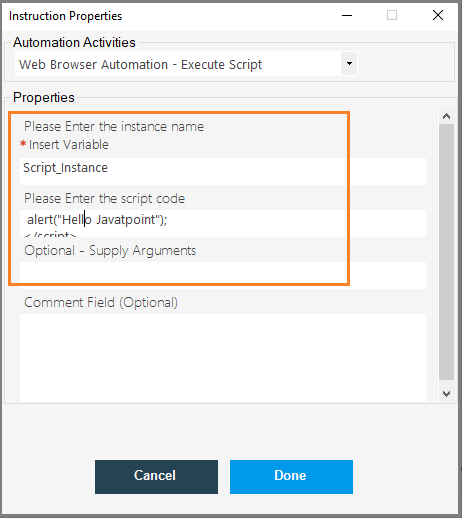
- Now save the code and then go to the Actions tab and click on Run.
- Once the robot runs successfully, the given script will be executed in the selected window.
17.5.Get Browser Info
The Get Browser Info command is used to get the information of the given browser based on a given property such as Window Title, Window URL, Current Handle ID, HTML Page Source, Handle ID List.
Let us see how to perform this operation using the DWmaker automation tool.
- Click on the Create Browser command, once the Instruction properties pop-up window will open, enter the instance name and then click on Done.
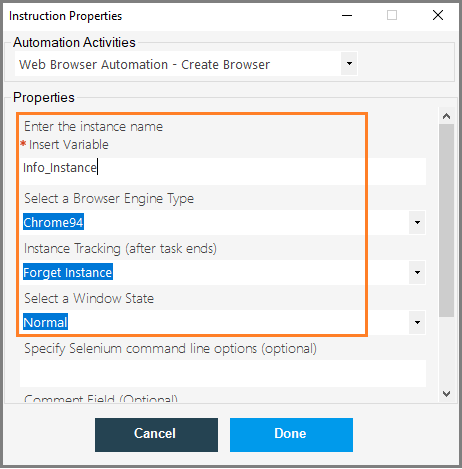
- Next click on the Navigate to URL command, once the Instruction Properties pop-up window will open, enter the instance name and URL of the browser that you want to get the information and then click on Done.
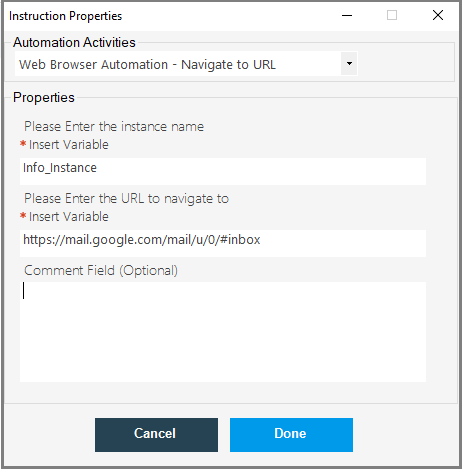
- Next, click on the Get Browser Info command, once the Instruction Properties pop-up window will open, enter the instance name and then enter the instance name.
- Next click on the Indicate Which Info Property to Retrieve drop-down list and select which one you want to get the information.
- If you select the Window URL, you will the complete URL of the given browser window.
- If you select the window Title, then you will the tile of the given browser window.
- Next, enter the variable to receive the property information and then click on Done.
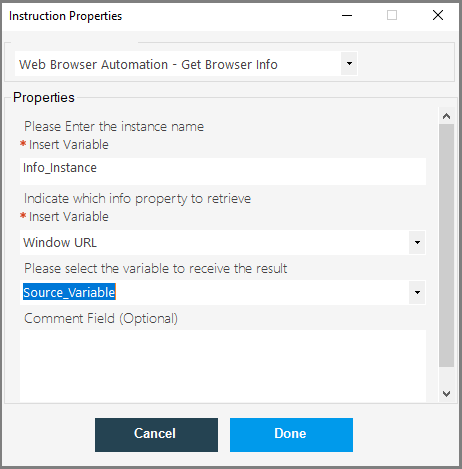
- Next, click on the Show Message command under Miscellaneous Operation, once the Instruction Properties pop-up window will open, enter the variable name and then click on Done.

- Now, save the code and then run, once the robot will run successfully, the information will be displayed on the output message box based on the selected property.
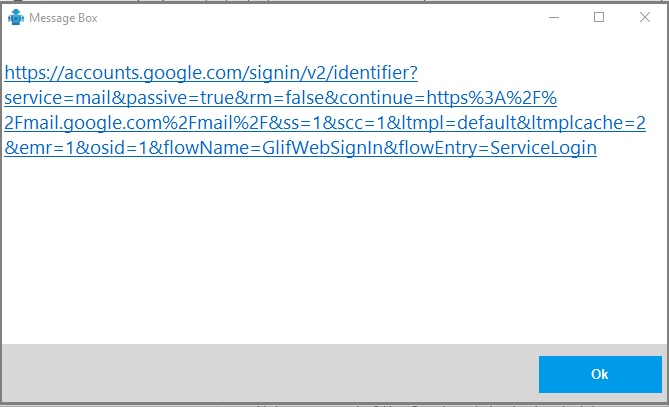
- If I select the window title and run the code, then the window title will be displayed on the output message box.
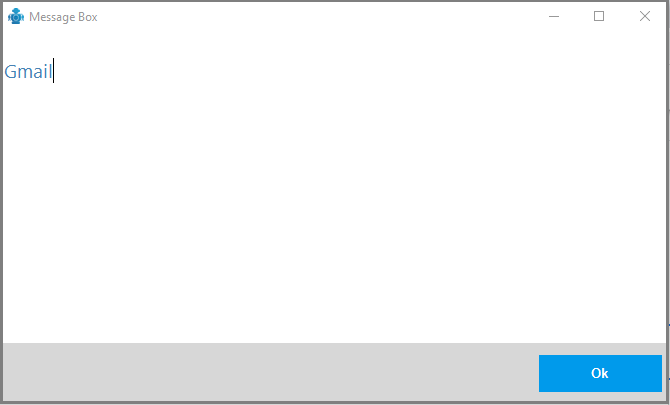
- If you select the HTML Page Source, then the output will be as below
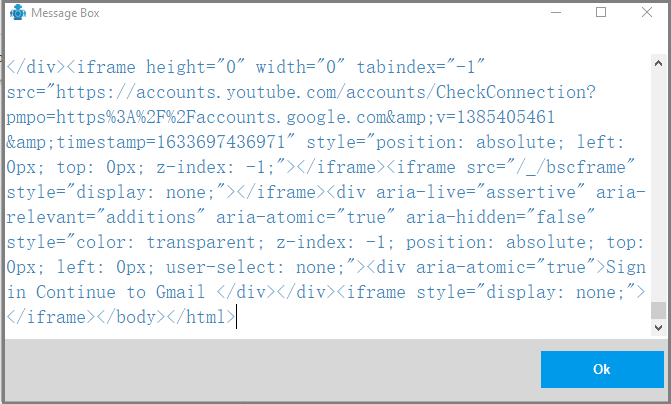
- This is how we can get the information about the given browser window.
17.6.Switch Browser Window
The Switch Browser Window command is used to switch to the given browser window when you have opened multiple windows in your system.
Let us see how to perform this operation.
- Click on Create Browser Command, once the pop-up window will open, enter the instance name and then click on Done.

- Next, click on Navigate to URL command, once the Instruction Properties pop-up window will open, enter the instance name and URL that you want to navigate and then click on Done.
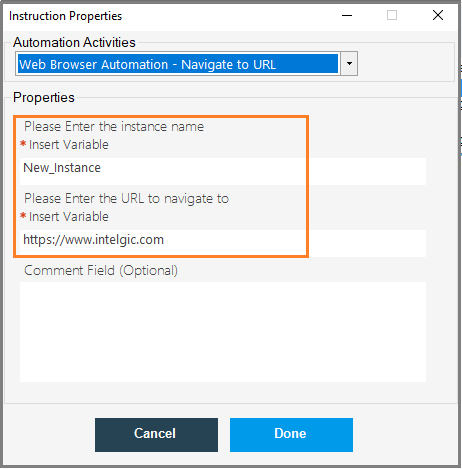
- In this operation, we have to create multiple browsers each with different instances.
- I am creating three browsers with three different instances.
- Click on Create Browser Command, once the pop-up window will open, enter the instance name and then click on Done.
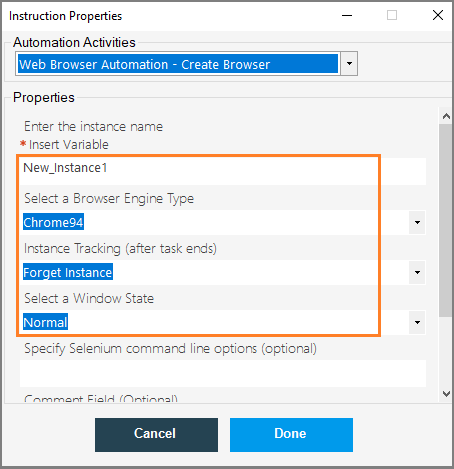
- Next, click on Navigate to URL command, once the Instruction Properties pop-up window will open, enter the instance name and URL that you want to navigate and then click on Done.
- Click on Create Browser Command, once the pop-up window will open, enter the instance name and then click on Done.

- Next, click on Navigate to URL command, once the Instruction Properties pop-up window will open, enter the instance name and URL that you want to navigate and then click on Done.
- Next, click on the Switch Browser Window command, once the Instruction Properties pop-up window will open, enter the
- Instance name
- Click on the select the type of match to make a drop-down and select Either Window URL, Window Hanle Id, or Window Title.
- Click on the please define a match specification drop-down and select the either Contains Match or Exact Match option.
- Ans, click on Indicate if the search is case sensitive drop-down and select Either Yes/No.
- If you select Yes, then you have to give the complete URL of the website that you want to switch to the browser window.
- Next, enter the URL and then click on Done.
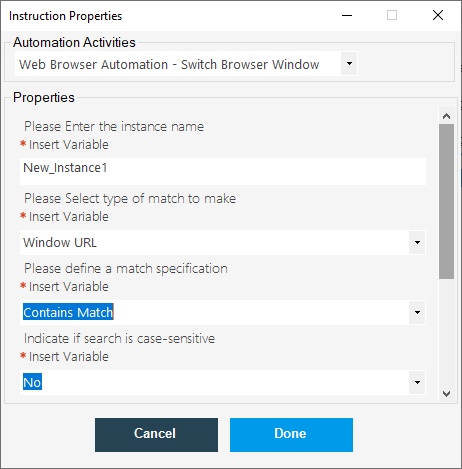
- Now, save the code and run, once the robot runs successfully, the given browser window will be open and the robot switched to the URL which you have given in the switch URL property window.
17.7.Switch Browser Fame
The Switch Browser Frame command is used to switch to the current frame in the browser window.
Where the frame is a component of a web page or browser window that shows content independently of its container and may load content independently in the context of a web browser.
Let us see how to switch to the select frame by using the DWmkaer automation tool.
- First click on the Create Browser, once the Instruction Properties pop-up window will open, enter the instance name and then click on Done.
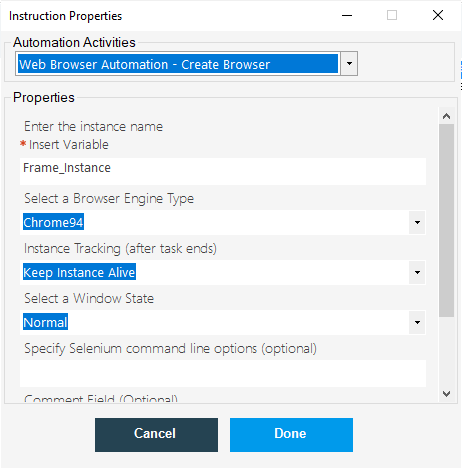
- Next click on the Navigate URL command, once the Instruction Properties pop-up window will open, enter the instance name and then the URL, and then click on Done.

- Next click on the Switch Browser Frame command, once the Instruction Properties pop-up window will open, enter the instance name, select the frame to find by type by clicking on the drop-down.
- Next, enter the index number or ID, or Frame name.
- And then select the switch to option by clicking on the Insert variable drop-down list.
- And then click on Done.
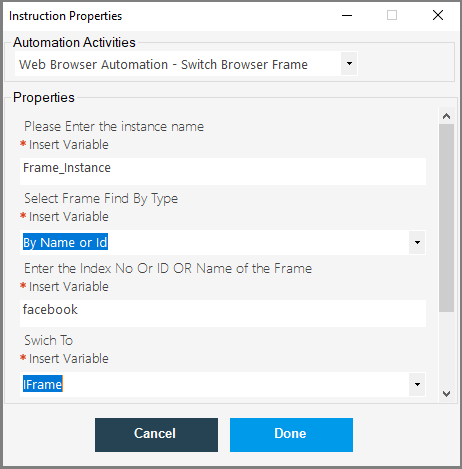
- Now, save the code and then click on run, once the robot runs successfully, the robot will be switched to the given frame of the web browser.
18.Data Table Automation
What is Data Table:
The data table is one of the most fundamental components of business intelligence. It consists of a sequence of columns and rows that intersect in cells, as well as a header row that states the names of the columns, to make the table’s information intelligible to the end-user. A tabular report is a name for this sort of table in BI. A tabular report is primarily but not exclusively used to keep track of data.
Data tables are the most fundamental and yet one of the most valuable components of BI.
Data Table Automation:
A data table is a structured set of data that is held in an excel sheet, database, etc., while data table automation is a process to manage all the data table activities (table creation, read the table, merge table, fetch table data, and so forth ) robotically.
Data Table Automation in DWmaker:
DWmaker is a robotic process automation tool that allows users to manage and automate all their data table management tasks. The tool is integrated with a number of data table automation commands in order to operate a number of data table operations. The data table automation command of the DWmaker tool holds a few more sub-command options such as:
- Create Data
- Read data
- Filter Data
- Merge Data
- Append Data and etc…
18.1.Create Data Table
The Create Data Table command is used to create a blank data table. Let us see what are the steps present in this automation process.
- Click on the Assign Data Table command under Data Table Automation, once the Instruction Properties pop-up window will open enter the data table name and data table instance and then click on Done.

- Next click on the Create Data Table command, once the Instruction Properties pop-up window will open, enter the data table name to be created and then enter the column name and select the data type, which is as shown below.
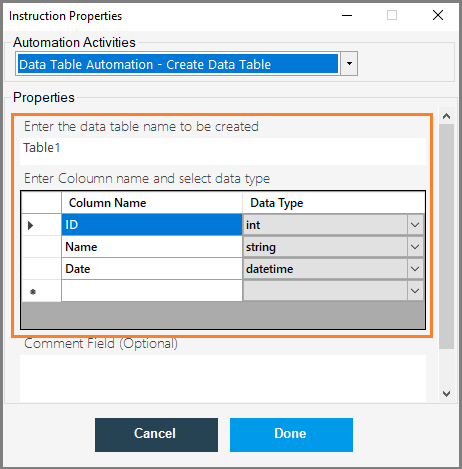
- Next, click on the Preview Data Table, once the Instruction Properties pop-up window will open enter the instance name and then click on Done.

- Next, save the code and then click on run, once the robot runs successfully, the preview data table with column name will be displayed on the output message box.
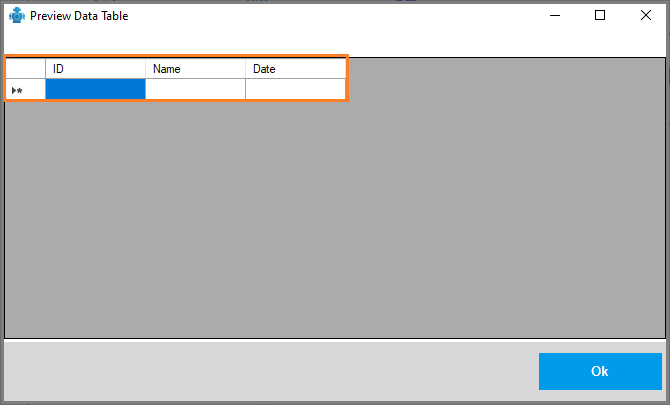
- So, the data table has been created with the given column names as shown above.
18.2.Append Data Table
The Append Data Table command is used to add the content to the data table. We can also add content to the blank data table, which keeps the current data and adds new data to the data table.
The First step here is we need to Assign a data table instance and create a data table and then we can append data to the data table.
Let us see what are the steps present in this automation process.
The Create Data Table command is used to create a blank data table. Let us see what are the steps present in this automation process.
- Click on the Assign Data Table command under Data Table Automation, once the Instruction Properties pop-up window will open enter the data table name and data table instance and then click on Done.
- Next click on the Create Data Table command, once the Instruction Properties pop-up window will open, enter the data table name to be created and then enter the column name and select the data type, which is as shown below.
- Next, click on the Append Data Row command, once the Instruction Properties pop-up window will open, enter the Instance name and then, enter the row values as JSON array format.
- Here, I am passing the JSON values as shown below
[{‘ID’:’1′,’Name’:’Ashwini’,’Date’:’10/12/2021′},{‘ID’:’2′,’Name’:’Rajesh’,’Date’:’11/12/2021′}]
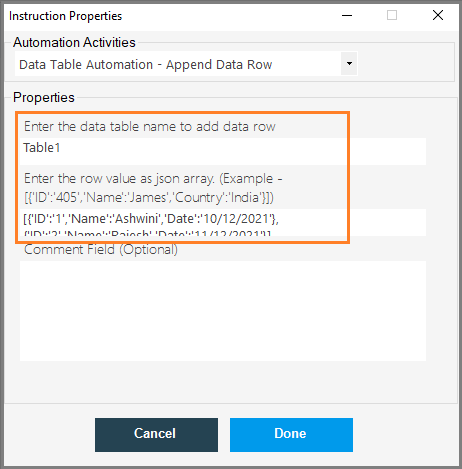
- Next click on the Preview Data Table, once the Instruction Properties pop-up window, enter the data table name and click on Done.
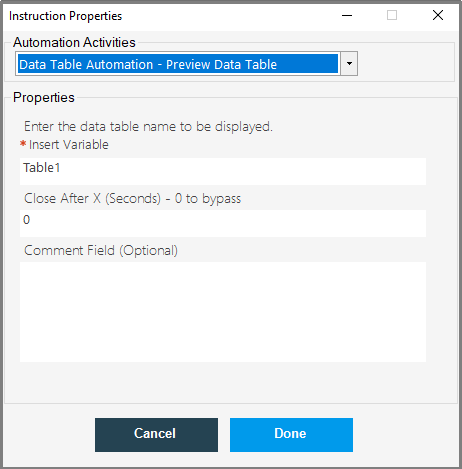
- Next, save the code and then click on Run.
- Once the robot runs successfully, the preview data table with data will be displayed on the output message box, which is as shown below.
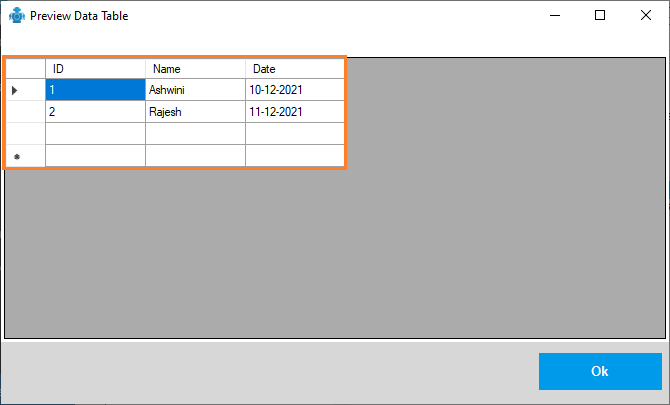
18.3. Merge Data Table
The Merge Data Table command is used to merge two or more data tables into a single data table.
Let us see, how we can perform merge data tables using the DWmaker automation tool.
- Click on the Assign Data Table Instance under the Data Table Automation, once the Instruction Properties pop-up window will open, enter the data table name and create a data table instance and then click on Done.

- Next, click on the Create Excel Data Table command under Excel Automation, once the Instruction Properties pop-up window will open, enter,
- The Data Table Name
- Workbook file path location
- Sheet name from which sheet you want to merge the data table
- And, then click on Done.
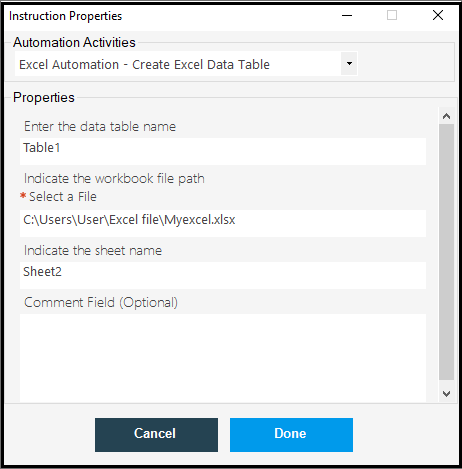
- To merge two data tables we have to create another instance by repeating the above steps.
- Click on the Assign Data Table Instance under the Data Table Automation, once the Instruction Properties pop-up window will open, enter the data table name and create a data table instance and then click on Done.
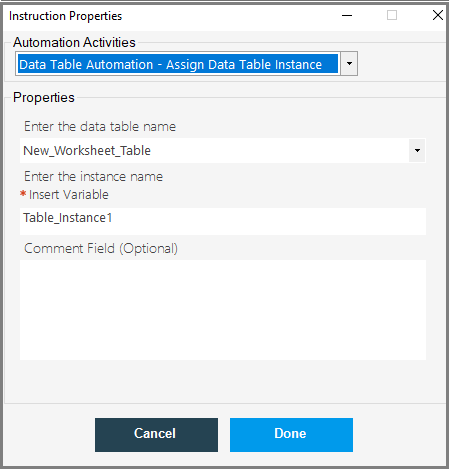
- Next, click on the Create Excel Data Table command under Excel Automation, once the Instruction Properties pop-up window will open, enter,
- The Data Table Name
- Workbook file path location
- Sheet name from which sheet you want to merge the data table
- And, then click on Done.
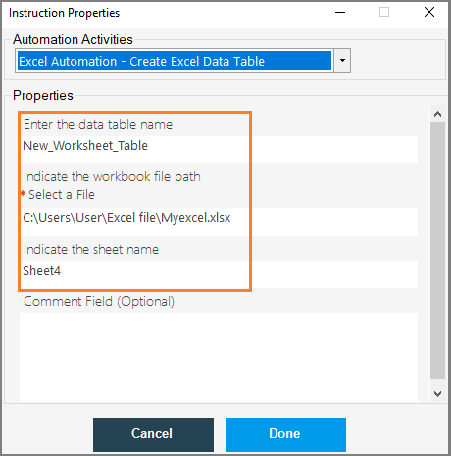
- Next, click on the Merge Data Table command, once the Instruction Properties pop-up window will open, enter the required and then click on Done.

- Next, click on Preview Data Table, once the Instruction Properties pop-up window will open, enter all the details and click on Done.
- In the Preview data table window, we have to provide the name of the other data table other than the source data table.
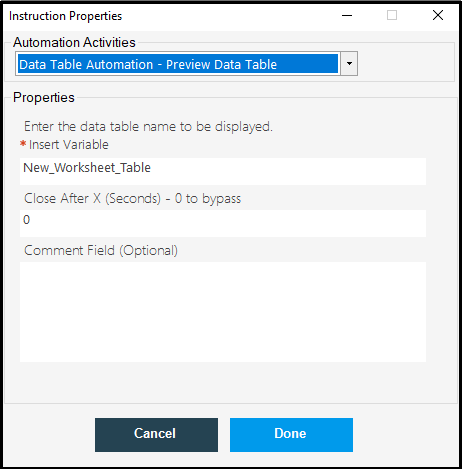
- Next, save the code and then run, once the robot runs successfully, the merge table preview will be displayed as shown below.
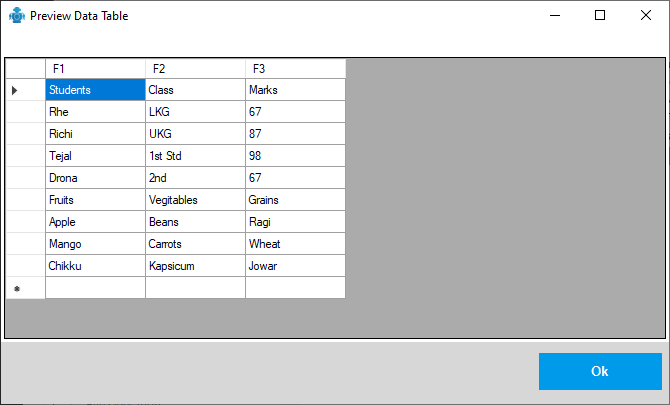
18.4.Filter Data Table
The First step here is we need to Assign a data table instance and create a data table and then we can append data to the data table.
Let us see what are the steps present in this automation process.
The Create Data Table command is used to create a blank data table. Let us see what are the steps present in this automation process.
- Click on the Assign Data Table command under Data Table Automation, once the Instruction Properties pop-up window will open enter the data table name and data table instance and then click on Done.
- Next click on the Create Data Table command, once the Instruction Properties pop-up window will open, enter the data table name to be created and then enter the column name and select the data type, which is as shown below.
- Next click on Preview Data Table, Once the Instruction Properties pop-up window will open, enter the instance name and then click on Done.

- Next, click on the Append Data Row command, once the Instruction Properties pop-up window will open, enter the Instance name and then, enter the row values as JSON array format.
- Here, I am passing the JSON values as shown below
[{‘ID’:’1′,’Name’:’Ashwini’,’Date’:’10/12/2021′},{‘ID’:’2′,’Name’:’Rajesh’,’Date’:’11/12/2021′}] - Next click on the Preview Data Table, once the Instruction Properties pop-up window, enter the data table name and click on Done.
- Next, save the code and then click on Run.
- Once the robot runs successfully, the preview data table with data will be displayed on the output message box, which is as shown below.
- Next click on the Assign Data Table Instance command, once the Instruction Properties pop-up window will open, enter the new data table name and new data table instance name and then click on Done.
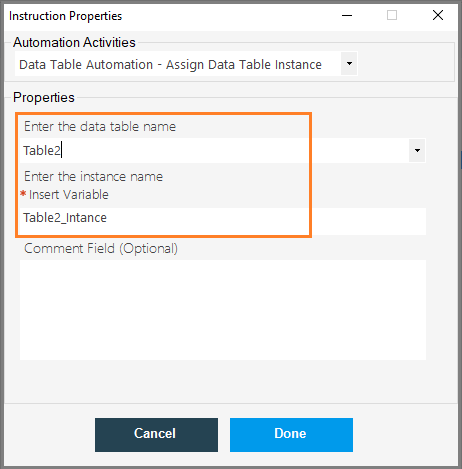
- Next, click on the Filter Data Table command, once the Instruction properties pop-up window will open, enter the instance name.
- And, then, select the logical operator to perform the logic operation on the given data table.
- Here, we have AND and OR operators, where AND operator is used to perform a logical conjunction on given vales.
- The logical OR operator is used to perform logical disjuction on given values.
- Here, I am performing the AND operation and giving the filter condition, to filter the values where ID=1
- Select the condition in the Slect the Logical Condition table which is as shown below.
- And enter the output data table name to receive result set.

- Now, click on the Preview Data Table command , once the Instcruction Proprties pop-up window will open, enter the instance name and then click on Done.
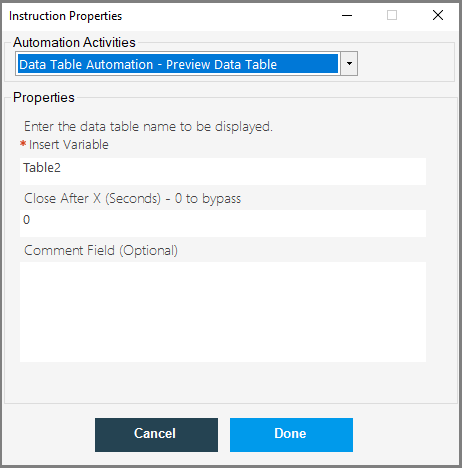
- Now, save the code and click on Run, once the robot runs successfully, based on the given condition, the data table filter the data and the preview of the data table will be displayed on the output message box.
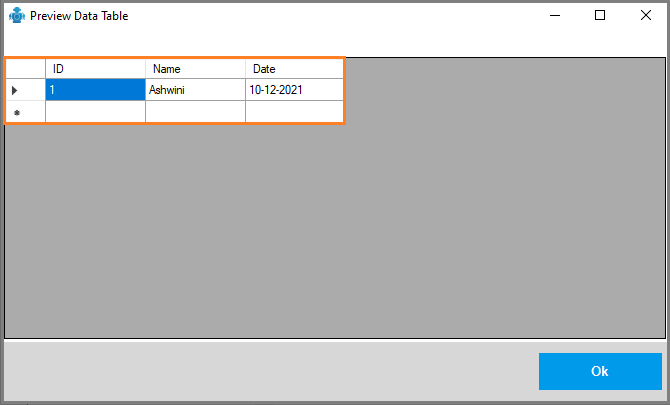
18.5.Convert Data Table to JSON
The Convert Data Table to JSON is used to convert the Data table values into JSON format.
Let’s see what are the steps present in this operation.
- Click on the Assign Data Table Instance, once the Instruction Properties pop-up window will open, enter the data table name and data table instance name and then click on Done.
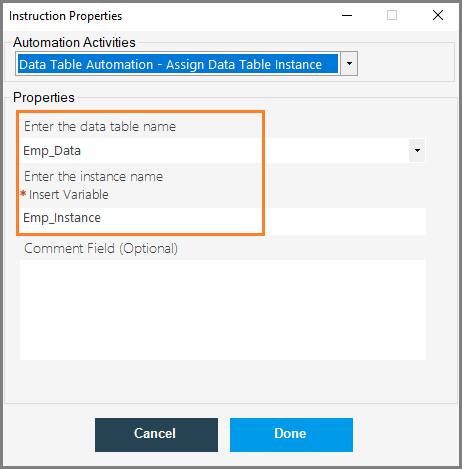
- Next, click on the Create Data Table command, once the Instruction Properties pop-up window will open, enter the data table name.
- And, then enter the column name and then select the data type.
- Click on Done.

- Next, click on the Append Data Row command, once the Instruction Properties pop-up window will open, enter the data table name to add the row.
- And, enter the row values as JSON array and then click on Done.

- Next, click on the PReview data table command, once the Instruction Properties pop-up window will open, enter the table name and then click on Done.

- Next, click on the Convert Data Table to Json command, once the Instruction Properties pop-up window will open, enter the data table name and then enter the output variable name, and then click on Done.
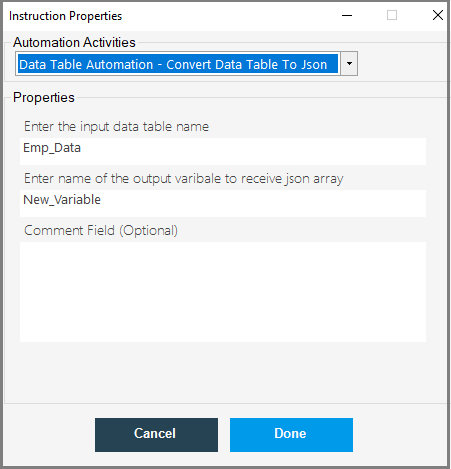
- Next, click on the Show Message Options command, once the Instruction Properties pop-up will open, enter the output variable am then click on Done.
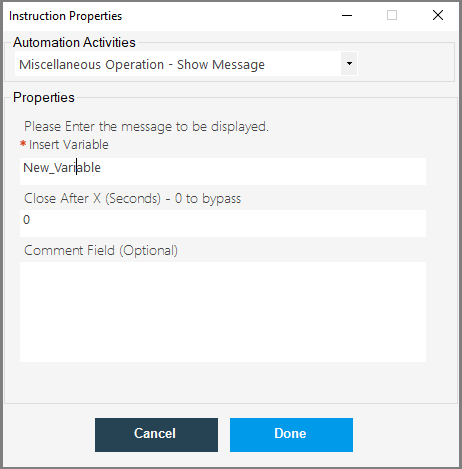
- Next, save the code and then click on run, once the robot runs successfully, the data table values will be converted into the JSON format, which is as shown below.
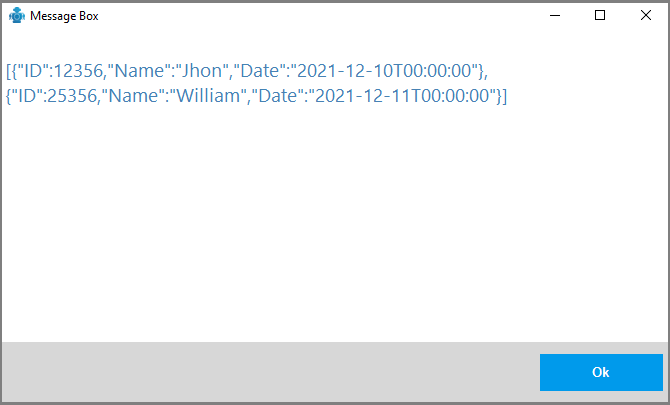
18.6.Convert HTML to Data Table
The Convert HTML to Data Table command is used to convert unstructured data to the structured data table.
Let us see, how to perform this operation step by step by using DWmaker.
Our first step is to get the HTML data from the website, we can scrape the data from the website by using the web browser automation command.
Let us create a browser first, click on the Create Browser command under Web Browser Automation, once the Instruction Properties pop-up window will open, enter all the details and then click on Done.
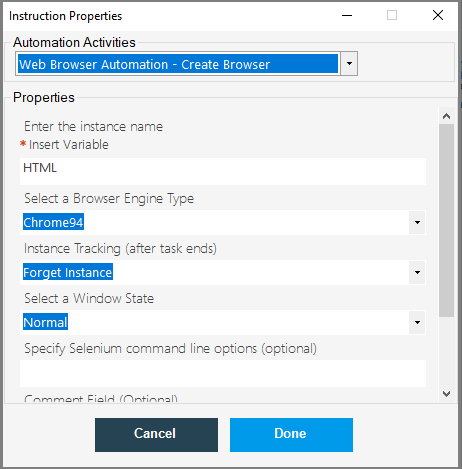
Next, click on the Navigate to URL command, once the Instruction Properties pop-up window will open, enter the instance name and then the URL to which you want to navigate to and then click on Done.

Next click on the Element Action command, once the Instruction Properties pop-up window will open, enter the Instance Name, Element Search Methods, and Element Search Parameter, and Select the element Action as Wait for Element to exist and enter the additional parameter as 15 and then click on Done.
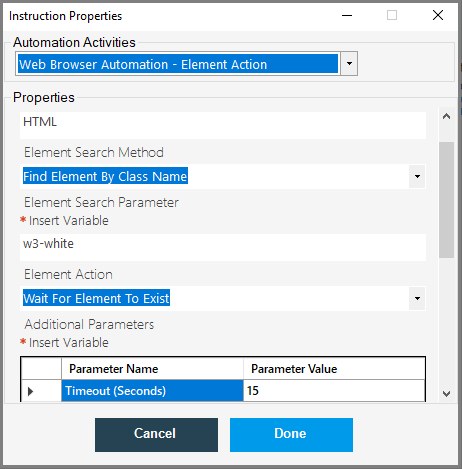
Once again click on Element Action, once the Instruction Properties pop-up window will open, enter all the details as shown in the below image and then click on Done.
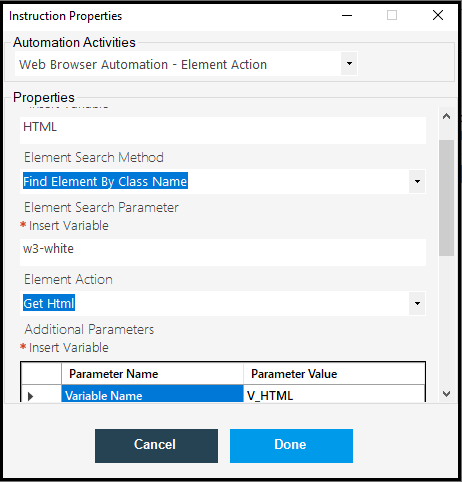
Here, I am using the sample HTML data from the website and scraping the data by using the element by class Name.
Next, click on the Assign Data Table Instance command, once the Instruction Properties pop-up window will open, enter the instance name and then click on Done.

Next, click on Convert to HTML to Data Table, once the Instruction Properties pop-up window will open, enter all the details and then click on Done.
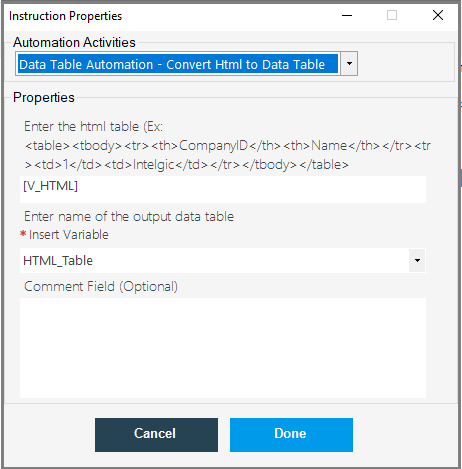
Next, click on the Preview Data Table property window, once the Instruction Properties pop-up window will open enter the instance name and then click on Done.

Now, save the code and click on run, once the robot runs successfully, the HTML data will be converted into the Data Table as shown below.
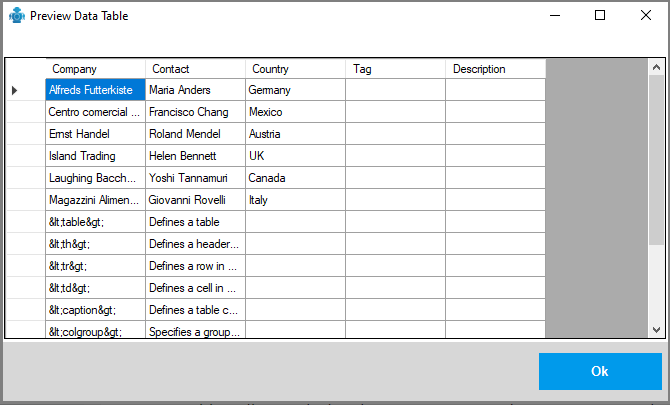
This is how we can easily convert HTML data into the Data Table.
18.7.Convert List to Data Table
Convert List to Data Table command is used to convert the list object into the Data Table format. Let us see what are the steps present in this process by using the Dwmaker automation tool.
- Our first step is to read the Json array, i have json array,which is as shown below.
[{‘ID’:’1′,’Name’:’Ashwini’,’Date’:’10/12/2021′},{‘ID’:’2′,’Name’:’Rajesh’,’Date’:’11/12/2021′},{‘ID’:’5′,’Name’:’Rakhi’,’Date’:’3/10/2019′}] - Click on the Read Json Array command, which is present under the Json Operation.
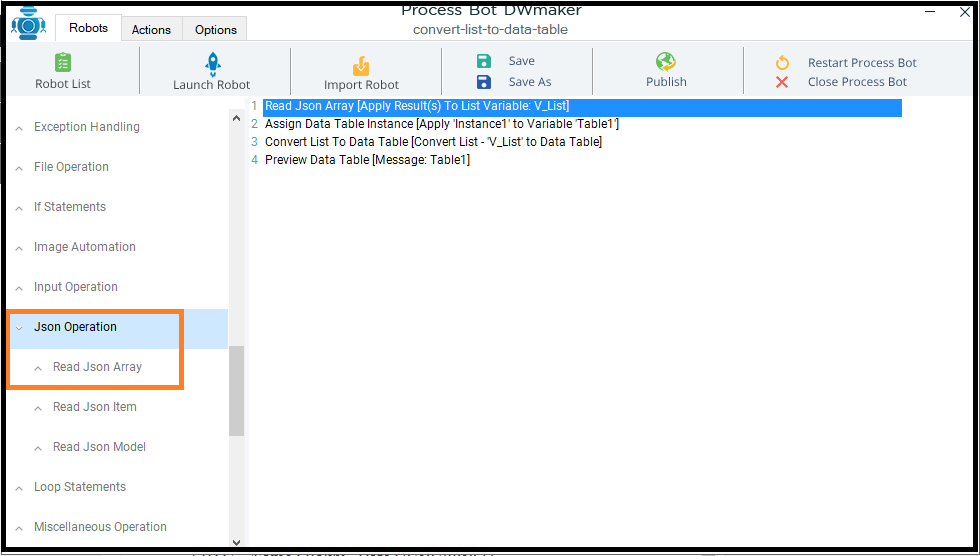
- Next, click on Asign Data Instance command, once the Instructon Properties pop-up window will open, enter instance name and data table and then click on Done.
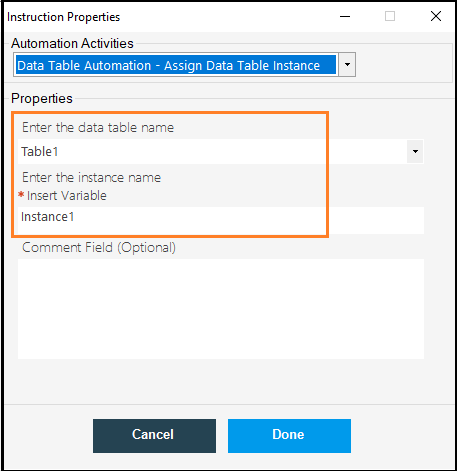
- Next, click on Convert List to Data Table command, once the InstructionProperties pop-up window will open, eter the object which hold the list int which is V_List and then enter the output data table name and then click on Done.

- Nex, click on Preview Data Table command,once the Instruction properties pop-up window will open, enter the data table name to be displayed and then click on Done.

- Now save the code and run, once the robot run successfully, the list object has been converted into the data table and the same will be displayed on the preview data table which is as shown below.
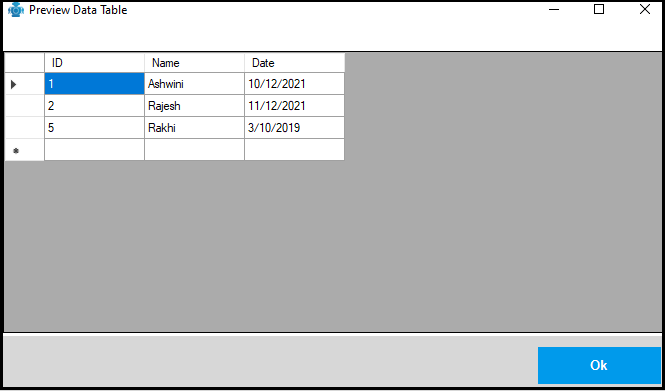
- This is how we can convert list object to data table by using the command Convert List to Data Table.
18.8.Convert Json to List
The Convert List to Data Table command is used to convert the JSON format text to data tale format.
- Click on the Assign Data Table Instance, once the Instruction Properties pop-up window will open, enter the Data Table name and Data Table Instance and then click on Done.

- Next click on the Create Data Table command, once the Instruction Properties pop-up window will open, enter the data table name to be created and then enter the column name and select the data type, which is as shown below.
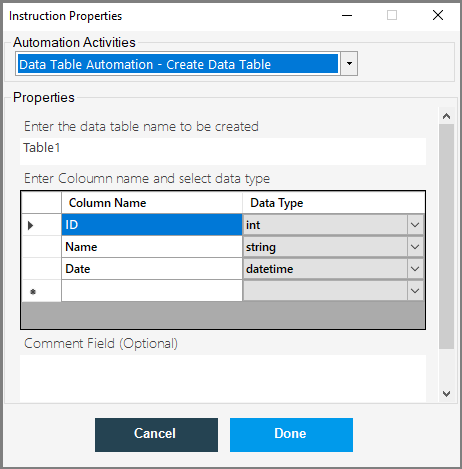
- Next, click on the Preview Data Table, once the Instruction Properties pop-up window will open enter the instance name and then click on Done.
- Next, save the code and then click on run, once the robot runs successfully, the preview data table with column name will be displayed on the output message box.
- So, the data table has been created with the given column names as shown above.
- Next, click on the Append Data Row command, once the Instruction Properties pop-up window will open, enter the Instance name and then, enter the row values as JSON array format.
- Here, I am passing the JSON values as shown below
[{‘ID’:’1′,’Name’:’Ashwini’,’Date’:’10/12/2021′},{‘ID’:’2′,’Name’:’Rajesh’,’Date’:’11/12/2021′},{‘ID’:’2′,’Name’:’Rakhi’,’Date’:’3/10/2019′}]
- Next click on the Preview Data Table, once the Instruction Properties pop-up window, enter the data table name and click on Done.
- Once again, click on the Assign Data Table Instance, once the Instruction Properties pop-up window will open, enter the Data Table name and Data Table Instance and then click on Done.

- Next, click on the Read JSON Array ( used to read the JSON array as a list) command under JSON Operations, once the Instruction Properties pop-up window will open, enter the JSON array to read as a list and then enter variable to receive the array list and click on Done.

- Next click on the Show Message command under Miscellaneous Operations, once the Instruction Properties pop-up window will open, enter the variable name and then click on Done.
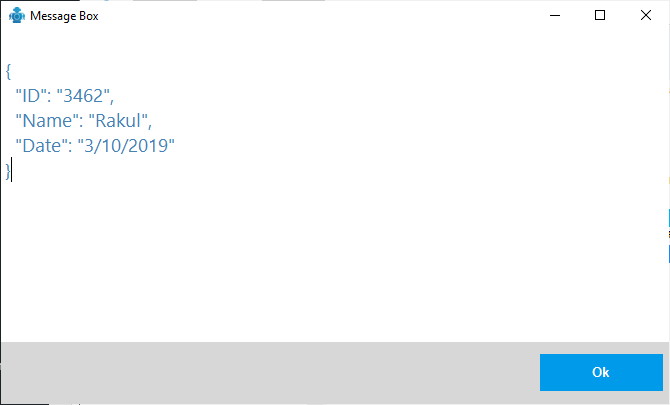
- Once you run the robot, the JSON array will be converted to a list and the same will be displayed on the output message box.
- Our next step is, click on Convert List to Data Table command, once the Instruction Properties pop-up window will open, enter the variable name which is having list data and enter the output data table name and then click on Done.

- Next, click on Preview Data Table, once the Instruction Properties pop-up window will open, enter the output data table and then click on Done.

- Now, save the code and run, once the robot runs successfully, the list will be converted into a data table and the same will be displayed on the preview data table.
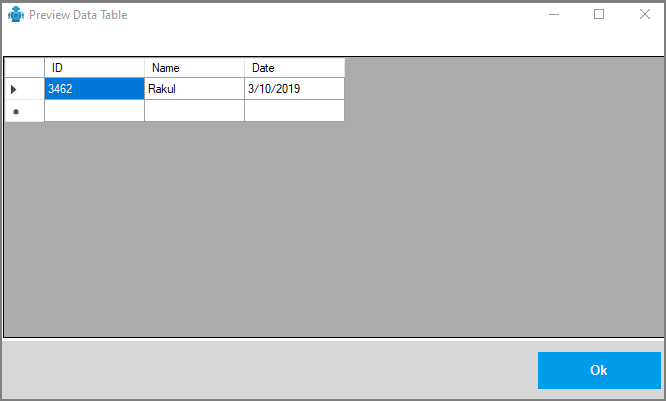
18.9.Convert JSON to Data Table
The Convert JSON to Data Table command is used to convert JSON array into data table format.
- Click on the Assign Data Table Instance, once the Instruction Properties pop-up window will open, enter the Data Table name and Data Table Instance and then click on Done.
- Next click on the Create Data Table command, once the Instruction Properties pop-up window will open, enter the data table name to be created and then enter the column name and select the data type, which is as shown below.
- Next, click on the Preview Data Table, once the Instruction Properties pop-up window will open enter the instance name and then click on Done.
- Next, save the code and then click on run, once the robot runs successfully, the preview data table with column name will be displayed on the output message box.
- So, the data table has been created with the given column names as shown above.
- Next, click on the Append Data Row command, once the Instruction Properties pop-up window will open, enter the Instance name and then, enter the row values as JSON array format.
- Here, I am passing the JSON values as shown below
[{‘ID’:’1′,’Name’:’Ashwini’,’Date’:’10/12/2021′},{‘ID’:’2′,’Name’:’Rajesh’,’Date’:’11/12/2021′},{‘ID’:’2′,’Name’:’Rakhi’,’Date’:’3/10/2019′}]
- Next click on the Preview Data Table, once the Instruction Properties pop-up window, enter the data table name and click on Done.
- Once again, click on the Assign Data Table Instance, once the Instruction Properties pop-up window will open, enter the Data Table name and Data Table Instance and then click on Done.
- Click on Convert JSON to Data Table command under Data Table Automation, once the Instcrutcion Properties pop-up window will open, enter JSON array to convert and then enter the output data table name.
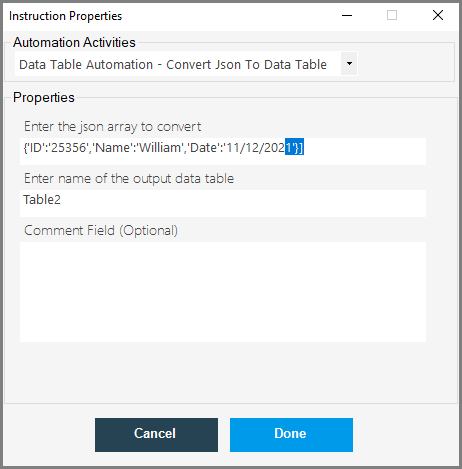
- Next, click on the Preview Data Table command, once the Instruction Properties pop-up window will open, enter the output data table name and click on Done.

- Now, save the code and run, once the robot runs successfully, the JSON array will be converted into the data table and the same will be displayed on the preview data table.
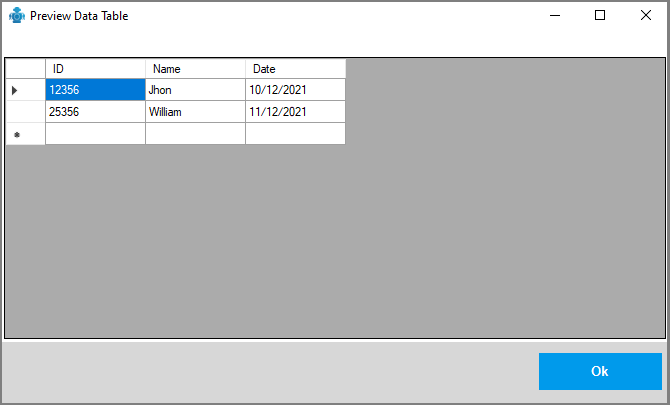
18.10.Generate Data Table
The Generate Data Table command is used to generate a data table by using the specific information present in the text file.
Let us see, how to perform this operation by using the DWmaker automation tool.
Here, our first step is to read the text file present in the Notepad file.
Click on the Read Text File command under Text File Operation, once the instruction properties pop-up window will open, enter file path location and variable name to hold the text file. And then click on Done.
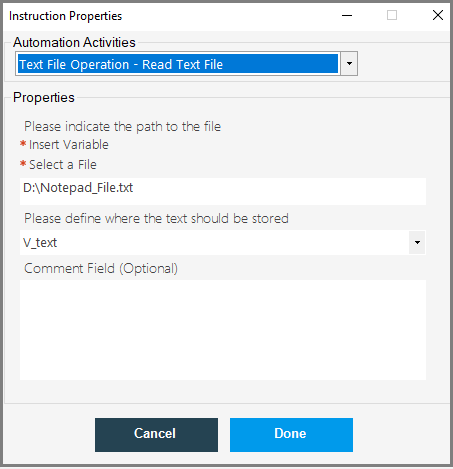
Next, click on Assign Data Table Instance, once the Instruction Properties pop-up window will open, enter the Data Table name and Instance name and then click on Done.
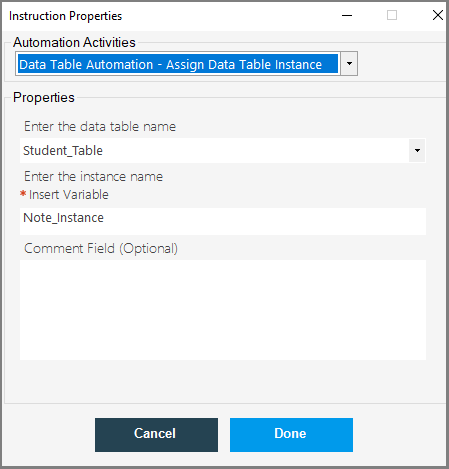
Next, click on Generate Data Table, once the Instruct Properties pop-up window will open, enter a variable name under the unstructured data and select the separator as your preference.
Select yes, if you want to create a header from the first line of your text present in the Notepad, or else select No.
Next, enter the name of the table and then click on Done.
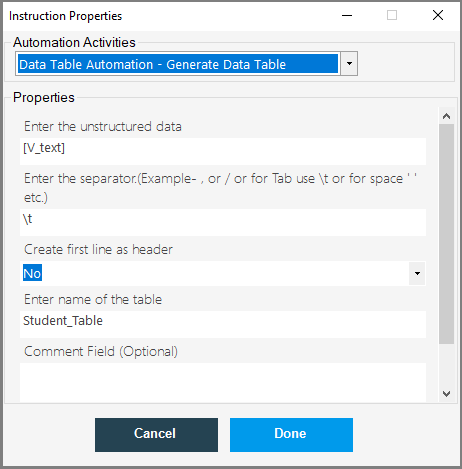
Next, click on the Preview Data Table property window, once the Instruction Properties pop-up window will open, enter the data table name to be displayed.

Next, save the code and then click on Run. Once the robot runs successfully, the preview data table will be displayed on the preview table window.
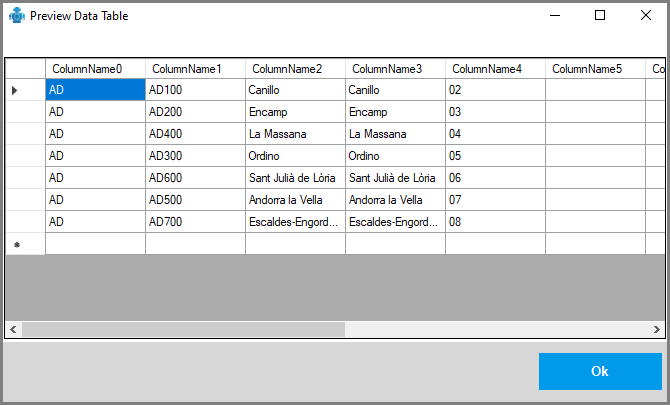
18.11.Read Table
The Read Table command is used to read the data present in the data table, we also have the option to read the data table either by ascending or by descending order.
Let us see, how to perform this operation using the DWmaker automation tool.
Before we read any data table, we must first create a data table and, it should have some data in it.
The Create Data Table command is used to create a blank data table. Let us see what are the steps present in this automation process.
- Click on the Assign Data Table command under Data Table Automation, once the Instruction Properties pop-up window will open enter the data table name and data table instance and then click on Done.
- Next click on the Create Data Table command, once the Instruction Properties pop-up window will open, enter the data table name to be created and then enter the column name and select the data type, which is as shown below.
- Next, click on the Preview Data Table, once the Instruction Properties pop-up window will open enter the instance name and then click on Done.
- Next, save the code and then click on run, once the robot runs successfully, the preview data table with column name will be displayed on the output message box.
- So, the data table has been created with the given column names as shown above.
- Next, click on the Append Data Row command, once the Instruction Properties pop-up window will open, enter the Instance name and then, enter the row values as JSON array format.
- Here, I am passing the JSON values as shown below
[{‘ID’:’1′,’Name’:’Ashwini’,’Date’:’10/12/2021′},{‘ID’:’2′,’Name’:’Rajesh’,’Date’:’11/12/2021′}]
- Next click on the Preview Data Table, once the Instruction Properties pop-up window, enter the data table name and click on Done.
- Next, save the code and then click on Run.
- Once the robot runs successfully, the preview data table with data will be displayed on the output message box, which is as shown below.
- Next click on the Read Table command, once the Instruction Properties pop-up window will open, enter the data table name,
- Select the column identification type, here you can select either by column index or by column name.
- Next, specify the column name or index, (If you select identity by column index then you have to give index number or else column name).
- Next, define a variable name to hold the extracted column data.
- And, select the data sorting order, here you can select either Ascending or Descending or Default option.
- Next click on Done.
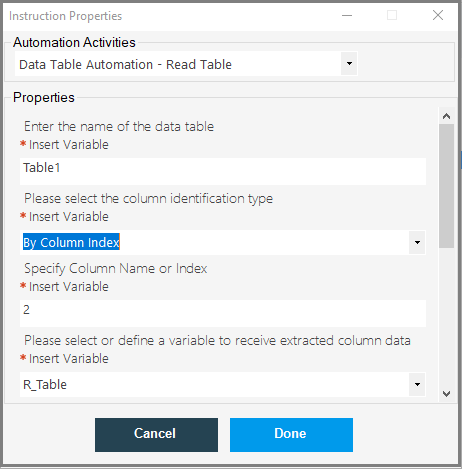
- Next, click on the Preview Data Table command, once the Instruction Properties pop-up window will open, enter the table name and then click on Done.
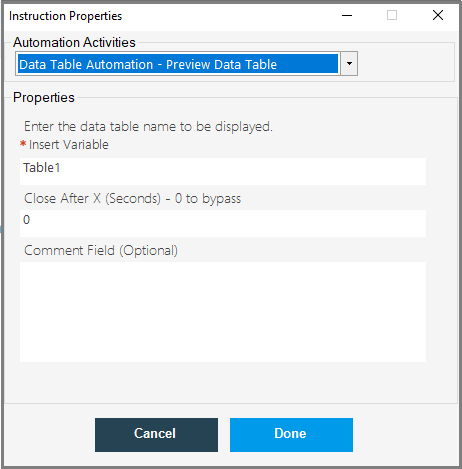
- Now, save the code and run, once the robot runs successfully, the text present in the data table will be read by the robot in the given order.
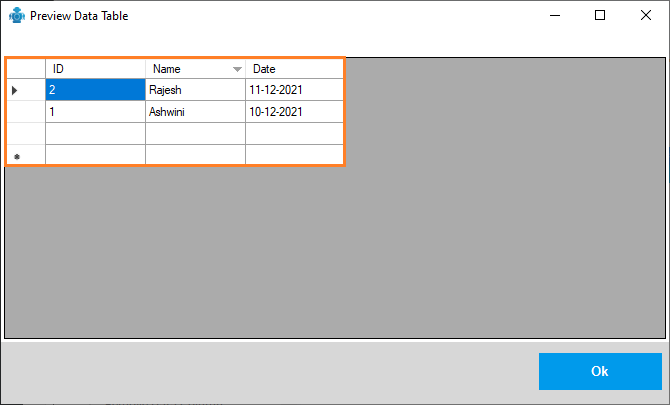
18.12.Append Data Column
The Append Data Column command is used to add a new column to the current data table with identity value.
Let us see what are the steps present in this operation by using the DWmaker automation tool.
Here, our first step is to create a Data table.
Click on the Assign Data Table Instance, once the Instruction Properties pop-up window will open, enter the Data Table name and Data Table Instance and then click on Done.
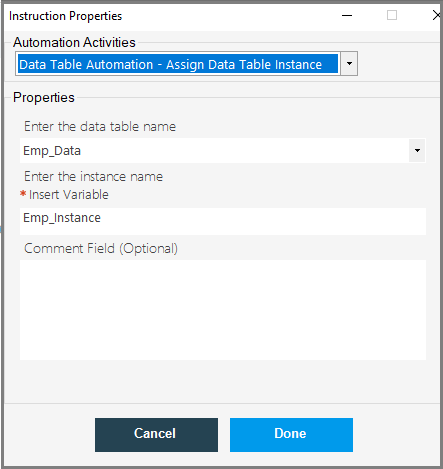
Next, click on Create Data Table command, once the Instruction Properties pop-up window will open, enter the data table name and enter the column name and select the data type and then click on Done.

Next, click on the Append Data Row command, once the Instruction Properties pop-up window will open, enter the data table name to add a Row, and enter the row values in the JSON format which is as shown below.

Next, click on the Preview Data Table command, once the Instruction Properties pop-up window will open, enter the data table name and click on Done.

Next, click on the Append Data Column command, once the Instruction Properties pop-up window will open, enter the table name.
And, enter the column name and select the data type and then select the Yes/ No for Is-Identity.
If you select yes for is identity then the identity value will be increased according to the given value or else select No.
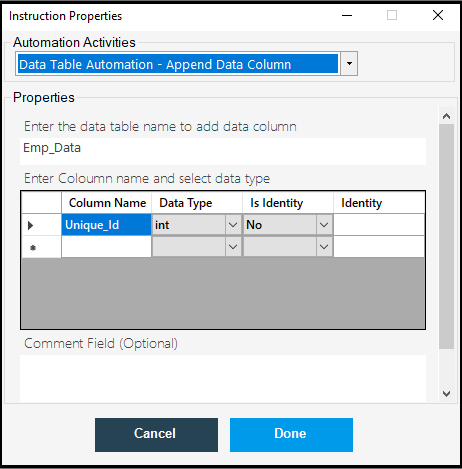
Our next step is to preview the data table. Click on Preview Data Table, once the Instruction Properties pop-up window will open, enter the table name and then click on Done.

Now, save the code and run, once the robot runs successfully, the data table will be displayed on the window which shows the new column has been added to it.
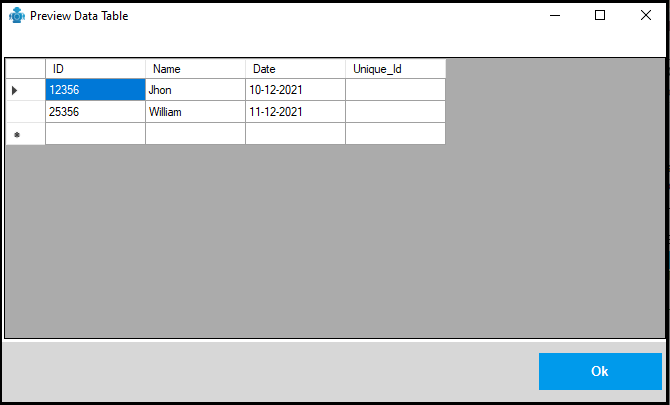
18.13.Remove Data Column
The Remove Data Column command is used to remove the data column from the given data table.
I am using the Emp_Data data table to remove the data column, which is having four columns as shown below.

Click on the Assign Data Table Instance, once the Instruction Properties pop-up window will open, enter the Data Table name and Data Table Instance and then click on Done.
Next, click on Create Data Table command, once the Instruction Properties pop-up window will open, enter the data table name and enter the column name and select the data type and then click on Done.
Next, click on the Append Data Row command, once the Instruction Properties pop-up window will open, enter the data table name to add a Row, and enter the row values in the JSON format which is as shown below.
Next, click on the Preview Data Table command, once the Instruction Properties pop-up window will open, enter the data table name and click on Done.
Next, click on the Append Data Column command, once the Instruction Properties pop-up window will open, enter the table name.
And, enter the column name and select the data type and then select the Yes/ No for Is-Identity.
If you select yes for is identity then the identity value will be increased according to the given value or else select No.
Our next step is to preview the data table. Click on Preview Data Table, once the Instruction Properties pop-up window will open, enter the table name and then click on Done.
Now, save the code and run, once the robot runs successfully, the data table will be displayed on the window which shows the new column has been added to it.
Click on the Remove Data Column command, once the Instruction Properties pop-up window will open, enter the data table name and select the column parse type and then, select the data column name to remove.
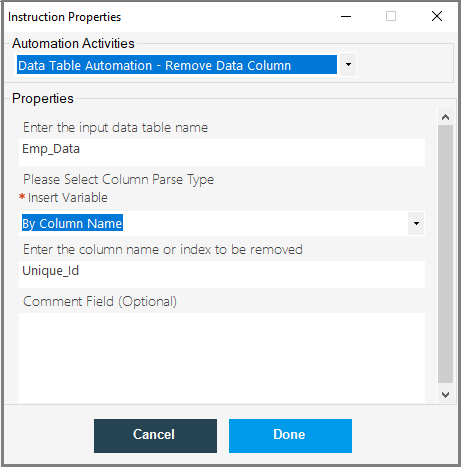
Now, save the code and run, once the robot runs successfully, the data column has been removed from the given data table.

18.14.Remove Data Rows
The Remove Data Rows command is used to delete a data row from the given Data Table.
- Click on the Assign Data Table Instance, once the Instruction Properties pop-up window will open, enter the Data Table name and Data Table Instance and then click on Done.

- Next, click on Create Data Table command, once the Instruction Properties pop-up window will open, enter the data table name and enter the data table column name and select the data type and then click on Done.

- Next, click on Append Data Row, once the Instruction Properties pop-up window will open, enter the data table name to add a Row, and enter the row values in the JSON format which is as shown below.
- Next, click on the Preview Data Table command, once the Instruction Properties pop-up window will open, enter the data table name and click on Done.
- Click on the Remove Data Rows command, once the Instruction Properties pop-up window will open enter the data table name and then enter the row select condition to delete the row and then click on Done.
- Note: you can give the condition as ID=25267 or Name=James like that.

- Next, Save the code and click on run, once the robot runs successfully, the data row will be deleted from the given data table.
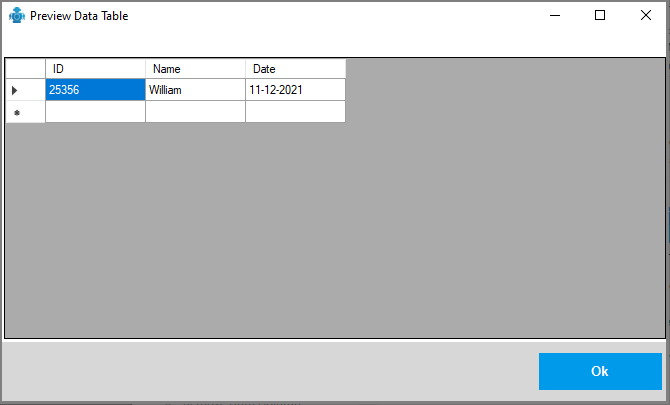
- You can see the above table, the table with ID=12356 has been deleted.
18.15.Data Table Row Count
The Data Table Row Count command is used to get the total number of rows present in the given data table.
Let us see what are the steps present in this operation.
- Click on the Assign Data Table Instance, once the Instruction Properties pop-up window will open, enter the Data Table name and Data Table Instance and then click on Done.
- Next click on the Create Data Table command, once the Instruction Properties pop-up window will open, enter the data table name to be created and then enter the column name and select the data type, which is as shown below.
- Next, click on the Preview Data Table, once the Instruction Properties pop-up window will open enter the instance name and then click on Done.
- Next, save the code and then click on run, once the robot runs successfully, the preview data table with column name will be displayed on the output message box.
- So, the data table has been created with the given column names as shown above.
- Next, click on the Append Data Row command, once the Instruction Properties pop-up window will open, enter the Instance name and then, enter the row values as JSON array format.
- Here, I am passing the JSON values as shown below
[{‘ID’:’1′,’Name’:’Ashwini’,’Date’:’10/12/2021′},{‘ID’:’2′,’Name’:’Rajesh’,’Date’:’11/12/2021′},{‘ID’:’2′,’Name’:’Rakul’,’Date’:’3/10/2019′}]
- Next click on the Preview Data Table, once the Instruction Properties pop-up window, enter the data table name and click on Done.
- Next, click on the Data Table Row Count command, once the Instruction Properties pop-up window will open, enter the source data table name and enter the variable name to receive the count and then click on Done.
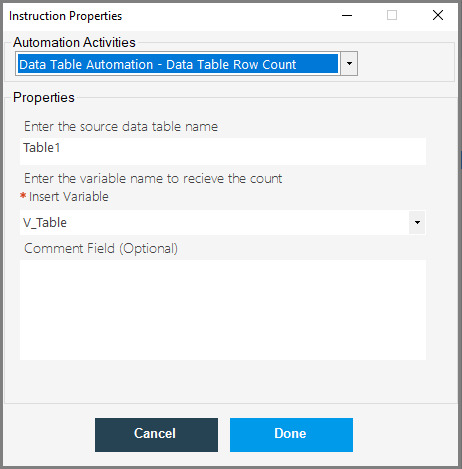
- Next, click on Show Message under the Miscellaneous Operations, and enter the output variable to display the output.

- Now, save the code and then click on Run. Once the robot runs successfully the row count will be displayed on the output message box.

- The Table1 data table has 3 rows and the same will be displayed on the output message box.
18.16.Remove Duplicate Rows
The Remove Duplicate Rows command is used to remove duplicate rows from the given data table.
- Click on the Assign Data Table Instance, once the Instruction Properties pop-up window will open, enter the Data Table name and Data Table Instance and then click on Done.
- Next click on the Create Data Table command, once the Instruction Properties pop-up window will open, enter the data table name to be created and then enter the column name and select the data type, which is as shown below.
- Next, click on the Preview Data Table, once the Instruction Properties pop-up window will open enter the instance name and then click on Done.
- Next, save the code and then click on run, once the robot runs successfully, the preview data table with column name will be displayed on the output message box.
- So, the data table has been created with the given column names as shown above.
- Next, click on the Append Data Row command, once the Instruction Properties pop-up window will open, enter the Instance name and then, enter the row values as JSON array format.
- Here, I am passing the JSON values as shown below, which contain two duplicate values as ID and Name.
[{‘ID’:’1′,’Name’:’Ashwini’,’Date’:’10/12/2021′},{‘ID’:’2′,’Name’:’Rajesh’,’Date’:’11/12/2021′},{‘ID’:’2′,’Name’:’Rajesh’,’Date’:’3/10/2019′}]
- Next click on the Preview Data Table, once the Instruction Properties pop-up window, enter the data table name and click on Done.
- Once you run the robot the data table will be displayed as below.
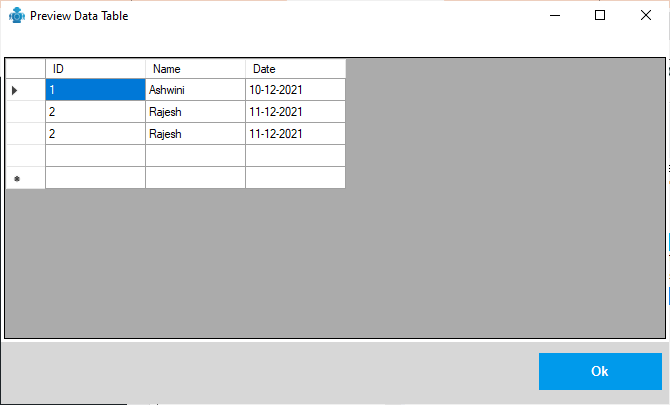
- Once again, click on the Assign Data Table Instance, once the Instruction Properties pop-up window will open, enter the Data Table name and Data Table Instance and then click on Done.
- Next, click on the Remove Duplicate Rows command, once the Instruction Properties pop-up window ill open, enter the Input data table name and output data table name and then click on Done.

- Next, click on Preview Data Table, Once the Instruction Properties pop-up window will open, enter the output data table name and click Done.
- Next, save the code and run, once the robot run successfully, the duplicate rows will be deleted from the given table and the same will be displayed on the preview data table.
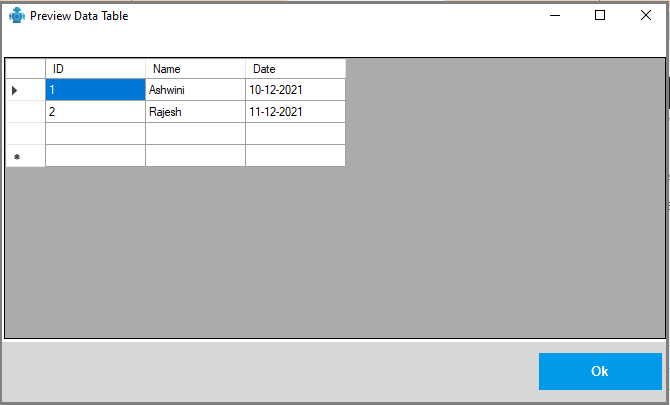
18.17.Join Data Table
The Join Data Table command is used join Rows from two tables are combined using values that are common to both tables, according to a Join rule provided in the JoinType parameter. join common column values into a single data table.
- Click on the Assign Data Table Instance, once the Instruction Properties pop-up window will open, enter the Data Table name and Data Table Instance and then click on Done.
- Next click on the Create Data Table command, once the Instruction Properties pop-up window will open, enter the data table name to be created and then enter the column name and select the data type, which is as shown below.
- Next, click on the Preview Data Table, once the Instruction Properties pop-up window will open enter the instance name and then click on Done.
- Next, save the code and then click on run, once the robot runs successfully, the preview data table with column name will be displayed on the output message box.
- So, the data table has been created with the given column names as shown above.
- Next, click on the Append Data Row command, once the Instruction Properties pop-up window will open, enter the Instance name and then, enter the row values as JSON array format.
- Here, I am passing the JSON values as shown below
[{‘ID’:’1′,’Name’:’Ashwini’,’Date’:’10/12/2021′},{‘ID’:’2′,’Name’:’Rajesh’,’Date’:’11/12/2021′}]
- Next click on the Preview Data Table, once the Instruction Properties pop-up window, enter the data table name and click on Done.
- Once you run the robot the preview of the data table will be displayed as shown below.

- Next, we have to create another data table with some common values in it, I am creating Table2 with common values as ID.
- Click on the Assign Data Table Instance, once the Instruction Properties pop-up window will open, enter the Data Table name and Data Table Instance and then click on Done.
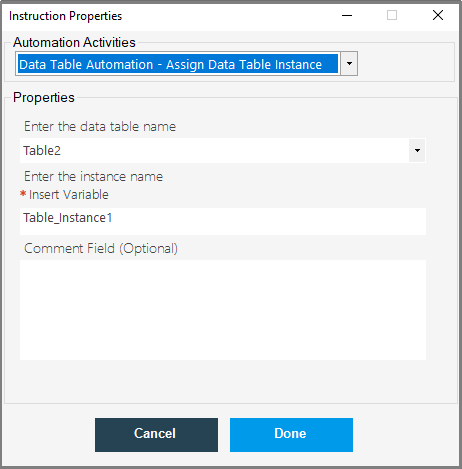
- Next click on the Create Data Table command, once the Instruction Properties pop-up window will open, enter the data table name to be created and then enter the column name and select the data type, which is as shown below.
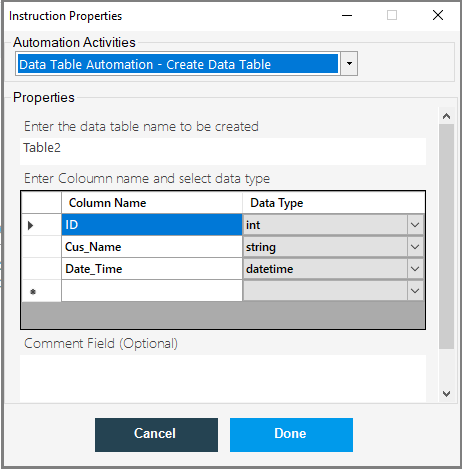
- Next, click on the Preview Data Table, once the Instruction Properties pop-up window will open enter the instance name and then click on Done.

- Next, save the code and then click on run, once the robot runs successfully, the preview data table with column name will be displayed on the output message box.
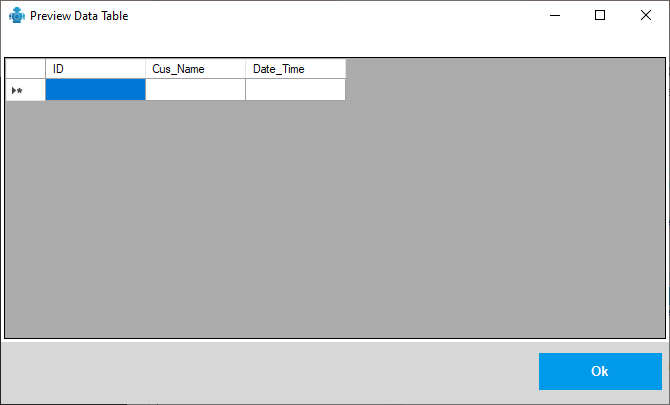
- So, the data table has been created with the given column names as shown above.
- Next, click on the Append Data Row command, once the Instruction Properties pop-up window will open, enter the Instance name and then, enter the row values as JSON array format.
- Here, I am passing the JSON values as shown below
[{‘ID’:’2′,’Cus_Name’:’Shine’,’Date_Time’:’1/2/1999′},{‘ID’:’22’,’Cus_Name’:’Balan’,’Date_Time’:’05/2/2021′},{‘ID’:’23’,’Cus_Name’:’Sindu’,’Date_Time’:’20/01/1992′}]

- Next click on the Preview Data Table, once the Instruction Properties pop-up window, enter the data table name and click on Done.
- Once you run the robot the preview of the data table will be displayed as shown below.
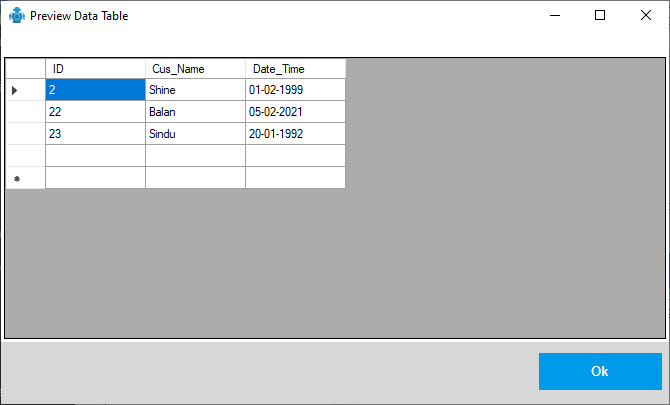
- Click on the Assign Data Table Instance, once the Instruction Properties pop-up window will open, enter the Data Table name and Data Table Instance and then click on Done.

- Next, click on the Join Data Table command, once the Instruction Properties pop-up window will open, enter the first data table name, second data table name, and enter the join type as inner join and enter the join conditions as below.
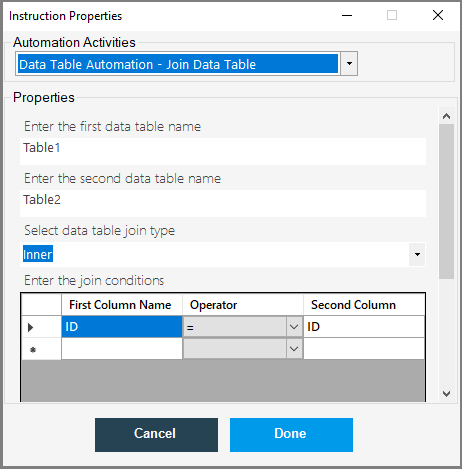
- Next, click on the Preview data table and enter the Output data table name, and click on Done.
- Save the code and run, once the robot runs successfully, the common values rows will be joined and created new data table which is as shown below.
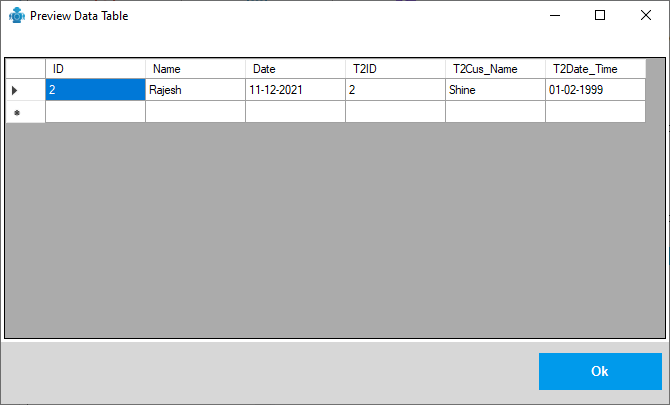
18.18.Lookup Data Table
The Lookup Data Table command allows you to search a specific DataTable for a given value and provides the RowIndex where it was located. If the given value cannot be found, the RowIndex returned is -1.
- Click on the Assign Data Table Instance, once the Instruction Properties pop-up window will open, enter the Data Table name and Data Table Instance and then click on Done.
- Next click on the Create Data Table command, once the Instruction Properties pop-up window will open, enter the data table name to be created and then enter the column name and select the data type, which is as shown below.
- Next, click on the Preview Data Table, once the Instruction Properties pop-up window will open enter the instance name and then click on Done.
- Next, save the code and then click on run, once the robot runs successfully, the preview data table with column name will be displayed on the output message box.
- So, the data table has been created with the given column names as shown above.
- Next, click on the Append Data Row command, once the Instruction Properties pop-up window will open, enter the Instance name and then, enter the row values as JSON array format.
- Here, I am passing the JSON values as shown below
[{‘ID’:’1′,’Name’:’Ashwini’,’Date’:’10/12/2021′},{‘ID’:’2′,’Name’:’Rajesh’,’Date’:’11/12/2021′}]
- Next click on the Preview Data Table, once the Instruction Properties pop-up window, enter the data table name and click on Done.
- Once you run the robot the preview of the data table will be displayed as shown below.
- Next, click on the Lookup Data Table command, once the Instruction Properties pop-up window will open, enter the lookup data table name.
- And, enter the lookup column name.
- Enter the lookup value to search for.
- And, enter the variable name to receive the lookup value.
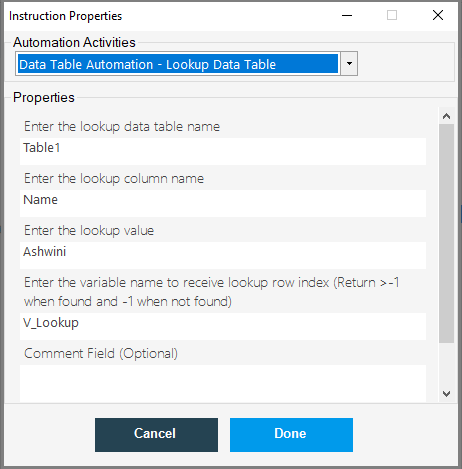
- Next, click on the Show Message command, once the Instruction Properties pop-up window will open, enter the variable name and then click on Done.

- Now, save the code and run, once the robot runs successfully, the lookup values row index will be displayed on the output message box as shown below.
- If the lookup value does not exist then the robot will return -1 as an output.
19.Service Integration
API integration services enable users to tailor their services to their own requirements. Users will be able to add or delete features as well as analyze data to suit their needs. APIs allow you to personalize an application in whatever way you want and make modifications if required.
DWmaker automation tool has Service Integration Provider commands, such as :
- Get User Input
- Import DDL
- Rest API Integration
- Send User Input
- Web Scraper
- Web Scraping Query
19.1.Rest API Integration
What is Rest API :
Representative State Transfer (REST API) is an architectural approach for distributed hypermedia systems. REST API, like other architectural approaches, has restrictions. If you want your interface to be user-friendly, you must adhere to certain constraints.
REST (Representational State Transfer) or RESTful API is a form of API (Application Program Interface) that facilitates communication between web service applications. While it may potentially work with any protocol or data format, REST is most often used with HTTP, and data is sent using JSON (JavaScript Object Notation). Because of its versatility, speed, and simplicity, REST is one of the most common methods for retrieving data from the web.
Let us see, how to perform Rest API integration using the DWmaker automation tool.
Click on the Rest API Integration command, under Service Integration, once the Instruction Properties pop-up window will open, enter the below details:
- Enter the Base URL: A base URL is, basically, the consistent part of your web address. For example, throughout this training site, you’ll note that the address section http://api.openweathermap.org/ always appears in the address bar. This is the base URL. Everything that follows it is known as a URL path. To find the base URL of your website, go to the site’s front page. What you see in the address bar on your site’s front page is the base URL of your website.
- Enter the endpoint: An endpoint is a point at which a communication channel terminates. The endpoints of a communication between an API and another system are referred to as touchpoints. A URL of a server or service can be used as an endpoint in APIs. APIs can obtain the resources they require to perform their functions from each endpoint. Example: data/2.5/weather?q=Kolkata&appid=116ea75857cc70e4dcc33b5ab458efd8
- Please Choose the API request type: You can use an API request to obtain or transfer data from a data source. In the DWmaker tool, we have JSON and XML API request types. Select JSON as an API Request type.
- Where JSON, is the most extensively used data format for data transfer on the web is JSON (JavaScript Object Notation). This data exchange might take place between two computer applications located in different places around the world or within the same system.
- As we are integrating the APIs with the weather forecasting website, hence we are using JSON to get the API in the JSON format.
- Please Choose API Method type: An API method in API Gateway is made up of a method request and a method response. You create an API method to specify what a client should or must do in order to make a request to contact the backend service, as well as the replies the client will get.
- So, to request data from any destination website, the data must be in a browser-readable format, such as HTML, but the REST API’s return will be in XML/JSON or another comparable format.
- The Standard API Methods are:
- Get: GET method is used to appends form data to the URL in name or value pair.
- Put: In the RESTful architecture, the HTTP PUT method is used to update an existing record in the data source.
- Post: Post is a protocol for sending data to a server in order to create or update a resource.
- Delete: The DELETE method removes the provided resource from the system.
- The Standard API Methods are:
- Basic API Parameter: The changeable elements of a resource are API parameters. They help you decide what kind of action you want to take with the resource. Each parameter has a name, a value type, and a description that is optional. When creating a REST API, you must first select which arguments should be included in the API endpoint. API parameters are options that may be supplied with the endpoint to modify the answer in a straightforward way. Learn more about the different sorts of API parameters and how to utilize them when making a request by reading on.
- Advance API Parameter: If you want to use the Advance API parameter then we have that option.
- Choose or Define a variable to receive the API response: Declare a variable name to receive the API response.
- Next, click on Done.
- Next, click on the Show Message command, once the Instruction Properties pop-up window will open, enter the variable name to receive the API response and click on Done.

- Now, save the code and run, once the robot runs successfully, the API response of the given URL will be displayed on the output message box in the JSON format.
- This is how we can get the weather report by using the API integration in the JSON format.
19.2.Web Scraper
The Web Scraper command is used to extract the data from the given website.
Let us see how to perform this operation using the DWmaker automation tool.
Click on the WebScraper command under Service Integration, once the Instruction Properties pop-up window will open enter the URL of the website which you want to scrape, and select Yes, for Logged in as the currently logged-on user.
and, next, choose or define the variable to receive scraped output and then click on Done.
Next, click on the Show Message command under Miscellaneous Operations, once the Instruction Properties pop-up window will open, enter the variable name and then click on Done.

Next, save the code and run, once the robot runs successfully, the extracted data will be displayed on the output message box.
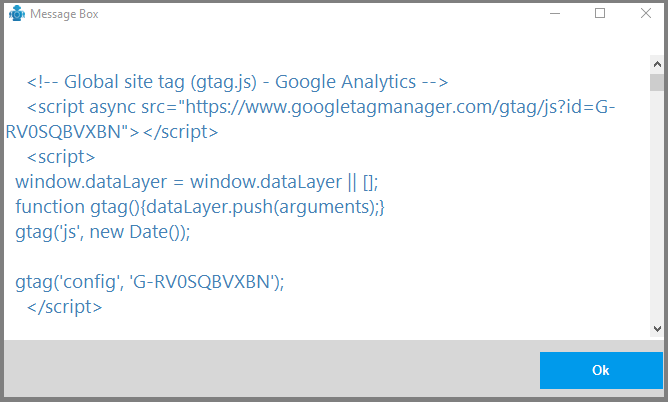
19.3.Web Scraping Query
The Web Scraping Query command is used to scrape the web data by using the XPath query.
Let us see how to perform this operation using the DWmaker automation tool.
What is Xpath Query: XPath (XML Path Language) is a query language for extracting information from XML documents. XPath queries may be used in RUEI to scan the content of XML documents.
Click on the Web Scraping Query command, once the Instruction Properties pop-up window will open, enter the variable which contains HTM data.
Next, enter the Xpath Query and then enter the variable name to receive the output query result and then click on Done.
For Example: Here I am using the Intelgic Website to fetch the Xpath of an element.
First, click on the WebScraper command under Service Integration, once the Instruction Properties pop-up window will open enter the URL of the website which you want to scrape, and select Yes, for Logged in as the currently logged-on user.
and, next, choose or define the variable to receive scraped output and then click on Done.
Next, Open the Website page, right-click on any element, here I am clicking on Our Story as shown below. Once you right-click, an HTML page will open, right-click on our story which is on the HTML code, and then right-click and select Copy, next, click on Copy Full Xpath.
Next, paste the copied full XPath in the DWmaker tool and enter the variable name to receive the output query, and click on Done.

Next, click on the Show Message command, once the Instruction Properties pop-up window will open, enter the variable name and then click on Done.

Now, save the code and run, once the robot runs successfully, the element of the given Xpath query will be displayed on the output message box.
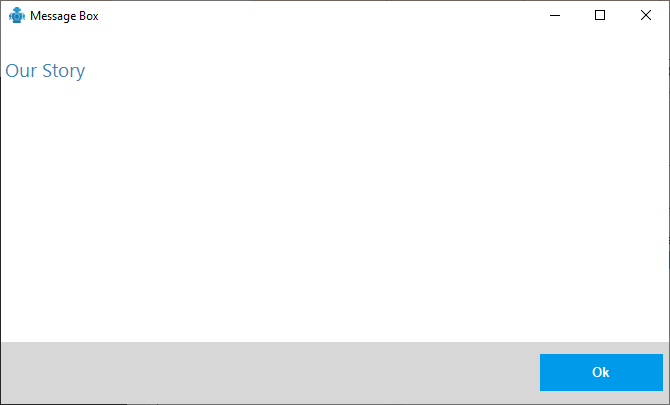
19.4.Import DLL
What are DLL files: A DLL stands for Dynamic Link Library, A DLL file is a Windows library that contains a set of code and data for performing a specific task.
DLL files are similar to executable (EXE) files, with the exception that DLL files cannot be run directly in Windows.
A dynamic link library (DLL) is a collection of code and data that may be utilized by several programs at the same time. The Comdlg32 DLL, for example, performs typical dialogue box operations in Windows operating systems. The functionality supplied in this DLL may be used to implement an Open dialogue box in any program. It encourages code reuse and efficient memory management.
The DWmaker automation tool has an import DLL command, which is used to import the DLL files.
19.5.Get User Input
The Get User Input command is used to get the user input from the robot in the JSON format.
Let us see what are the steps followed in this process.
Click on the Get User Input command, once the Instruction Properties pop-up window will open, enter the variable name to receive the user input in the JSON response.
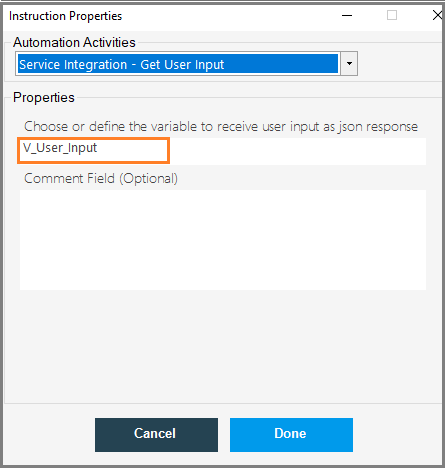
Next, click on the Show Message command, once the Instruction Properties pop-up window will open, enter the variable name in the [] and click on Done.

Next, click on Publish button under the robots tab.
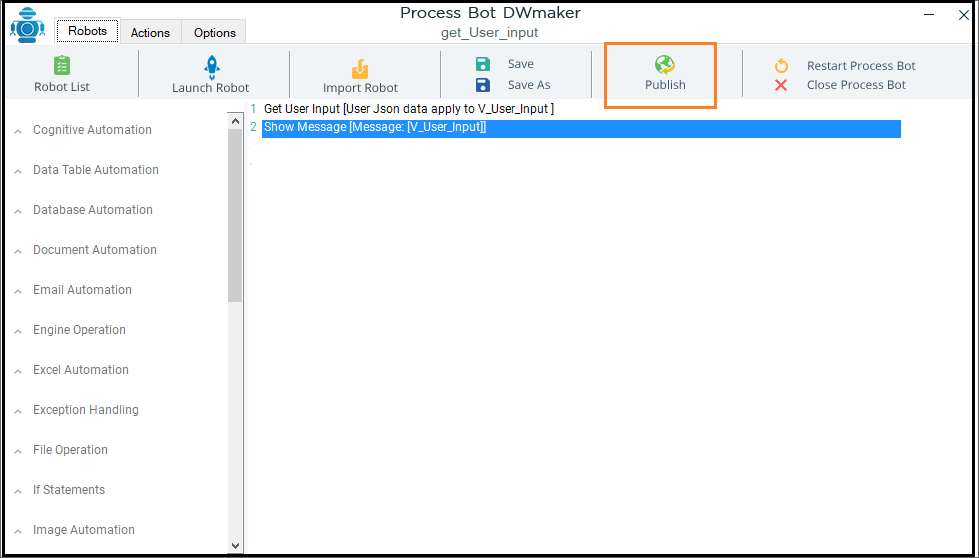
Next, log in to the Process Bot One, once the process bot one page will open, click on Robot on the left-hand side, and go to the Published robot
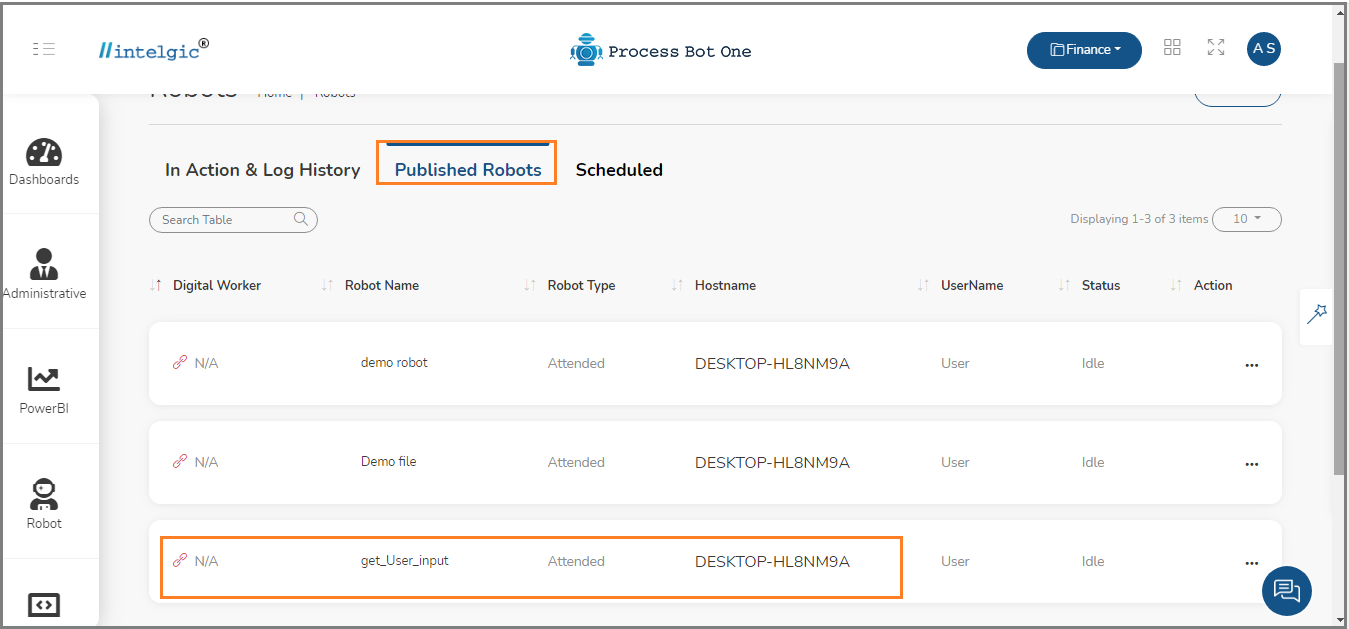
Next. Click on three dots(…) which are corresponding to the Get_User_Input, once the drop-down list will open, select Add Parameters.
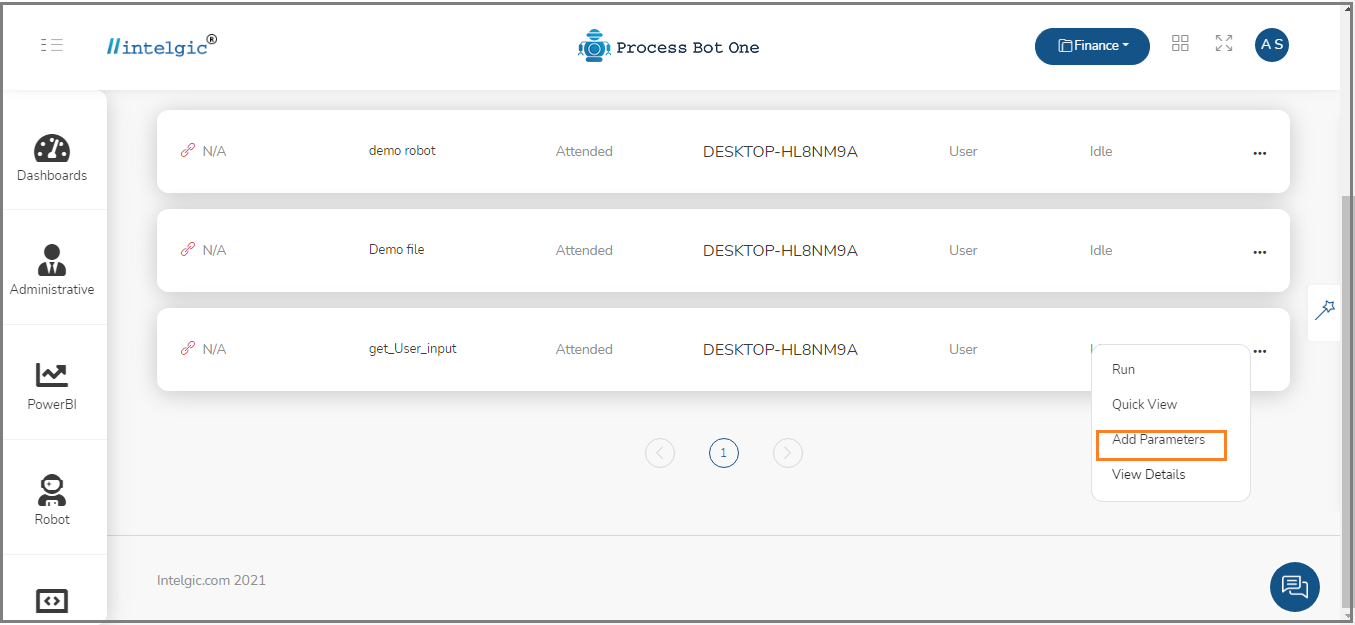
The parameters pop-up window will open, enter the parameter name, and select the data type as shown in the below image.
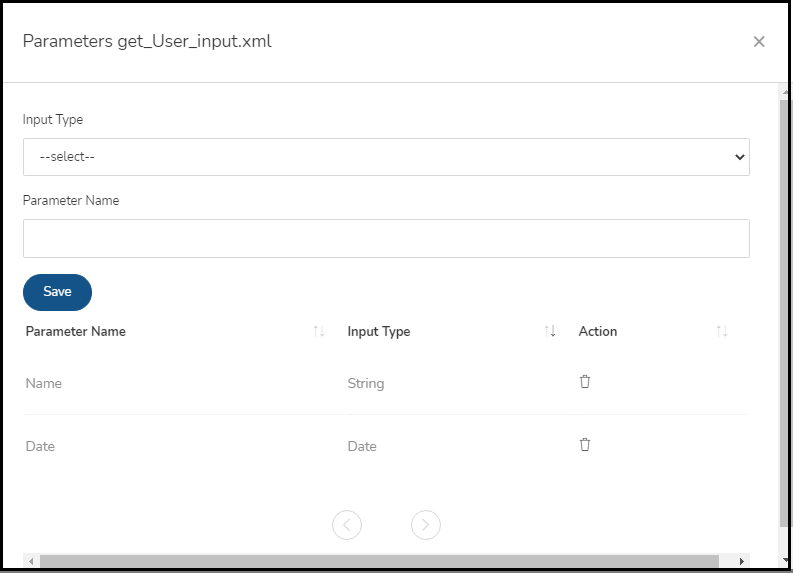
Click on Select drop-down under Input Data type and select the data type, next enter the parameter name, and click on Save.
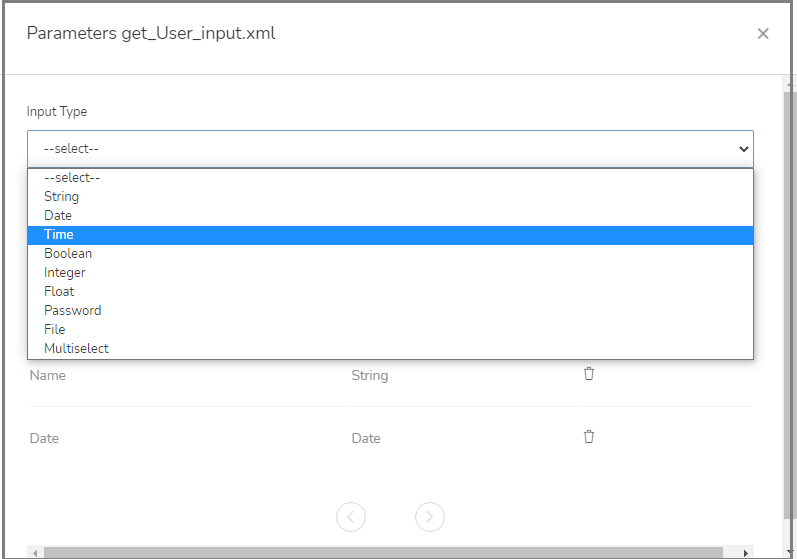
Next, click on three dots(…) and then select Run.
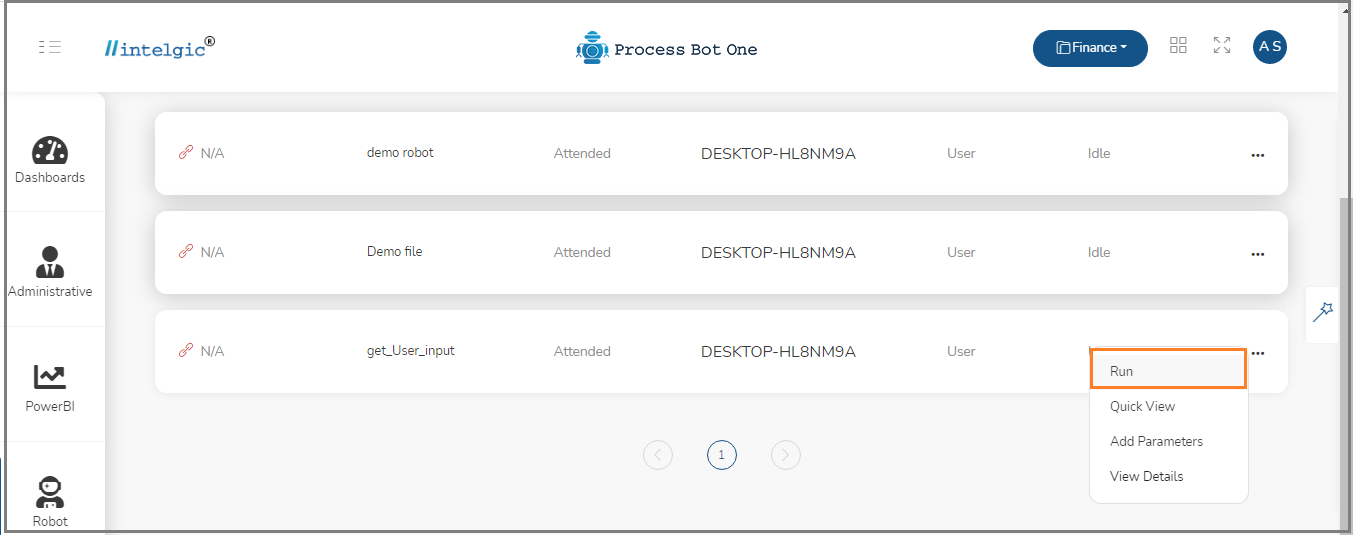
Once you click on run, the Add Parameter pop-up window will open, enter the parameter value as shown below, and then click on Submit.
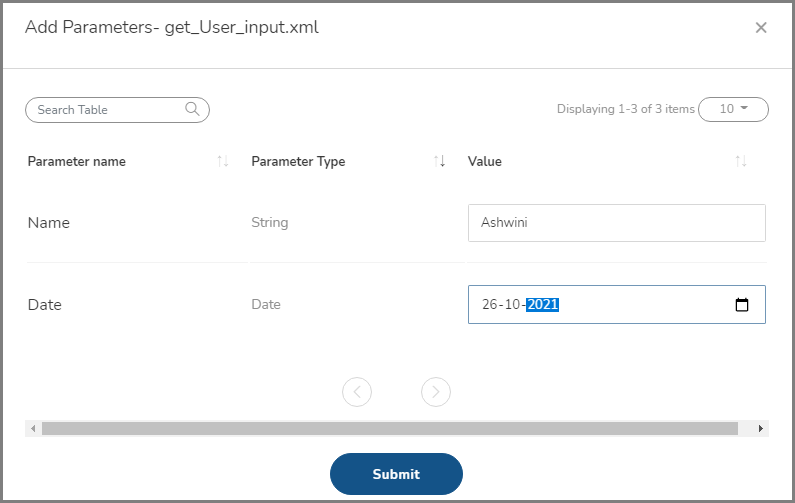
Next, as soon as you click on Submit button, the task will be created successfully, and the output of the get user input in the JSON format will be displayed as shown below.
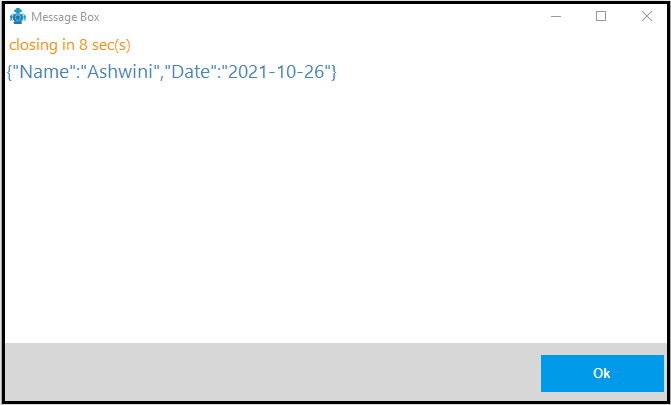
19.6.Send User Output
The Send User Output command is used to send the user output in JSON format.
Click on Send User Output command, once the Instcrutcion Properties pop-up window will open, enter the Sent output parameters.
Select the parameter type and name and then enter the value and then enter the variable name to receive the send status as shown below.
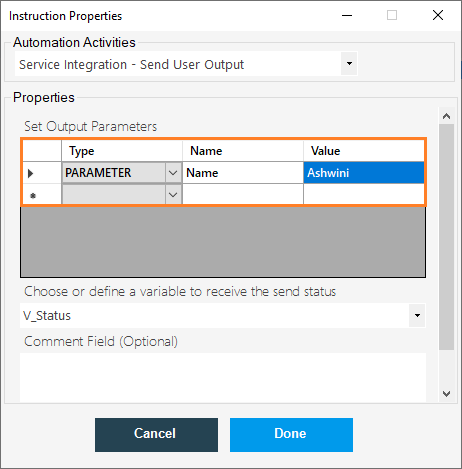
Next, click on the Show Message command, once the Instruction Properties pop-up window will open, enter the variable name and then click on Done.

Now, save the code and then click on Publish. Once you click on publish, the publish robot pop-up window will open, select the directory, select robot type, and then enter the approx time and then click on Publish.

Now, the robot has been published successfully, now go to the process bot and then go to the published robot, you can see the published robot with the command name as shown below.
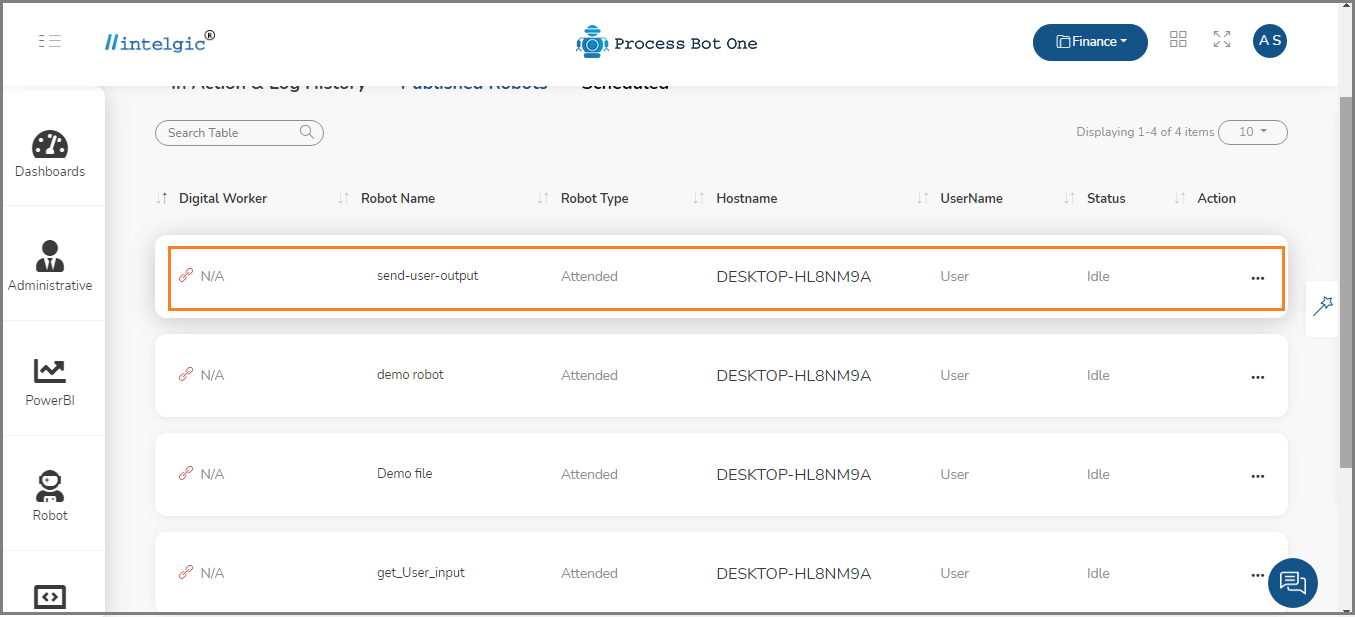
Click on the three dots(…) which are corresponding to the published robot and select Add Parameters.
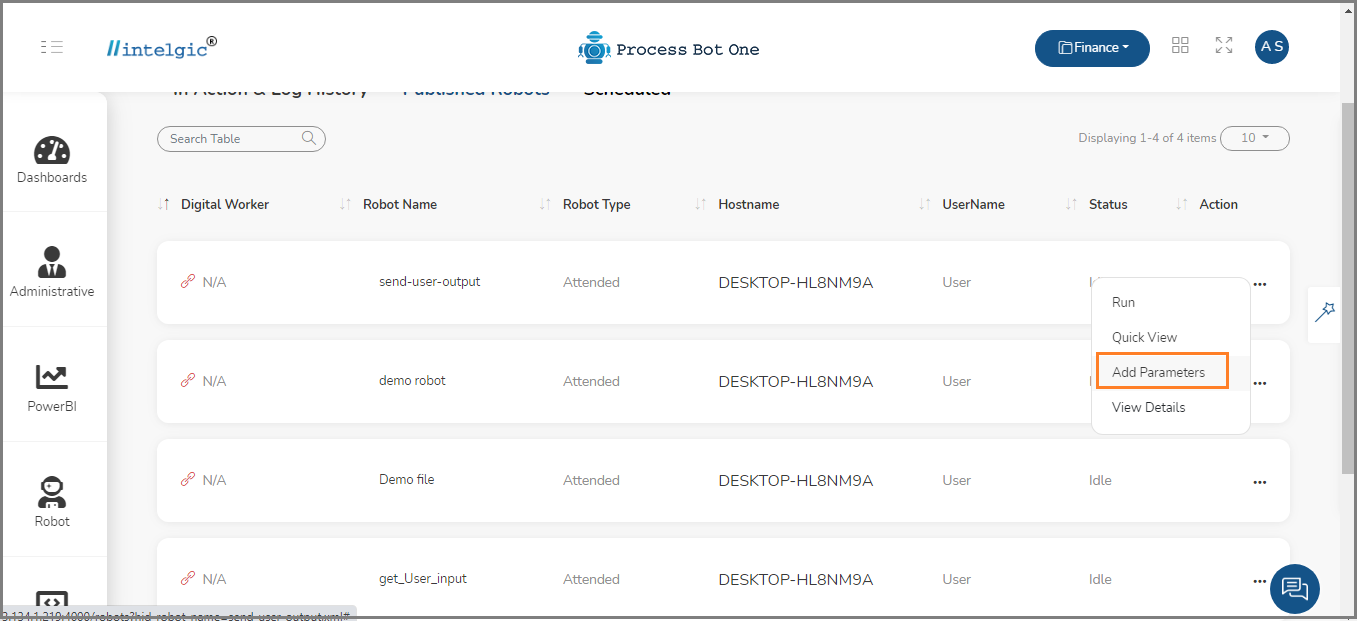
The parameters pop-up window will open, select the Input type and parameter type and then click on Save.
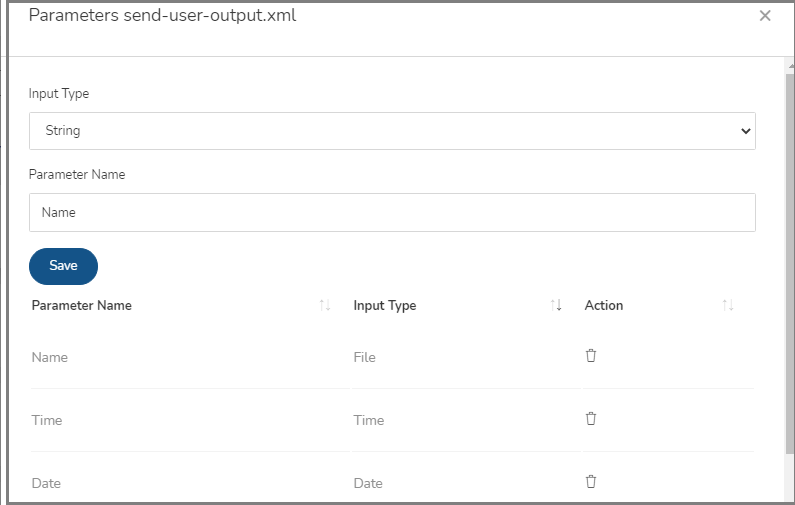
Once again, click on three dots(…) and select the Run, once the robot runs successfully, the task will be created successfully and the send user output status will be displayed on the output message box.
20.String Operation and Data Type conversion
What is String: A string is a collection of characters that may or may not contain literal constants or variables. Double-quotes are used to symbolize the String.
Example: “Intelgic.com”, “Apple”
Dwmaker has many String Operation commands in it. Let us see how to perform all these commands one by one.
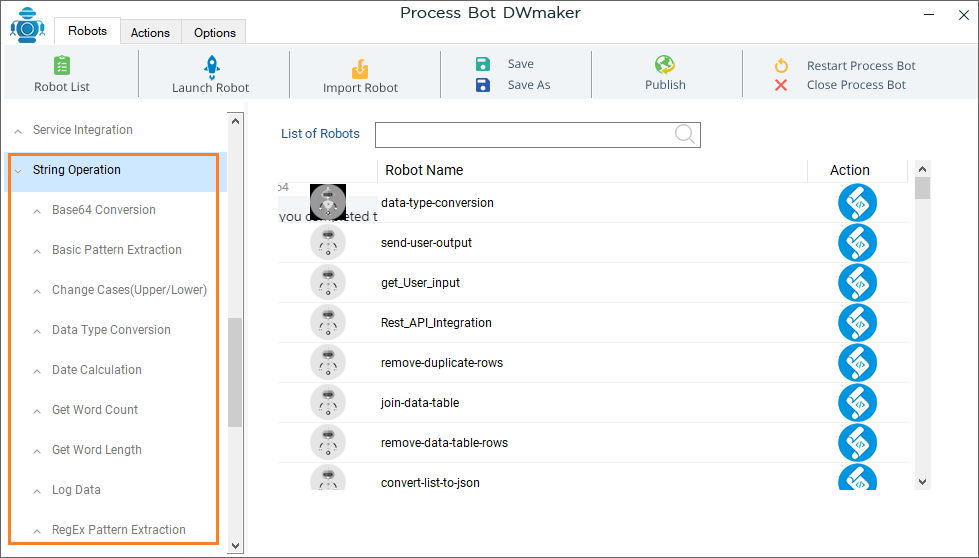
20.1.Base64 Conversion
What is Base64: Base64 is a collection of binary-to-text encoding techniques that convert binary data into a radix-64 representation to express binary data in an ASCII string format. The word Base64 refers to a MIME content transmission encoding standard.
When it comes to encoding binary data that has to be saved and transferred across ASCII-compatible media, Base64 encoding strategies are often utilized. This is done to guarantee that the data is not tampered with during transit. Base64 is widely used in a variety of applications, including MIME communication and XML data storage.
The Dwmaker has Base64 conversion command, which is is used to decode and encode binary data.
Click on the Base64 conversion command, once the Instruction Properties pop-up window will open, enter the variable or text to convert and then select the conversion type and then choose or define the variable to receive the conversion result.
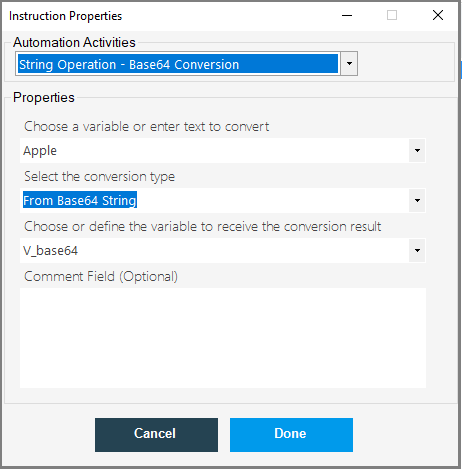
Next, click on the Show Message command, once the Instruction Properties pop-up window will open, enter the output variable name and then click on Done.
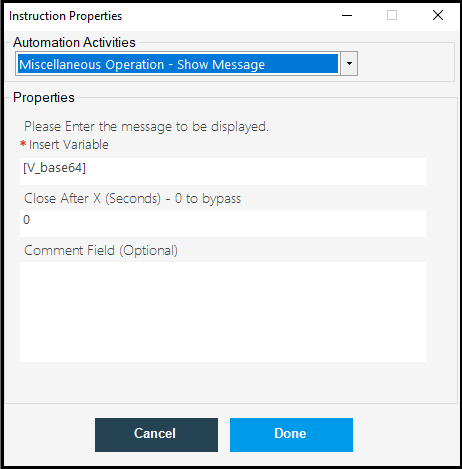
Now, save the code and run, once the robot runs successfully the decode of the given text in the base64 format will be displayed on the output message box.

We can encode the above base64 conversion into the original text if you select from the Base64 string in the Base64 string conversion property window. and enter the QXBwbGU= in the enter the text or variable window.
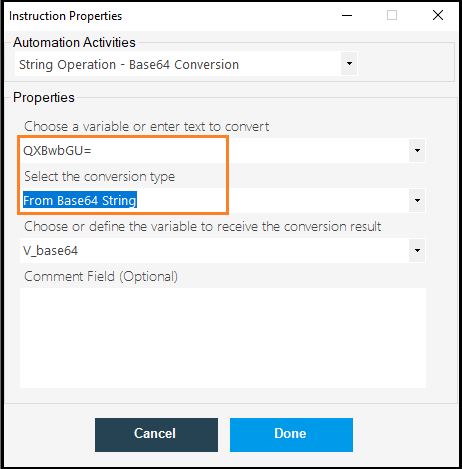
Now, save the code and run, once the robot runs successfully, the encoding of the given text will be displayed on the output message box.

20.2.Data Type Conversion
- Integer (int): It stores the numeric value in the form of data.
- Characters (Char): It stores character data (words) in a program.
- Float: This data type is helpful to store and represent the numeric value with a decimal point.
- String: This data type holds the alpha-numeric values.
- Array: It represents the collection of elements which includes; array variable, array value, etc.
- Boolean: This data type returns the “False and True” value for “0 and 1” respectively.
The Dwmaker has a Data Type Conversion command, which is used to convert data from one data type into another data type.
Click on the Data Type Conversion command, once the Instruction Properties pop-up window will open, enter the value to convert, and then select the data type by clicking on the select data type drop-down list and selecting the data type to which data type you want to convert,
Next, provide the output format and then enter the output variable and click on Done.
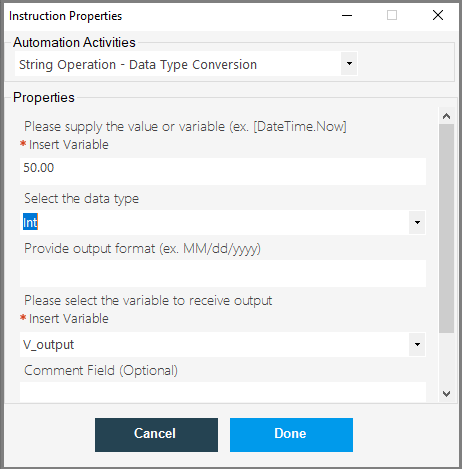
Next, click on the Show Message command, once eth InstcrutionProperties pop-up window will open, enter the output variable and click on Done.

In the same way, we can also convert integer value into string data type and many more which are listed as below:

Now, press the “Done” button, and move forward to print it using the “Show Message” command.
As of now, we are printing the string data type then we need to insert the variable name with the string operation (.ToString()) as shown in the below image.

Save the process and run it to see the result.

So, whenever you want to pass an alphanumeric value or value with an expression such as phone no, date of birth like 12-6-1999, etc. you always need to convert it into a string data type to get the proper output.
To print an integer value with a decimal (.) expression, you need to access the “String Operations” command. See the picture.

When you click on String Operation, it will open a list of a few more commands associated with it. Here, you need to click on the “Data Type Conversion” in order to convert one form of data type into another.
On the click of the “Data Type Conversion” command, it will open a property window, where you need to set the variable value as per your data type preference.

Here, you can choose any specific data type from the drop-down.

In case, you need to deal with salary or some finance-related sheets then you need to get the values in a decimal format like (25.75 or 45.00). In such cases, you are required to convert the integer into a decimal value to get accurate results.
For this, first set a variable using the “Set Variable” command. Like I have created a variable as “Decimaleg” here along with a variable value of 25.

Now, to convert it into a decimal data type value, go to the “Data Type Conversion” command under the “String Operation” and fill up the property window with the required details. See the image.

Note:
- Here, I select the decimal data type, because I want to print the value in the decimal format.
- In the variable output field, you need to input the variable name whose value you want to convert. You can input the same variable name or another existing variable as well.
Once done filling with all the properties, press the “Done” button, and print the message using the “Show Message” command.

Finishing with all these processes, the code window will be like this:

Save the process and move forward to check it in action using the “Run” button under the “Actions” tab.
Now, see the integer value “25” is converted into a decimal value “25.00”.
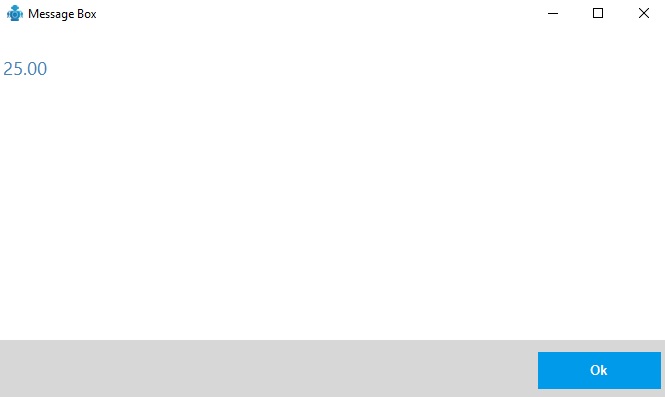
To convert the decimal value into an integer, you need to access the “Data Type Conversion” command under the “String Operations”.
For example, here I have a variable “IntegerVar” with a value “25.34”. Currently, this is a decimal value and I want to convert it as an integer value.
Click on Datatype Conversion under String Operation enter the variable name and the decimal value that you want to change as shown in the below image.

Again click on the Datatype Conversion under String Operation and enter the variable name, select the data type, and then enter the variable name in the square bracket, which is as shown below.

As here, we are using a value with an expression, therefore, we need to pass it with string command (.ToString()).
Click on Show Message under Miscellaneous Operation, Once the Instruction Properties window will open, enter the details as shown in the below image.

Save the process and Run.

The above image is showing the result of integer data type conversion from a decimal value.
Like we have converted Integer to Decimal we can also convert DateTime property into Date.
Click on the Datatype Conversion under String Operations.
Once the Instructions Properties window will open, select the variable scope to Set Variable.
Next, enter the variable name as Date under Choose/Name a variable to change its value.
And, click on Insert variable and select the [DateTime. Now] from the drop-down list, and click on Done, which is as shown in the below image.

Next, click on the Datatype Conversion under String Operation, and enter,
- Variable name Date in the square bracket([])
- Select the Date from the drop-down under Select Data Type
- Next, provide the output format as MM/dd/yy
- Click on the Insert variable and select DateTime.Now from the drop-down
- And, click on Done.

Next, Click on Show Message under Miscellaneous Operation and enter the Variable name and click on Done.

Now, click on Save to save this code, and go to the Actions tab, and then click on Run, once the robot executes successfully, the time date will be displayed on the Message box as shown below.

Boolean data type works to declare one of the two possible values in the form of true and false. In the computer science language, the boolean data type returns the “False” result with zero (0), and “True” with one (1).
To declare true or false results in the program, set a variable first.
For example, here I took the variable as “booleanVar” along with the variable value “0”. See the image.

Press “Done” and click on the “Data Type Conversion” under the “String Operation”.
On the “Data Type Conversion” property window, set the data type as “Boolean” from the data type drop-down and fill the other required properties with the respective values. See the image.
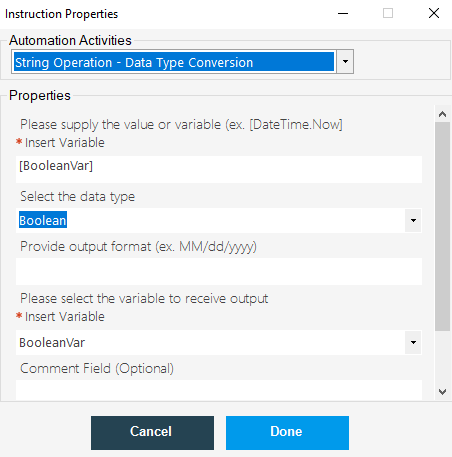
Now, press the “Done” button and proceed to print the value using the “Show Message” command.

Save the process and Run the program.

Here it returns the result as “False” because I set the variable value as 0 (Zero). While it will return the result with “True” when the variable value will be 1 (One).
The above was the entire step-by-step process for the data type conversion in the simplest way.
20.3.Change Cases(Upper/Lower)
The Change Cases(Upper/Lower) command is used to change the cases of the given text.
Let us convert the given test cases into the Upper case. Click on the Change Cases(Upper/Lower) command, once the Instruction Properties pop-up window will open, enter the text to convert into the Upper case and then select the case to convert to string and enter the variable to hold the output text and then click on Done.
Next, click on the Show Message command , once the Instruction Properties pop-up window will open, enter the output variable name n then click on Done.
Now, save the code and run, once the robot runs successfully, the given text will be converted into the upper case as shown below.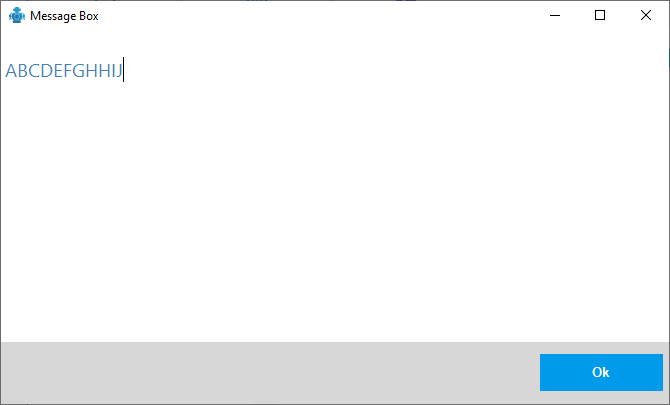
Convert to Lower Case: The Change Case(Upper/Lower) command, is used to change the given text into the lower case.
Click on the Change Cases(Upper/Lower) command, once the Instruction Properties pop-up window will open, enter the text to convert into the Lower case and then select the case to convert to string and enter the variable to hold the output text and then click on Done.
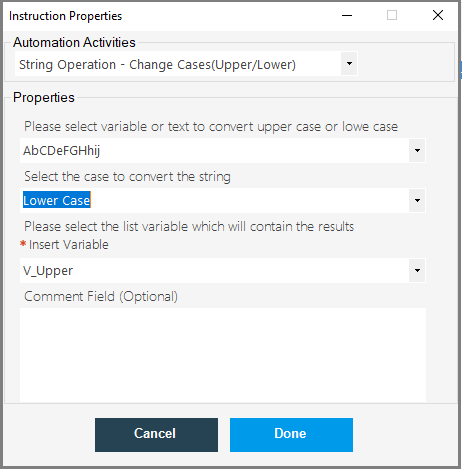
Next, click on the Show Message command, once the Instruction Properties pop-up window will open, enter the output variable name and then click on Done.
Now, save the code and run, once the robot runs successfully, the given text will be converted into the lower case as shown below.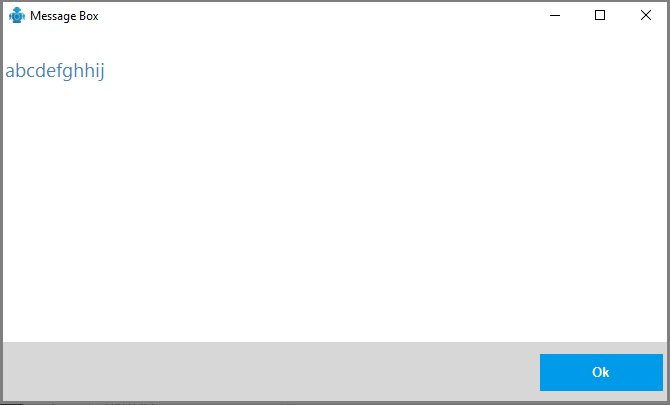
This is how we easily change the cases of the given text using the Change Case(Upper/Lower) command.
20.4.Get Word Count
The Get Word Count command is used to determine the total number of words present in the given document or passage of text.
Click on the Get Word Count command, once the Instruction Properties pop-up window will open, enter the value, and then enter the output variable name to hold the output and click on Done.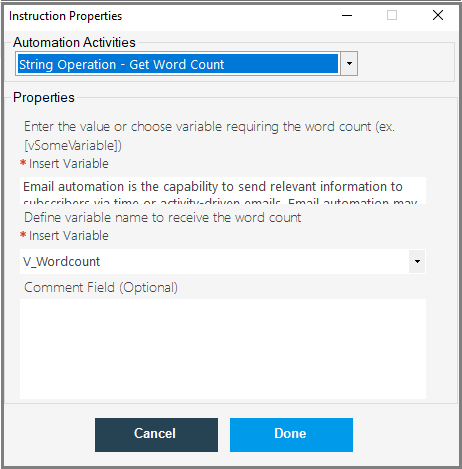
Next, click on the Show Message command, once the Instruction Properties pop-up window will open, enter the output variable and click on Done.
Now, save the code and run, once the robot runs successfully, the total number word count will be displayed on the output message box.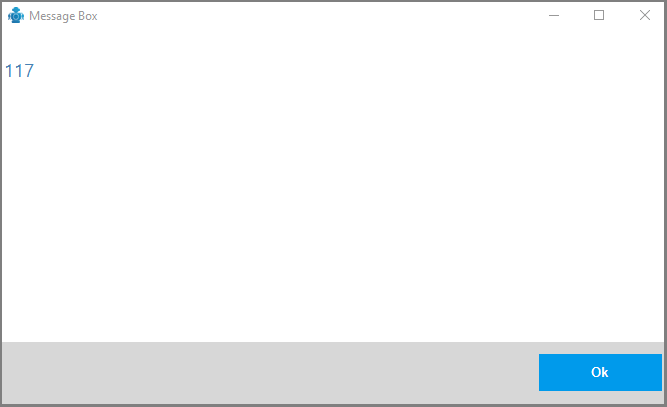
20.5.Get Word Length
The Get Word Length command is used to get the total number of characters present in the given word.
Let us see, how to perform this operation using the Dwmaker automation tool.
Click on the Get Word Length command, once the Instruction Properties pop-up window will open, enter the text to get the word length and then enter the output variable name and click on Done.
Next, click on the Show Message command, once the Instruction Properties pop-up window will open, enter the output variable name and click on Done.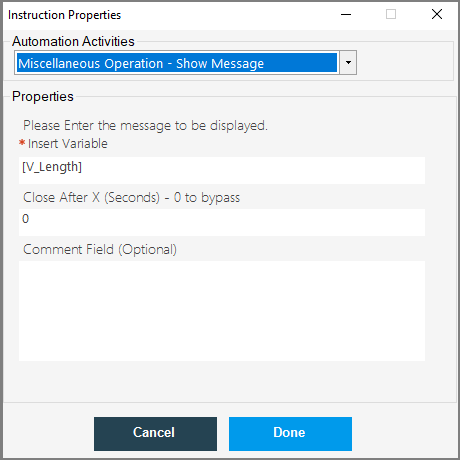
Now, save the code and run, once the robot runs successfully, the word length will be displayed on the output message box.
20.6.Replace String
The Replace String command is used to replace the text with the given new text.
Let us see, how to perform this operation using the Dwmaker automation tool.
Click on Replace String command, once the Instruction Properties pop-up window will open, enter the text to replace.
And, Indicate the text to be replaced and enter the replacement value.
Next, enter the output variable to receive the output and then click on Done.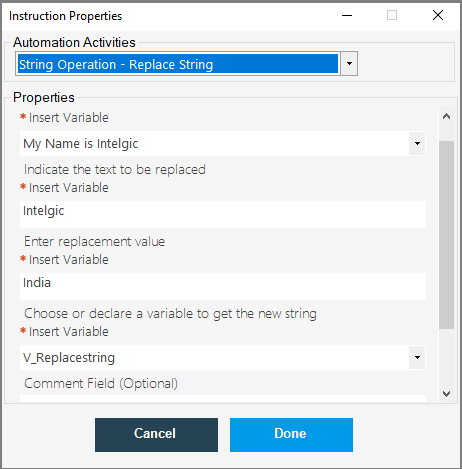
Next, click on the Show Message command, once the Instruction Properties pop-up window will open, enter the output variable name and then click on Done.
Now, save the code and run, once the robot runs successfully, the indicated text will be replaced with the given text as shown below.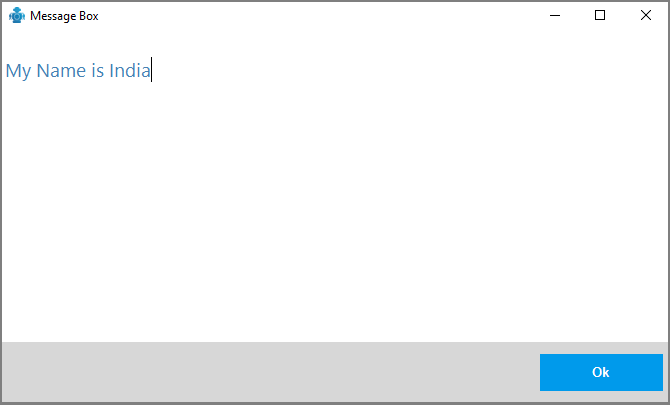
As shown above, the Intelgic will be replaced with India.
20.7.Search String
The Search String command is used to search strings in the given sentence.
the search string is case-sensitive. If the given string is present in the sentence the command will return True else return False.
Click on the Search String command, once the Instruction Properties pop-up window will open, enter the Value to the search string.
Next, enter the search string value and then enter the variable name to receive the output variable and click on Done.

Next, click on the Show Message command, once the Instruction Properties pop-up window ill open, enter the output variable name and then click on Done.
Now, save the code and run, once the robot runs successfully if the given string is present in the given text then it will return as True in the output message box.
If the search string is not present then the robot will return false.
20.8.Split String
The Split String command is used to split the given string by using the delimiter. Here we can split the given string either by using the Coma(,) or press CRLF for new-line and return it in the loop format.
Let us see how to perform this operation using the DWmaker automation tool.
Click on the Split String command, once the Instruction Properties pop-up window will open, enter the string to split
Next enter the delimiter to split the string and enter the variable name to store the split string and click on Done.
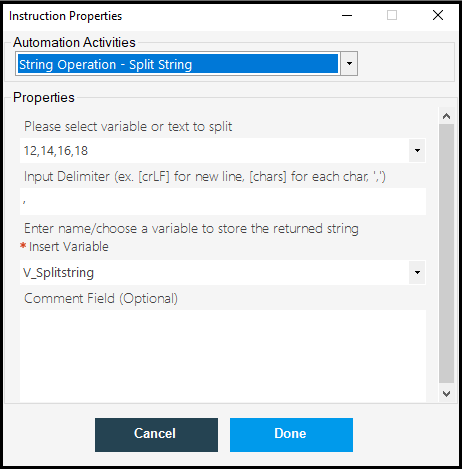
Next, click on the Loop List command under the Loop Statements, once the Instruction Properties pop-up window will open, enter the output variable name and click on Done.
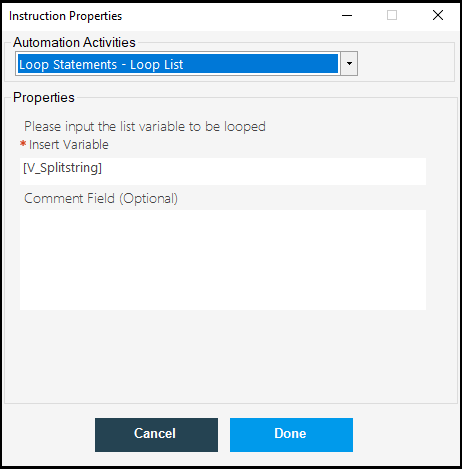
Next click on the Show Message command, once the Instruction Properties pop-up window will open, enter the output variable name and click on Done.
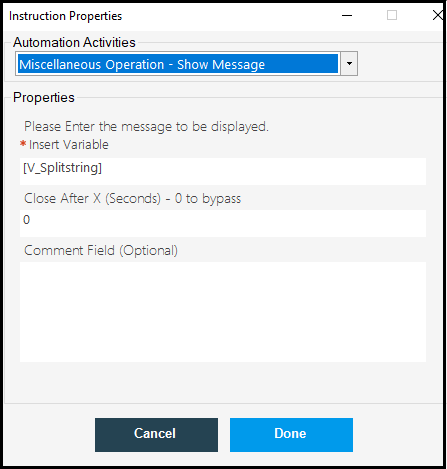
Now, save the code and run, once the robot runs successfully, the split string will be displayed in a loop as shown below.
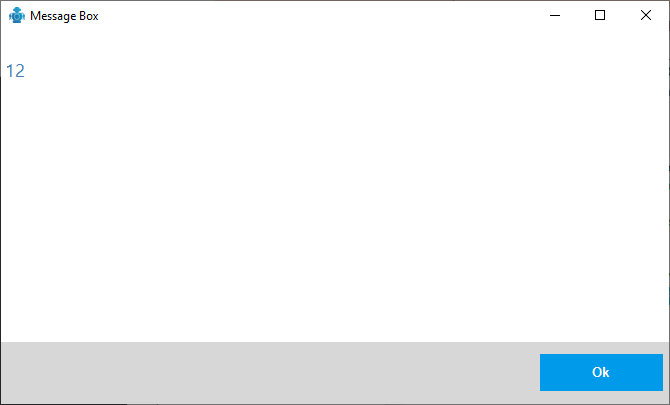
Now click on Ok in the Message Box, the next number will be displayed and follows the same.

20.9.Substring
The Substring command is used to get the substring from the given string by using the index value.
Let us see how to perform this operation using the DWmaker automation tool.
Click on the Substring command, once the Instruction Properties pop-up window will open, enter the text to find the substring index value.
Next, enter the index value from where you want to get the substring from the given string.
Example: Kit Kat Kitty Cat,
Where, the index value of K is 0, and if you want to start from Kat, then you have to enter the index value of K which is 3.
Next, enter the length of the substring value, for example, if we want to get the substring, Kat, then the index of the kat will be 3-5, so you need to enter 5 in the length.
Next, enter the output variable name to receive the output variable.
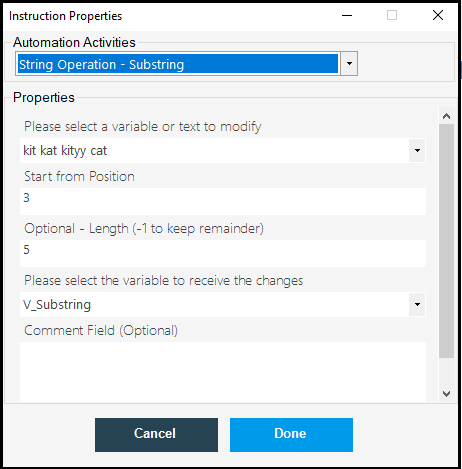
Next, click on the Show Message command, once the Instruction Properties pop-up window will open, enter the output variable name and click on Done.
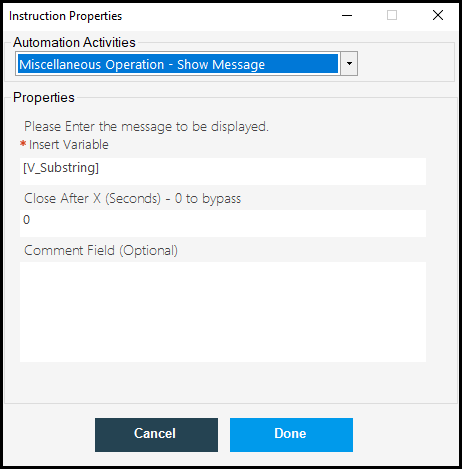
Now, save the code and run, once the robot runs successfully, the substring of the given index will be displayed on the output message box.

20.10.Basic Pattern Extraction
The Basic Pattern Extraction command is used to extract the data from the given document. If the given pattern does not exist, then the robot returns an error.
Our first step here is to read the document before we extract the pattern, click on the Read Document command, once the Instruction Properties pop-up window will open, enter the file path location from which you want to read the pattern from and enter the variable to receive the text and then click on Done.
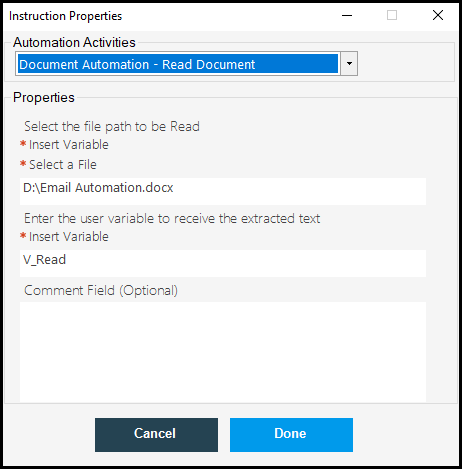
Click on the Basic Pattern Extraction command, once the Instruction Properties pop-up window will open, enter the variable name to receive the extracted pattern inside the [] bracket.
Next, click on choose the right pattern to extract the text drop-down list, which contains three options such as:
- Extract All after the Text: This option selects the text which is present after the leading text. For example, Name: Ashok, if we give leading text as Name then the text after the name will be extracted.
- Extract All Before Text: If we select this option, then the text before the leading text will be extracted. example, Emp:Name: Ria and the leading text is Name, the Emp which before Name will be extracted.
- Extract All Between Text: This option extract the text present between the Leading text and trailing text.
- example, Rose:Red: Root, the red which is present in between will be extracted.
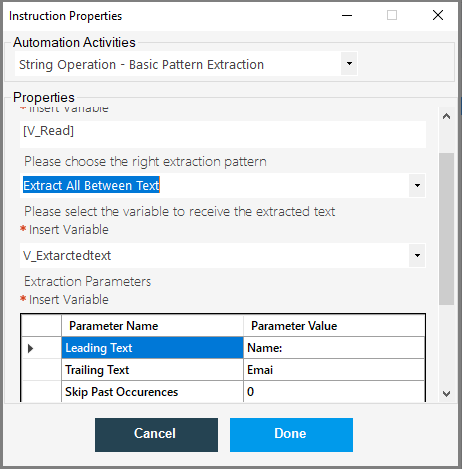
Next, click on the Show Message command, once the Instruction Properties pop-up window will open, enter the variable name to receive the output and click on Done.

Now, save the code and run, once the robot runs successfully, the text will be extracted.

the Jhony will be extracted from the below-given pattern.
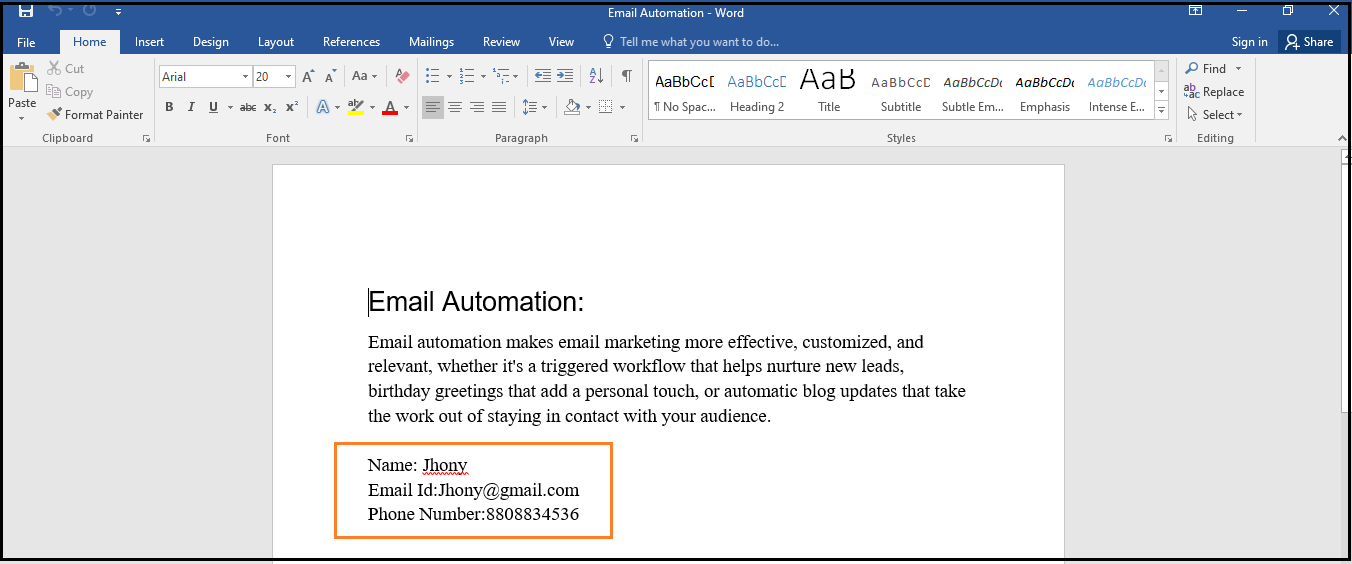
If change the pattern as below, and run the robot will encounter an error.
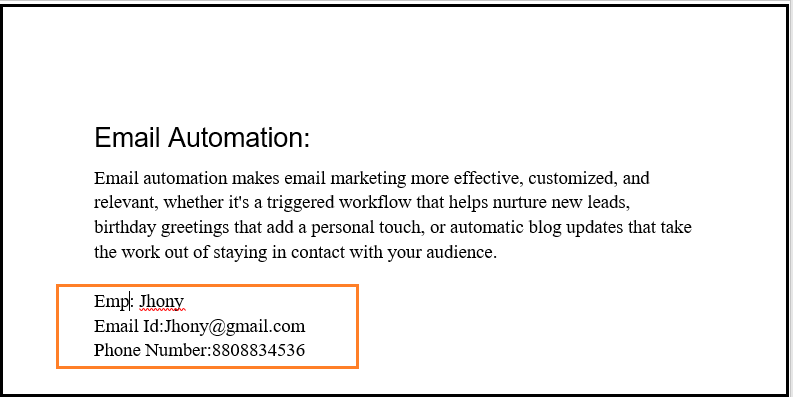
20.11.RegEx Pattern Extraction
What is Regex: Regex (Regular Expressions) is a text processing tool that may be used in a variety of situations. You may look for numbers, characters, punctuation, and even whitespace patterns. Regex is quick and lets you eliminate excessive loops in your software while matching and extracting data.
The RegEx Pattern Extraction command is used to extract the regular pattern extraction from the given document.
Our first step here is to read the document before we extract the pattern, click on the Read Document command, once the Instruction Properties pop-up window will open, enter the file path location from which you want to read the pattern from and enter the variable to receive the text and then click on Done.
Click on the RegEx Pattern Extraction command, once the Instruction Properties pop-up window will open, enter the source variable name.
Next, enter the regex extractor pattern as [0-9]+, and then enter the output variable name to receive the extracted data and click on Done.
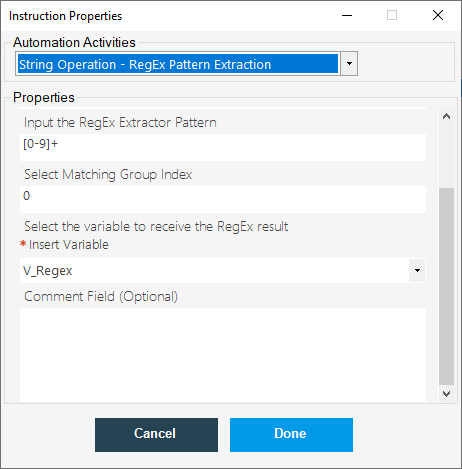
Next, click on the Show Message command, once the Instruction Properties pop-up window will open, enter a variable name to receive the extracted text.

Now, save the code and run the robot, once the robot runs successfully, the extracted pattern will be displayed on the output message box.
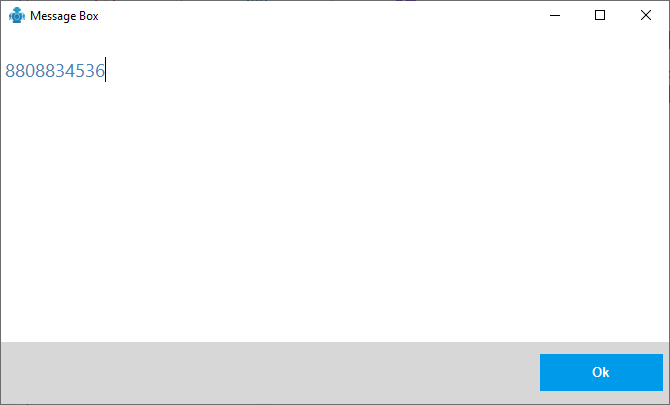
20.12.Date Calculation
The Date Calculation command is used to add /sub seconds, minutes, hours, years, and days to the given date or time variable.
Click on the Date Calculation command, once the Instruction Properties pop-up window will open, enter the text or the variable.
Next, enter the calculation Method, which is having options to Add/ Sub Hours, Minutes, Seconds, Years, and Days.
Next, enter the value of the increment and variable to receive the output and click on Done.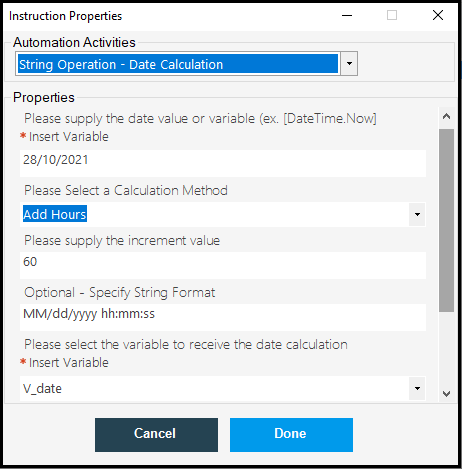
Next, click on the Show Message command, once the Instruction Properties pop-up window will open, enter the variable name and click on Done.
Now, save the code and run, once the robot runs successfully, the output will be displayed in the Output Message box.
20.13.Remove White Space
The Remove White Space command is used to remove white space characters from the given text either from the Left side or /right side or from both.
Click on the Remove White Space command, once the Instruction Properties pop-up windowsill open, enter the string where you want to remove white space.
Next, click on the Remove White Space drop-down and select the options such as left, right, Left-right as you required and enter the variable to receive the output, and click on Done.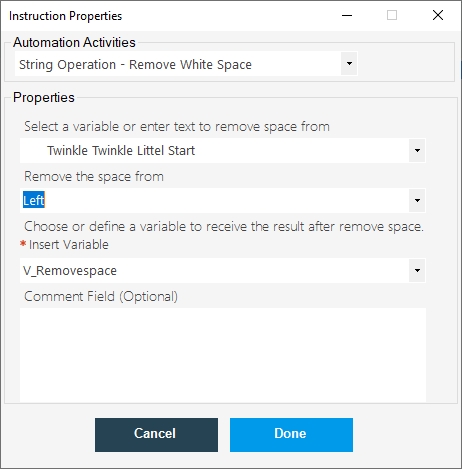
Next, click on the Show Message command, once the Instruction Properties pop-up window will open, enter the variable name and click on Done.
Now, save the code and run, once the robot runs successfully, the string with no white space on the left side will be displayed as shown below.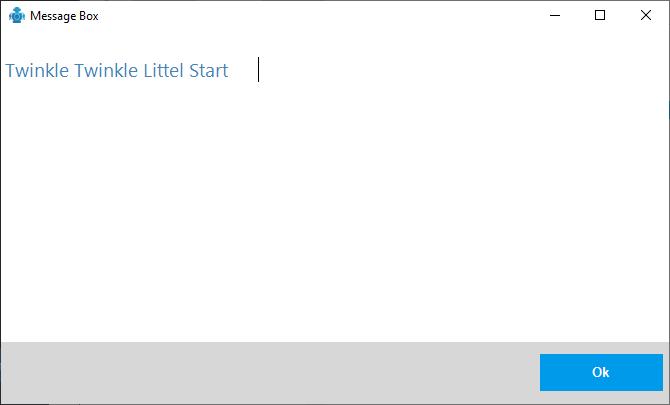
20.14.SHA 256 Conversion
What is SHA 256: A cryptographic hash (sometimes known as a “digest”) is a type of text or data file “signature.” For a text, SHA-256 provides a nearly-unique 256-bit (32-byte) signature.
Let us see, how to perform this task.
Click on SHA 256 conversion command, once the InsctructionProprties pop-up window will open, enter the text to convert it into SHA-256, and then select the conversion type, which means either to decode or encode the given string.
And then enter the variable to receive the output and click on Done.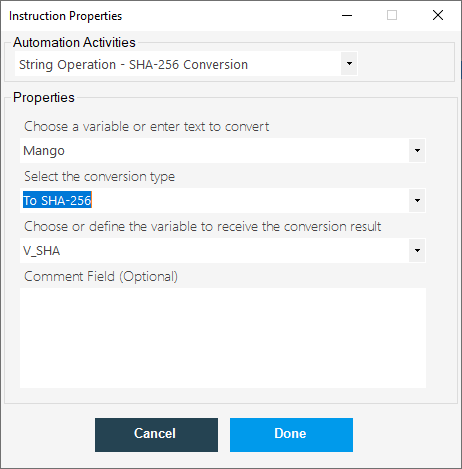
Next, click on the Show Message command, once the Instruction Properties pop-up window will open, enter the output variable name and click on Done.
Now, save the code and run, once the robot runs successfully, the given string will be converted into the SHA format.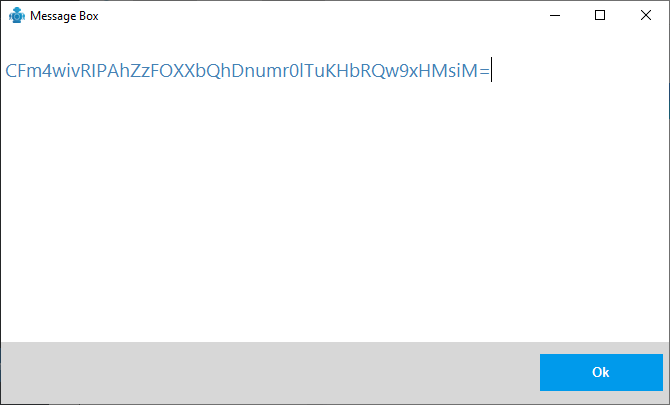
20.15.Difference Between Base64 and SHA-256
Base64 :
- This includes the encoding from Base16 to Base64.
- Base 64 encodes the Raw bytes.
- It encodes the data using a public algorithm, so it can be easily reversible
- Because encodings have widely accepted standards, the type of encoding employed may be easily identified, making decoding a simple operation.
SHA-256:
- It is a set of cryptographic hash functions.
- It’s a ‘one-way’ cryptographic function with a fixed size for any source text size.
- For a text, SHA-256 creates a nearly-unique 256-bit (32-byte) signature.
- SHA-256 is one of the most powerful hash functions known, and it is one of the successor hash algorithms to SHA-1 (together referred to as SHA-2).
21.PDF Automation
What is PDF: Adobe PDF files, often known as portable document format files, are one of the most widely used file formats today. Which is independent of software, hardware, or operating system.
The International Organisation for Standardisation (ISO) now maintains the PDF as an open standard (ISO). Links and buttons, form fields, music, video, and business logic may all be found in PDF documents. They may be signed electronically, and you can view PDF files using the free Acrobat Reader DC program for Windows or Mac OS.
The DWmaker tool has PDF Automation commands, let us see how to perform use these commands:
- Excel to PDF conversion
- PDF Auto Fillup
- Read PDF
- word to PDF Conversion
21.1.Excel to PDF Conversion
The Excel to PDF Conversion command is used to convert from Excel Document into PDF format.
Let us see, how to perform this operation.
- Click on Excel to PDF Conversion command, once the Instruction Properties pop-up window will open, enter the Excel File path location.
- Next, enter the file path where the file will be saved as a PDF document.
- Next, select the sheet you want to convert, we have two options here, All and Specific. You can select as you required.
- Next, enter the sheet name that you want to convert(This would be applicable only for a specific sheet).
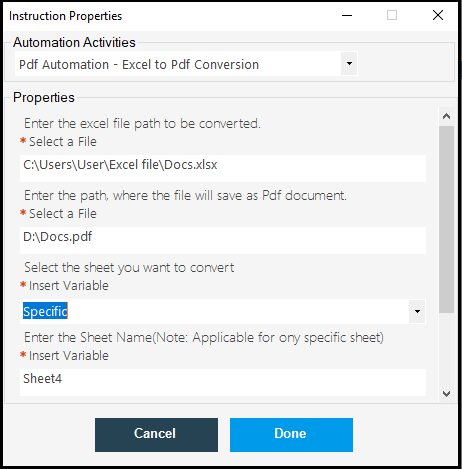
- Now, save the code and run, once the robot runs successfully, the given excel sheet will be converted into PDF format.

21.2.Word to PDF
Word to PDF command is used to convert Word documents into PDF files.
- Click on the Word to PDF command, once the Insctrutcion Properties pop-up window will open, enter the word file path to convert into PDF.
- Next, enter the file path location to save the PDF file.
- And, then click on Done.

- Now, save the code and run, once the robot runs successfully, the word document will be converted into a PDF doc.
21.3.Pdf Auto Fillup
The PDF Auto Fillup command is used to fill or add text to a PDF file. Here the PDF file should be an editable pdf file.
This command is useful to add field values which are corresponding to the fields.
For Example, I have a sample editable PDF file, I am going to add Name value to the pdf file, which is as shown below:
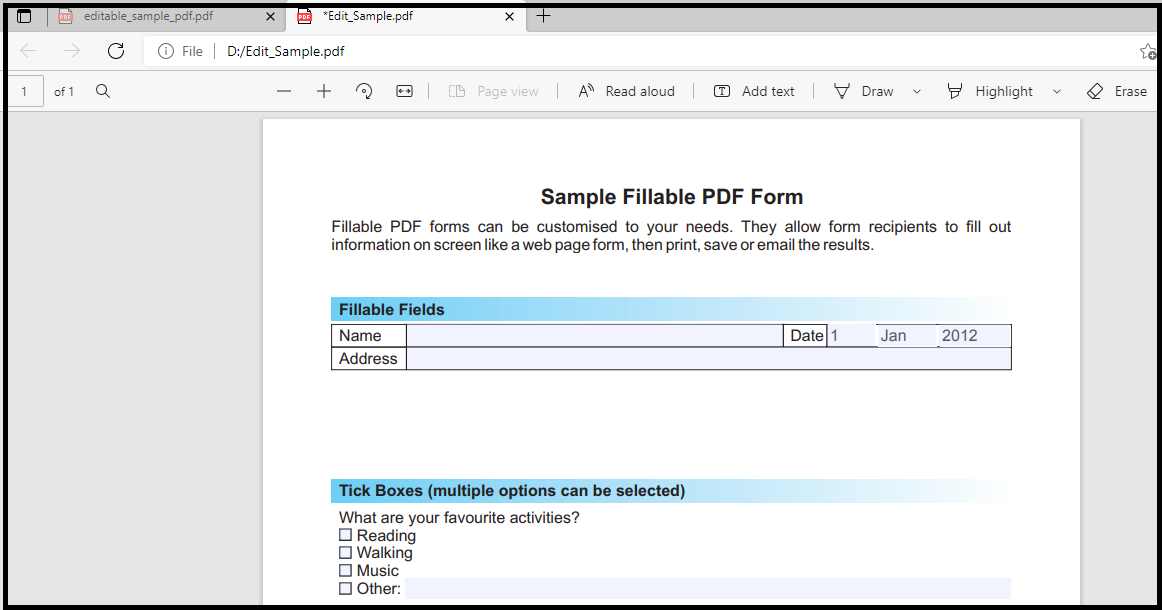
Click on the Pdf Auto Fillup command, once the Instruction Properties pop-up window will open, enter the pdf file path to be edited.
Next, enter the field value which is corresponding to it and enter the file path to be saved.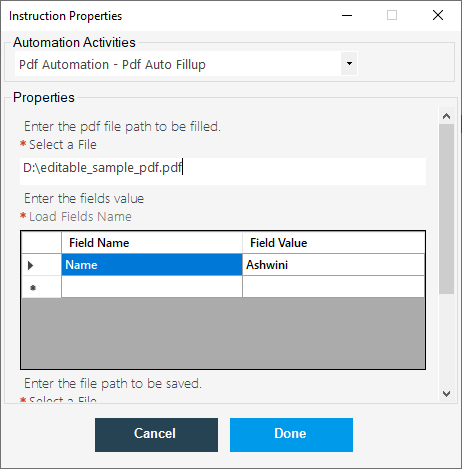
Next, Save the code and run, once the robot runs successfully, the given field value will be added to the editable pdf file which is as shown below.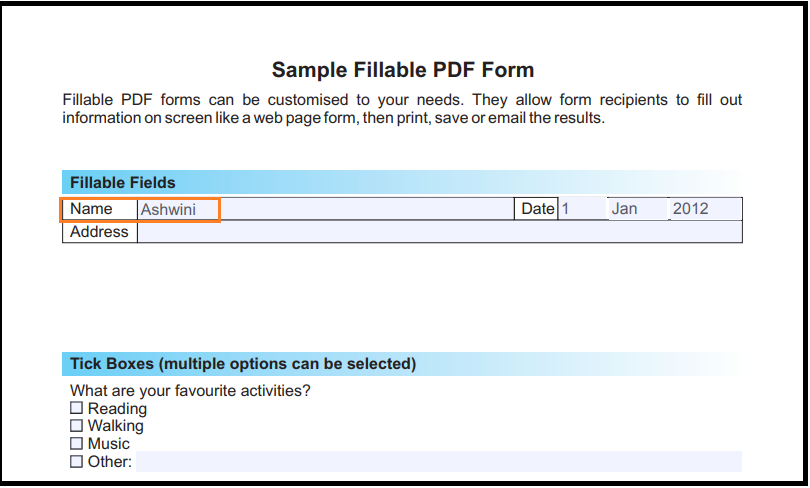
21.4.Read PDF
The Read PDF command is used to read the text which is present in the given pdf file.
Click on the Read PDF command under PDF automation, once the Instruction Properties pop-up window will open, enter the pdf file path to read a pdf file.
Next, define the variable to receive the pdf text, and then click on Done.
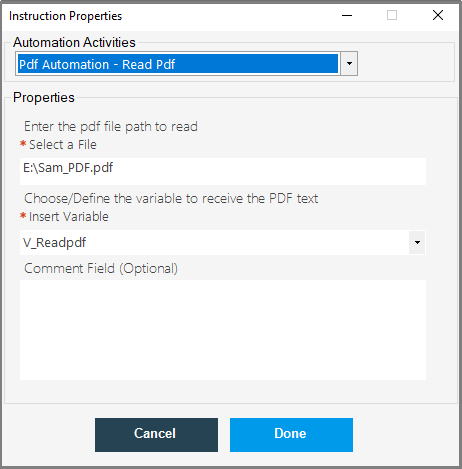
Next, click on the Show Message command, once the Instruction properties pop-up window will open, enter the variable name to receive the pdf text and click on done.
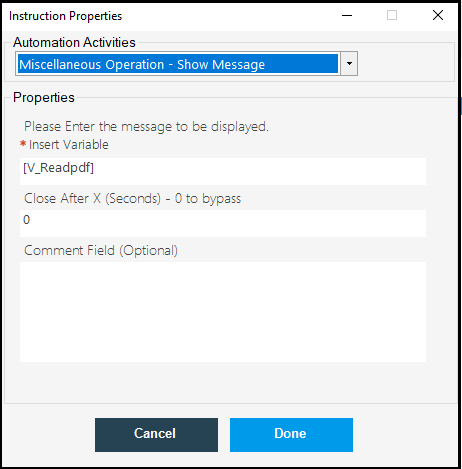
Now, save the code and run, once the robot runs successfully, the text will be displayed on the output message box.
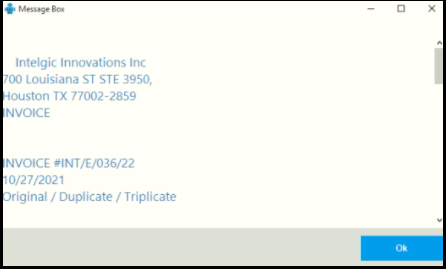
22.Miscellaneous Operation
What is Miscellaneous Operation :
Miscellaneous operations give functionality to basic analytical tasks, making them easier to do.
DWmaker Automation tool has below miscellaneous Operations such as: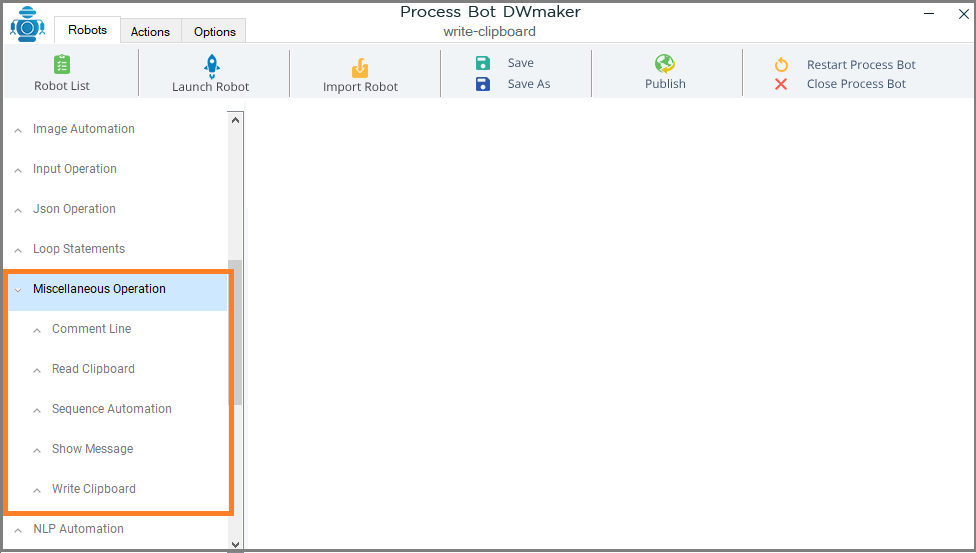
Let us see how to perform these operations one by one.
22.1.Comment Line
Commenting is an “art” of expressing what your software will accomplish in “high level” English sentences. It’s better to perform your commenting before you start writing your program’s code.
Comments in the program are specifically indicated lines of text that are not evaluated. There are generally two methods to remark syntactically. The first is known as a single-line comment, because it only pertains to a single line in the “source code,” as the name implies (the program). The second type of remark is known as a Block comment, and it generally relates to a paragraph of text. A block comment has a start and an end sign, and the computer ignores everything in between.
The Dwmaker tool has a Comment Line command, click on Comment Line, once the Instruction Properties pop-up window will open, enter the comment line in it and click on Done.
22.2.Write/Read Clipboard
The Write Clipboard command is used to write arbitrary data to the clipboard. This can be used to implement cut and paste functions.
Let us see how to perform this operation using the DWmaker Automation tool.
Click on the Write Clipboard command under Miscellaneous Operation, once the Instruction Properties pop-up window will open, define the variable or enter a value to set in the clipboard. and then click on Done.
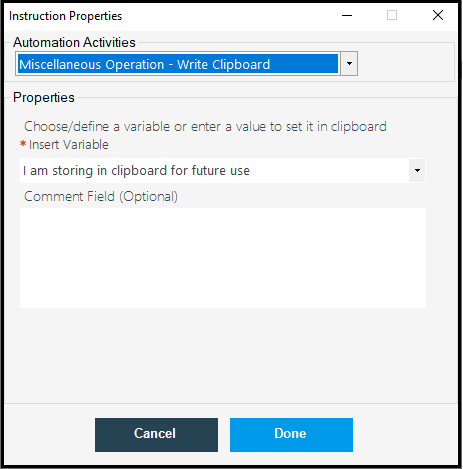
The Read Clipboard command is used to read the content which is written on the clipboard.
Click on the Read Clipboard command, once the Instruction Properties pop-up window will open, enter the variable to receive the text and click in Done.

Next click on the Show Message command, once the Instruction Properties pop-up window will open, enter the variable name to receive the output text and then click on Done.
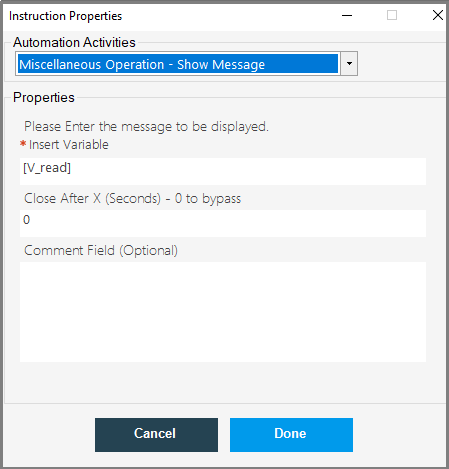
Now save the code and run, once the robot runs successfully, the written clipboard text will be read and the same will be displayed on the output message box as shown below.

22.3.Show Message
The show Message command is used to display the messages or values which are stored in the variable.
Click on the Show Message command, once the Instruction Properties pop-up window will open, enter the variable name or message to display and click on done.
Now, save the code and run, the text which is present in the variable will be displayed on the pop-up message box.
23.Json Operation
What is JSON:
JSON (JavaScript Object Notation) is a text-based standard for encoding structured data that is based on JavaScript object syntax. It’s often used in web applications to convey data (e.g., sending some data from the server to the client, so it can be displayed on a web page, or vice versa).
- The DWmaker has below Json Operation commands, let us see how to perform this operation using the Dwmaker Automation tool.
- Read JSON Array
- Read JSON Item
- Read JSON Model
23.1.Read JSON Array
What is JSON Array:
An ordered list of values is represented by a JSON array. Multiple values can be stored in a JSON array. In a JSON array, you may store text, integer, Boolean, or object values. Values in a JSON array must be separated by a comma.
A JSON array is represented by the [](square bracket).
What is JSON Model :
The JSON format is a client-side model, therefore it’s best for tiny datasets that are fully accessible from the client. The JSON model doesn’t have any mechanisms for server-side paging or delta loading. It does, however, support two-way binding. Client-side models, such as the JSON model, also lack functionality for transferring data back to the server. To deliver updated data to the server, applications must use model.getData() and jQuery. Ajax(), for example.
What is JSON Selector:
It’s a library/tool that allows you to select values from JSON objects using specific query syntax.
The Read JSON Array command is used to read the given JSON array.
Click on the Read JSON Array command, once the Instruction Properties pop u window will open, enter the JSON array to read like a list and then enter the variable to receive the array list and then click on Done.

As we posted two set of JSON Array to read, the DWmaker will read it as a array list, to read all the two set of details, we have to make a loop to read all the details.
Click on Loop List command, under Loop Statement, once the instruction properties pop-up window will open, enter the variable name and click on Done.

Next, click on Read JSON Model command, under JSON Operation, once the Instruction Properties pop-up window will open, enter the JSON Variable name and then enter the JSON Selectors and output variable which as shown below.
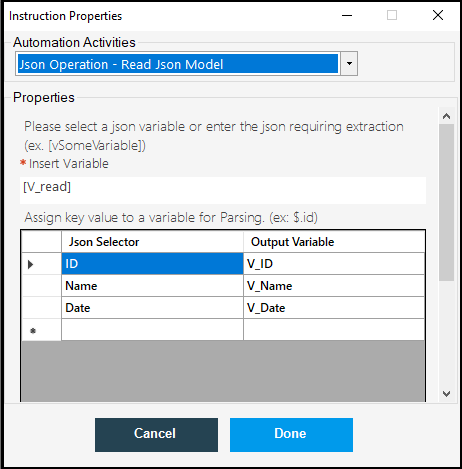
Next, click on the Show Message command, once the Instruction Properties pop-up window will open, enter the variable name to receive the output variable.
As we have three output variables are there hence enter the three show messages to display the three values.


Next, save the code and run.
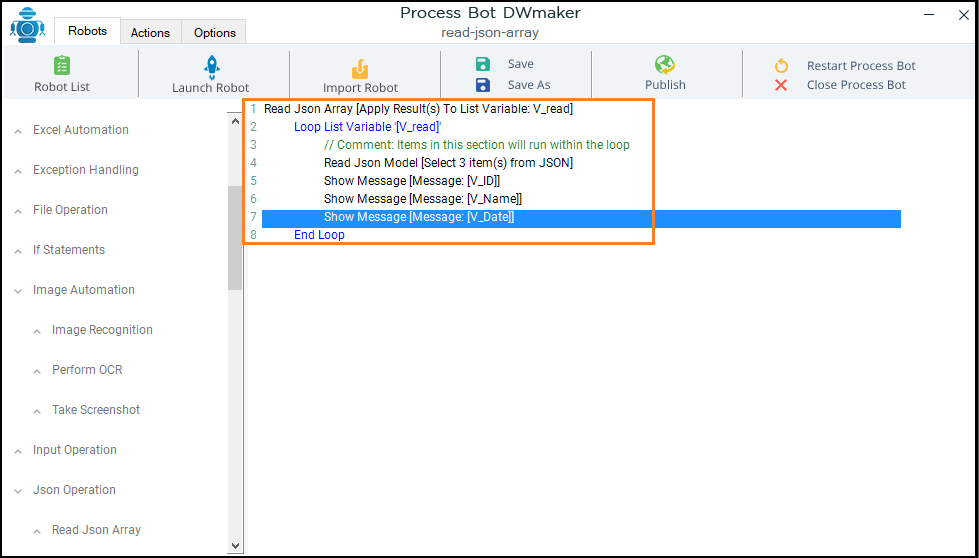
Once the robot runs successfully, the JSON array will be read and the same will be displayed as a list in the output window.

Just, keep click on OK button in the Message box, the remaining values will be displayed one by one.
24.Image Automation
What is Image Automation: The Image automation is the process of capturing the image and text which is present in the image.
the DWmaker automation tool has Image Automation commands, by using these commands we can scrape the text which is present in the invoices and also can take the screen shot of the any given windows.
Let us see one by one.
24.1.Perform OCR
The Perform OCR command is used to scrape the text present in the any text based images.
Click on Perform OCR command, once the Instruction Properties pop-up window will open, select the file path location, which contains image for OCR.
Next, choose or define the variable to receive the OCR and then click on Done.

Next, click on show Message command, once the Instruction Properties pop-up window will open, enter variable name to receive the OCR result.

Now, Save the code and run, once the Robot runs successfully, the text will be displayed on the output message box as shown below.
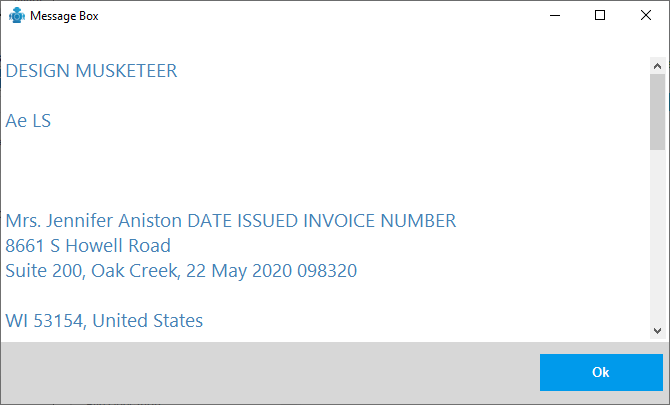
24.2.Take Screenshot
The Take Screenshot command is used to take the screenshot of the given window.
Click on Take Screenshot command, once the Instruction Properties pop-up window will open, enter the window name which you want to take the screenshot.
Next, enter the file path location to save the screenshot of the given window.

Now, save the code and run, once the robot runs successfully, the screenshot of the given window will be saved in the given file path location.
25.Input Operations
What is Input Operation?:
It is the process of taking data or information from a user, and it allows a computer to do any task by employing input.
The Input Operation is the stream of data going from an input device such as a keyboard to the main memory. An Output Operation, on the other hand, is a stream that flows from the main memory to an output device such as a screen.
The DWmaker provide some of the Input operation commands, by using the DWmaker Automation tool you can automate these input operation command.
The Input Operation commands are as follow:
- Mouse Click Event
- Mouse Move Event
- Prompt For HTML Input
- Prompt for Input
- Send Advanced Hotkey
- Send Basic Hotkey
- UI Automation
25.1.Mouse Move Event
The Mouse Move Event command is used to capture the mouse movement. This captures the x and y coordinate values of your mouse position and the same will be automated using the Dwmaker automation tool.
Let us see, how to perform this operation step by step.
Click on the Mouse Move Event command, once the Instruction Properties pop-up window will open, click on the Capture Mouse Position and move your mouse cursor on the application that you want to open.
As soon as you hover the mouse cursor on the application, the Cursor position Tracker pop-up window will open and it will track the mouse position.
![]()
Next, immediately go to your Mouse Move Event Property window and keep your mouse cursor under the Capture Mouse Position and then click on the space bar button then the X and Y position of the mouse cursor will be captured automatically.
Next, click on the Please Indicate the Mouse Click Type If Required drop-down and then select the type of mouse click on click on Done.
![]()
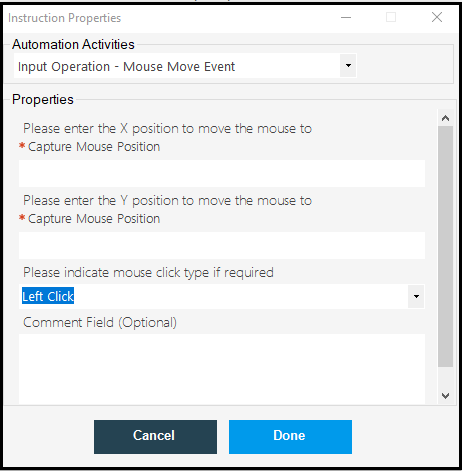
As soon as you click on the Space Bar button the x and y position will be captured on the DWmaker tool as shown below.
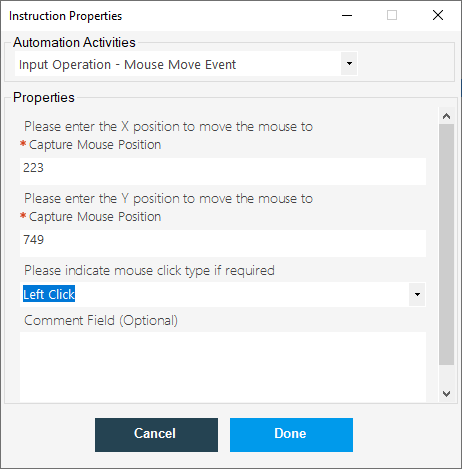
Now, save the code and run, the mouse will automatically click on the application that has been captured the x and y values.
For Example, here I have captured the x and y values of the chrome browser and when I used to run the chrome page will be opened as shown below.

25.2.Mouse Click Event
The Mouse Click Event command is used to capture the mouse click events.
The Mouse Click Event contains events that occur when the mouse interacts with HTML content.
Dwmkaer has a Mouse Click Event command, by using it we can automate the Mouse click events.
Click on the Mouse Click Event command, once the Instruction Properties pop-up window will open, click on please indicate the mouse click type drop-down button and select the mouse click type.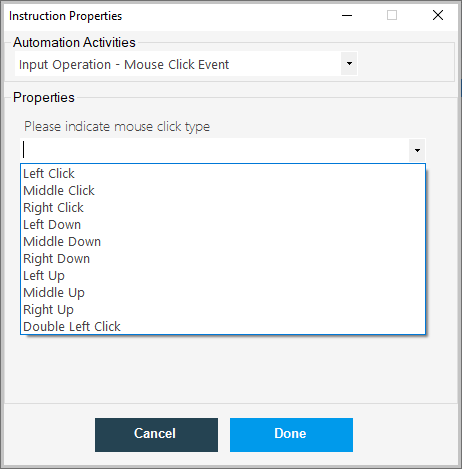
25.3.Send Advanced Hotkey
The Send Advanced Hotkey command is used to send advanced keyboard shortcuts to the Dwmaker automation tool.
By using these shortcuts we can perform different automation operations on a selected window or current window.
The Dwmaker’s Send Advanced Hotkey command is associated with All the Keys and their actions.
Let us see, how to perform these operations.
First, click on Send Advanced Hotkey command, once the Instruction Properties pop-up window will open, click on the Please Enter the Window Name drop-down list and select the window that you want to operate.
Here, for example, I have selected the Current Window option and opened a Word document to perform certain operations on it.
Let us take a Screenshot of the current window, to take a screenshot usually, we used to click on Crtl+Alt+(Prt+Scr).
Next, we have to set the Keys and their Parameters. So, click on the Selected Key drop-down and select the Control button as shown below.
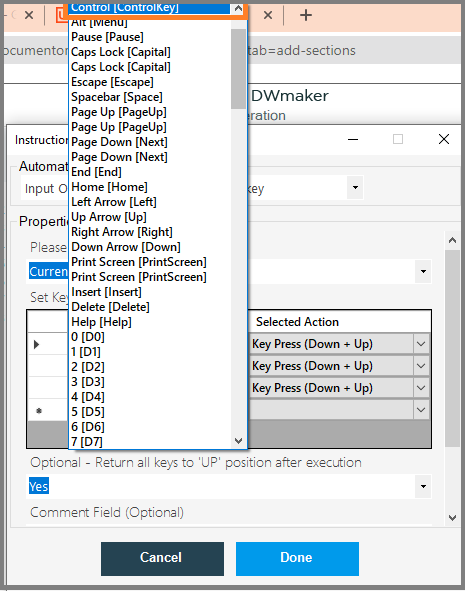
Next, click on the Selected Action drop-down and select the KeyPress(Down+UP) key action to be performed.
In the Selected Actions drop-down, we have three types of actions such as :
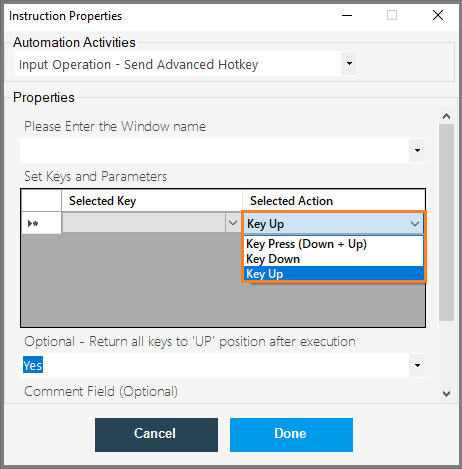
- KeyPress(Up+Down), Key Down, Key Up: The key down and key up events offer a code that identifies which key has been pushed, whereas the keypress event tells which character has been input.
- I have set the keys and key parameters as shown below.
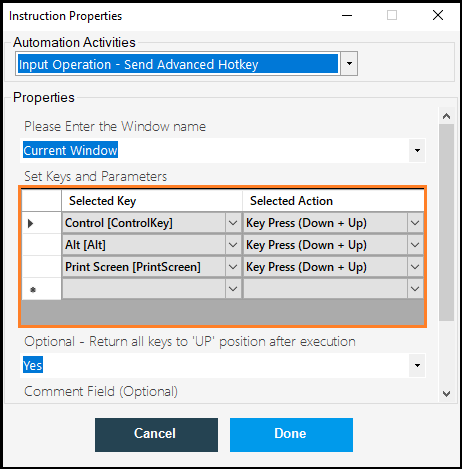
- Now, save the code and run, once the robot runs successfully the current window(Word Doc) will be opened and the screenshot of the current window will be taken.
- To check that Open the Paint application and click Crtl+V the screenshot will be pasted over here.
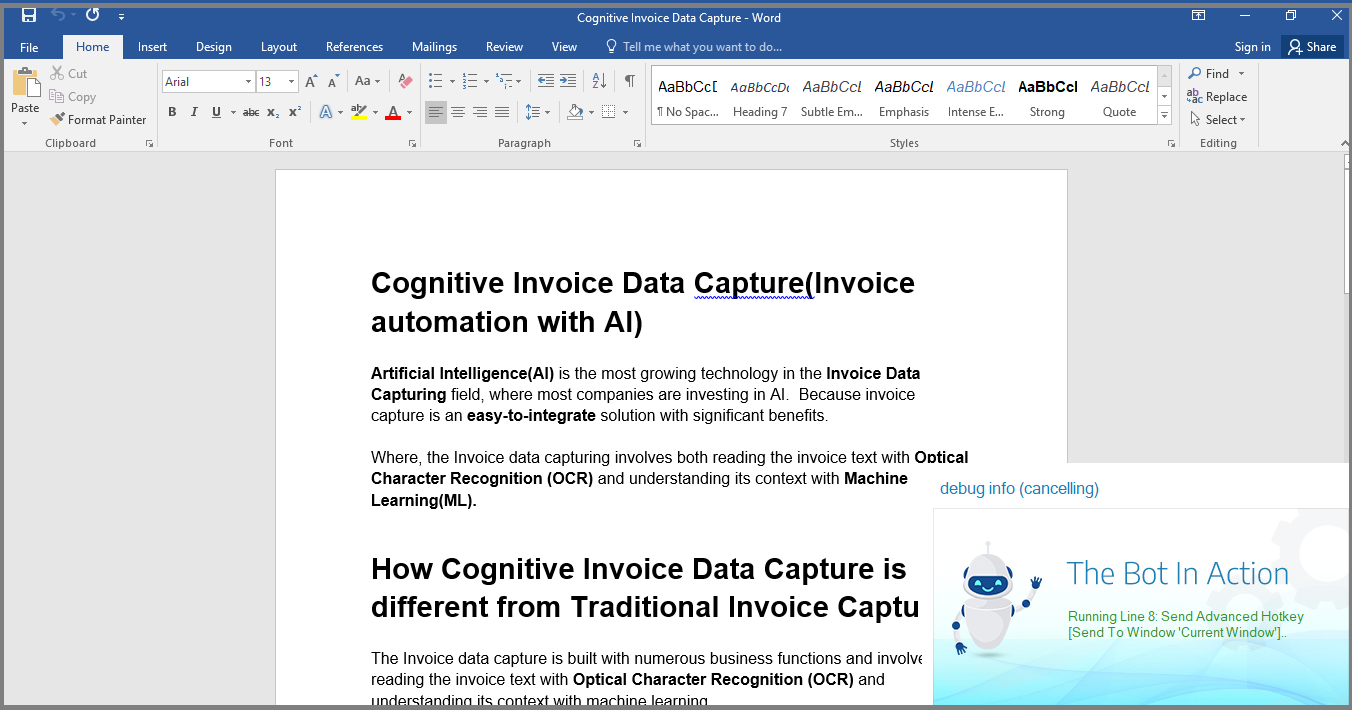
- In the same way, you can also perform several actions which can be performed keyboard.
25.4.Send Basic Hotkey
The Send Basic Hotkey command enables you to add the basic key elements to the Dwmaker automation tool.
Let us see how to perform this operation step by step.
In this operation, we are using the Start-Process command and Pause Script commands.
Click on the Start-Process command under Programs/Process automation, this commands will activate the given programs/process.
Once the Instruction Properties pop-up window will open, click on the Select file option and then enter the file path location to which you want to perform an action.
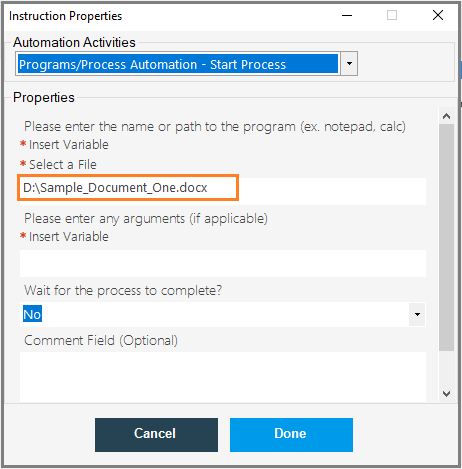
Next, click on the Pause Script command under Enige Operation, once the Instruction Properties pop-up window will open, enter the amount of time to Pause for(1sec=1000 ms)

Next, click on Send Basic Hotkey command under Input Operation, once the Instruction Properties pop-up window will open, select the document name from the drop-down.
Next, enter the text to send and then click on Done.
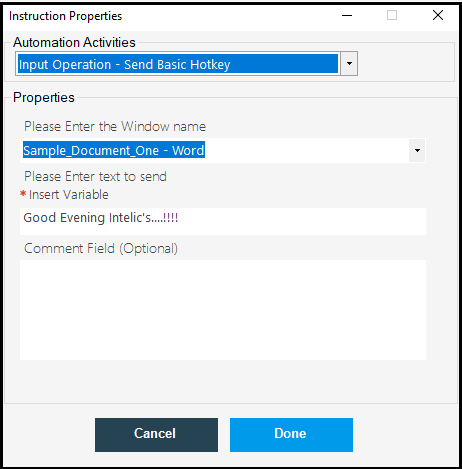
Now save the code and run, once the robot runs successfully, the sent key will be printed on the given document window.
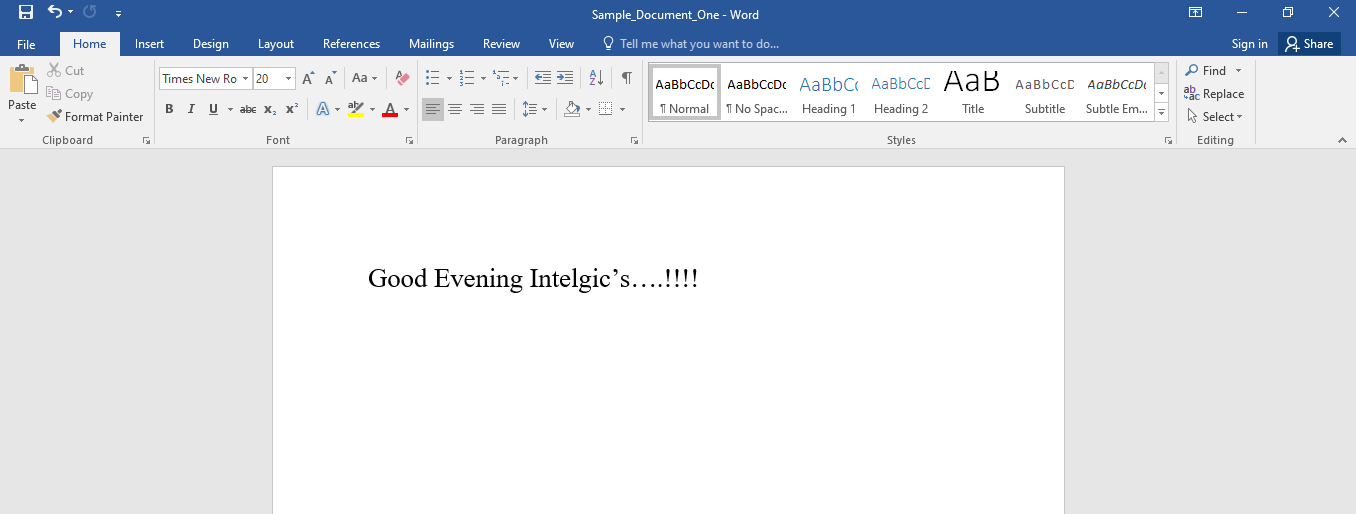
25.5.Prompt For Input
What is Prompt For Input: The prompt For Input command displays a dialogue with an optional message prompting the user to type something. It’s commonly used when a user wishes to enter a value before proceeding to the next page. It returns either a string containing the user’s content or null.
- Let us see, how to perform this operation step by step.
- Here, first, we need to start a process, click on the Start-Process command under Programs/Process automation, these commands will activate the given programs/process.
- Once the Instruction Properties pop-up window will open, click on the Select file option and then enter the file path location to which you want to perform an action.
- Next, click on the Pause Script command under Enige Operation, once the Instruction Properties pop-up window will open, enter the amount of time to Pause for(1sec=1000 ms)
- Next, Click on the Prompt For Input, once the Instruction Properties pop-up window will open, enter the heading name under, please specify the heading name.
- Next, Please specify the input directions.
- Next, click on the Add input parameters under User Input Parameters and then enter the parameters as shown below.
- Once you click on the Input dropdown list, you can see three types of Input methods such as Text Box, Combo Box, and, CheckBox.
- In the next input box, write your label name as Enter your Paragraph or you can write text which is related to your project.
- In the next input box, we can see a word count limit.
- Next, in the Assigned input box assign a variable to hold your text. And, then click on Done.
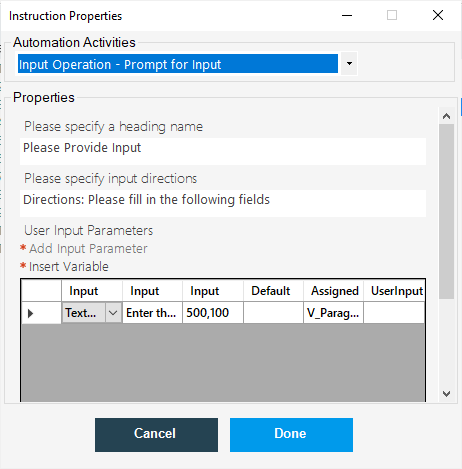
- Next, click on Send Basic Hotkey command under Input Operation, once the Instruction Properties pop-up window will open, select the document name from the drop-down.
- Next, enter the variable to hold the text, and then click on Done.
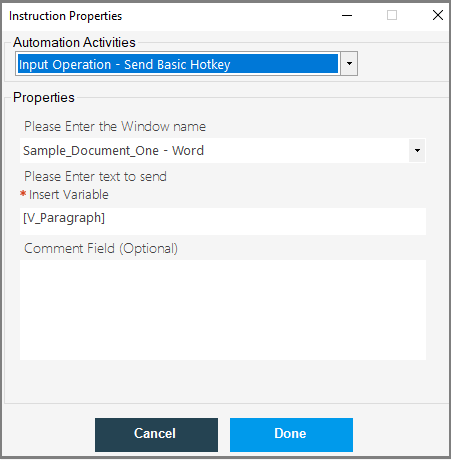
- Now save the code and run, once the robot runs successfully, the Input prompt and the given document will be opened simultaneously. Enter the input paragraph and click on Accept,

- Next, the entered text will be printed on the given document as shown below.
- In the same way, we can use the Prompt for Input command for several other applications.
25.6.Prompt For HTML Input
What is HTML Builder: A HyperText Markup Language (HTML) builder is software that generates HTML code for a designer who is working on an HTML document or web page.
- The Prompt For HTML Input command is used to enter the user input through the HTML Prompt.
- Click on the Prompt For HTML Input command, once the Instruction Properties pop-up window will open, Launch HTML builder.
- Next, click on Specify if an error should occur on any result other than ok.
- Here, we have two options here:
- Error On Close: This command closes the HTML code if an error occurs.
- Do not Error on Close: This command does not close the HTML code if an error occurs.
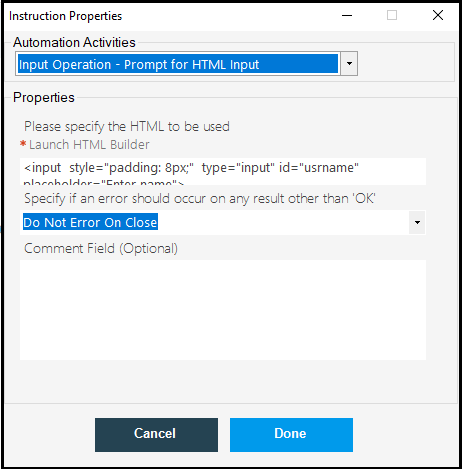
- Now, save the code and run, once the robot runs successfully, the HTML code will run and the Input prompt will be displayed.
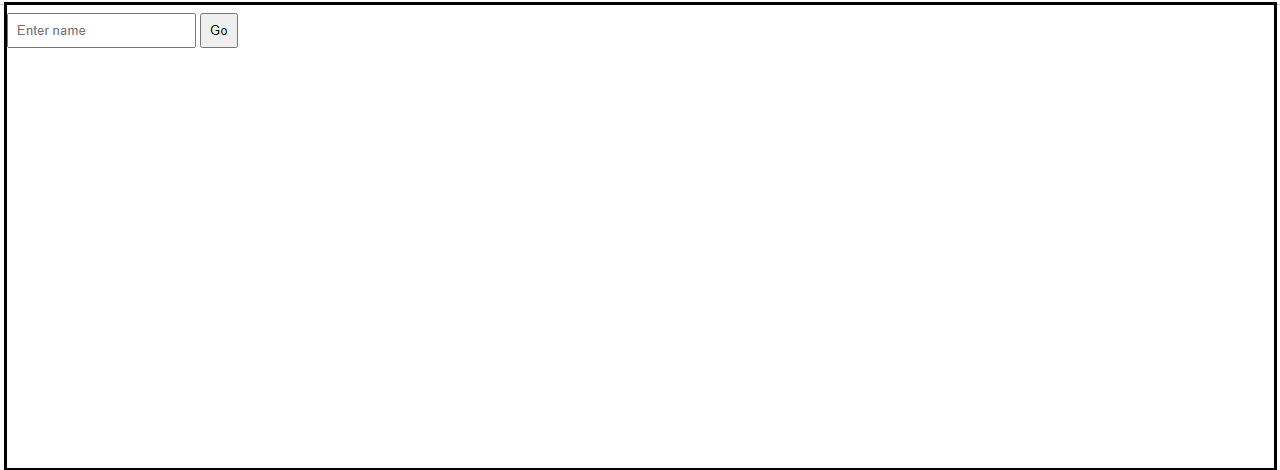
- Next, enter your name and then click on Go. The output will be displayed as follow.
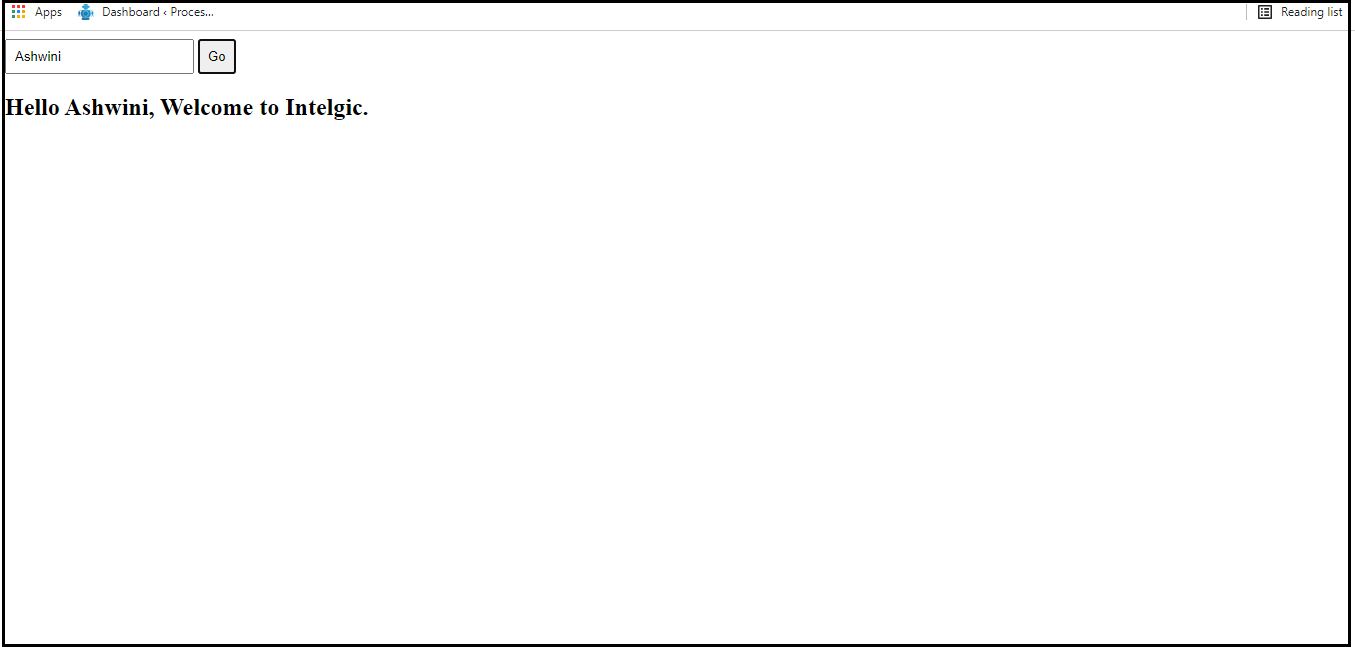
25.7.UI Automation
What is UI Automation: Microsoft UI Automation is an API that allows you to access, identify, and alter the user interface components of another application.
- Let us see, how to perform this operation using the Dwmaker automation tool.
- Click on the UI Automation command, once the Instruction Properties pop-up window will open, click on the Please Indicate the Action drop-down list and, and select the action that you want to perform.
- Next, click on Please Select the Window to Automate, and select the window to automate. Here I have selected Calculator Window to automate.
- Next, click on the Element Recorder under the Set Search Parameter.
- As soon as you click on the Element Recorder, the recorder window will open, click on the recorder button.
- Note: Before you click on Recorder, the calculator window should be opened.
- Click on the Recorder button and then perform any calculation operation(Example:5+5=10) by clicking on the calculator buttons, so the automation ID of the button which you have clicked will be recorded in the checkbox.
- For each button, you have to perform in a new UI Automation window.
- First, Open the UI Automation Property window, Select the Click Element, and select Calculator and then click on Element Recorder and press number 5 on the calculator, the Automation Id of the number 5 will be recorded as shown below.
- Check the corresponding checkbox of the Automation Id of the Number 5 button.
- Next, scroll down and select the click type as Left click and then click on Done.
- Repeat the same steps for +, 6, and =, so you will get the automation id for each button you clicked on Calculator.

- Next, the automation id of 6 will be as shown below.
- Next, the Automation ID of equal(=) is as shown below.

- Now, save the code and run, once the robot runs successfully, the calculator operation will be automated.
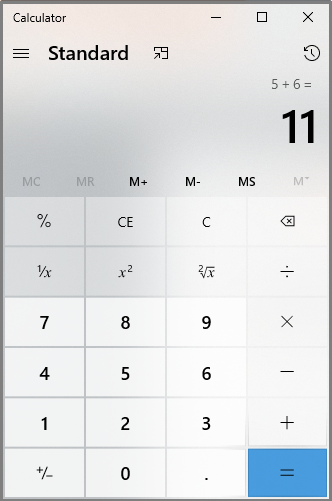
26.Programs/Process Automation
What is a Program: a program is a specific set of ordered operations for a computer to perform.
What is Process: a set of actions that generate something or lead to a specific outcome.
The Dwmaker has Programs/Process automation commands, using these commands we can automation any programs or Process files.
Dwmaker is associated with the following commands such as :
- Run Custom Code
- Run Script
- Start-Process
- Stop-Process
26.1.Start Process
The Start-Process command is used to start any of the given process or programs.
- Let us see how to perform this operation using the Dwmaker automation tool.
- Click on Start Process command, once the Instruction Properties pop-up window will open, click on Select file location and then, enter the file path location of the application program.
- For example, I am using calculator, hence I am locating the .exe file of the calculator in the property window.
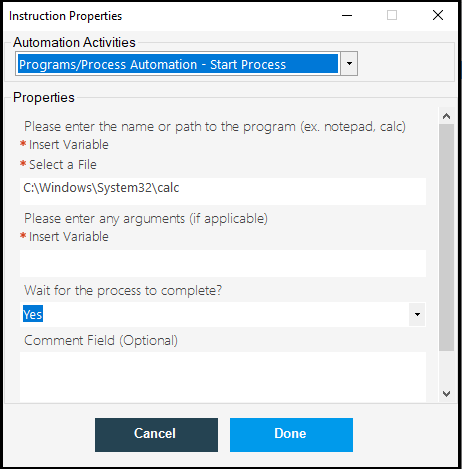
- Next, save the code and run,once the robot runs successfully, the calcltor will be opened.
26.2.Stop Process
The Stop-Process command is used to stop any program or Process to stop its execution.
Click on the Stop-Process command, once the Instruction Properties pop-up window will open, enter the name of the program to be stopped and then click on Done.
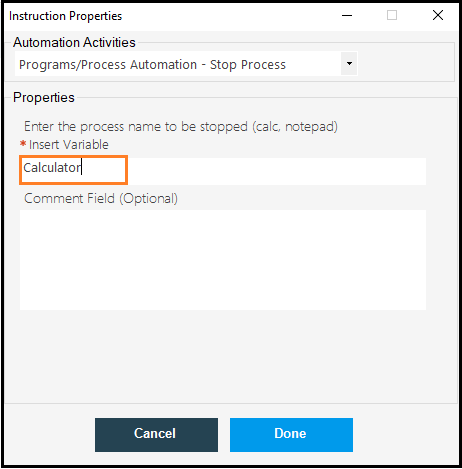
Now, save the code and run, the execution of the Calculator will be stopped.
26.3.Run Script
The Run Script command is used to run the scripts.
What is Script: A script, often known as a scripting language, is a computer language that contains a set of commands that may be run without being compiled. Perl, PHP, and Python are examples of server-side scripting languages. JavaScript is the greatest example of a client-side scripting language. Our programming language definition contains a complete list of scripting languages and other programming languages.
The DWmaker is associated with the Run Script command. Click on the Run Script command under Programs/Process Automation, once the Instruction Properties pop-up window will open, enter the path to the script that you want to run and then click on Done.

Now, save the code and run, once the robot runs successfully, the given script will be run.
26.4.Run Custom Code
The Run Custom Code command is used to run the customized code. The DWmaker Automation tool has the command option to run the customized code.
Click on the Run Custom Code command under Programs/Process Automation.
Once the Instruction Properties pop-up window will open, enter the code that you want to run and then enter the arguments.
And, then enter the variable to receive the output and click on Done.
27.System Automation
The System Automation command is used to perform system-related automation processes.
The DWmaker is associated with a few System Automation Commands such as:
- Environment Variable
- OS Variable
- Remote Desktop
- System Power Option
27.1.Environment Variables
The Environment Variables command is used to find the value of the given environment variable.
What is Environment Variable: An environment variable is a variable, whose value is set outside of the application, usually through the operating system or microservice capability. A name/value pair makes up an environment variable, and any number of them can be generated and referenced at any time.
- Click on the Environment Variable command, once the Instruction Properties pop-up window will open, click on the Please select required environment variable and then select the required environment variable from the drop-down list.
- Next, enter the variable name to receive the output and then click on Done.
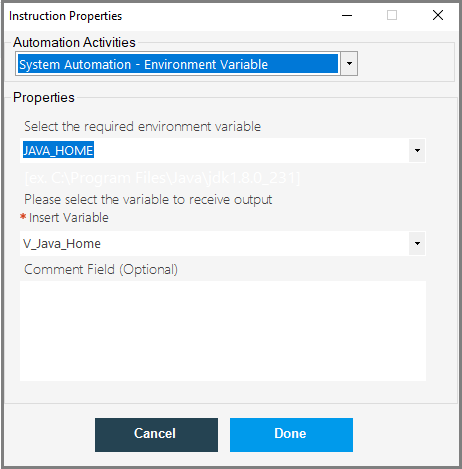
- Next, click on Shown Message command under Miscellaneous Operations and enter the output variable and then click on Done.

- Now, save the code and run, once the robot runs successfully, the value of the given environment variable will be displayed on the output message box.
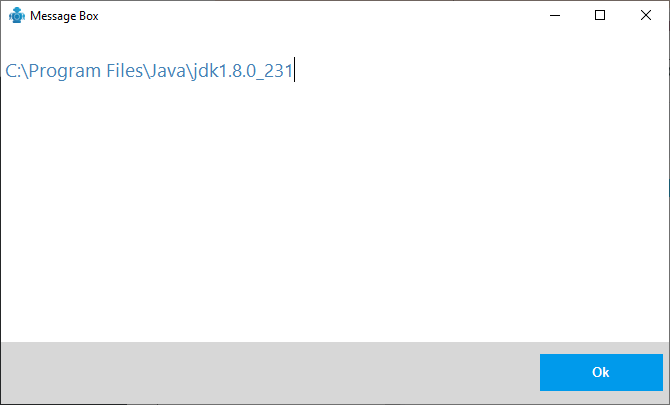
27.2.OS Variable
The OS Variable is used to get the value of the given system Variable.
- Click on the OS Variable command, once the Instruction Properties pop-up window will open, click on the select required variable from the drop-down and select the variable.
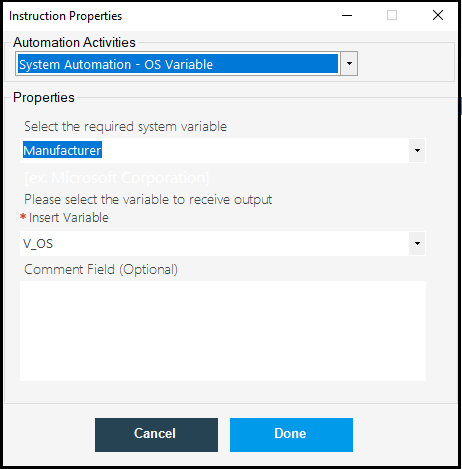
- Next, enter the output variable to receive the output.

- Now, save the code and run, once the robot runs successfully, the value of the given os variable will be displayed on the output message box.
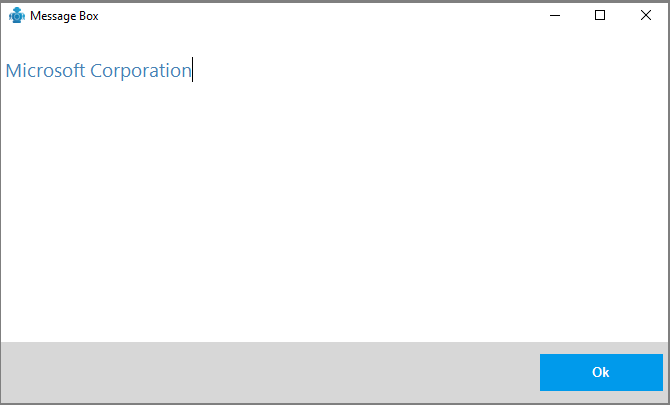
27.3.System Power Option
The System Power Option command is used to perform system power-related operations.
The system Power Option performs Shut Down, Restart, Logoff, and Lock Screen operation.
Example: After Installing any Software, the system needs to re-strat.
Click on the System Power Option command, once the Instruction Properties pop-up window will open, select the system power action to be performed and then click on Done.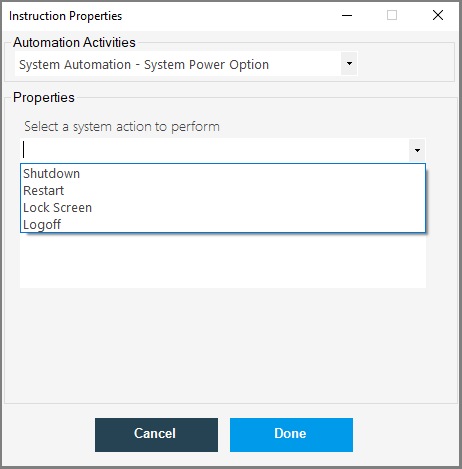
27.4.Remote Desktop
A remote desktop is a technology that allows people to connect to a computer from a distance and interact with it as if they were sitting in front of it. Users may execute a wide range of operations as if they were using the computer in person after the connection is established. They can administer programs, troubleshoot problems, and even conduct administrative jobs if necessary.
Note: We can’t use this command for cloud network Virtual Machines, this will work only for the local network computers.
Click on the Remote Desktop command, once the Instruction Properties pop-up window will open, enter the name of the Machine to be connected.
Next, enter the:
- Username and Password
- And then enter the width of the RDP window
- Enter the height of the RDP window
- And then click on Done.
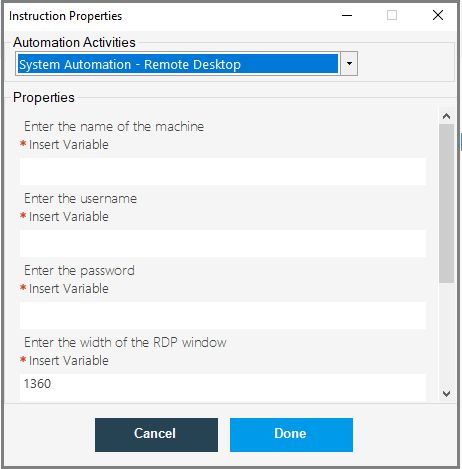
Now, save the code and run.
28.Windows Automation
Windows Automation is a mechanism of executing Windows programmes without having human involvement in order to reduce human error.
The DWmaker automation tool has Windows Automations command, which is associated with Subcommands such as:
- Activate Windows
- Close Windows
- Move Windows
- Resize Windows
- Set Window State
- Wait for the Window to Exist
By using these commands we can perform windows automation.
28.1.Activate windows
Activate Windows command is used to activate the given window application windows.
- Click on Activate Windows command, once the Instruction Properties pop-up window will open, select the window which you want to automate from the drop-down list and then click o Done.
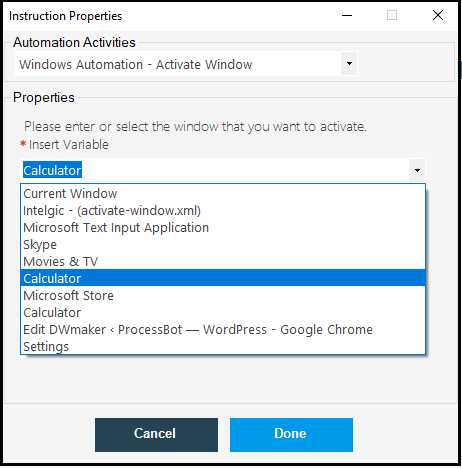
- Next, add a simple calculation process by using the UI Automation command.
- Click on the UI Automation command, once the Instruction Properties pop-up window will open, click on the Please Indicate the Action drop-down list and, and select the action that you want to perform.
- Next, click on Please Select the Window to Automate, and select the window to automate. Here I have selected Calculator Window to automate.
- Next, click on the Element Recorder under the Set Search Parameter.
- As soon as you click on the Element Recorder, the recorder window will open, click on the recorder button.
- Note: Before you click on Recorder, the calculator window should be opened.
- Click on the Recorder button and then perform any calculation operation(Example:5+5=10) by clicking on the calculator buttons, so the automation ID of the button which you have clicked will be recorded in the checkbox.
- For each button, you have to perform in a new UI Automation window.
- First, Open the UI Automation Property window, Select the Click Element, and select Calculator and then click on Element Recorder and press number 5 on the calculator, the Automation Id of the number 5 will be recorded as shown below.
- Check the corresponding checkbox of the Automation Id of the Number 5 button.
- Next, scroll down and select the click type as Left click and then click on Done.
- Repeat the same steps for +, 6, and =, so you will get the automation id for each button you clicked on Calculator.
- Next, the automation id of 6 will be as shown below.
- Next, the Automation ID of equal(=) is as shown below.
- Now, save the code and run, once the robot runs successfully, the calculator operation will be automated.
- Now, save the code and run, once the robot runs successfully the given windows will be activated and the addition of two numbers will be done as shown below.
Note: Before you run the command, please open the selected window to activate.
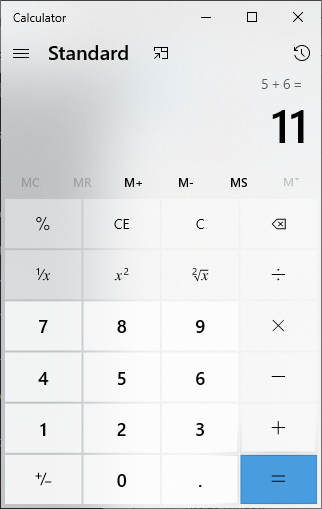
28.2.Close Window
Close Window command is used to close the given activated window.
Click on the Close Window command, once the Instruction Properties pop-up window will open, enter the name of the window to close and then click on Done.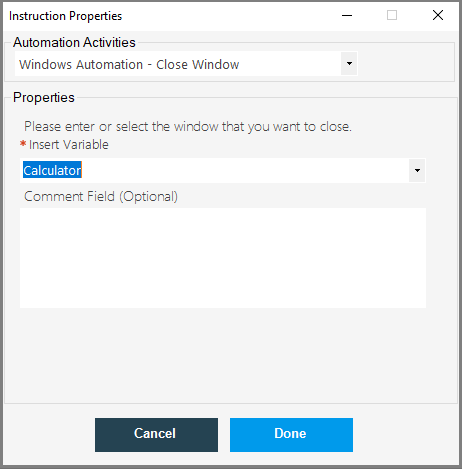
Now, save the code and run, once the robot runs successfully, the given window will be closed.
28.3.Move Window
Move Window Command is used to move the activated window.
Click on the Move Window command, once the Instruction Properties pop-up window will open, enter the below details:
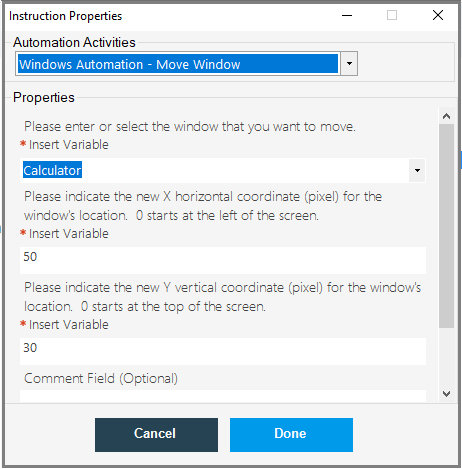
Now, save the code and run, once the robot runs successfully, the activated window will be moved to corresponding pixels of x and y coordinate values.
Before, running the move command, the calculator window position was as shown below.
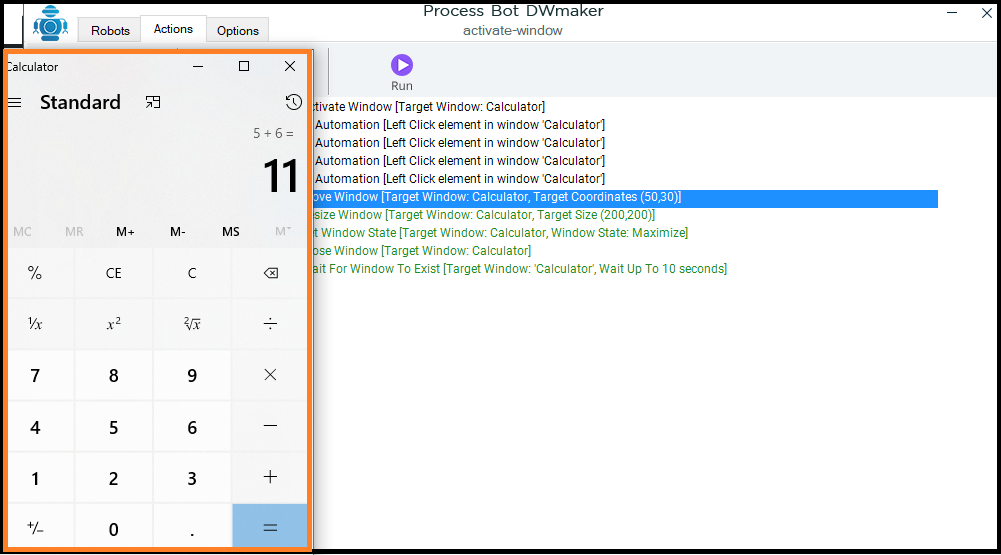
Once the command will run, the calculator window will move to the given position of the x and y coordinate values.
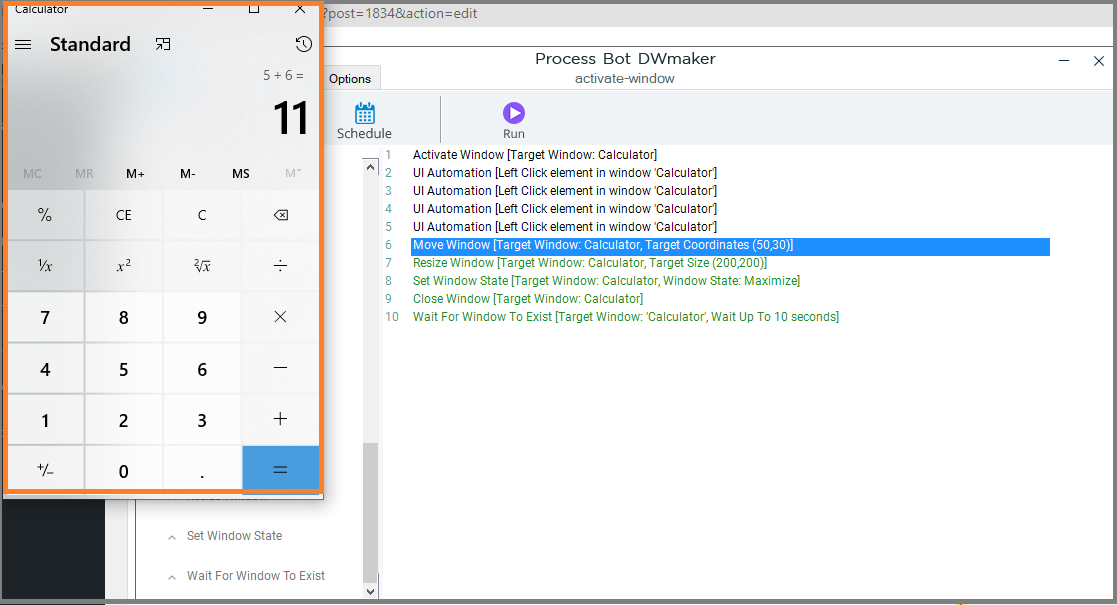
28.4.Resize Window
Resize Window command is used to resize the given active window.
Click on Resize Window command, once the Instruction Properties pop-up window will open, enter the window name to be resize and then enter the width and height of the window and click on Done.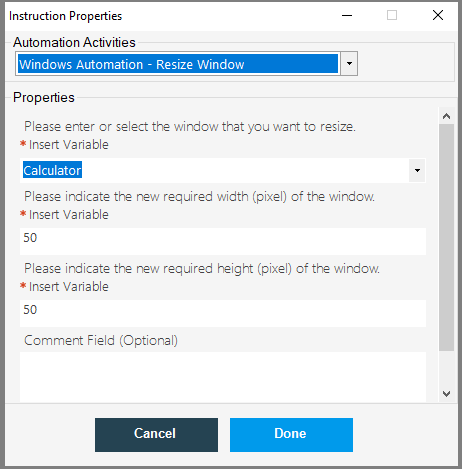
Now, save the code and run, once the robot runs successfully, the given window will be resized to the given pixel.
28.5.Set Window State
The Set Window State command is used to set the window staus of the given active window.
Set Window State has three options such as:
- Maximize: This option will Maximize the given current window.
- Minimize: This option will Maximize the given current window.
- Restore: This option will restore the given current window.
Click on the Set Window State command, once the Instruction Properties pop-up window will open, enter the window name that you want to target for the change and then select the newly required state of the window from the drop-down list and then click on Done.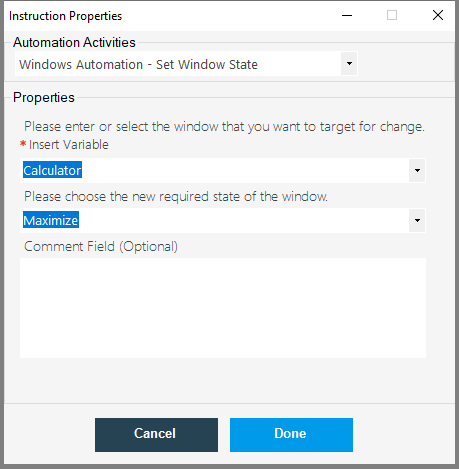
Now, save the code and run, once the robot runs successfully, the given window will be resized to the selected state.
28.6.Wait For Window to Exist
The Wait For Window to Exist command is used to wait for the specified window to be closed before executing the next action.
- Click on Wait For Window to Exist command, once the Instruction Properties pop-up window will open, enter the window name you are waiting to exist.
- Next, and then indicate the number of seconds to wait for the window to exist.
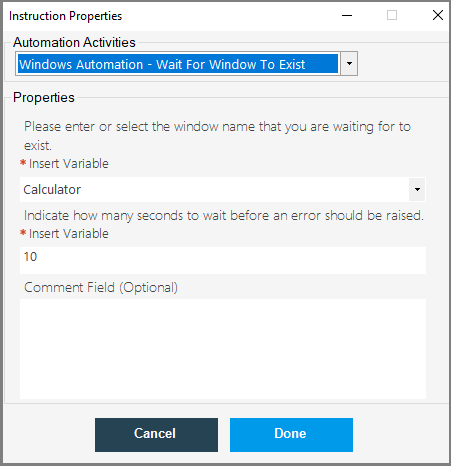
- Now, save the code and run, once the robot runs successfully, the this command will wait till the window to exist.
29.Engine Operation
The Dwmaker has Engine Operation commands, these commands help us to perform certain activities such as Clear Memory, Error Handling, Pause Script, etc.
The Engine Operation commands are as follows:
- Clear Memory
- Error Handling
- Pause Script
- Set Engine Delay
- Show Engine Context
- Stop Watch
Let us see, how to perform each command.
29.1.Clear Memory
The Clear Memory command is used to clear your application memory if it exceeds the given limit.
To Check the used Memory, run the ready robot in the DWmaker and then, go to the Task Manager and check the memory usage, you will come to know how much memory that run robot is consuming.
Next, click on the Clear Memory under Engine Operation, once the Instruction Properties pop-up window will open, enter the memory limit that you want to set for his application and then click on Done.
![]()
Now, save the code and run, once the robot runs successfully, once again go to the Task Manager and check, the memory has been cleared and controls the memory usage below the given limit.
![]()
Now, in the above image, you can check the memory is below the given limit. This is how we can control and manage the usage of the memory to run our robots.
29.2.Error Handling
The Error Handling command is used to handle the errors in the given robots.
29.3.Pause Script
The Pause Script command is used to pause the script for the given amount of time.
Click on the Pause Script command under Engine Operation, once the Instruction Properties pop-up window will open, enter the amount of time to pause the script and then click on Done.
For Example, I am Pausing the Send Hot Key script for 3 seconds in the below example.
The Send Basic Hotkey command enables you to add the basic key elements to the Dwmaker automation tool.
Click on the Start-Process command under Programs/Process automation, this commands will activate the given programs/process.
Once the Instruction Properties pop-up window will open, click on the Select file option and then enter the file path location to which you want to perform an action.
Next, click on the Pause Script command under Enige Operation, once the Instruction Properties pop-up window will open, enter the amount of time to Pause for(1sec=1000 ms)
Next, click on Send Basic Hotkey command under Input Operation, once the Instruction Properties pop-up window will open, select the document name from the drop-down.
Next, enter the text to send and then click on Done.
Now save the code and run, once the robot runs successfully, the sent key will be printed on the given document window.
29.4.Set Engine Delay
The Set Engine Delay command is used to set the delay between the execution of the commands at the given interval of time.
Click on the Set Engine Delay command, once the Instruction Properties pop-up window will open, enter the delay in seconds and then click on Done.
This is how we can set the delay time between the execution of commands.
30.Robots Chain Operation
Robots Chain Operation provides us with the commands to perform robot-related operations.
It has two sub-commands, Run Robot and Stop Current Robot.
Let us see how to perform these operations in the DWmaker Automation tool.
30.1.Run Robot
The Run Robot command is used to run the created robot from the saved list file.
Click on the Run Robot command under Robot chain Operation, once the Instruction Properties pop-up window will open, click on the Select a File and then select the script file that you want to run and then click on Done( click on the check box if you want to assign variables on startup) and then enter the variable name and variable value.
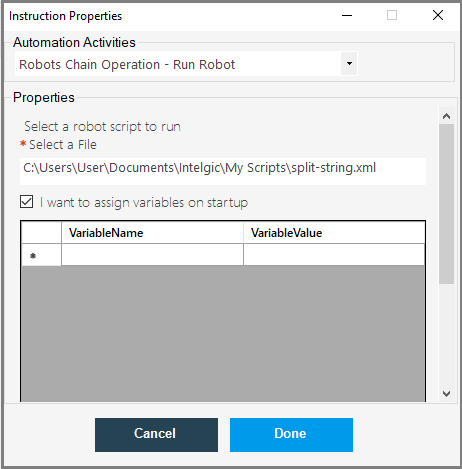
Now, save the code and run, once the robot run successfully, the given script will be run.
30.2.Stop Current Robot
Stop Current Robot command is used to stop the current running robot.
Click on the Stop Current Robot command, once the Instruction Properties pop-up window will open, click on Done.
Now, save the code and run, once the robot runs, the command will stop running the current script.
31.Database Automation
What is a Database: A database is a collection of data that has been arranged in a way that makes it easy to access and manage. To make it easier to access relevant information, you can organize data into tables, rows, columns, and indexes.
Database Automation command is used to automate database-related operations. which is also having sub-commands like:
- Define Database Connect
- Execute Database Query
Let us see, how to perform these operations step by step.
31.1.Define Database Connection
Define Database Connection command is used to define a connection between the Database provider and the Current system using the connection string.
A connection string is a string in computing, that includes information about a data source as well as how to connect to it. In order to establish a connection, it is supplied as code to an underlying driver or provider. The data source might be a spreadsheet or a text file and is most typically used for database connections.
The connection string may contain information such as the driver’s name, the server’s name, and the database’s name, as well as security information such as the user name and password.
Click on the Define Database Connection command, once the Instruction Properties pop-up window will open, enter:
- Enter the Instance Name
- Click on Build Connection String
- Once you click on Build Connection String, the Data Link Properties pop-up window will open,
- Click on the Provider Tab and select the Data that you want to connect to from the given list and then click on Next.

- Once, you click on Next, you are navigated to the Connection tab, which contains the following details, fill in the required details, and then click on the Test connection button as shown below.
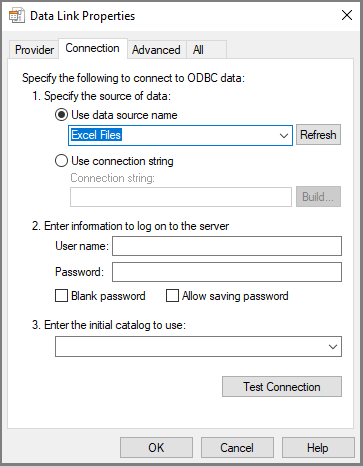
- Next, click on the Advanced tab, once the tab will open, enter the network settings and then enter the connection timeout and select the Access permission and then click on Ok.
- Next, define the connection string password.
- Enter yes for Test Connection Before Proceeding and then click on Done.
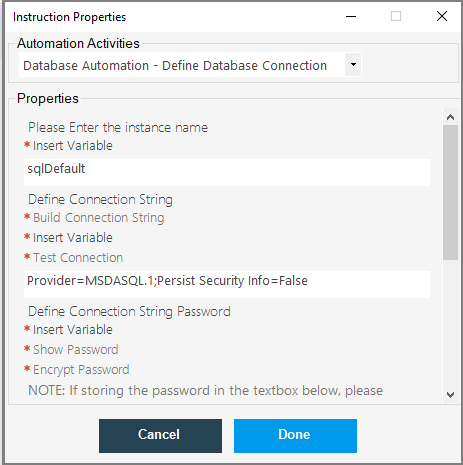
- Now, save the code and run, once the robot runs successfully, the database connection will be established.
- Click on the Provider Tab and select the Data that you want to connect to from the given list and then click on Next.
31.2.Execute Database Query
Execute Database Query command is used to automate the execution of the database queries.
Click on the Execute Database Query, once the Instruction Properties pop-up window will open, enter the
- Instance name
- Define the Query to execute
- And, define the query parameters
- And then click on the Define Query Execution Type drop-down list and select the
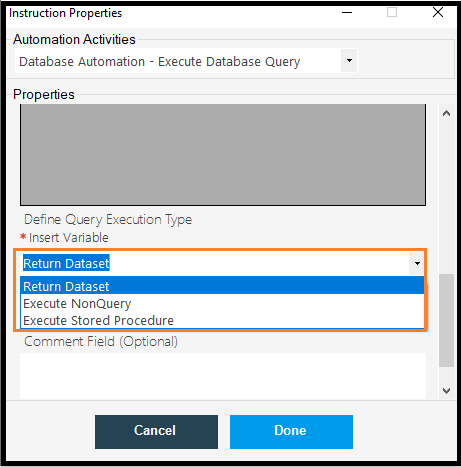
- Next, enter the variable to receive the output
- And then click on Done.
- Next, click on the Show Message command under Miscellaneous Operations, once the Instruction Properties pop-up window will open, enter the variable name and then click on Done.
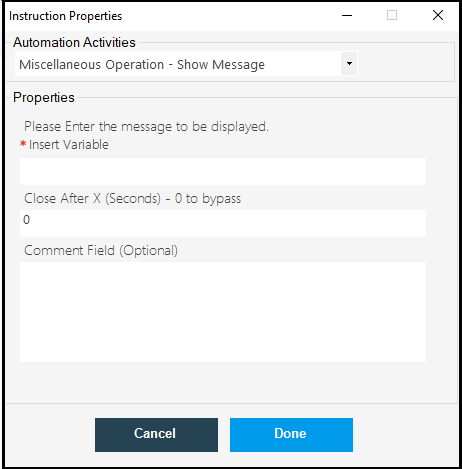
- Now, save the code and run, once the robot runs successfully, the query will be executed and the result will be displayed on the output message box.
32.GitHubRepo
Git is an open-source distributed version control system that may also be referred to as a backup system.
Git keeps track of all activities you’ve performed in each updated version, as well as files, commit history, and the ability to make modifications and undo changes you’ve made before. Git Version manages almost any type of text-based file.
Git allows one or more individuals to collaborate on a project as a group, which we refer to as collaboration.
Git also offers branching, which will increase the project’s quality.
The GitHubRepo tab will be located under the Options tab. Once you click on the GitHubRepo the GitHub Explorer pop-up window will open, which contains three tabs such as:
- Settings
- Branches
- Clone

Let us see how to use GitHubRepo to create Project Directory, Cloning, and Branching.
32.1.How to Create GitHub Account
Github is a web-based hosting service that is mostly used for version control using Git.
To fully comprehend the complete Git procedure on both the local and remote sides, we must first build a remote repository on GitHub, which we can then replicate on the local machine.
Let us see how to create a GitHub account.
- Open a browser and navigate to the given link https://github.com/
- If you already have an account means you are directed to sign in to a page or else go to sign up.

- Once you click on sign up, you will be navigated to the below page. Enter your email and then click on Continue as shown below.
- Next, create a password and then click on Continue.
- Next enter the Username and then click on Continue.
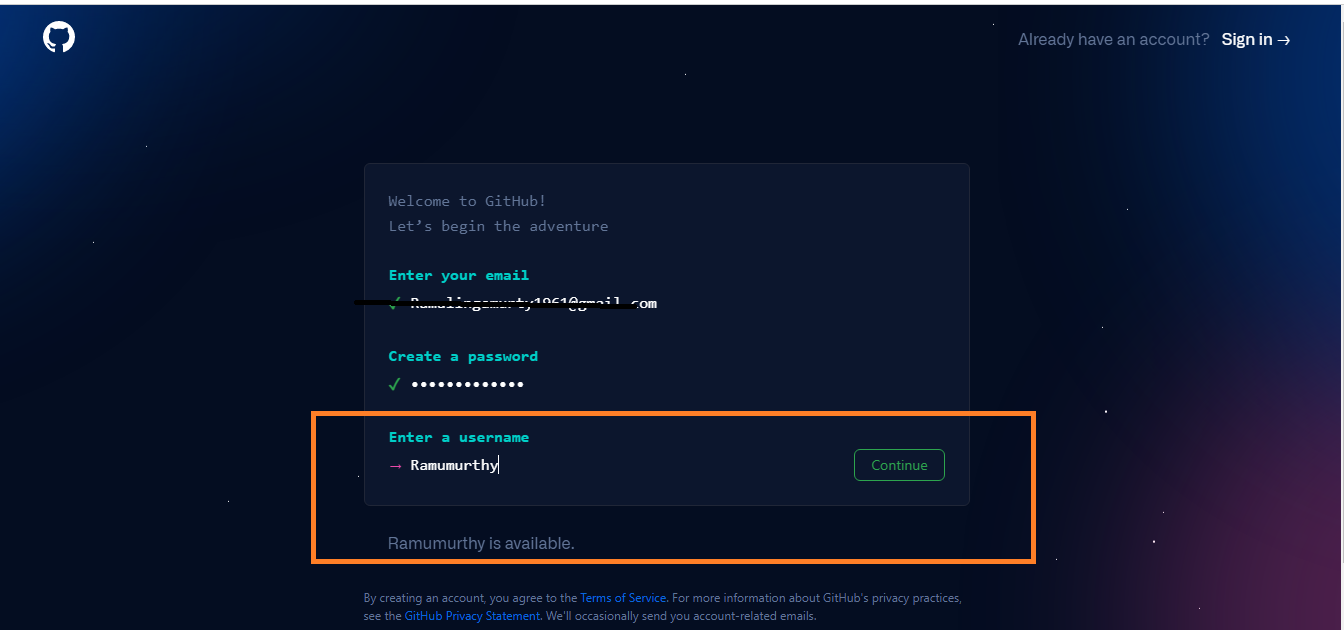
- Next, Would you like to receive product updates and announcements via email?
Type “y” for yes or “n” for no and then click on Continue.
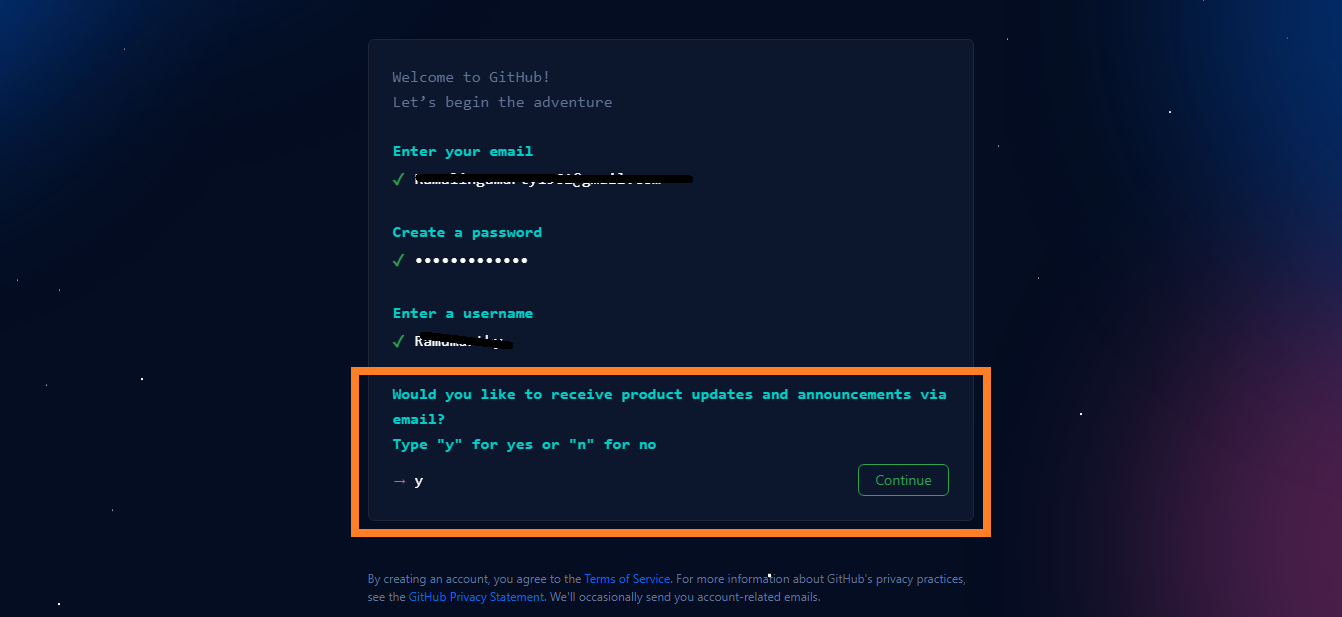
- Next, solve the puzzle and once your account is verified, just click on it. Create Account.
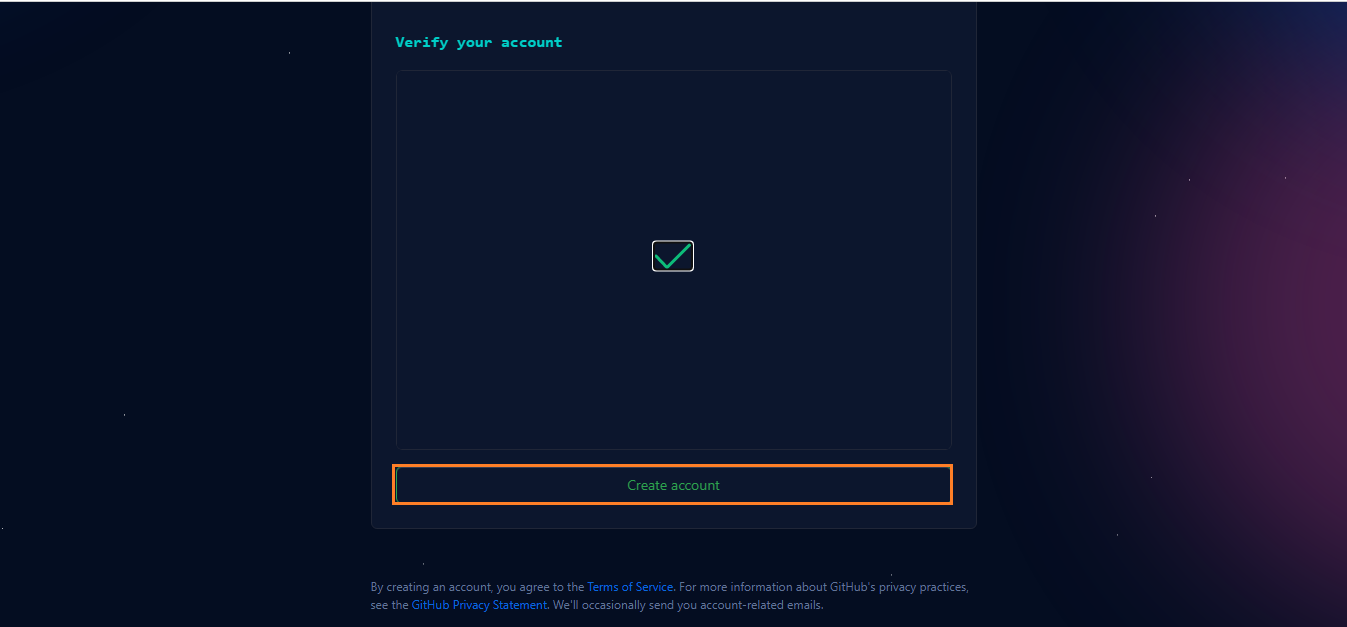
- Next, the GitHub team sent a verification code to your registered mail id, enter the code, and hit enter.
- Next, you will be navigated to the below page enter the required details of the team and click on Continue.

- Next, select the features that you are interested in and then click on Continue.

- Next, you will see two sections, one which is free access for students and another one is additional benefits call Githubpro. Select which one you want.

- Now, you are navigated to your GitHub account, and which is as shown below.
32.2.How to Create a New Repository
What is Git Repository: Repositories in GIT contain a collection of files of various different versions of a Project. These files are imported from the repository into the local server of the user for further updations and modifications in the content of the file.
Let us see how to create a new git Repository step by step.
- Open your Github account and click the ” + ” symbol in the top right corner to create a new repository, project, or anything you like. Choose New Repository as the repository type.
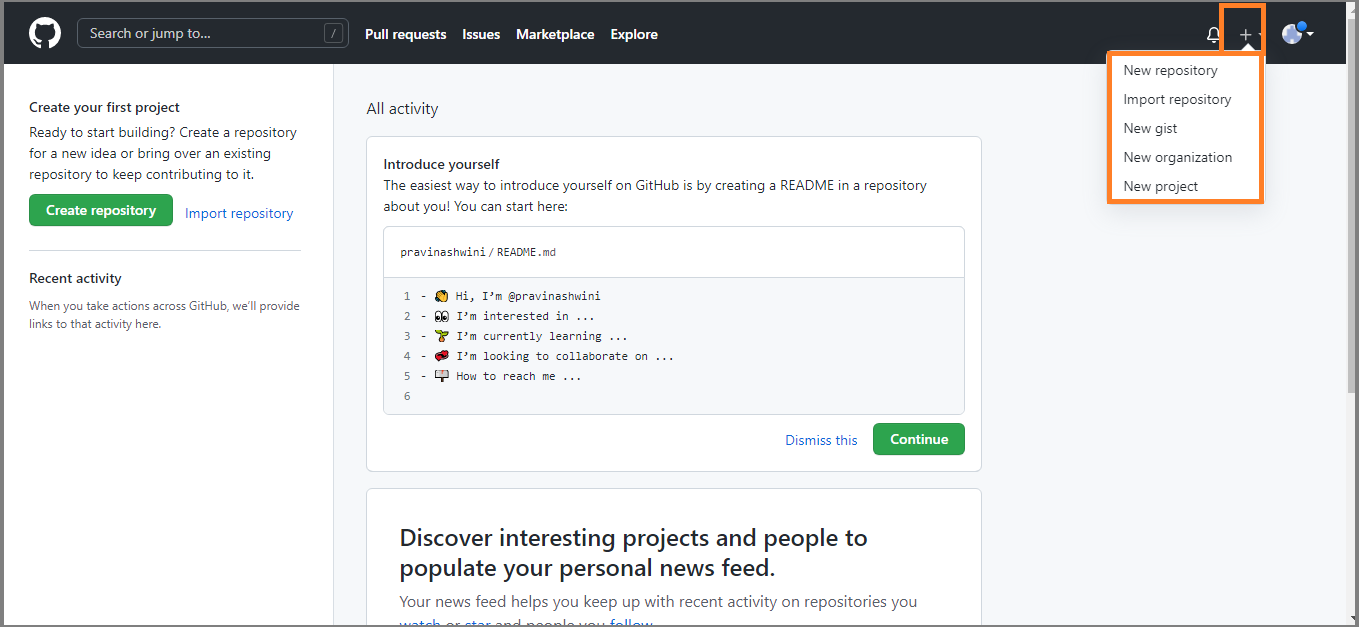
- Enter the new repository name you wanted to create and select initialize and select from the below options I am selecting here, Initialize this repository with README.md or and click on Create Repository.
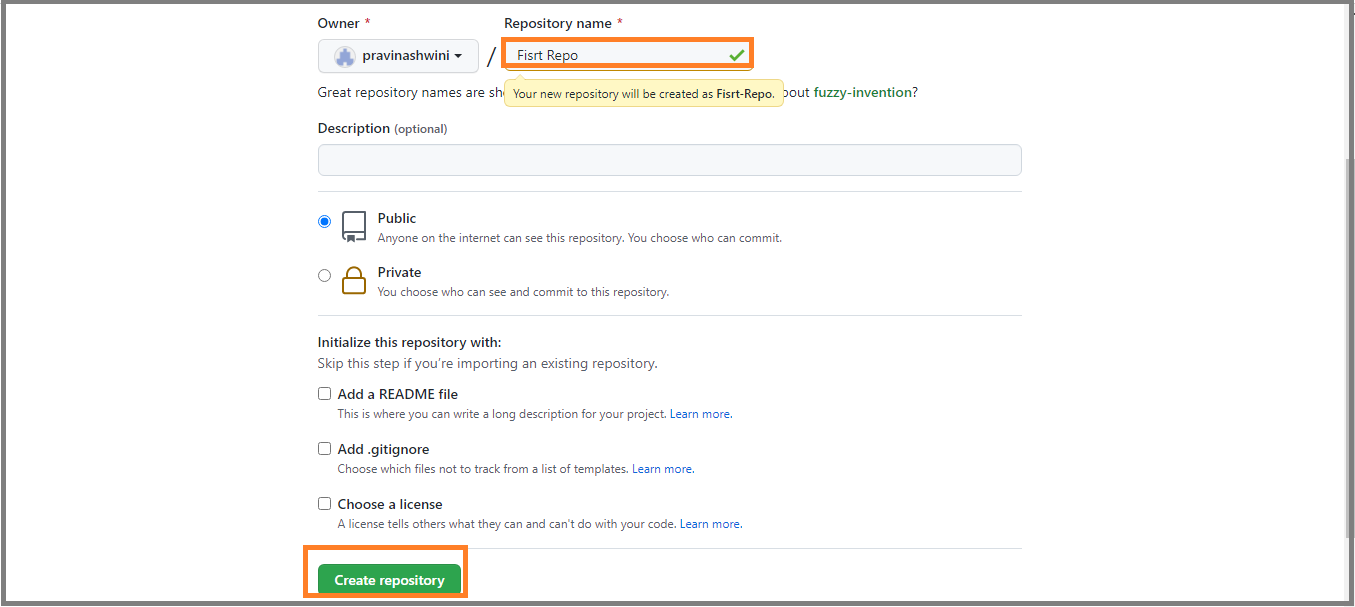
- Now, the Git Repository has been created in the GitHub account.
32.3.Settings
- The Settings tab in the GitHub Repos is as shown below. Which contains two sections as Git Init and Github Access Details.
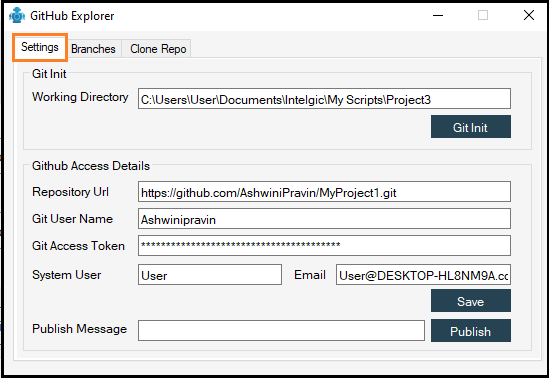
- In the GitInit section, Here you can see your working directory in which folder your robots are being created.
- If you want to change your working directory, go to the DWmaker dashboard window and click on the Settings Manager under the Options tab.
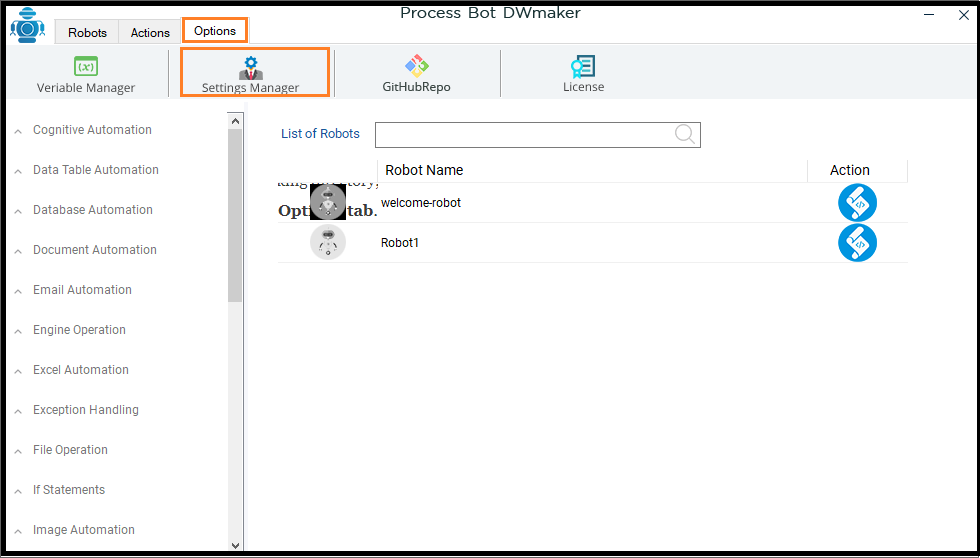
- After that, you’ll be navigated to the Settings window, where you’ll find the link under-attended task folder under the General tab, as seen below.
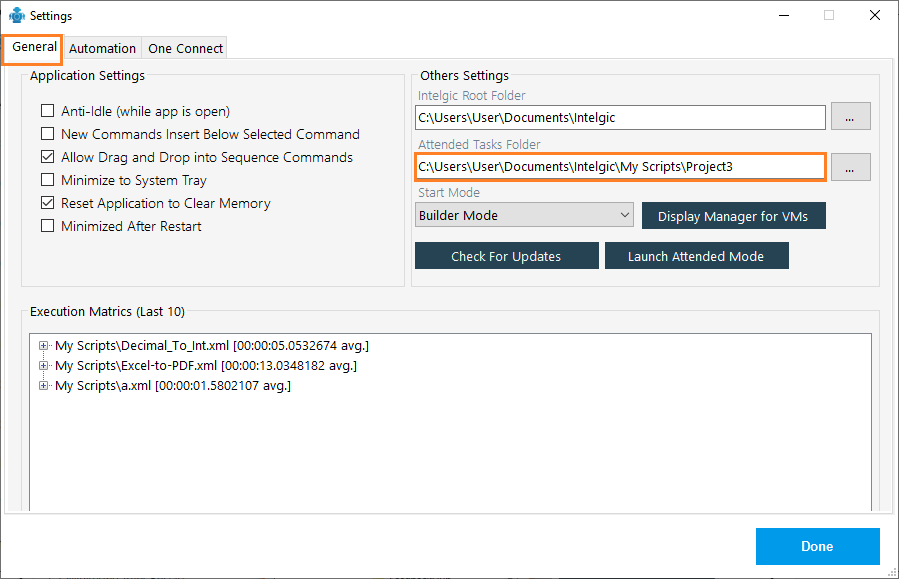
- Click on the three dots on the immediate right of the attended task folder box.
- Next, the Browse For Folder pop-up window will open, and select the project folder where you want to perform the automation operations, and click on Ok.
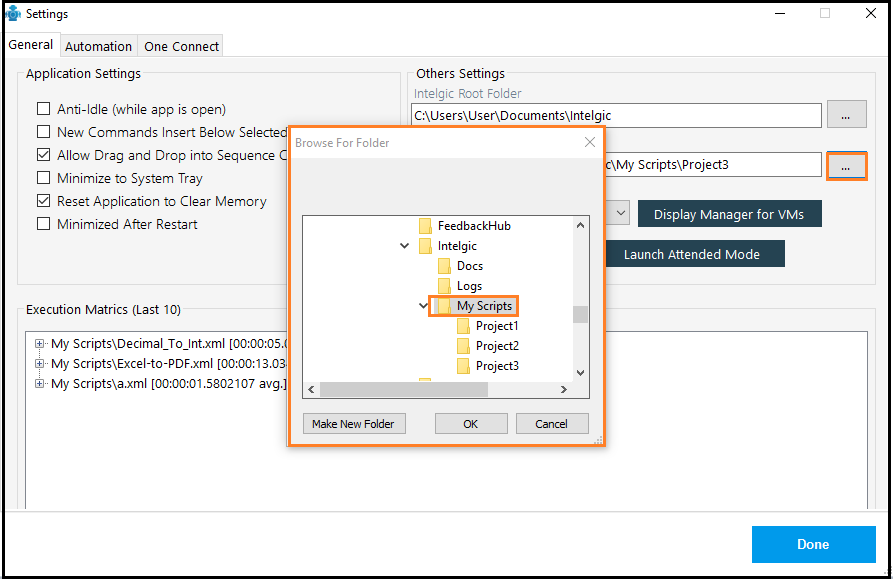
- Or if you want to create new project folder means, you can just enter the name of the new project folder inside the attended task folder box and then click on Done.
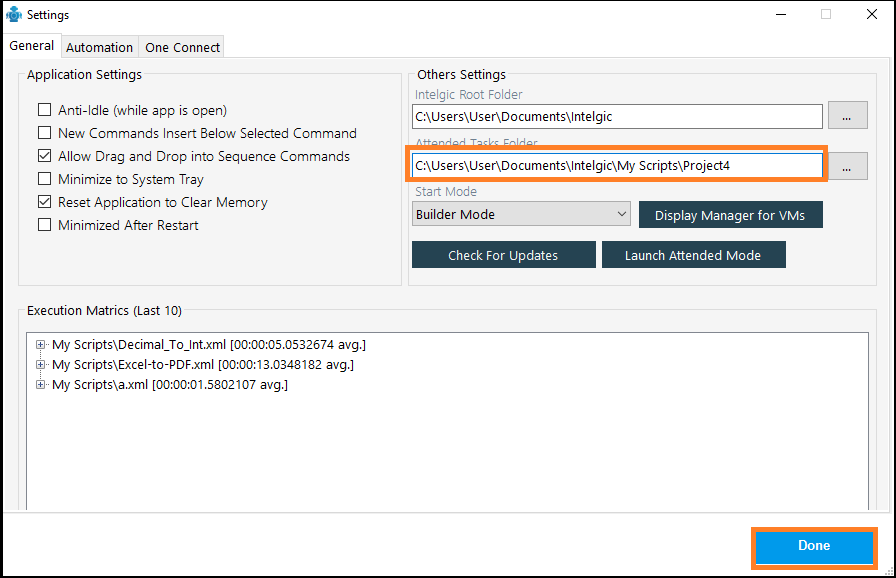
- Next, click on Robot List under Robots, you will be switched to the new project folder Project4.
- Make sure that, you are connected to the server before you switch to a new/any other project folder.
- If you are not connected then, connect to the server and then switch to another folder.
- Now, I have switched to the Project4 folder.
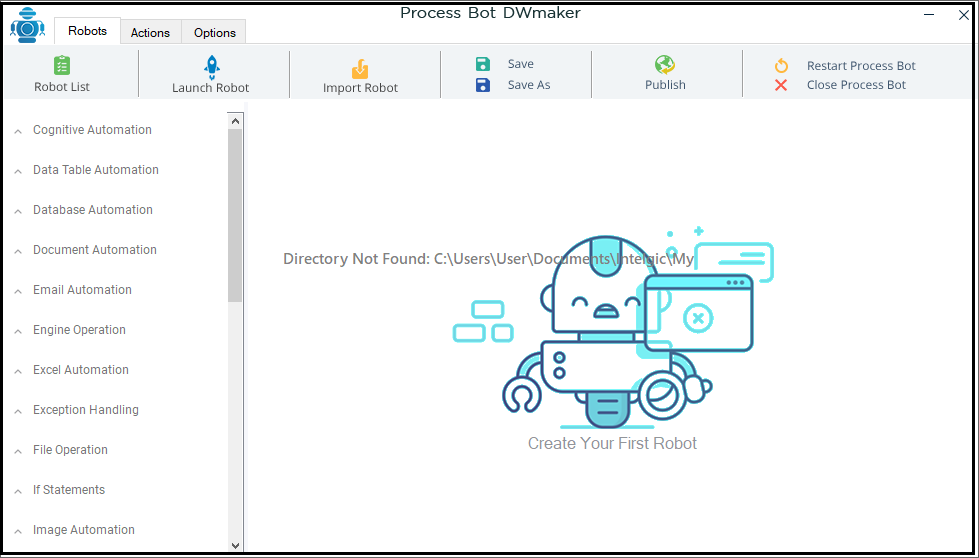
- Now, you can perform different types of automation operations using the commands available in the Dwmaker tool.
- We have one more section under Settings, called, GitHub Access Details, which is as shown below.
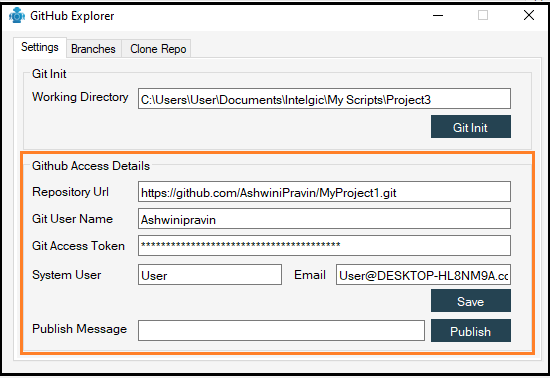
- Enter the repository URL in the repository URL box, navigate to your GitHub account and open the repository which you have created in it.
- Next, click on the copy symbol on the URL box and paste it in the DWmaker under Repository URL as shown below.
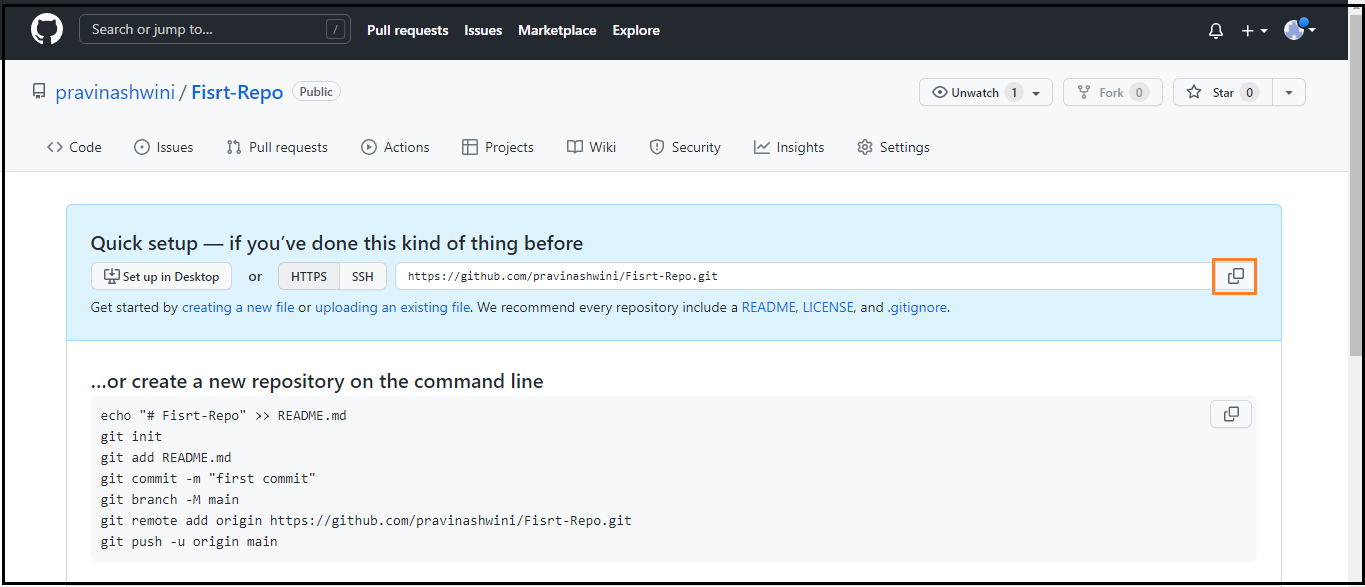
- Next, enter the Git Username and Git Access Token.
How to Generate Git Access Token: - Navigate to your GitHub account.
- Click on the Triangle symbol on the right-upper corner and click on the settings in the drop-down list as shown below.
- Once you navigate to the settings page, select the Developer Settings.
- Once, you navigated to the Developer Settings page, click on Generate New Token.
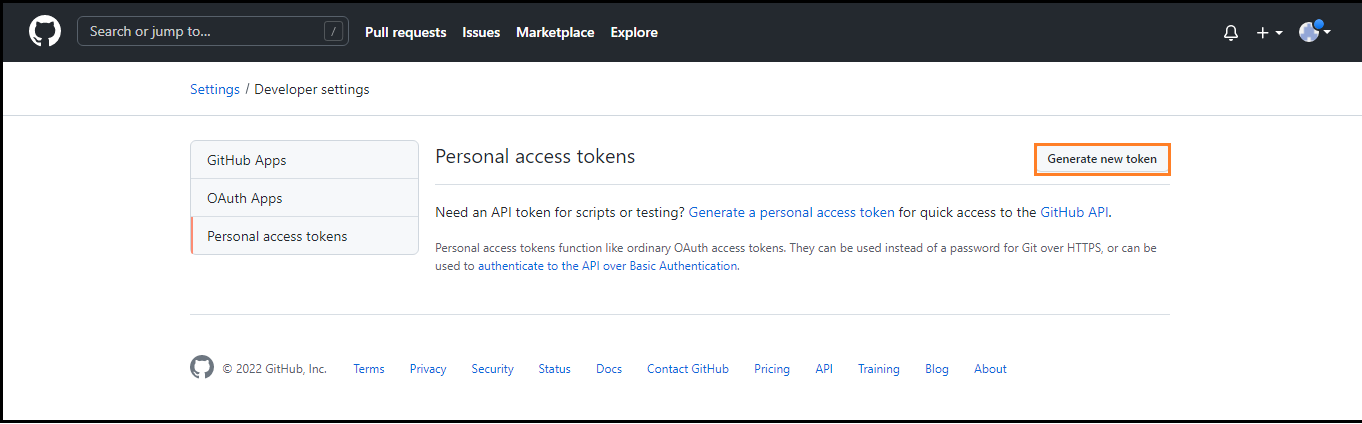
- Once you click on the Generate New Token, the New personal access token page will open, if you want to enter any note means you can enter in the note box and then select the expiry date of your token and then select the scope of the token.
- Next click on the Generate Token button.
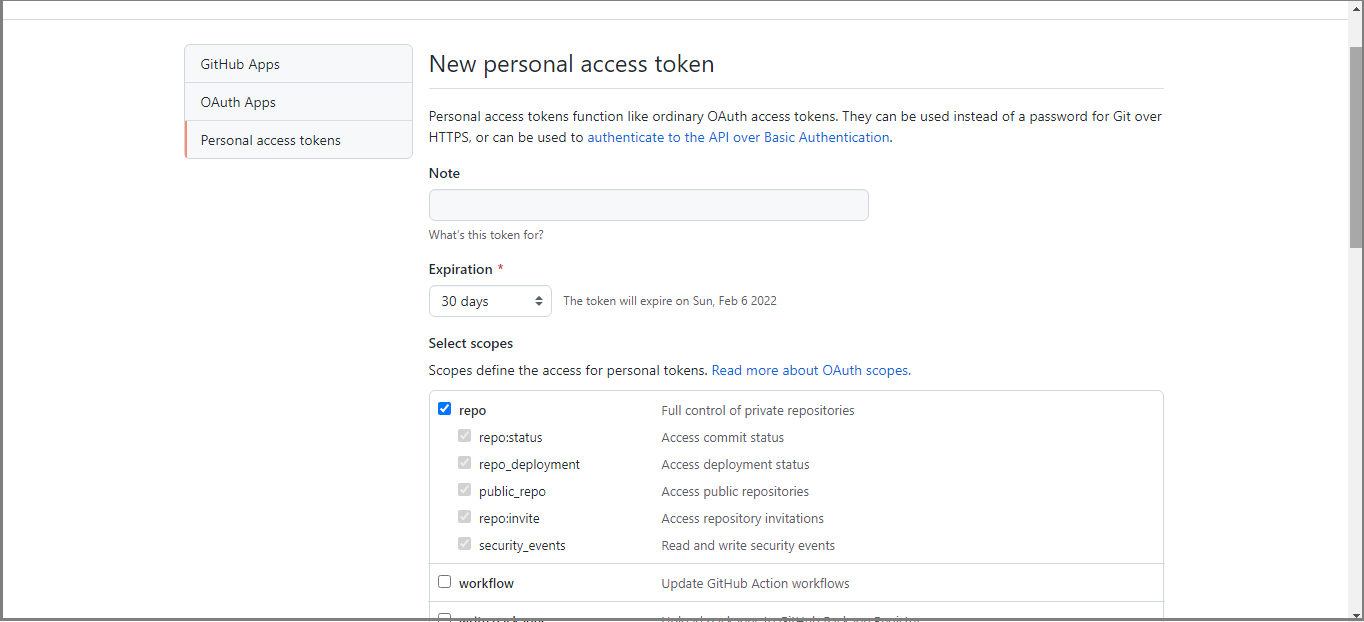
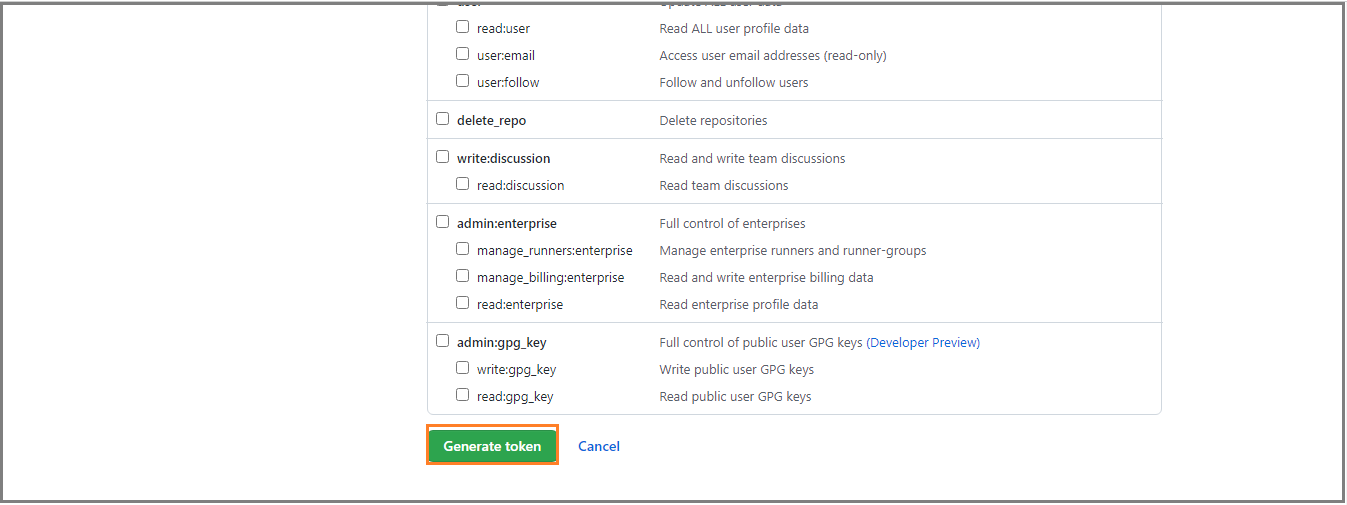
- Once you click on Generate Token button, the token will be created as shown below, click on the copy symbol and copy the token, and then paste it in the DWmaker.
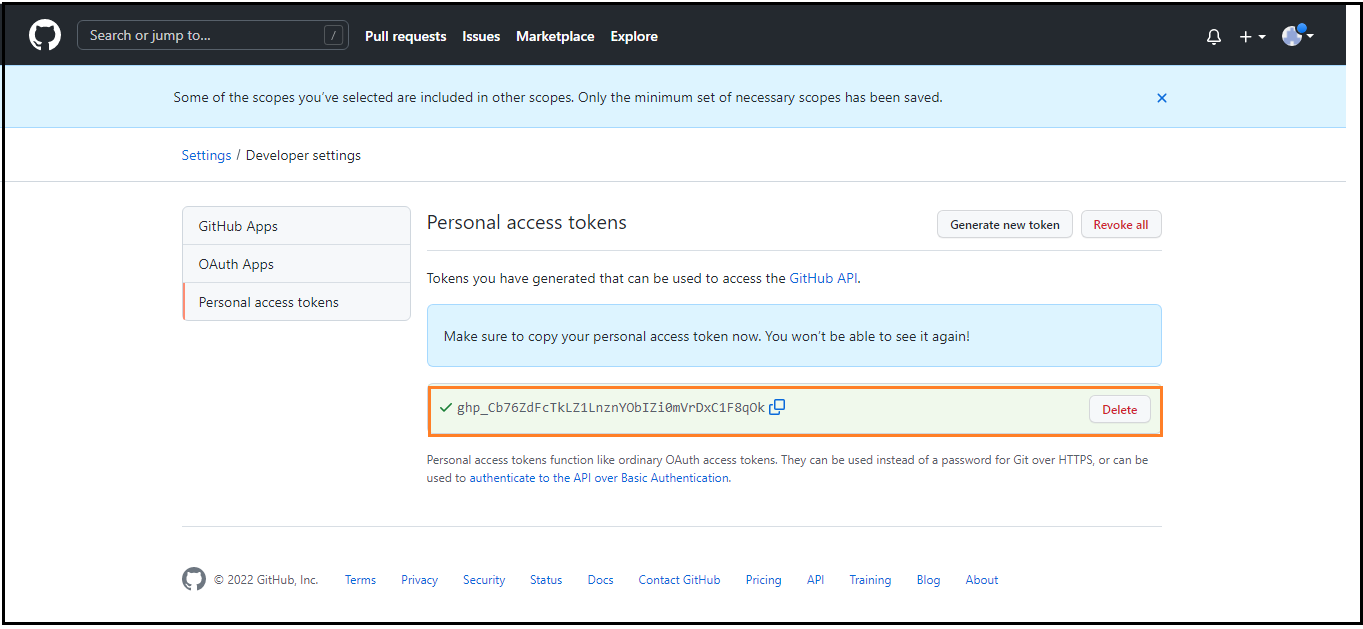
- You can paste the token in the Dwmaker window and then click on Save, as shown below.
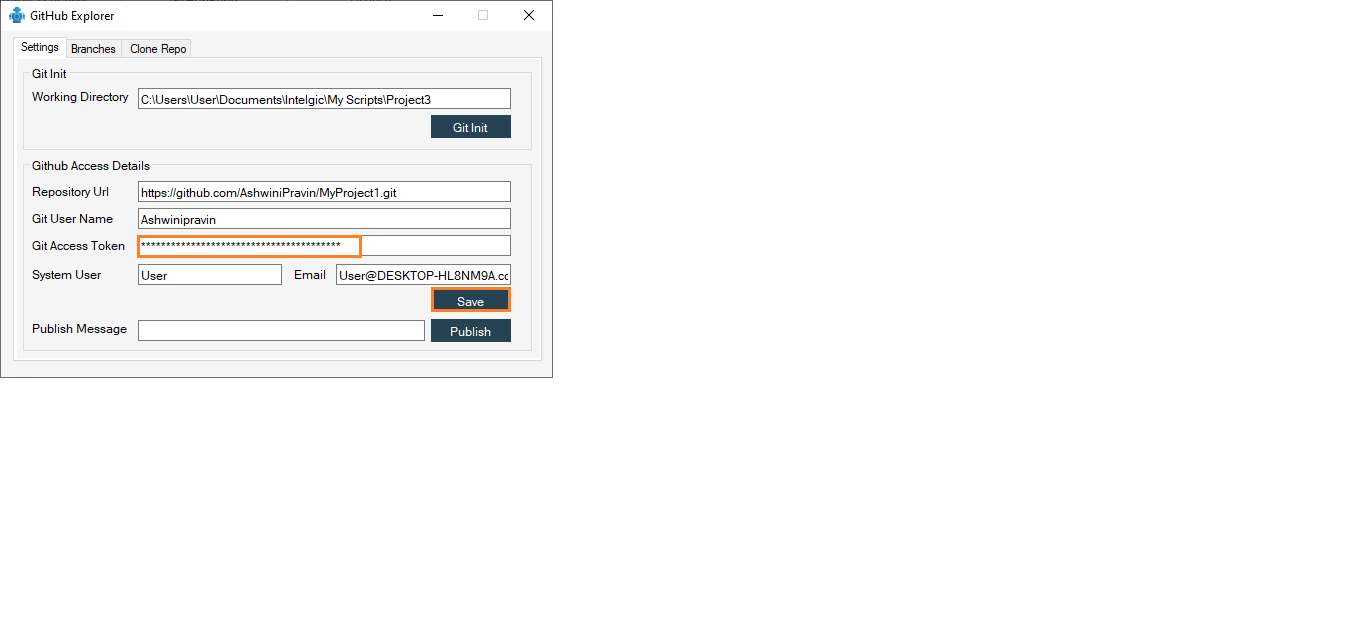
32.4.Push/Pull Operation
Git Push Operation stores the data permanently to the git remote repository after a successful git push operation, every contributor or developer can see your changes.
Git push command will push any commits from the local repository to the remote repository by reference name with the branch you wanted to push.
Git Pushes all the changes you have done on your local system to the remote repository. So Git pushes the changes to the git Mynewrepo repository on Github.
Let us see how to perform push operations in the DWmaker automation tool.
First, open the Dwmaker automation tool, currently, I am working on the Project3 directory.
Here I am creating a new robot called Lattitude as shown below.
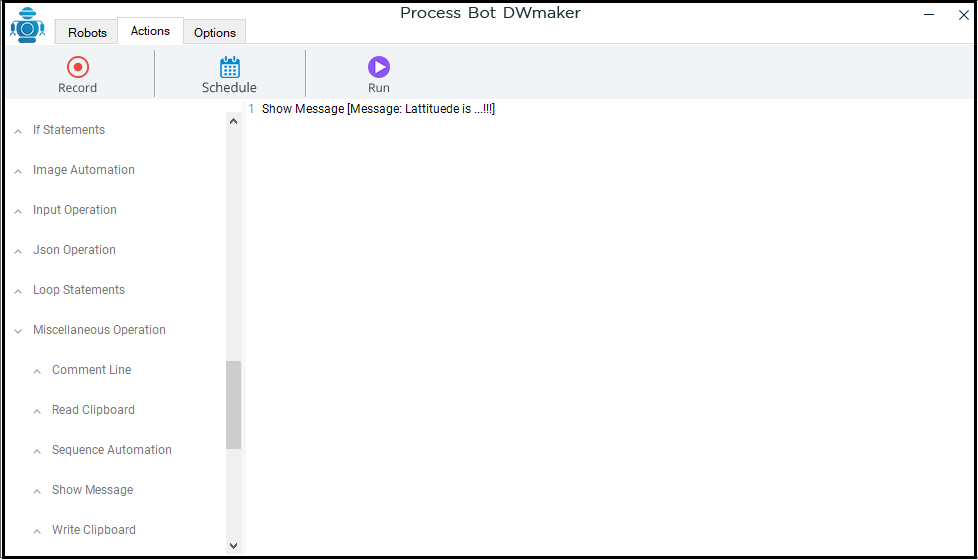
Now, go to the GitHubRepo, once the Github Explorer pop-up window will open, click on the branches tab.
You can see that, you have made changes in this directory(Created a new robot called Lattitude) and under the branch name Mybranch as shown below.
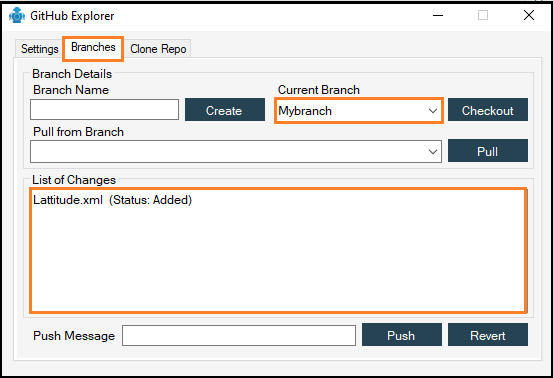
Now select from which branch you want to push the robot to the remote repository, here the remote repository refers to the repository which is present in the Github account.
Here I am selecting Mybrach as a branch to push the robot from and then click on the checkout button, here the checkout button is nothing but you are going to confirm you selected Mybranch for push operation.
Once you click on the checkout button, the pop-up message will be displayed as shown below.
Next enter the push message in the push message box and then click on the push button.
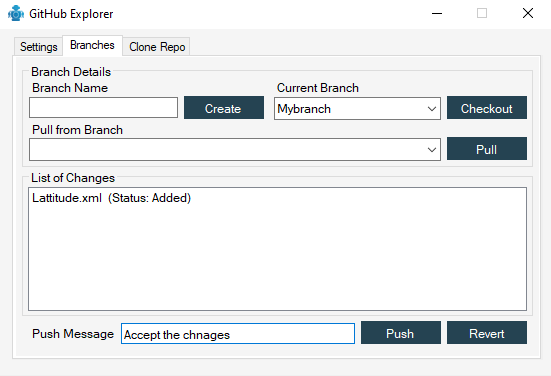
Now you have received a notification that your changes have been pushed to the remote branch as shown below.
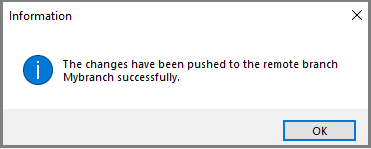
Now, go to the Github account and open your branch, by default it will be a master branch and you have received a notification of a push message in it.
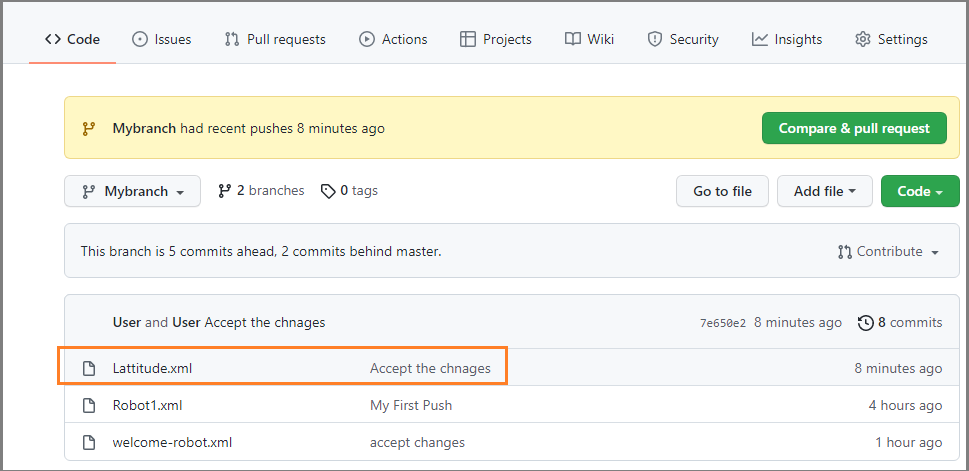
This is how we can push any changes we have done to the remote branch.
Pull Operation: The Git Pull Operation includes updating a repository’s local version from a remote repository.
Let us see how to perform this operation in the Dwmaker automation tool.
Now, I am making some changes to my existing robot and then, go to the Branches tab under Github Explorer, check out the current branch and then enter the branch name from which you want to pull. And then click on the Pull button.
Next, you will receive a pop-up window that shows you have pulled successfully.
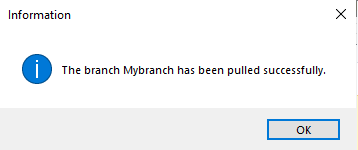
32.5.Clone Repos
What is Cloning: The process of cloning is the creation of a local repository. Cloning a repository entails getting a copy of the source code from a source control system, in this case, Git is a source control system.
Let us see how to perform this operation and download a copy of the remote repository in the working directory.
- Our First step is to open the Dwmaker automation tool, once it is open, click on the GitHubRepo under the Options tab.
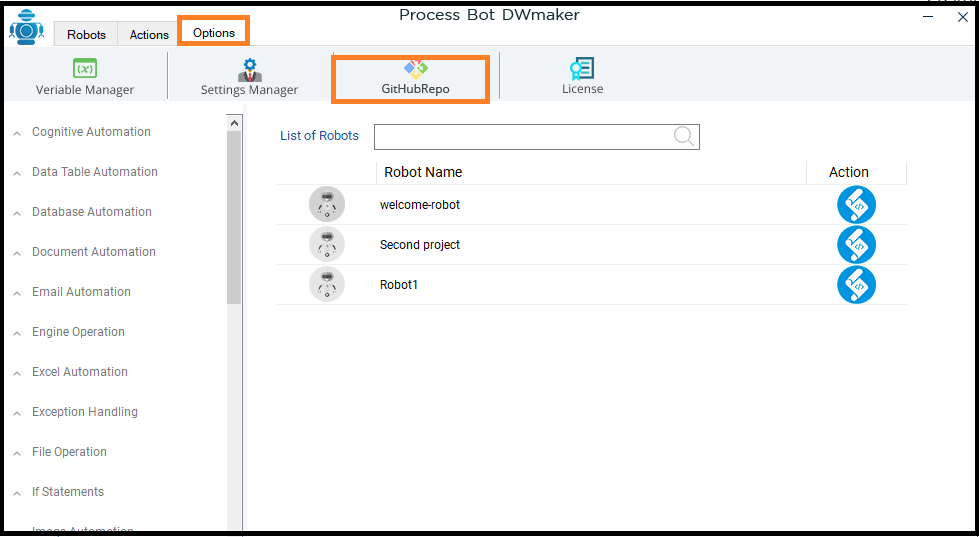
- Click on the Clonerepo, Once you navigate to the Github Explorer, which is as shown below.
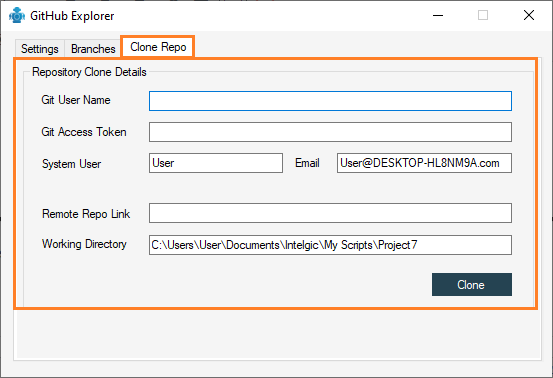
- Now, enter the Username and Access token and then the Remote Repo Link, and then click on the Clone button.
- To get the Remote Repo Link, go to the GitHub Account, open the remote repository that you want to clone.
- Next, click on the Code button and then copy the link which is as shown below.
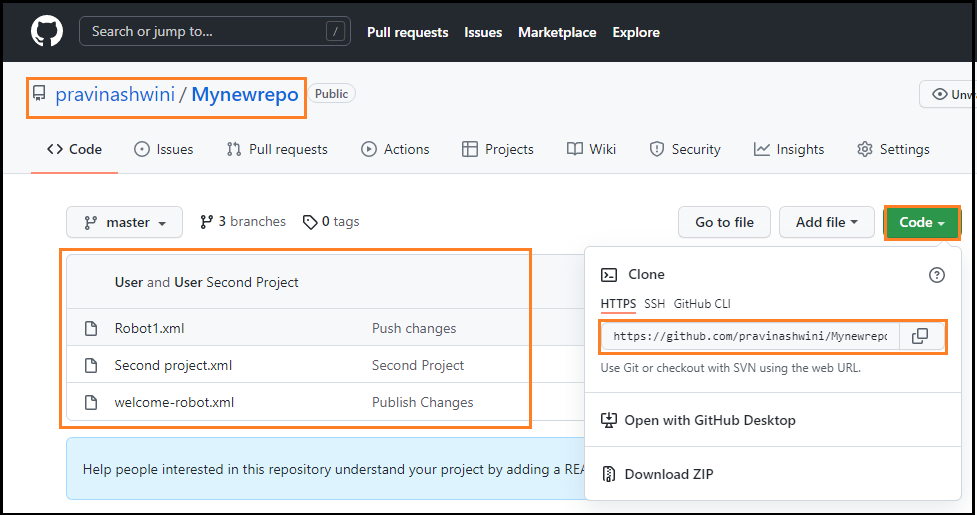
- In the working directory, you need to select the empty working or you can create a new working directory and enter the name in the working directory box.
- Here, I creating a new working directory called Project8, which is as shown below.
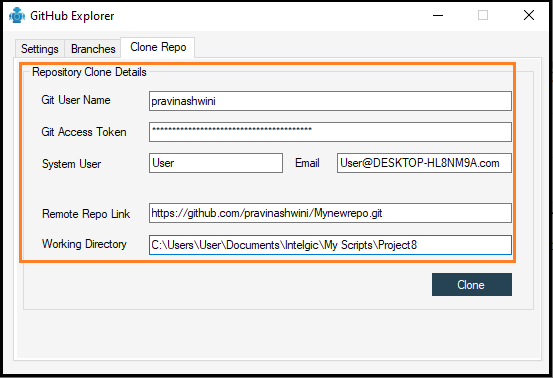
- Now, click on the Clone button, a pop-up notification window will appear containing the message, which is as shown below.
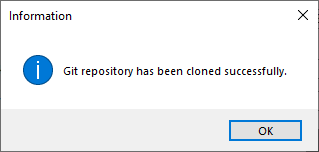
- Next, switch to the Project8 working directory, and then click on the Robot List under the Robots tab, you can see that the copy of the remote repository will be created in it as shown below.
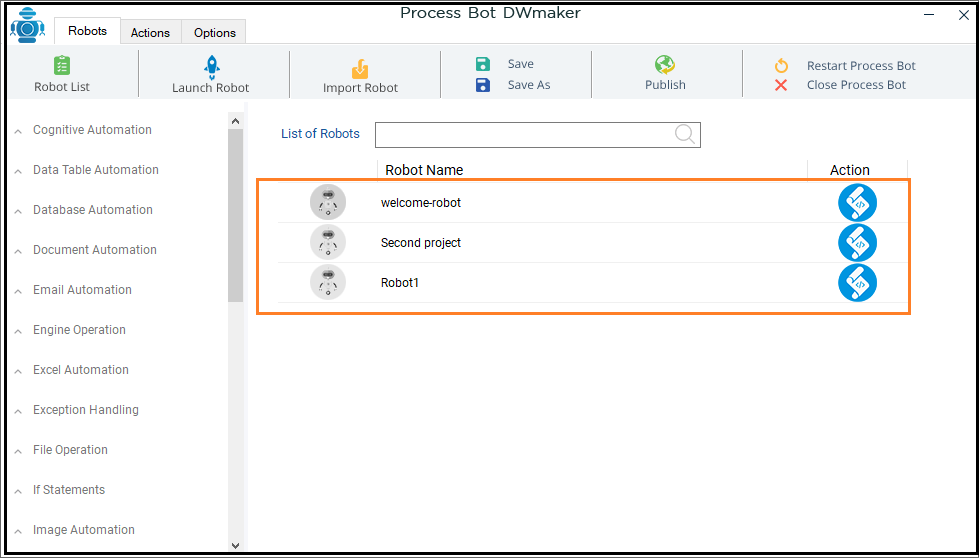
32.6.How to Publish Local Repository to a Remote Repository
Publishing Local Repository to a Remote Repository:
Once we create any new project folder in the local system, we can publish this local working directory to the remote repository.
- Let us see how to perform this operation in the Dwmaker automation tool.
- Our first step here is to create a new project folder.
- Click on the Settings Manager under the Options tab
- Once you navigate to the Settings window, enter the new project folder name under the Attend Task Folder and then click on Done.
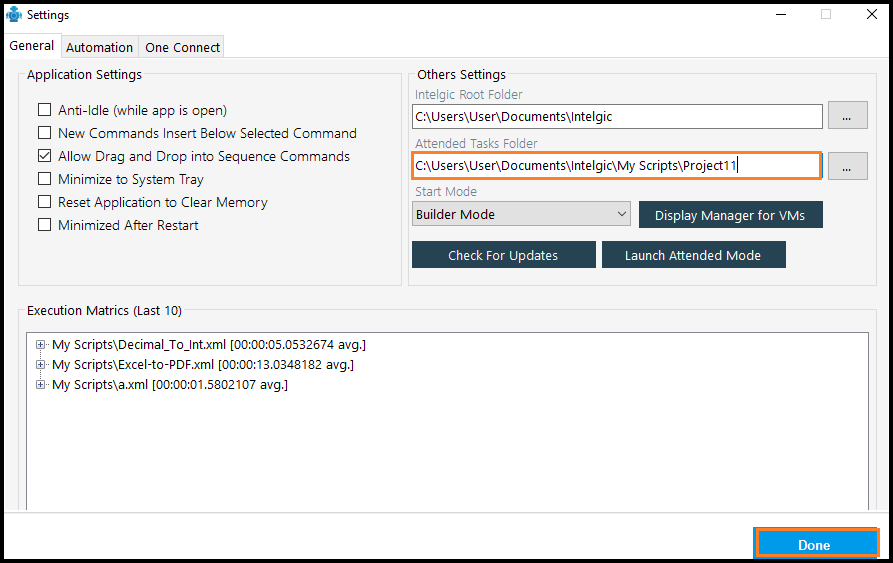
- Next click on Robot List under Robots, once you navigate there, create a once robot and then save it.
- Next, click on the GitHubRepo under the Options tab.
- Once you navigate to the Setting tab, enter the Repository URL and enter the publish message as shown below, and then click on Publish button.
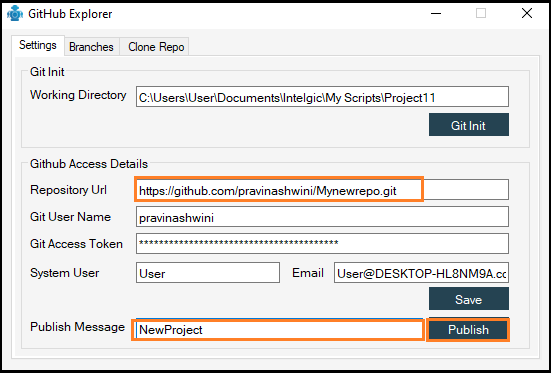
- Now, the project got published in the remote repository.
- Next, go to the Github account and refresh, you can see that the notification has arrived with publish message as shown below.
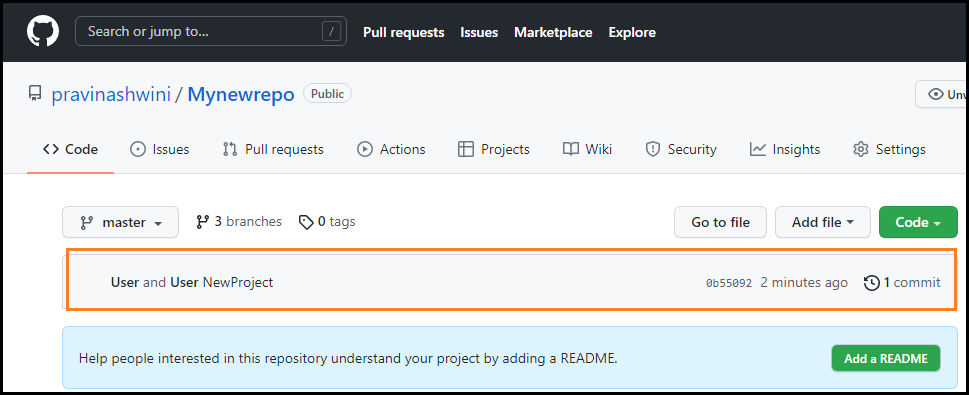
32.7.Git Branch
What is Git Branch: In a modern version control system, branching is a significant feature that stores the history of commits.
The term “branch” refers to an independent development path. Branches are used to abstract the edit, stage, and commit processes. Basically, they are ways to request a brand new working directory, staging area, and project history. Each commit is recorded in the history of the current branch, causing the project’s history to fork.
In Git, the Master branch is the default branch. It is created when the project’s first commit is made. You’re assigned a master branch to the starting commit point when you make your first commit.
- Let us see how to create a branch and perform push and pull operations in it.
- Navigate to your Dwaker automation tool.
- Next, click on the Settings Manager under the Options tab, once you navigate to the Settings tab, click on the Branches as shown below.
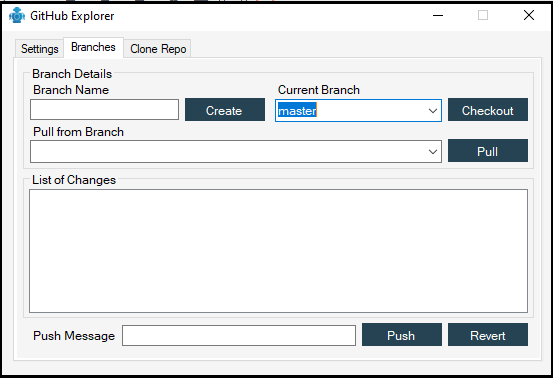
- In the above image, you can see that your current branch is the master branch.
- Next, enter the name of the branch you want to create and then click on Create button.
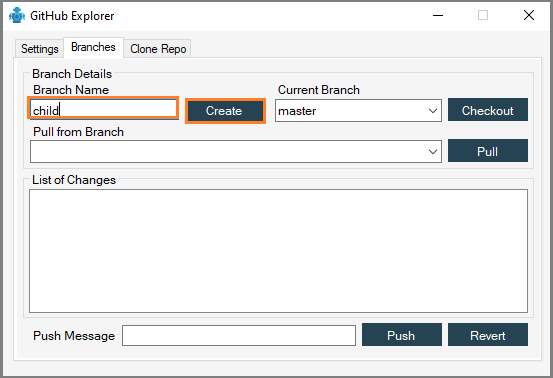

- Now if you click on the drop-down under the current branch you can see the new branches that you have created.

- Now click on the checkout button to select the branch to perform any pull or push operation.
- Here, I am going to update my current robot with the message ” File Operation Automation Robot” which is before contains text as “File Operation” already present in this working directory.

- Now, in the below image you can see that the file-robot.xml has been updated under the child branch.
- I am going to push this into the Child branch now.
- So, click on the Push button, the robot will be pushed into the remote repository under the child branch.
- Once you click on the push button, you have received the below pop-up notification which is as shown below.
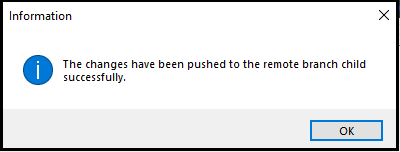
- Now, go to the GitHub account and verify, that whether you have received a notification or not.
- Click on the Master branch drop-down and select the child branch that you pushed a robot in it.
- The notification is as below.
- You can also revert the changes you have done to the remote repository.
- As you can see a revert button in the branch tab is as shown below.
- Once you click on this revert button, this will restore the changes you have done to this robot.
- If you go and check your robot, then you can see that the changes were restored to the original form.

33.Record
The Record button which is present under the Action tab enables you to record each and every step present in the automation process in the form of code lines.
You can edit these code lines and run them further. Let us see how to perform this action in the DWmkaer automation tool.
- To perform any application-oriented automation process, you need to open the application first.
- Here, I am performing an edit notepad application.
- So, before starting the automation process, I am opening the Notepad window.
- which has been saved in my desktop location.
- Next, click on the start process command under the Programs and Process Automation, which is as shown below:
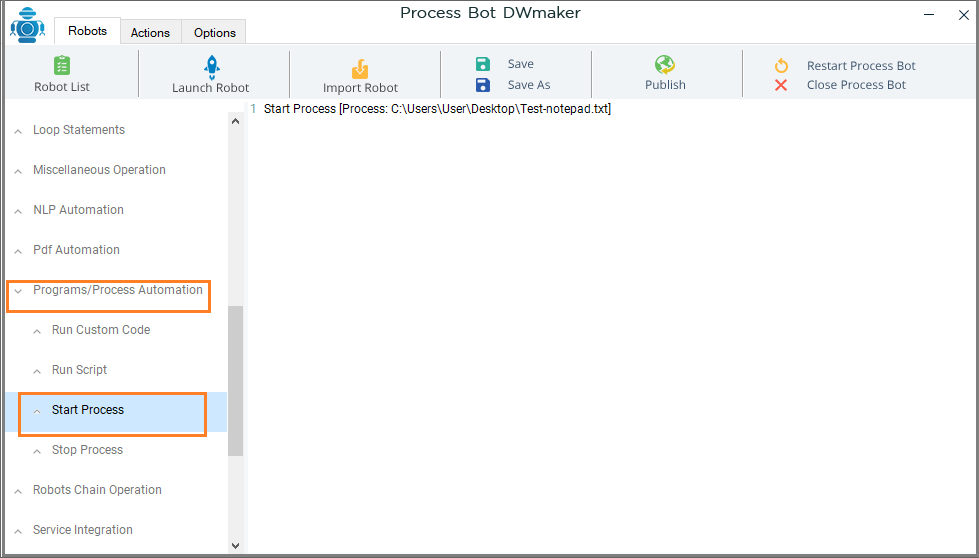
- Once the instruction properties pop-up window will open, click on the select file and then select the notepad file path location and then click on the Wait for the process to complete? drop-down and then select No.
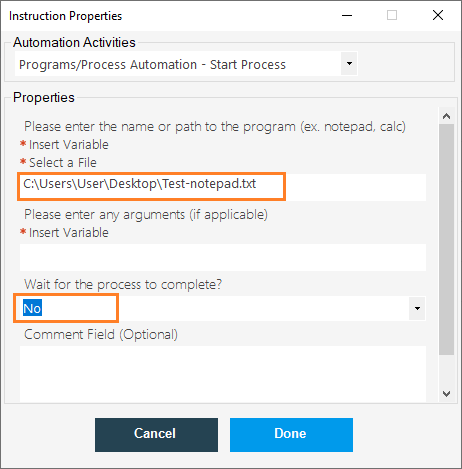
- Next, click on Done.
- Next, open the Notepad window before you start recording, and then click on the record button under the Actions tab. which is as shown below.
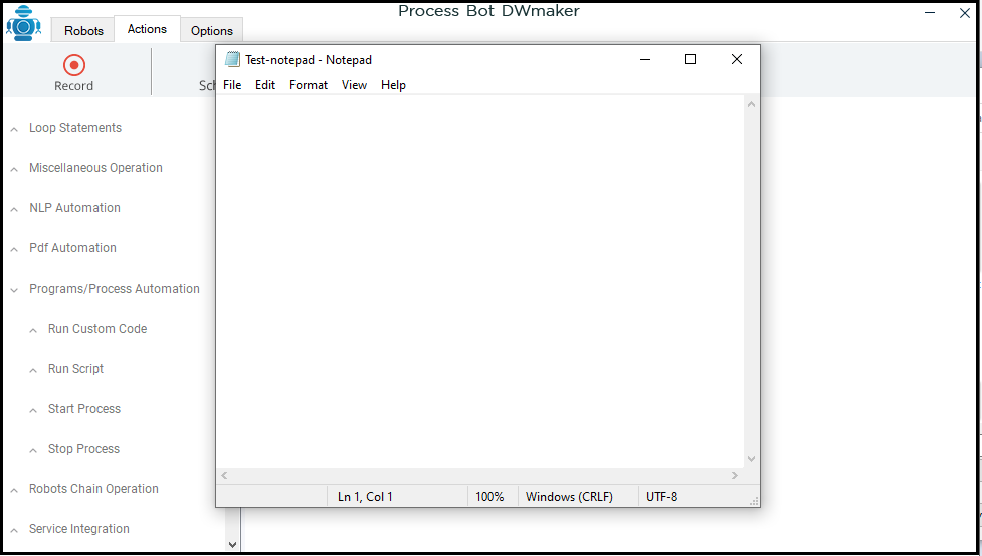
- Once you click on Record, the screen recorder pop-up window will open, click on the Start button, which is as shown below:

- The specifications of Screen Recorder are as follow:
- Capture window Events: This will capture the window events, even if the user resets the window size and location. If you select the capture window events option, this will re-size the window and position of the window to the left upper corner. With this, you also need to select the particular options from the Other Options.
- Capture Mouse Clicks: This option capture the mouse click.
- Capture Mouse Moves: This option will capture the movements of the mouse, in some cases the operation can be done by hovering the mouse on the options. If you select this option then, it will capture the mouse movements.
- Capture Keyboard Inputs: this option will capture the keyboard events.
- Next, we have Grouping options which are as follows:
- Group Mouse Moves as Sequence: This option will collect all the mouse moves into a single sequence.
- Group all into a sequence: This option groups all the code one into a single code line sequence. Once you select this option, you cannot able to edit any code line in this section. Again you have to create a new robot.
- Once you click on the Start button, the recorder will start recording the process.
- Next, go the Notepad and enter the text which you wanted to enter, and to stop recording click on the F2 button.
- I have entered Hi Welcome to Intelgic and stopped recording.
- Which is recorded in the code line form is as shown below.
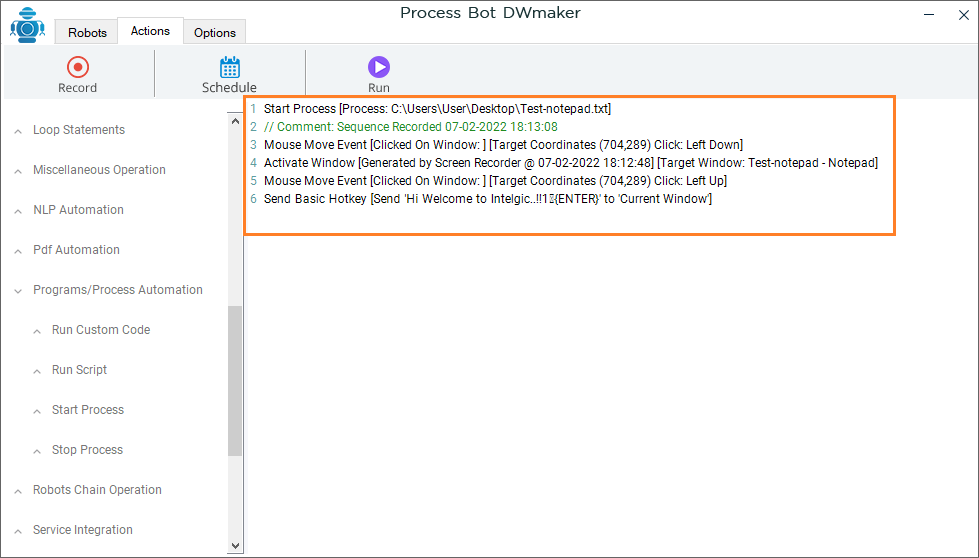
- Now save the code and run.
- The screen recorder will play the recorder process.
- This is how we can use the Record button to record our automation process.