

1.How To Register with Process Bot One
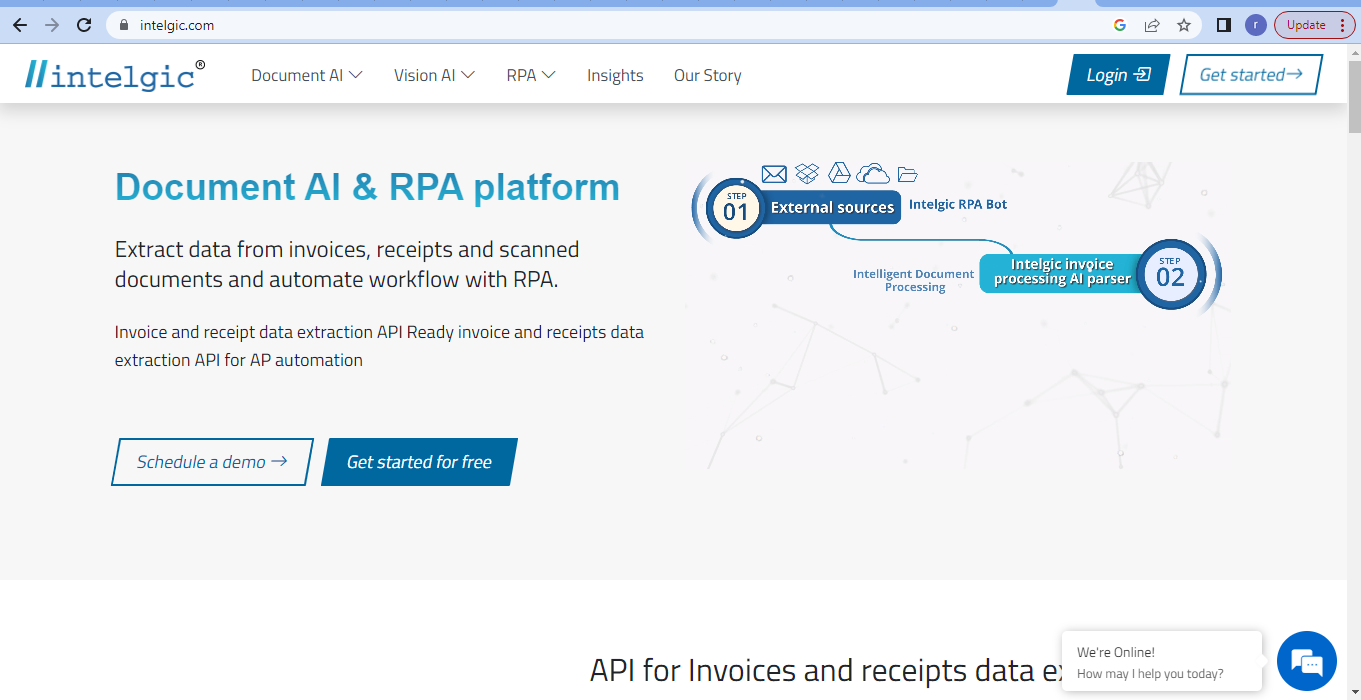
- To register with Process Bot One, first navigate to the given link intelgic.com
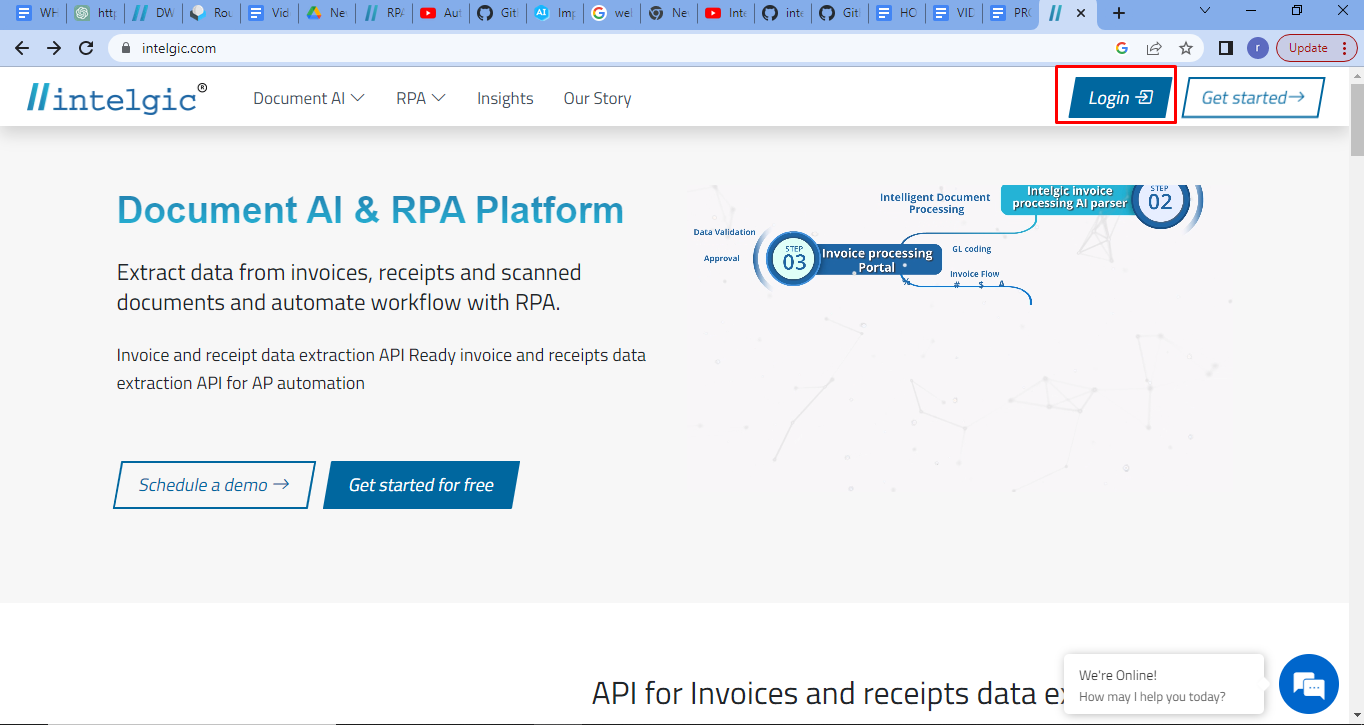
- Then click on the login button to sign up for your intelgic account.
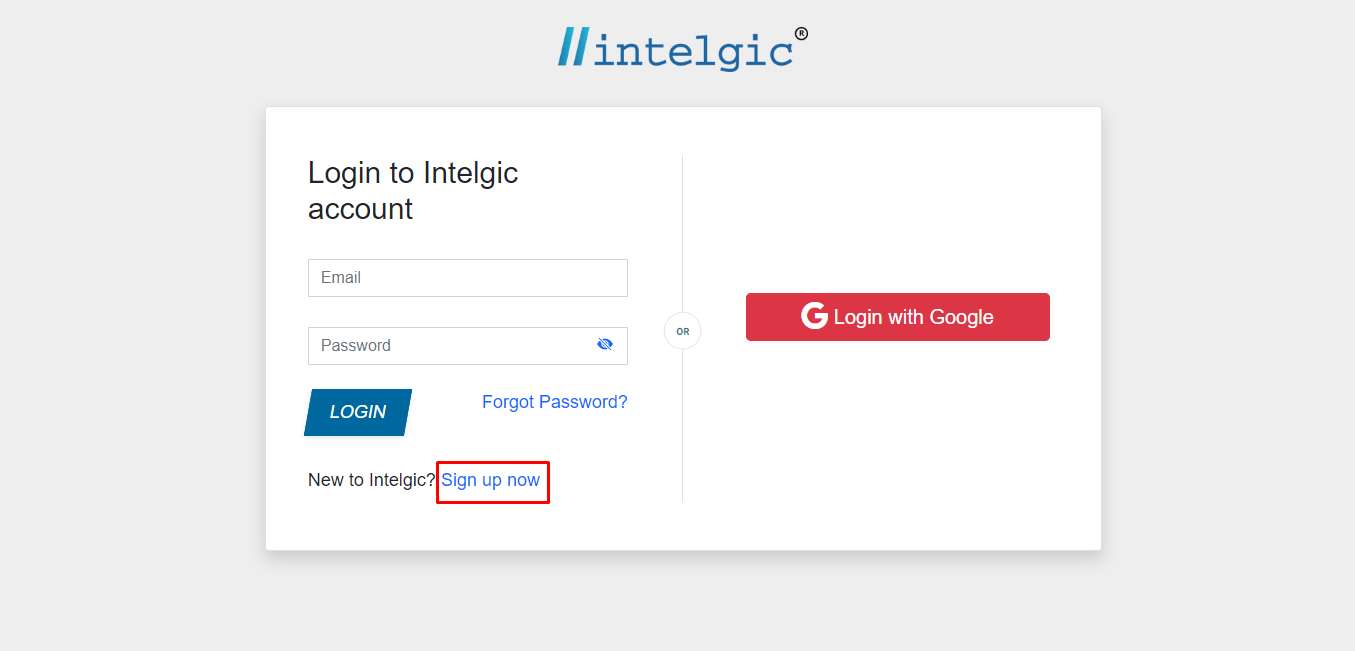
- You can sign up for your Intelgic account by using your email id or your Google account

- If you want to sign up with an email id, click on the Sign up now button. You will go to the below page.
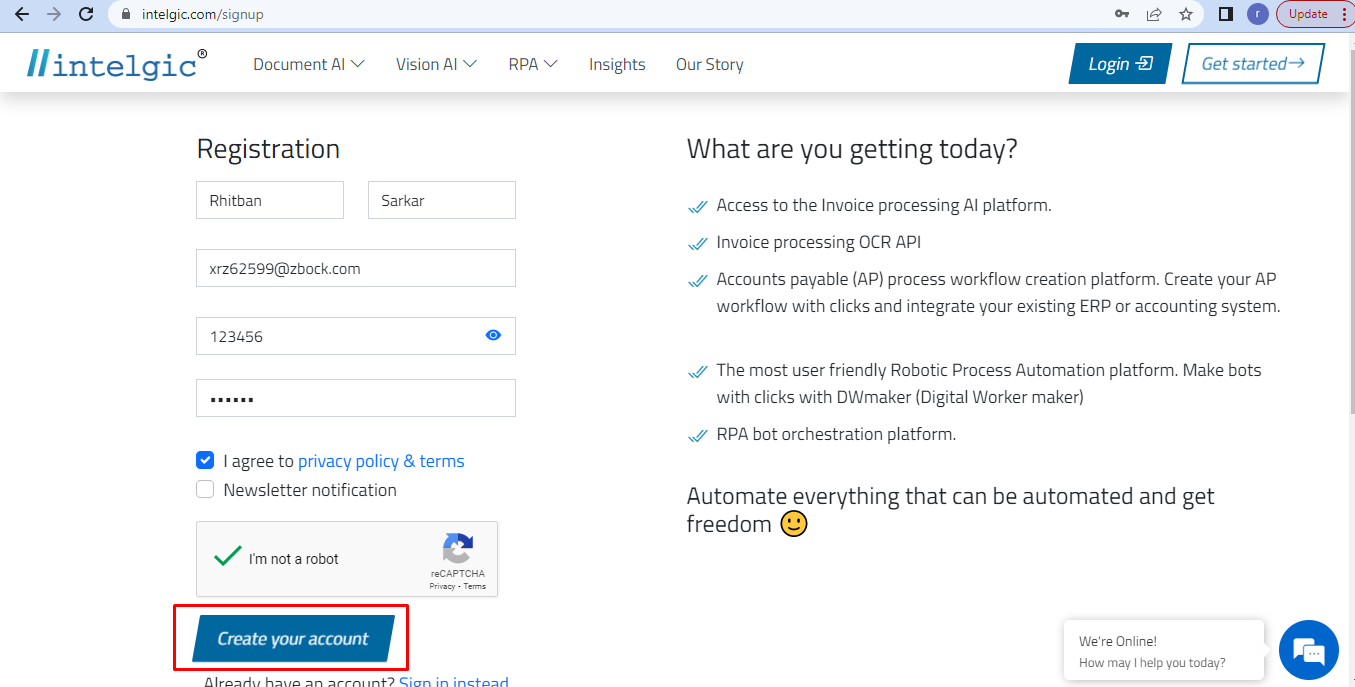
- Register your name, email id and password then click on the “Create your account” button. Don’t forget to check the “I’m not a robot” box.
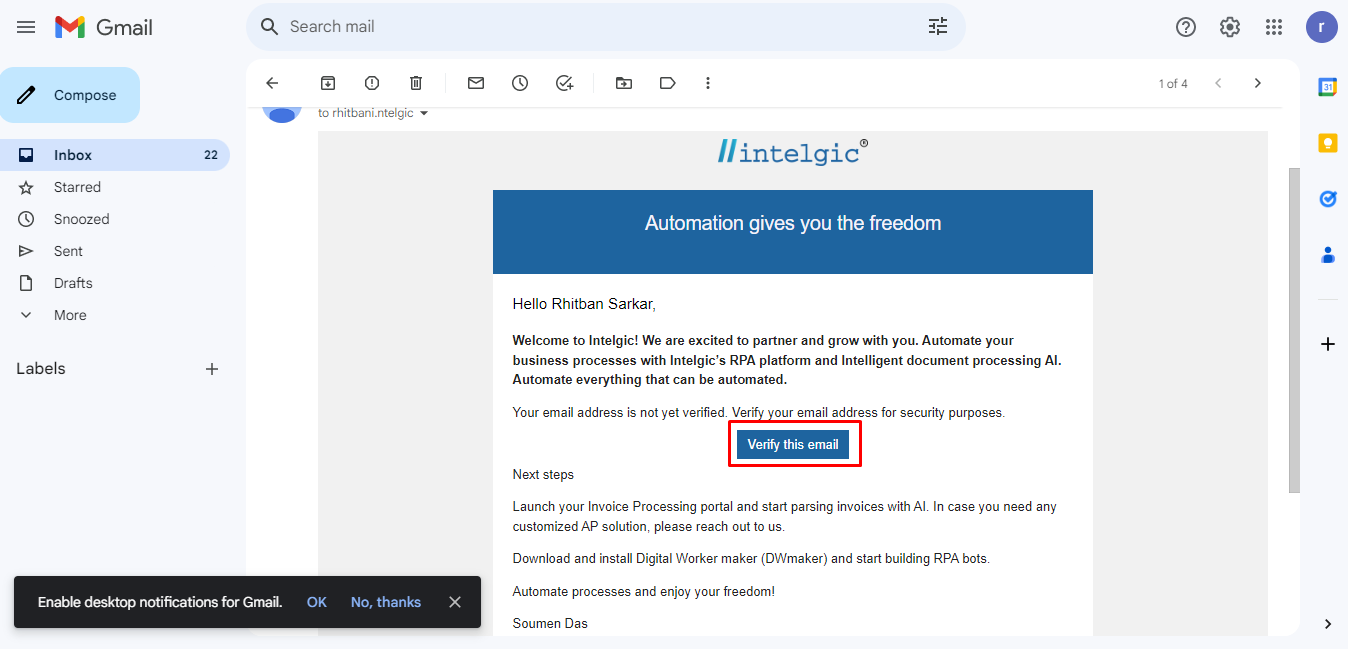
- You will get a mail on your registered email id to verify the email. Click on the “Verify this email” button.
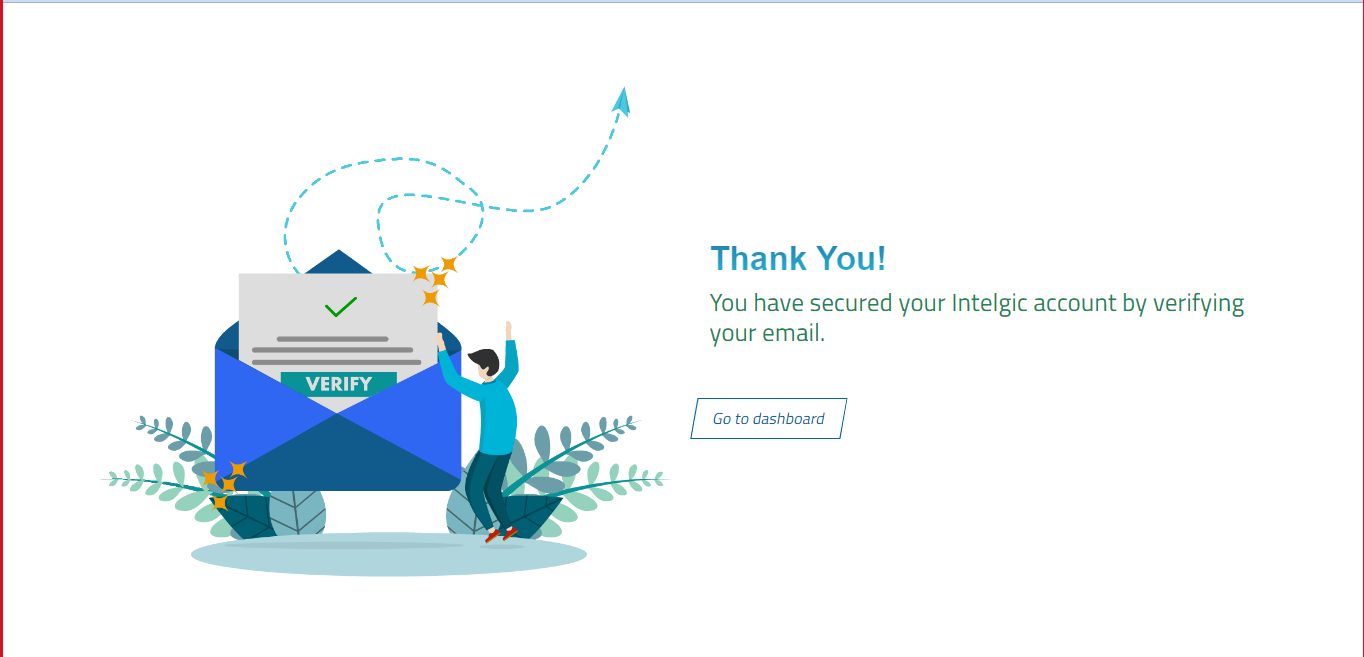
- Now you will be logged in to your intelgic account.
- Note: If your Email ID is registered once with the Process Bot DWmaker, you cannot use it again to register.
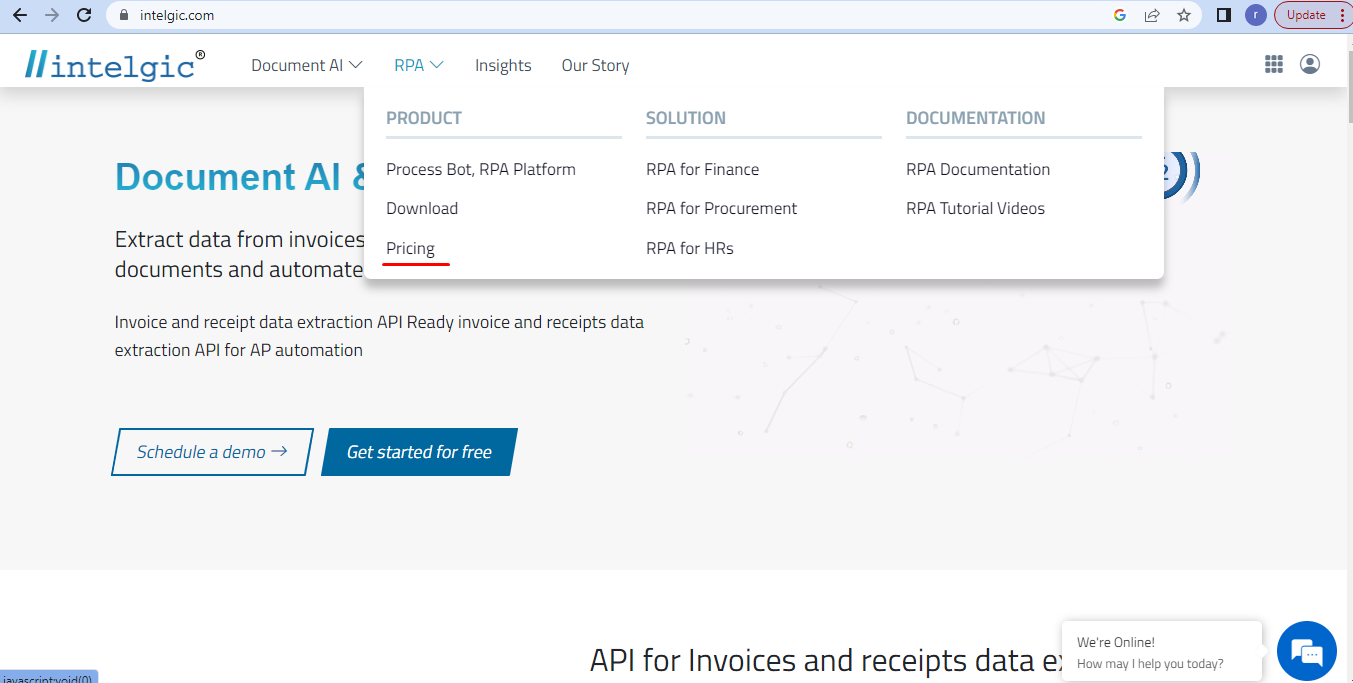
- Now click on the pricing under RPA.
- Choose the pricing option you like.
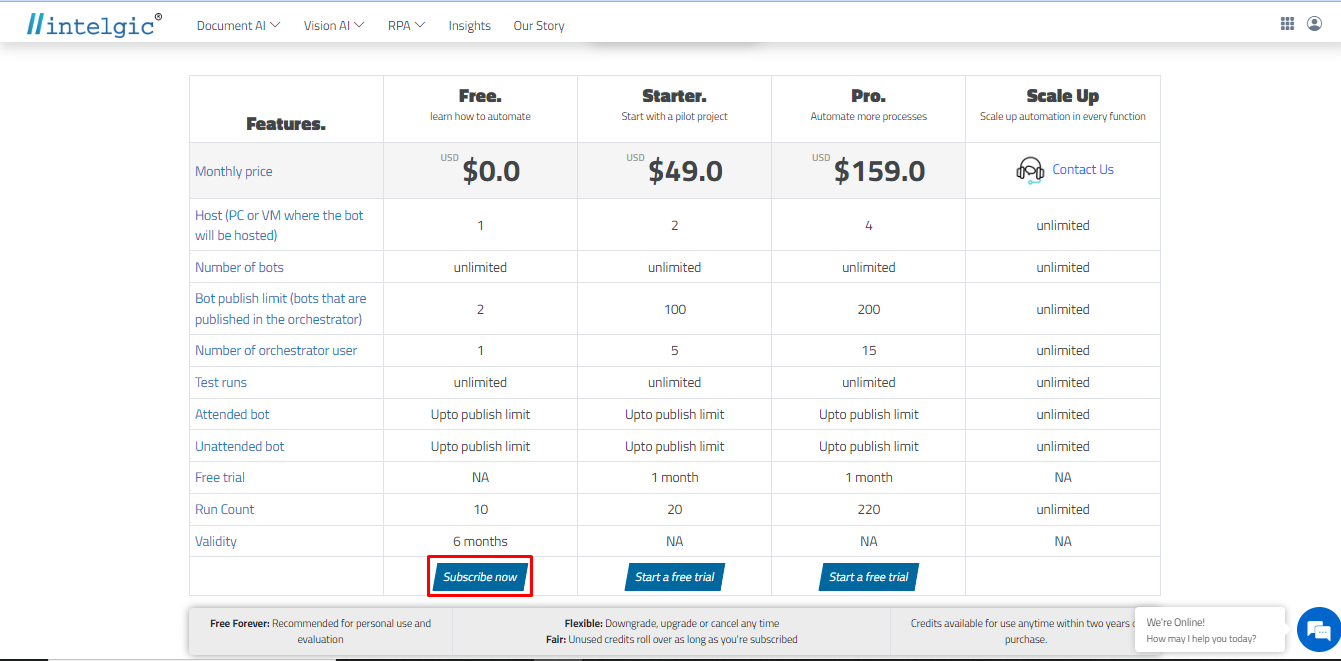
- You will be redirected towards the intelgic dashboard, where you will see that your plan has been activated.
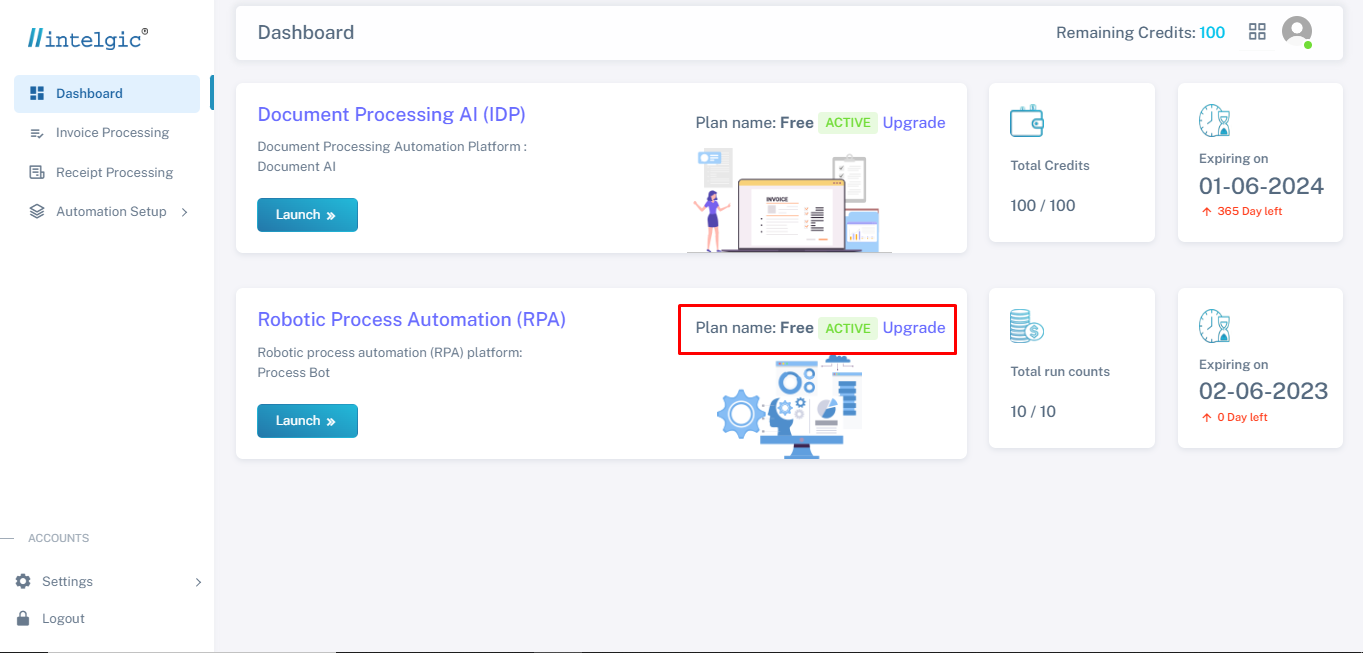
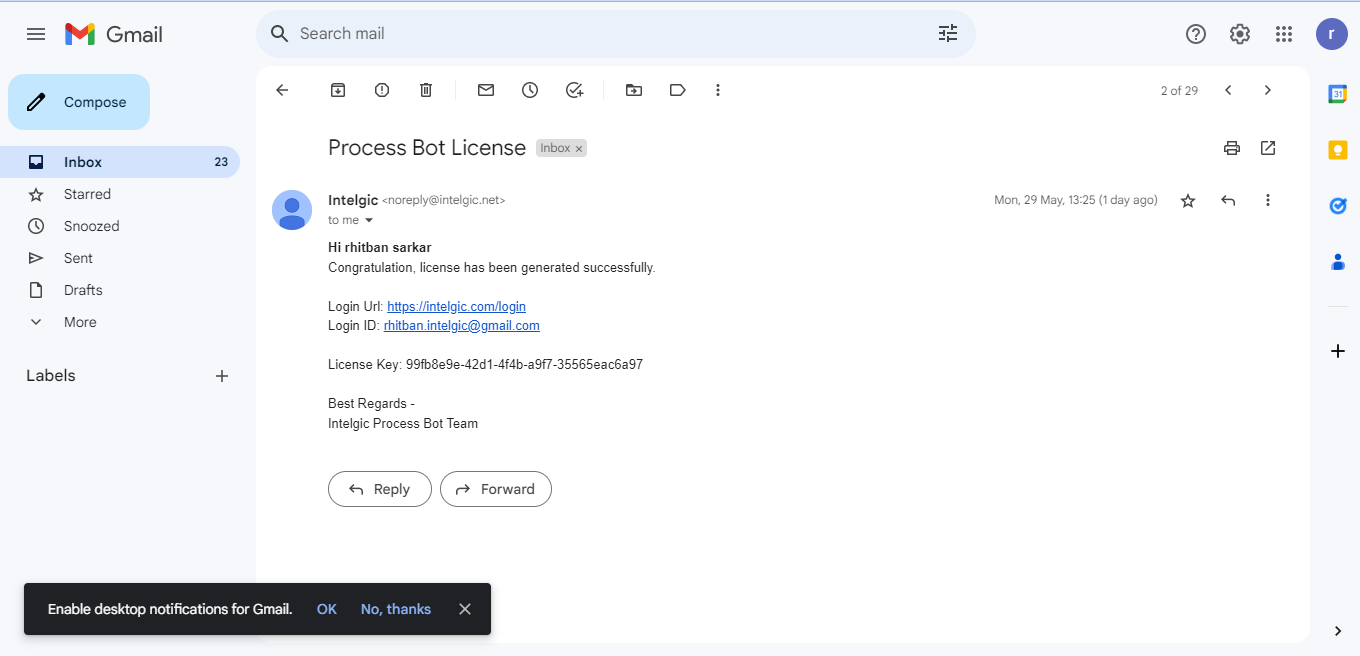
- You will get a mail on your registered mail id with the details of license key with the login id and login Url.
- The Registered Email Id will become your Super Admin, and this will control all your actions.
- By default, we can not apply any role to this super Admin.
2.Administrative
What is Administrative:
Our Process Bot One is associated with the Administrative section, which performs admin actives such as Managing users, creating users, Creating a directory, and maintenance a company profile.
Once you click on the Administrative section, you can see many lists which can perform under the Administrative section as shown below: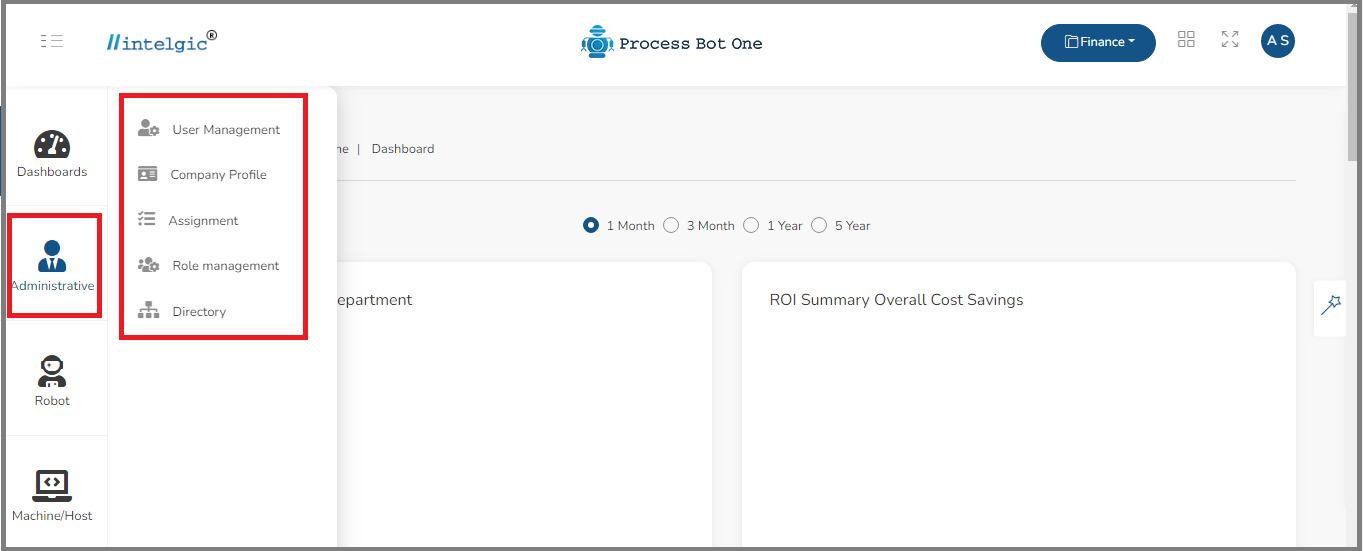
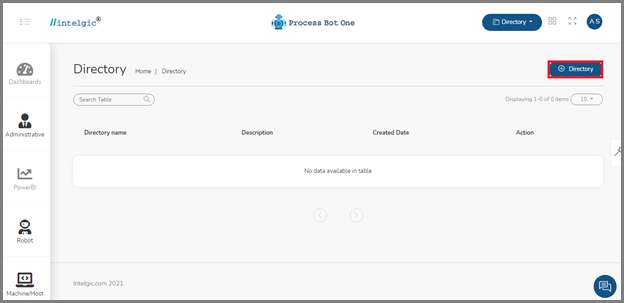
2.1.Directory
What is Directory: The directory contains the details of the different sections/departments.
Create a Directory:
- Login to the Process Bot One using the login credentials.
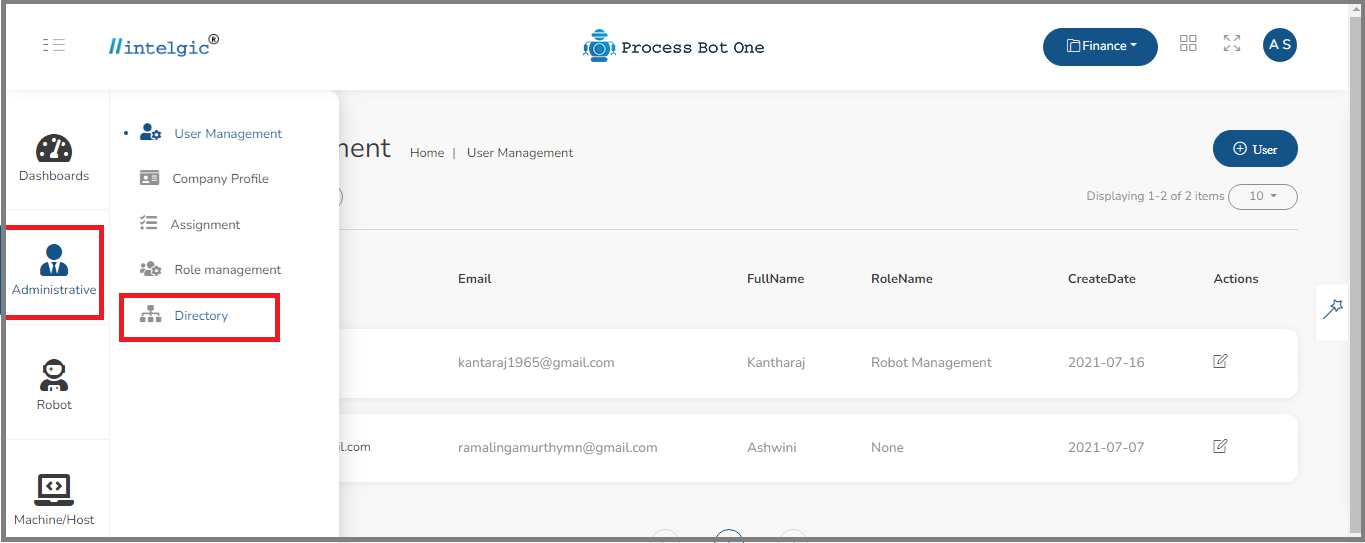
- Once you logged in successfully, click on the Directory under Administrative.
- Click on the + Directory symbol as shown in the below image.
- As we are working on different domains, to store those domains’ details we need a directory.
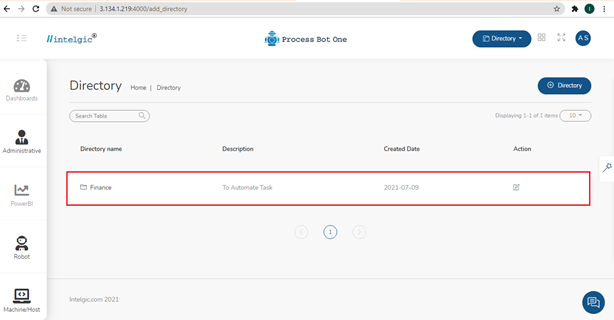
- Once you click on the + Directory you will get a pop-up window which is as shown below, enter the directory name and description and click on Save.

- Once you click on Save, the directory will be created with the given name and the same will be reflected in the Process Bot One window as shown in the below image.
- You can select the working directory by clicking on the + Directory drop-down as shown below.
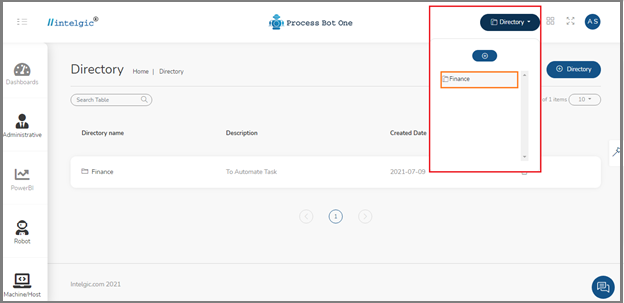
- This is how we can create a directory and maintain each domain information in an easy and catchy way.
2.2.Role Management
In this section, you are going to learn about how to perform an administrative task, which includes creating a role, creating a user, and assign permission to your roles, and assigning created roles to users.
Let us see one by one.
- The first step is to log in to your Process Bot One Orchestrator.
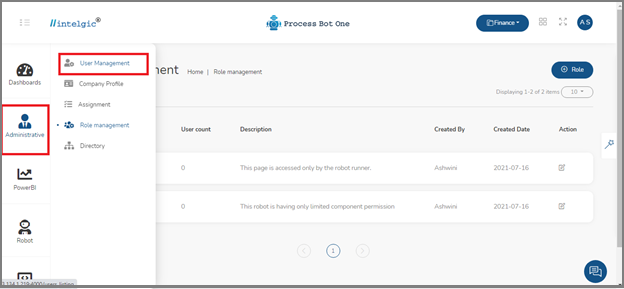
- Once you click on Administrative in the left-hand corner, you will see the other tasks that are present under administrative which is as shown in the below image.
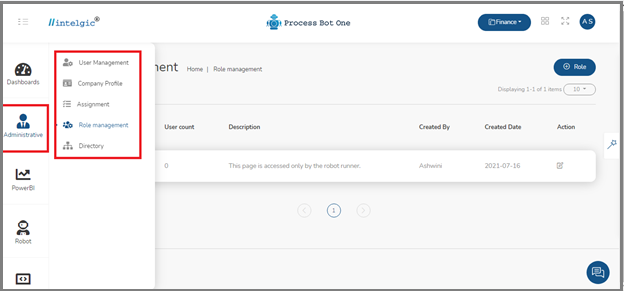
- The first step is to create a role. Let us follow the below steps to create a role.
- Click on the Role Management under the Administrative option.
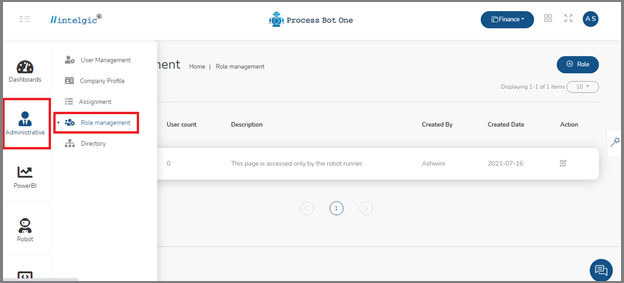
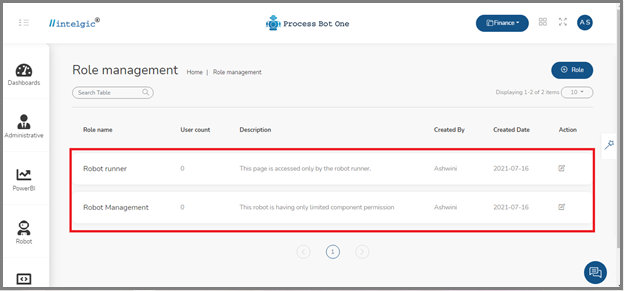
- Next, the Process Bot one will navigate you to the Role Management window, which is as shown below.
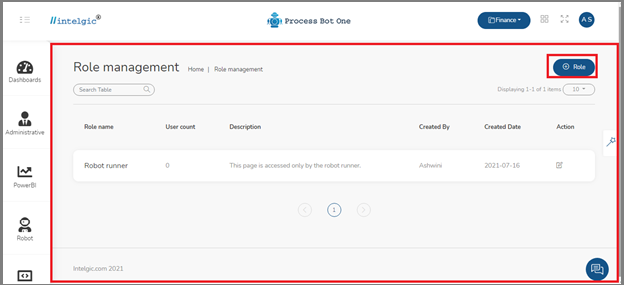
- The role is a specific function that can be performed by a specific group of users, click on the + Role button to create a role.
- Next, the Role Add/Edit page will open, It is having two sections, on the left side we have to enter the role name and role description, and on the right side we have the Role permission section, here we can assign permission to a component.
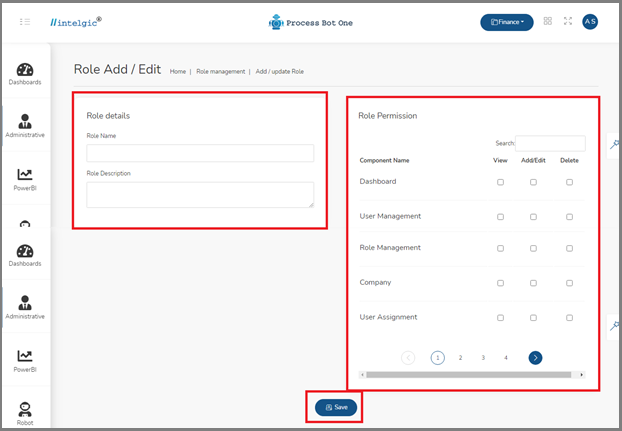
- Basically, we can assign three kinds of permissions to a role, they are: View, Add/Edit, and Delete.
- Enter required details and set permission to the role and then click on the Save
- In the below image, you can see that, I have given some permission to the different components.
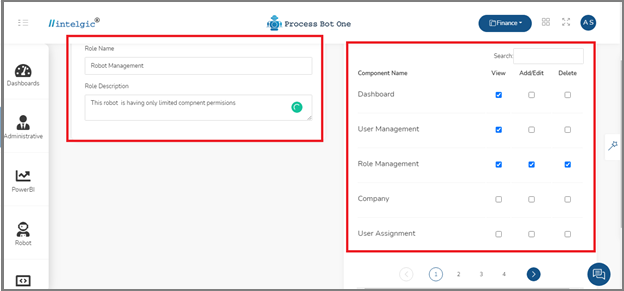
- Once you click on the save button, the role will be created successfully.
- Next, you have to create a user, the following steps will show you how to create a user.
2.3.User Management
- User: A person or object that uses a facility, product, or machine is known as a user.
- Here, the super admin/ super user is going to manage all the activities which we can perform in this section.
- Click on the User Management under the Administrative.
- Once you click on the User Management, the User Management window will open, which is as shown below.
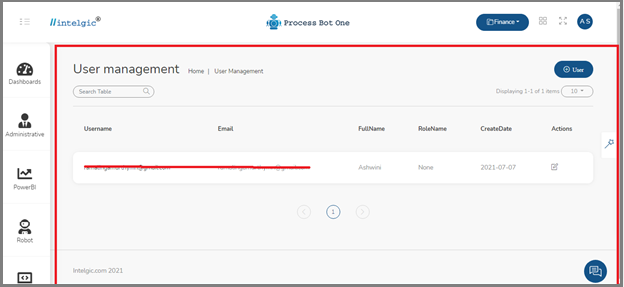
- The user management window will initially contain the superuser details, which means the username and email address that you used to register with Process Bot One.
- Next, click on the + User button to create a new user.
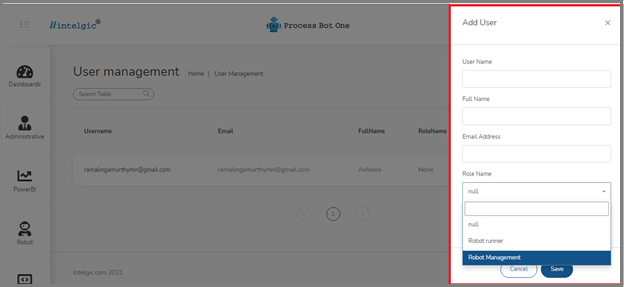
- Once you click on the User button, Add User page will open, enter the details in the required fields and select the role management name by clicking on the role name drop-down list, and then clicking on Save.
- Now, you can see the list of users in the user-management window, which is shown below.

- Now, the login credentials have been sent to the given user mail id, if any user logged in using that credentials, they can only perform the actions which are permitted to them.
2.4.Assignment
- The next step is to assign a robot to the user.
- Click on the Assignment under the Administrative, the assignment window will look like as shown below.
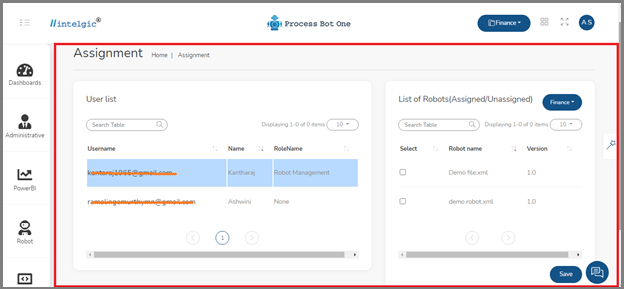
- The Assignment page is having two sections, User List and List of Robots(assigned/Unassigned).
- Click on the username for which you want to assign a robot, and then select the robot name and click on the Save button.
- Now, the particular role will be assigned to the selected user on the selected robot.
- For example, If you have created a user for the HR department and created a role in which you have given permission for the dashboard component to View, Edit, and Delete.
- Then, the HR who logged in using the login credentials of the given user can be able to view, edit and delete the dashboard in the selected robot.
- Here, you can also select the robots from a different directory, by clicking on the Directory drop-down button.
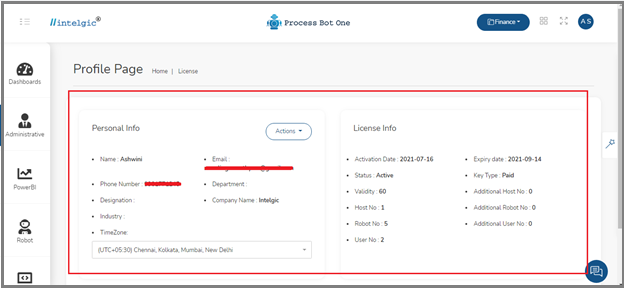
2.5.Company Profile
- Next, we have a company profile, if you click on Company Profile, you will see the details of the user and the license details, the image is as shown below.

3.Dashboard
A dashboard is an information management tool, which can be used for tracking, analyzing, and displaying important performance indicators, metrics, and data points. A dashboard can be used to keep track of the overall health of your company, department, or process, and can be accessed by the paid customer.
- The dashboard gives us the visual statistics of ROI.
- The dashboard looks like as shown below, it shows the cost savings as per department for one month and an ROI summary of the overall process of the organization.
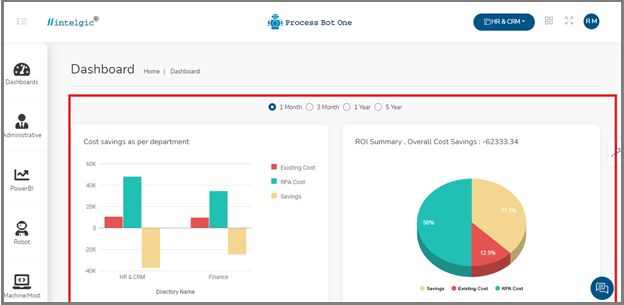
- In the beginning, the cost savings will be 0, as your RPA starts performing, the cost-saving will also be increased.
- Once you start implementation using RPA, you will start receiving ROI(Return on Invest).
- You are also able to analyze the overall ROI summary of your organization.
- ROI Summary: Return on investment (ROI) is a performance metric that can be used to assess an investment’s efficiency or profitability, as well as to compare the efficiency of several distinct investments. The return on investment (ROI) aims to directly evaluate the amount of profit made on a given investment about its cost.
- If you scroll down the dashboard, you can see the real-time parameters of robots like, how many robots are running, how many robots are paused, and how many robots are completed, and how many robots got errors, which is as shown in the below image.
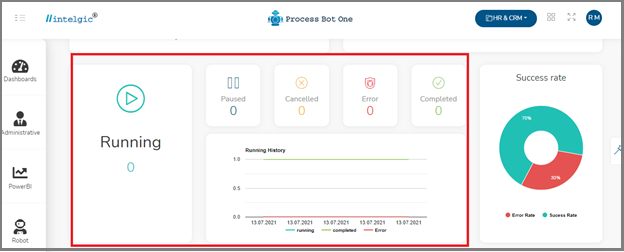
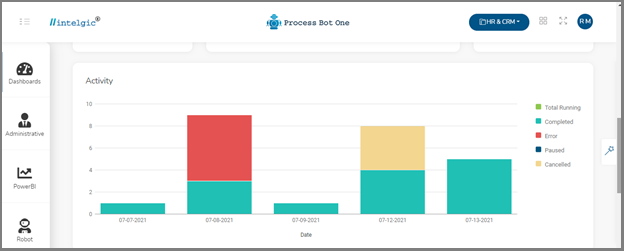
- If you again scroll down a little bit you can see the graph of day-to-day activity, which is as shown in the below image.
- The dashboard also shows you the top 10 best performing robots and non-performing robots in the graph format.

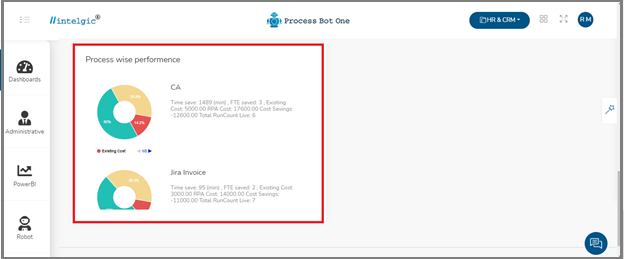
- Process Bot One also provides us the statics for digital worker vise, If you scroll down to the bottom of the dashboard, you can see the Process vise configuration of digital workers.
4.Robot
Next, we have a section called Robot, This section contains details of the In-action and Log History, Published Robots, and Scheduled robots.
As soon as you click on the Robot, the below page will open, which is as below:
- We have three sections under the robots respectively, In Action and Log History, Published Robots, and Schedule.
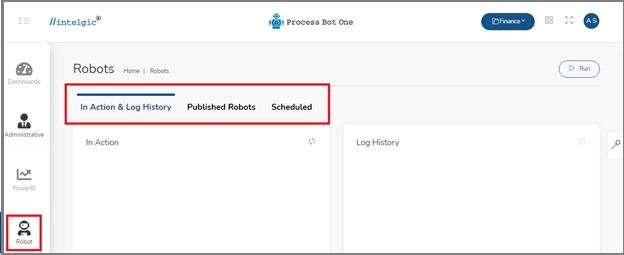
- In Action and Log history: It will display the history of the robots, like whether the robot is paused or running, or completed.
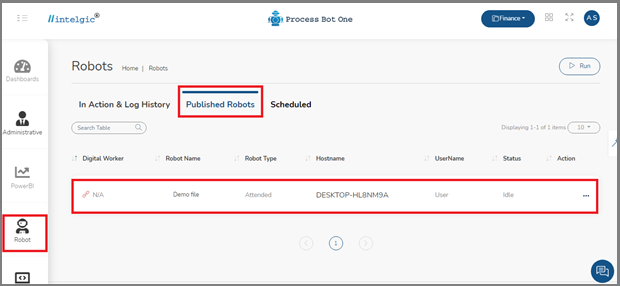
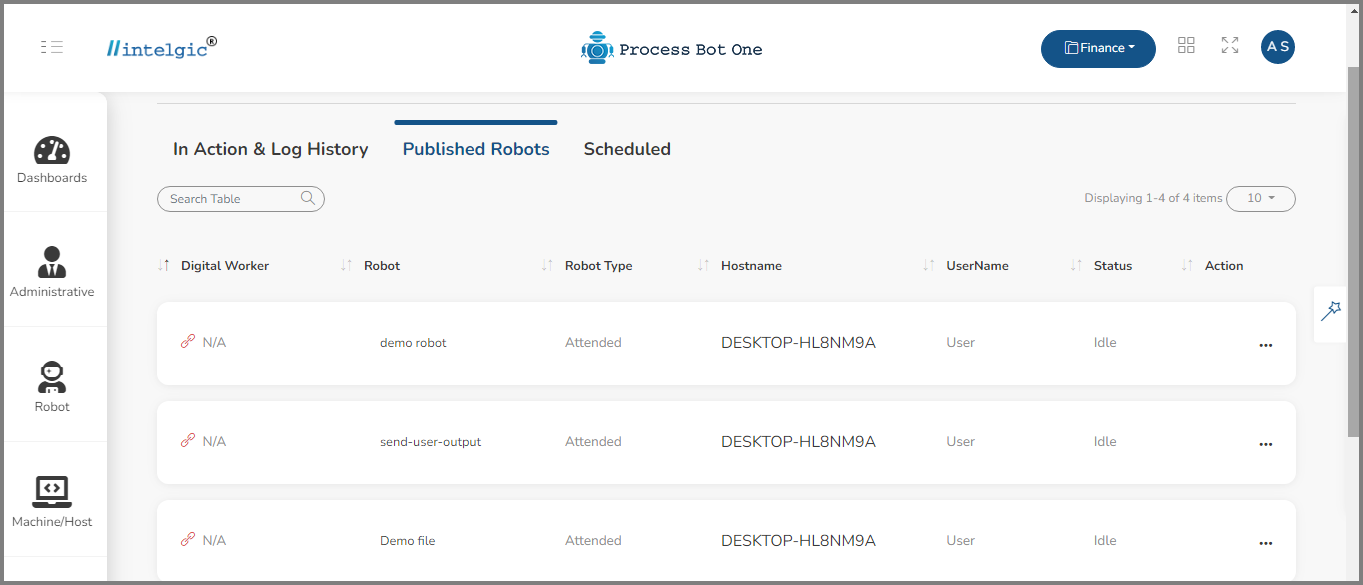
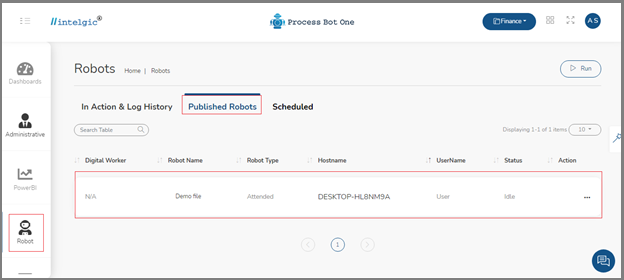
- Published Robots: It will display the list of published robots and details of each published robot.
- The details of the published robot include the following:
- Digital Worker: Digital Workers are virtual professionals who use AI, machine learning, RPA, and analytics to automate corporate operations from start to finish, enhancing and boosting human work.
- Robot Name: It will display the name of the robot
- Robot Type: It refers to the type of the robot, whether it is an attended or unattended robot.
- Hostname: It will display the name of the device/computer to which the Process Bot One has connected.
- User Name: Refers to the name of the user of the device/computer.
- Status: It refers to the relative level of the robot.
- Action: It represents the actions related to the published robots.
- Scheduled: You can schedule the robot when to trigger concerning Time, week, or Month.
- The schedule section will be as shown below:
- Robots: The robot drop-down provides you the option to select the name of the robot, which you want to run.
- Run On: The run-on drop-down provides you the option to select the host either from Default or Specific.
- Time Zone: By clicking on the time zone you can select the time zone according to your location and then set the time according to your preference.
- Now, to run robots, the first step is, go to the published robots under Robot, you can see the list of published robots which is as shown.
- We can run the robot either by clicking on the Run under the Action or by clicking on the Run button on the top.
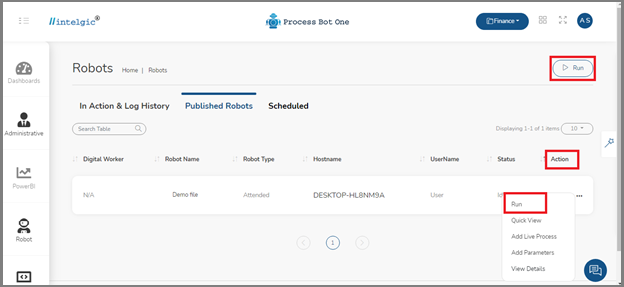
- If you click on the run which is under Action, then the robot will be launched under the default host machine.
- If you have a big network and multiple hosts( ex: Host1, Host2, Host3..etc….) then the robot will be launched under the default host(Host1).
- Once you click on the Run Button, a Start-Job pop-up window will appear, which is as shown below.
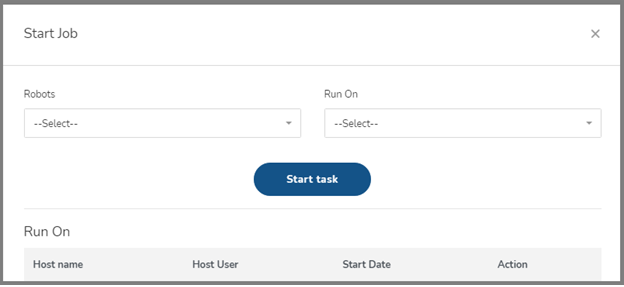
- Enter the required details and click on the Start task.
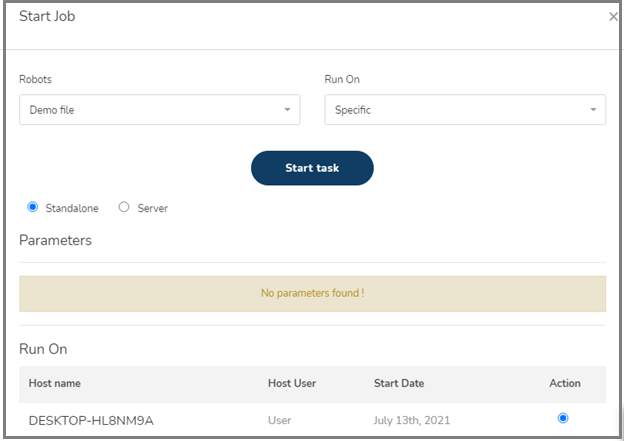
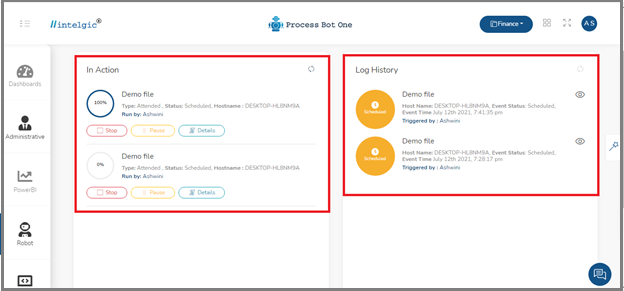
- Once we click on the start task, the robot will start running, if you go to In Action and Log History, you will find the Action which is going on and how much has been completed.
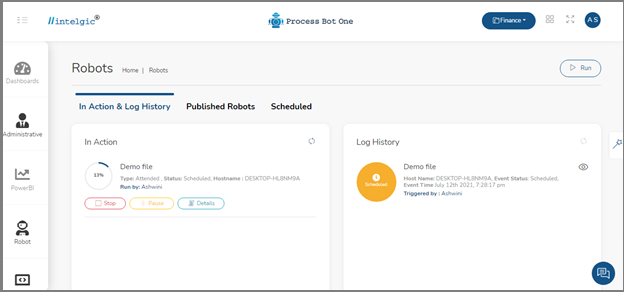
- You can see three options in the In Action section, If you want, you can Stop the Robot or, Pause the running action.
- Once you Pause you can Resume the action by clicking on the Resume
- In the Log History, you can see the relevant details of the robot as shown below.
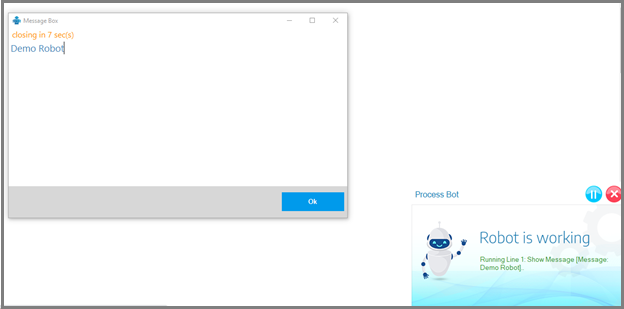
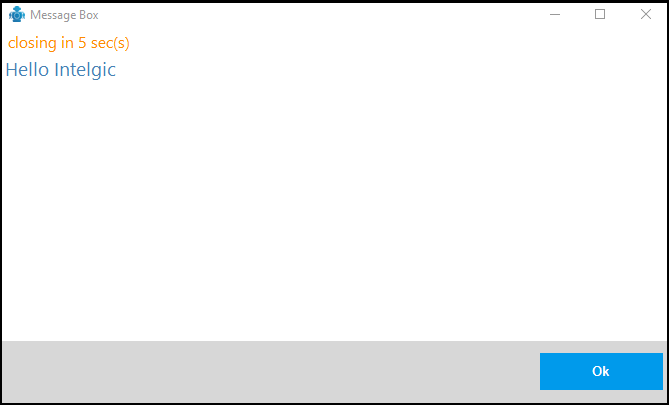
- Once the robot has been run successfully, just open the Process Bot DWmaker, the text message which is present in the file will be displayed in the Message box pop-up window as shown below.
- If you check again in the Action and Log history, you can see that the task has been completed.
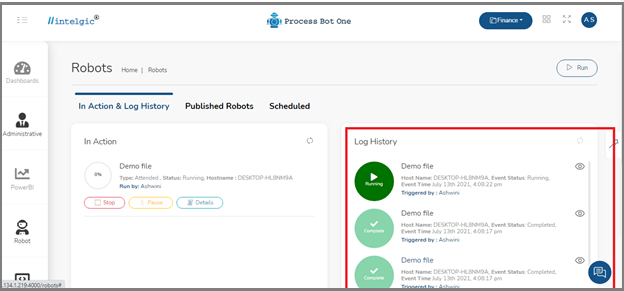
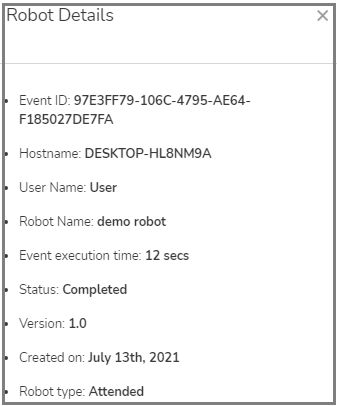
- If you click on the eye symbol in the Log History, you will get all the details regarding your published robot.
- The schedule section will be as shown below:
- The details of the published robot include the following:
4.1.In Action and Log History
- In Action and Log history: It will display the history of the robots, like whether the robot is paused or running, or completed.
- Published Robots: It will display the list of published robots and details of each published robot.
- The details of the published robot include the following:
- Digital Worker: Digital Workers are virtual professionals who use AI, machine learning, RPA, and analytics to automate corporate operations from start to finish, enhancing and boosting human work.
- Robot Name: It will display the name of the robot
- Robot Type: It refers to the type of the robot, whether it is an attended or unattended robot.
- Hostname: It will display the name of the device/computer to which the Process Bot One has connected.
- User Name: Refers to the name of the user of the device/computer.
- Status: It refers to the relative level of the robot.
- Action: It represents the actions related to the published robots.
- Scheduled: You can schedule the robot when to trigger concerning Time, week, or Month.
- The schedule section will be as shown below:
- Robots: The robot drop-down provides you the option to select the name of the robot, which you want to run.
- Run On: The run-on drop-down provides you the option to select the host either from Default or Specific.
- Time Zone: By clicking on the time zone you can select the time zone according to your location and then set the time according to your preference.
- Now, to run robots, the first step is, go to the published robots under Robot, you can see the list of published robots which is as shown.
- We can run the robot either by clicking on the Run under the Action or by clicking on the Run button on the top.
- If you click on the run which is under Action, then the robot will be launched under the default host machine.
- If you have a big network and multiple hosts( ex: Host1, Host2, Host3..etc….) then the robot will be launched under the default host(Host1).
- Once you click on the Run Button, a Start-Job pop-up window will appear, which is as shown below.
- Enter the required details and click on the Start task.
- Once we click on the start task, the robot will start running, if you go to In Action and Log History, you will find the Action which is going on and how much has been completed.
- You can see three options in the In Action section, If you want, you can Stop the Robot or, Pause the running action.
- Once you Pause you can Resume the action by clicking on the Resume
- In the Log History, you can see the relevant details of the robot as shown below.
- Once the robot has been run successfully, just open the Process Bot DWmaker, the text message which is present in the file will be displayed in the Message box pop-up window as shown below.
- If you check again in the Action and Log history, you can see that the task has been completed.
- If you click on the eye symbol in the Log History, you will get all the details regarding your published robot.
- The schedule section will be as shown below:
- The details of the published robot include the following:
4.2.Published Robots
- Published Robots: It will display the list of published robots and details of each published robot.
- The details of the published robot include the following:
- Digital Worker: Digital Workers are virtual professionals who use AI, machine learning, RPA, and analytics to automate corporate operations from start to finish, enhancing and boosting human work.
- Robot Name: It will display the name of the robot
- Robot Type: It refers to the type of the robot, whether it is an attended or unattended robot.
- Hostname: It will display the name of the device/computer to which the Process Bot One has connected.
- User Name: Refers to the name of the user of the device/computer.
- Status: It refers to the relative level of the robot.
- Action: It represents the actions related to the published robots.
- The details of the published robot include the following:
Let us See How to Publish a Robot in Process Bot One from the Dwmaker automation tool.
Before publishing any robots, our first job is to create a directory.
- As we are working on different domains, to store those domains we need a directory.
- Click on the Administrative section, and select the Directory.
- Click on the + Directory symbol as shown in the below image.
- Once you click on the + Directory you will get a pop-up window which is as shown below, enter the directory name and description and click on Save.
- Once you click on Save, the directory will be created with the given name and the same will be reflected in the Process Bot One window as shown in the below image.
- You can select the working directory by clicking on the + Directory drop-down as shown below.
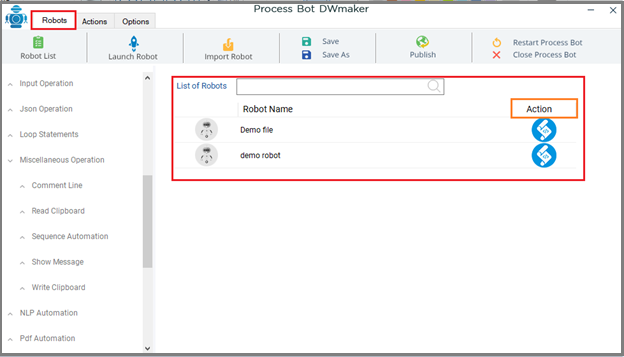
- Next, go to the Process Bot DWmaker click on Robot and select any robot from the list of robots and click on the Action.
- Once you click on the Action button from the list, the code window will be ready for publishing.
- Next, click on the publish button in the DWmaker window, the publish robot pop-up window will open, select the directory name, in which directory you want to publish.
- And, select the robot type, either you want to be attended to or an unattended robot.
- Attended Robot: Attended RPA bots are ready and waiting to be activated by employees whenever needed to help the process.
- Unattended Robot: Unattended RPA bots operate on a preset schedule, or as triggered by logic in the process flow.
- Enter the approximate job time and description and click on Publish.

- Once you click on publish, you will get a pop notification as your robot will be successfully published.
- To verify whether the robot got published or not, go to Process Bot One and Click on Robot in the left corner and click on Published Robots, you will get all the details as below.
4.3.Scheduled
Scheduled: You can schedule the robot when to trigger concerning Time, week, or Month.
-
- The schedule section will be as shown below:
- Robots: The robot drop-down provides you the option to select the name of the robot, which you want to run.
- Run On: The run-on drop-down provides you the option to select the host either from Default or Specific.
- Time Zone: By clicking on the time zone you can select the time zone according to your location and then set the time according to your preference.
- The schedule section will be as shown below:
Let us see how to schedule a Robot in Process Bot One:
What is Schedule Robot: Schedules allow you to run jobs on Robots in a predetermined order and at regular intervals. You can assign Robots to different schedules based on the following parameters:
- Select Robot
- Specific or Default host
- Machine type
- Let us see how to perform this action in Process Bot One.
- Our first job is to log in to Process Bot One using our login credentials.
- Once, the Process Bot One window will open, click on Scheduled under Robot, on the left-hand side as shown below.
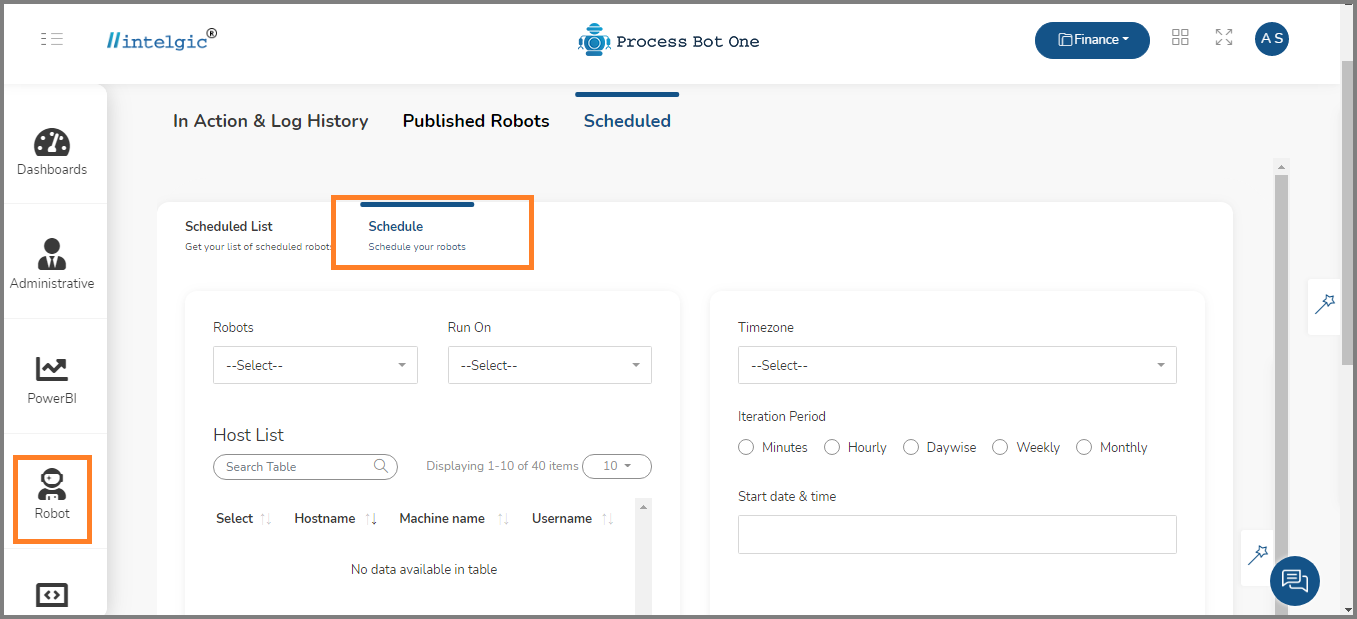
- Under Scheduled, we have two options called Scheduled List and Schedule.
- The Schedule List contains a list of schedule robots. Click on Schedule to create a new schedule robot.
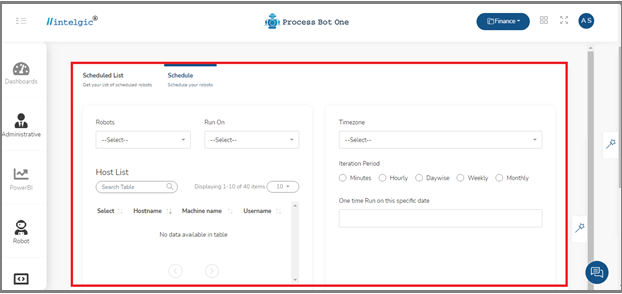
- Once you click on Schedule, the below page will be displayed, fillup in all the required details such as:
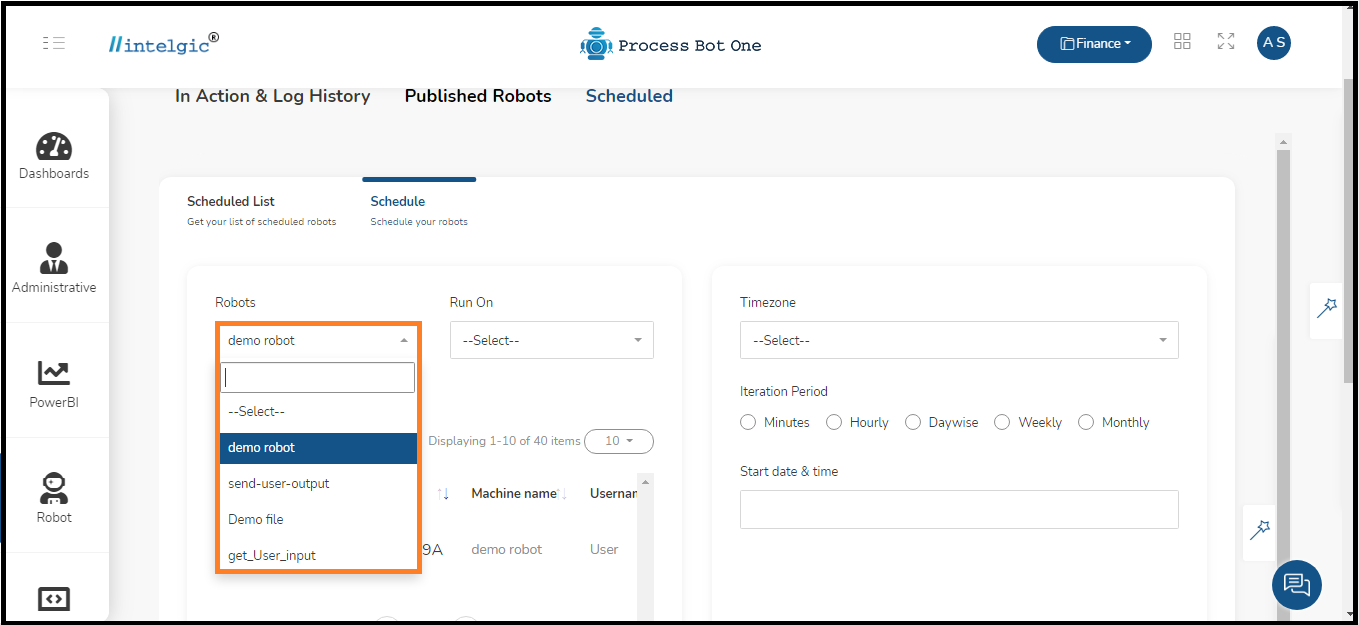
- Robot: Click on Robot drop-down list and select the robot to which you want to schedule.
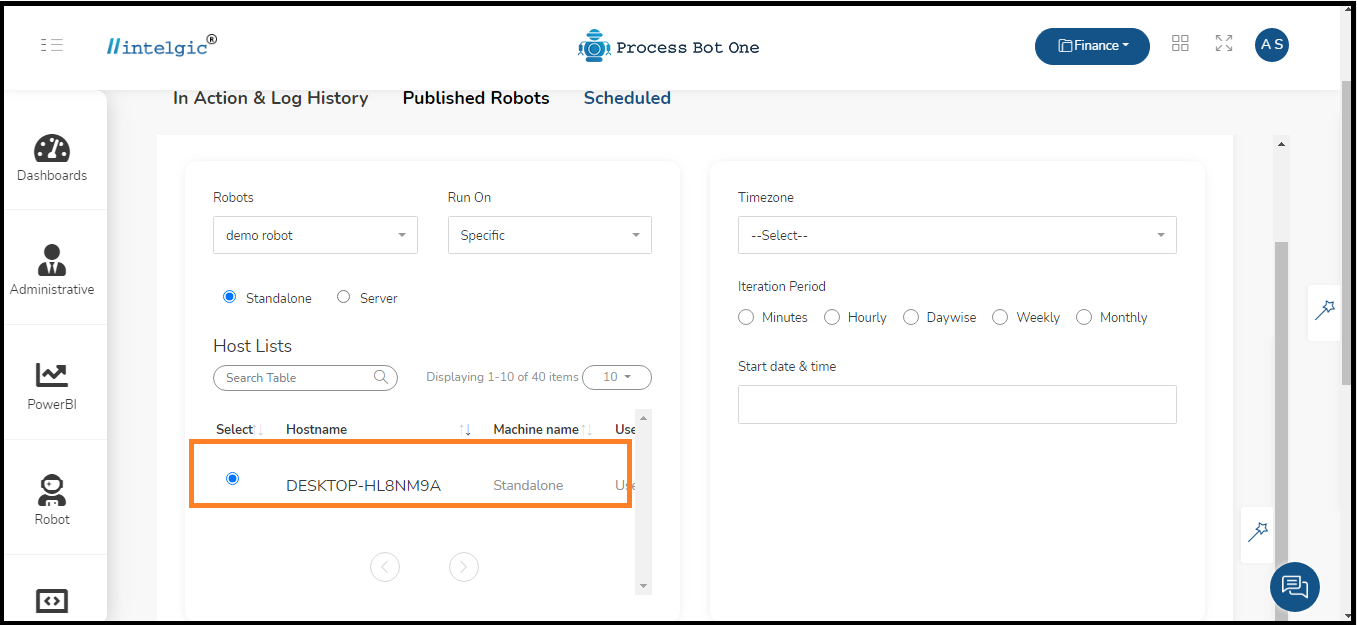
- Next, click on Run on Drop-down and select either Specific or Default server to run the scheduled robot.
- If you select specific, again you will get two options under it, such as Standalone and Server. you can select anyone you want to run on.

- Next, select the hostname, if you are connected with the system then your computer name will be displayed below as shown in the above image.
- Next, on the right side, we have a TimeZone option.
- Click on the Drop-down list and select the time zone of your place.
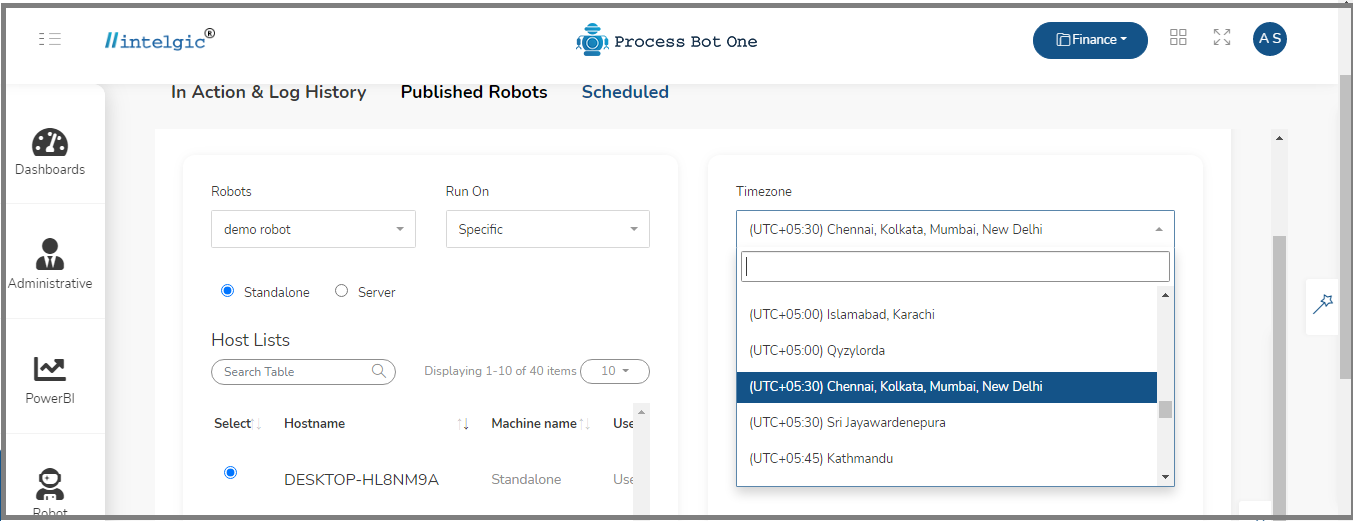
- Next, select the Iteration Period, here you can select the iteration period, we have options called
- Minutes: This option helps you to schedule your robot on a minute basis in the given interval of time.
- Hours: This option helps you to schedule your robot on an hourly basis in the given interval of time.
- Daywise: This option helps you to schedule your robot on a daily basis in the given interval of time.
- Weekly: This option helps you to schedule your robot on a weekly basis in the given interval of time.
- Monthly: This option helps you to schedule your robot on a monthly basis in the given interval of time.
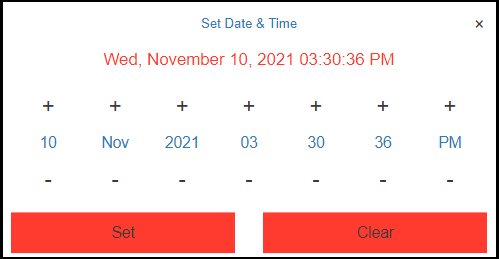
- In this example, I have selected minutes and then select the Start Date and Time.
- Once you click on the Start Date and Time, the pop-up window of set date and time will open, select the interval of minutes you want to schedule as below.
- Next, click on Add Schedule button on the Schedule window.
- Now the schedule becomes active and the selected robot will trigger at the given time.
- Now, go to the Scheduled List you will find the list of a robot that has been scheduled.
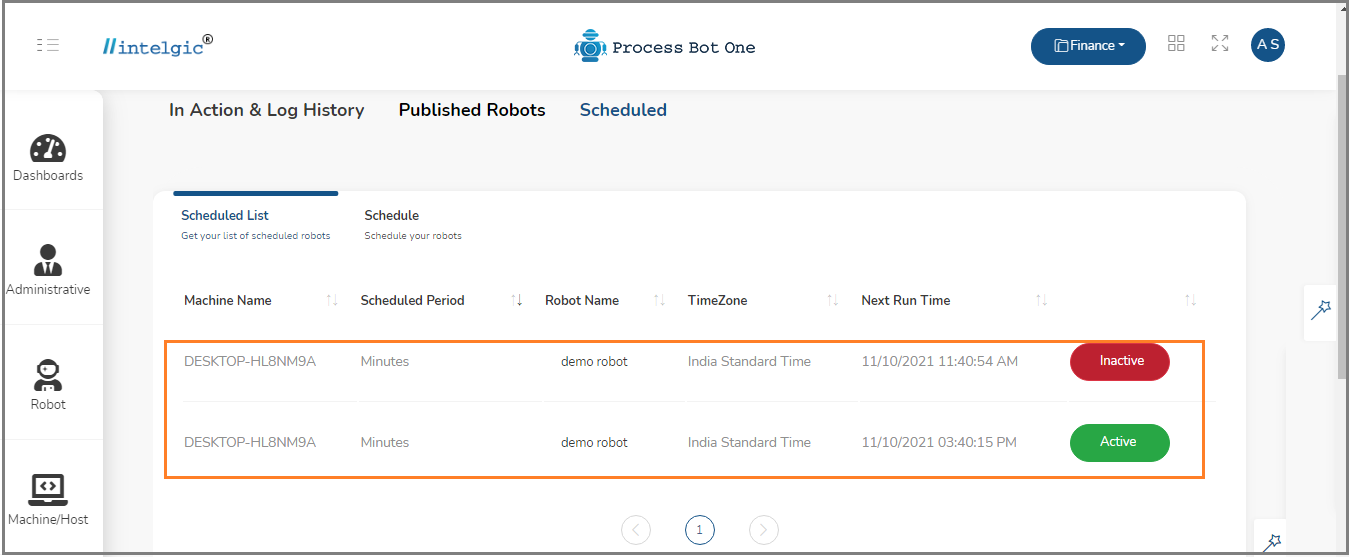
- Now at the given time interval, the robot will keep on running, and if in case you don’t want to run the robot then you can click on the Active button under the Scheduled List robot then the robot will become inactive as shown above.
- the given robot automatically runs and displays the output on the message box.
- This is how the Process Bot One will help you to run any robot without any human intervention at the given time of interval.
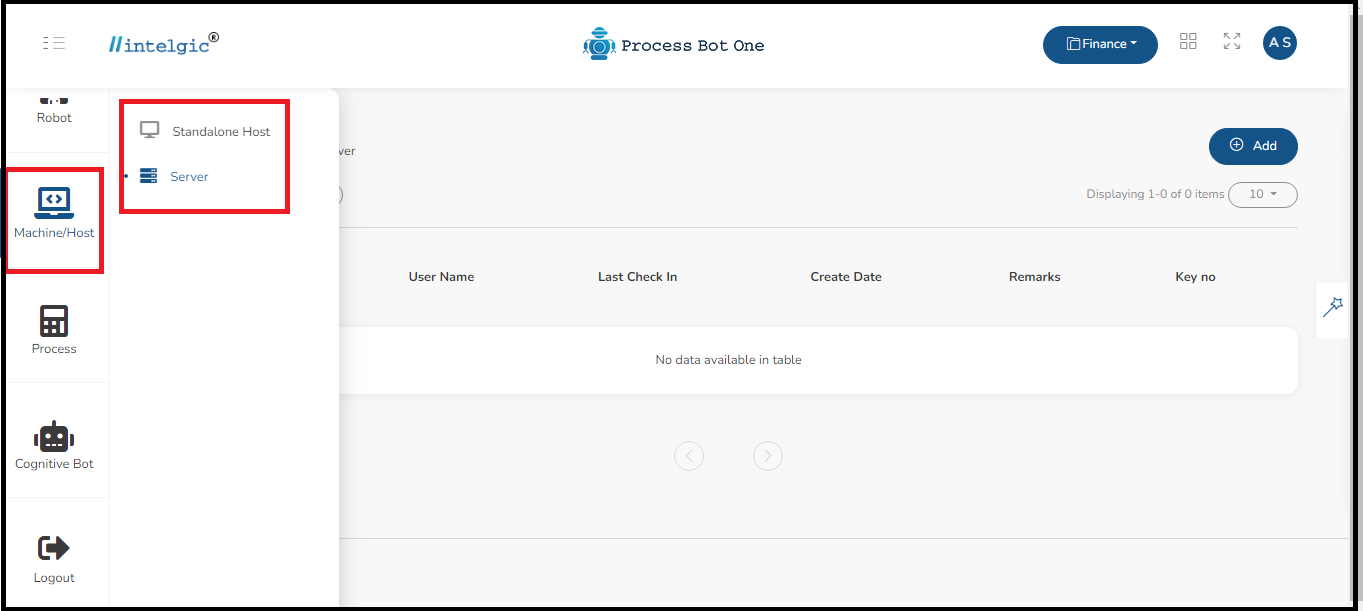
5.Machine/Host
Our Next Section is Machine/Host, once we click on Machne/Host, we can see two sub-menus namely:
- Stand-alone Host
- Server
- Let us see how to use each one in detail.
5.1.Standalone Host
A standalone host, in the Internet world, is a system that runs on its own server, as opposed to a shared host, which hosts numerous websites or other services on a single machine. A Virtual Host is an alternative to a standalone host in which a single system is divided into numerous systems.
In the case of a Standalone Host, though we can create multiple users, we cannot do multiple remote sessions.
Let us see how to connect the host to Process Bot One.
Once you click on the Standalone Host under the Machine/Host, you will navigate to the below page:
To add Machine, just click on +Add symbol, then add standalone pop-up window will open, enter the machine name and user name and then click on Save.
You will get the details of the Hostname and User name in the Dwmaker.
As soon as you Install Dwmaker in your Windows system the hostname and user name will be automatically detected by the Dwmaker.
Go to the Dwmaker, click on Settings Manager under the Options Tab.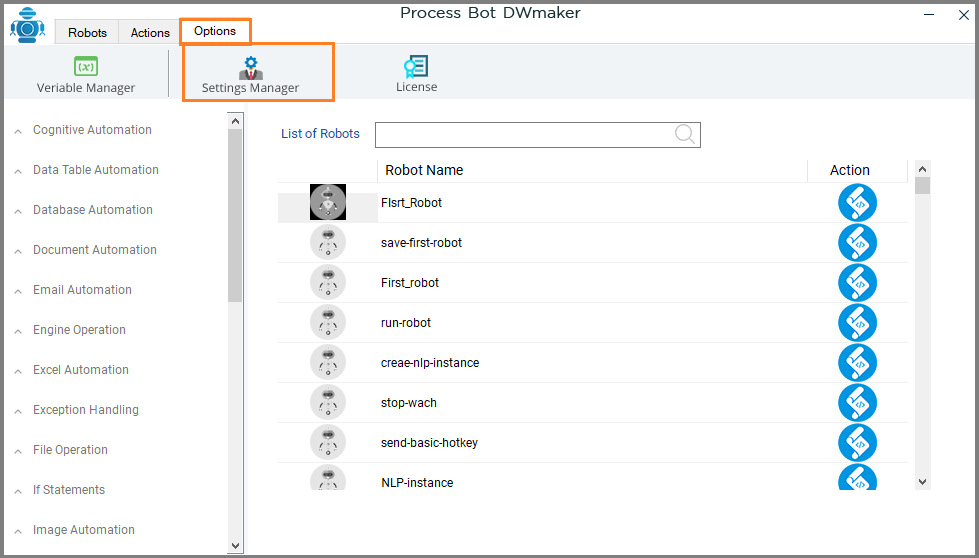
Once you click on Settings Manager, you will be navigated to the below page:
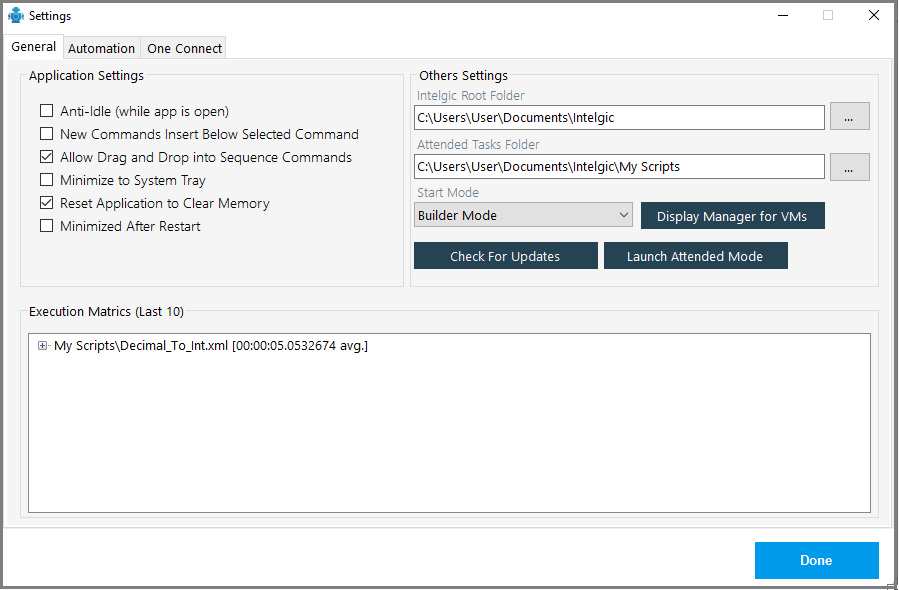
Click on One-connect tab in tah above image, then you will navigate to the below page.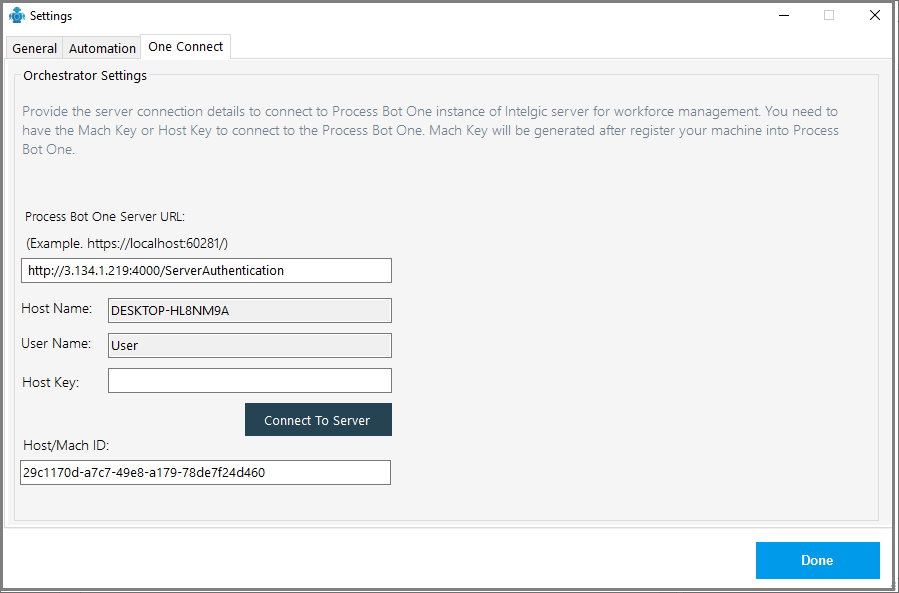 As shown in the above image, you will get the details of Host name and user name, copy these and then paste in the Add Standalone pop-up window and then click on Save.
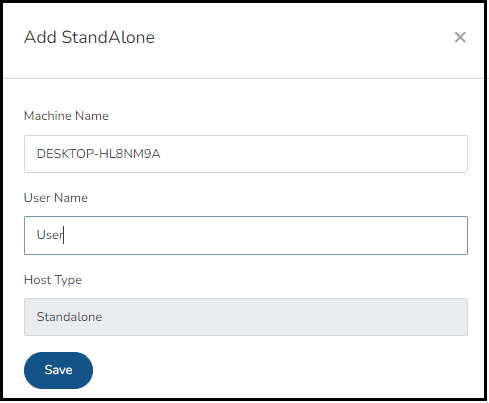
Next, click on the key symbol and copy the host key, and then paste it in the Dwmaker window under Host key and then click on Connect to Server.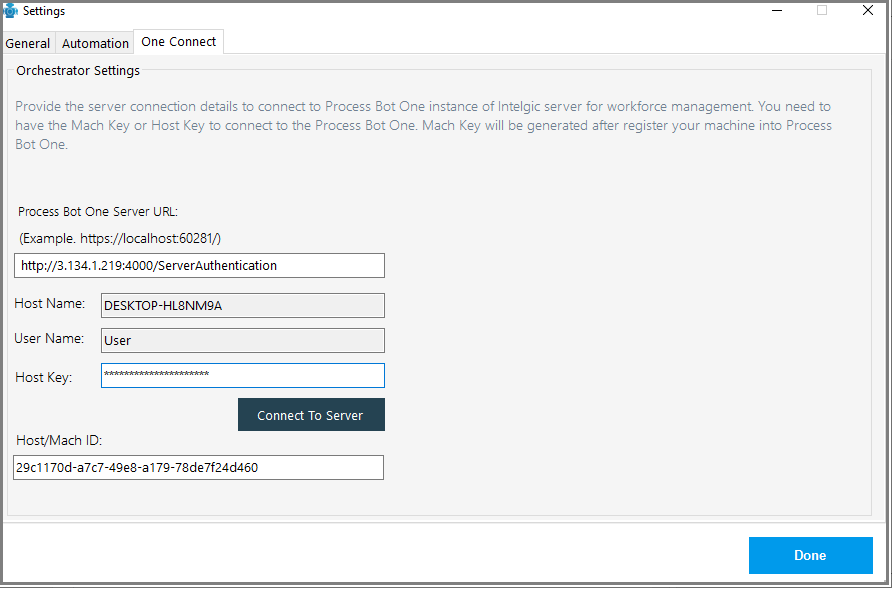
Now, the Dwmaker tool got connected to the process Bot One, as a result, you can see a Green check mark symbol in the standalone window as shown below.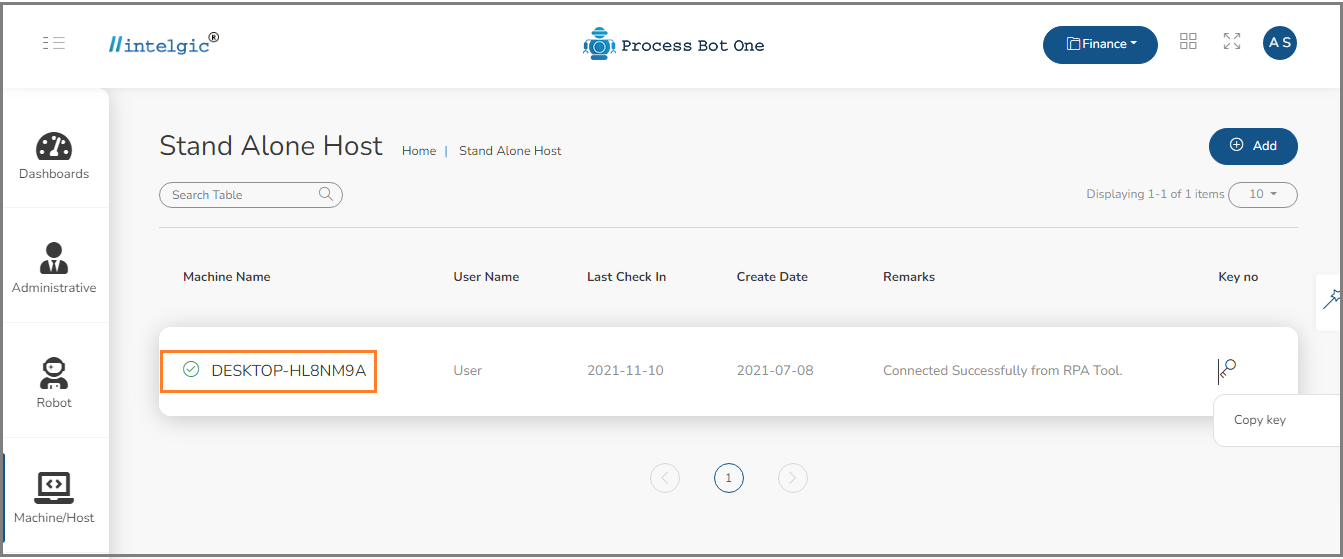
5.2.Server
The next, section is Server, here, we can perform multiple robot sessions by connecting to the server.
Click on the +Add button to add the server to the Process Bot One. you can see multiple servers are connected to the Process Bot One as shown below: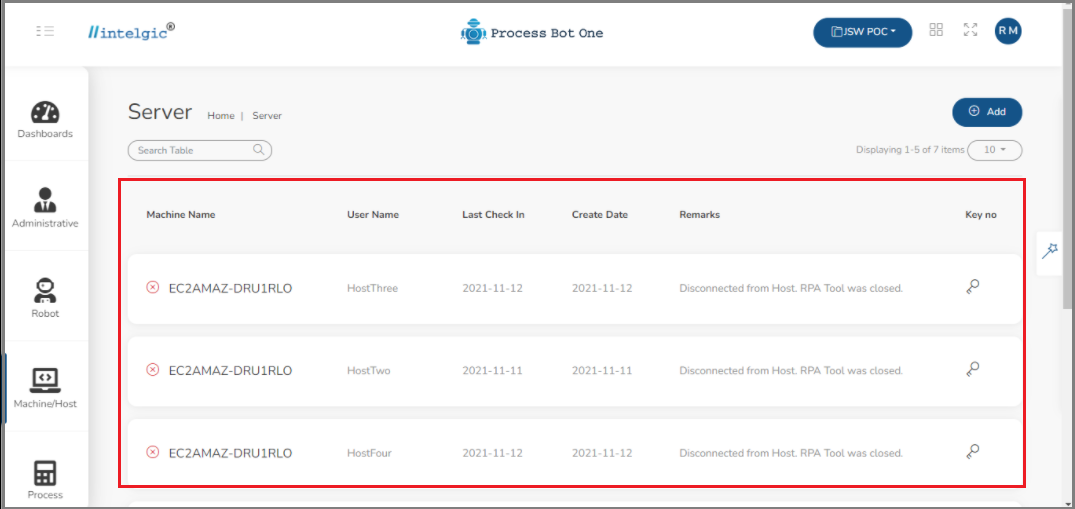
6.Process
Our Next section is Process, which is having two sections under that, respectively, AQ Calculator and ROI Calculator.
-
- AQ Calculator: Every process can be automated fully or partially. But before we automate, we must first identify the processes that will give high ROI, which has a lower impact on the workers who are executing them manually. We calculate that through Automation Quotient (AQ). We have a proprietary tool that calculates each process’s Automation Quotient (AQ) Score, and we automate the processes that have the highest AQ Scores.
- ROI Calculator: Return on investment (ROI) is a performance metric that is used to assess an investment’s efficiency or profitability, as well as to compare the efficiency of various investments. The term “return on investment” (ROI) refers to a method of calculating the amount of profit made on a given investment in relation to its cost.
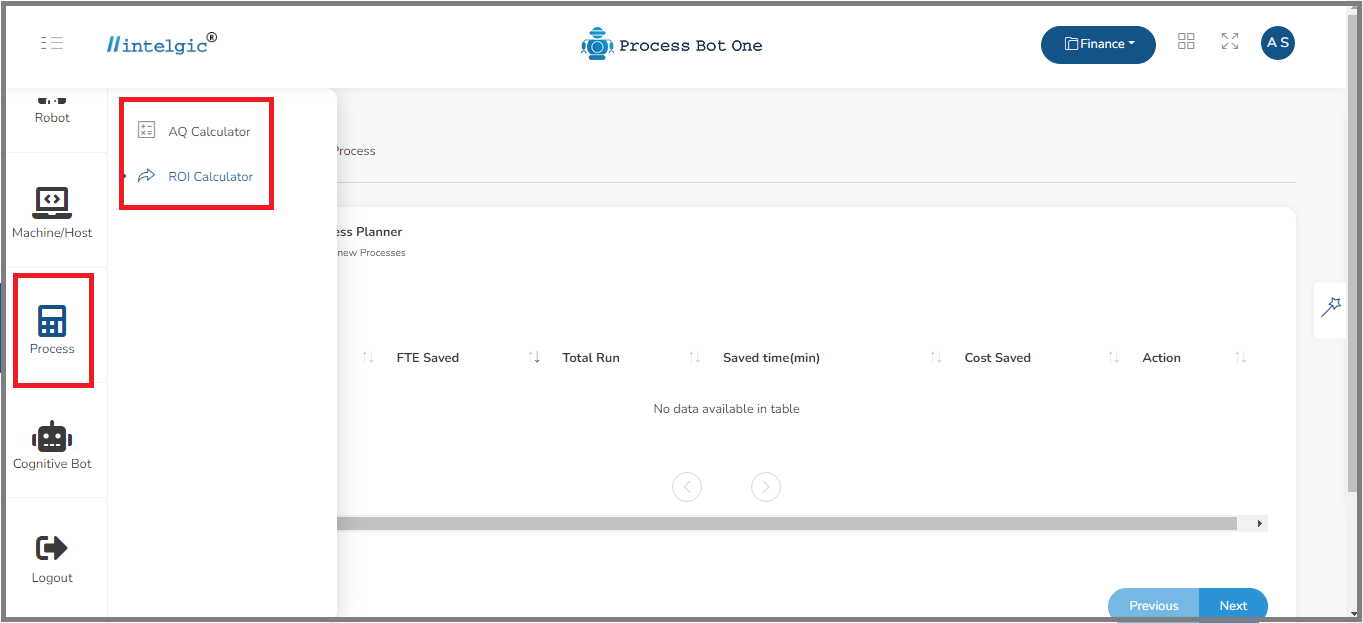
- Let us study AQ Calculator and ROI calculator in detail.
6.1.AQ Calculator
- AQ Calculator: Every process can be automated fully or partially. But before we automate, we must first identify the processes that will give high ROI, which has a lower impact on the workers who are executing them manually. We calculate that through Automation Quotient (AQ). We have a proprietary tool that calculates each process’s Automation Quotient (AQ) Score, and we automate the processes that have the highest AQ Scores.
- Once you click on AQ Calculator, you will be navigating to the below page, where you can add Process to calculate its AQ.

- Click on Add Process button, then you will be navigating to the below page.
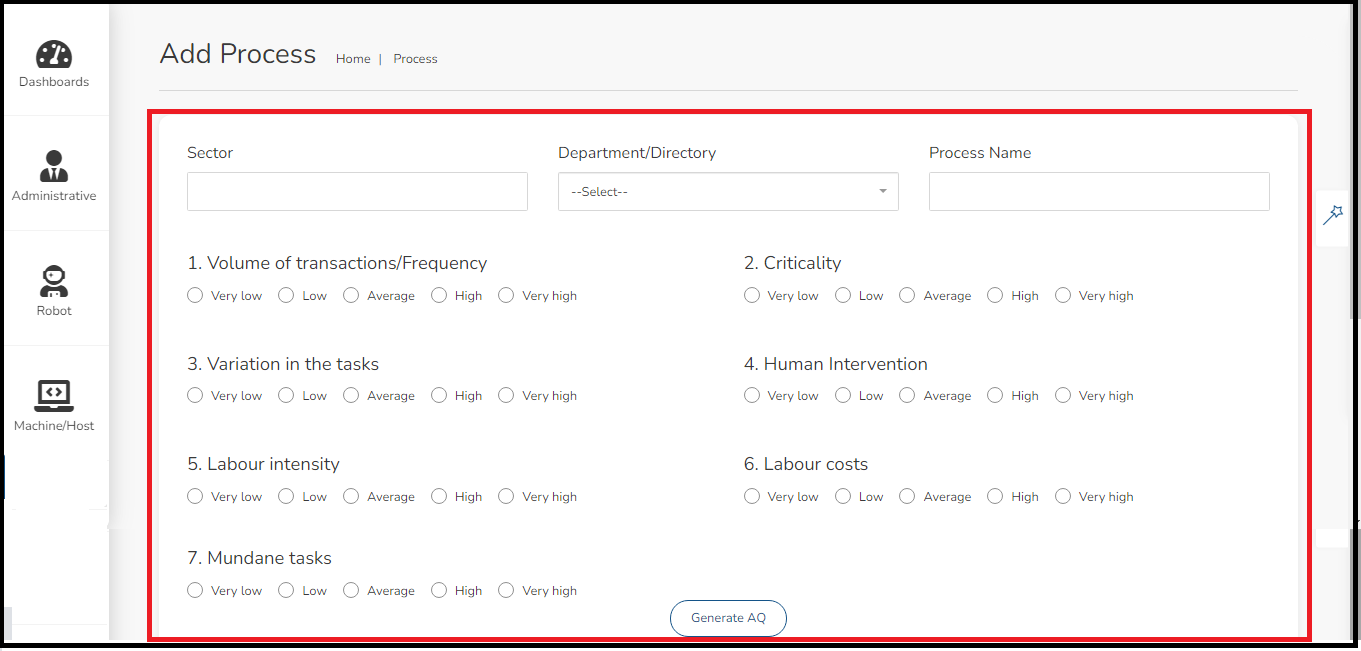
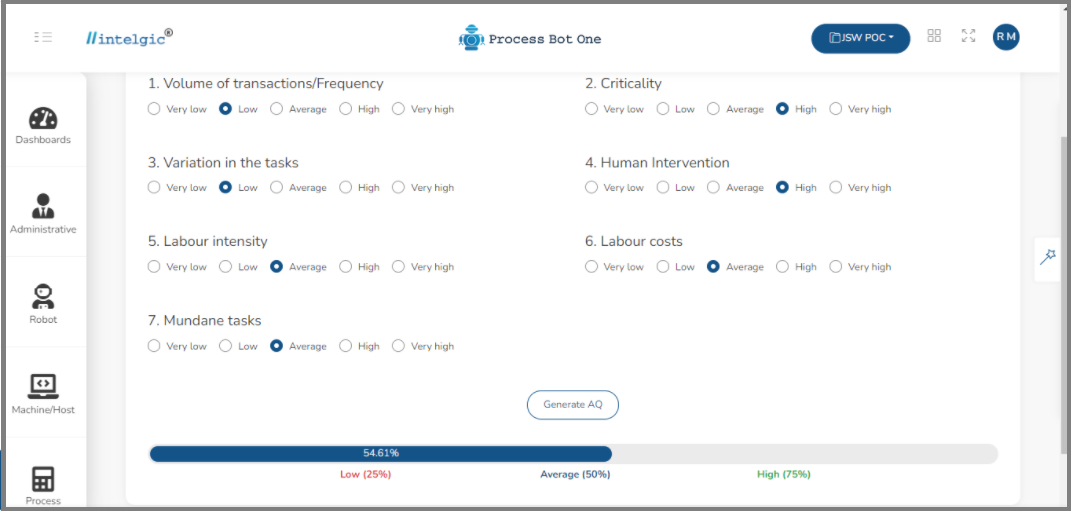
- Fill in all the details in the above section and click on Generate AQ.
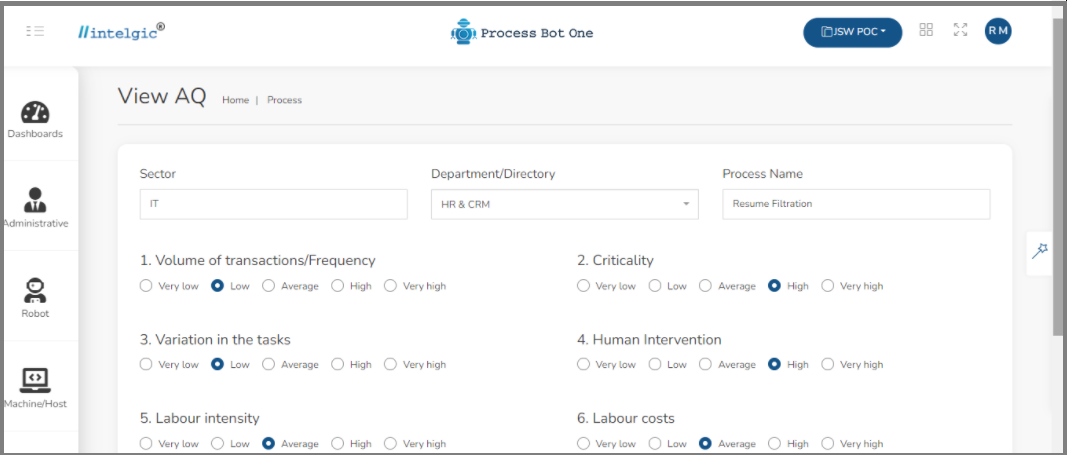
- As soon as you click on Generate AQ, the AQ will be generated as shown below.
6.2.ROI Calculator
ROI stands for Return On Investment. Return on investment (ROI) is a performance metric that is used to assess an investment’s efficiency or profitability, as well as to compare the efficiency of various investments. The term “return on investment” (ROI) refers to a method of calculating the amount of profit made on a given investment in relation to its cost.
Once you click on the ROI calculator the below image will open, which is having two sections, namely, Live Process and Process Planner.
- Live Process: Which shows the process which is currently live.
- Process Planner: This shows the approximate time has been saved and how much the human work got reduced, etc…
- Creating a process will give you an approximate value of Pre and Post RPA implementation.
- To create a Process, first, log in to Process Bot One using your login credentials.
- Once, the Process Bot One window will open, scroll down the left menu bar and click on the Process button.

- Next, click on the Process Planner, you can see different data variables available under Process Planner.
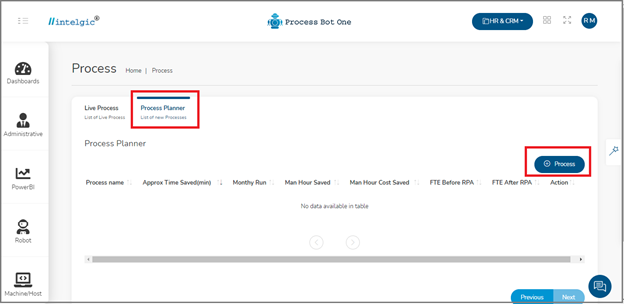
- Click on the + Process button to create a Process, A new Process Planner window will open.
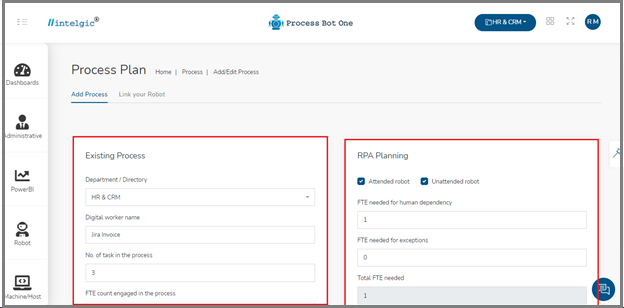
- The Process Planner window has two sections respectively, Existing Process and RPA Planning.
- The Existing Process is a pre-RPA implementation process section, that contains the below fields:
- INFO: Stands for “full-time equivalent.” It refers to the number of hours worked by a single employee in a week.
- Department/Directory: It refers to the name of the department/directory for which you want to create a process.
- Digital Worker Name: It refers to the name of the digital worker who holds this process. If you create a digital worker then only you can see ROI visualization for this process.
- of a task in the Process: It refers to the total number of tasks that are present in your current process.
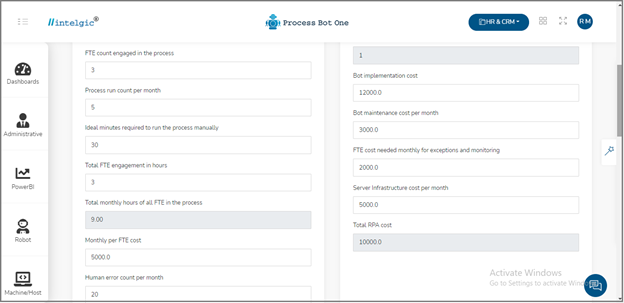
- FTE count engaged in the process: Refers to the total number of FTE engaged in the process.
- Process run count per month: It refers to the total number of processes running in a month.
- Ideal minutes required to run the process manually: It refers to the average time required to run a process manually.
- Total FTE engagement in hours: This refers to the total number of FTE working in an hour.
- Total monthly hours of all the FTE in the process: Refers to an average of the total number of FTE working in a month.
- Monthly per FTE cost: This refers to an average cost of FTE per month.
- The next is the RPA planning section, which contains the fields that are included after the implementation of the RPA in your business.
- You can select either attended or unattended robot as per your requirement and the fields are as below:
- FTE needed for human dependency: It refers to the total number of FTE needed for human dependency.
- FTE needed for exceptions: It refers to the total number of FTE needed for exception handling.
- Total FTE needed: It refers to the total number of FTE required for your business.
- Bot implantation cost: It refers to the total implementation cost of the bot.
- FET cost needed monthly for exceptions and monitoring: It refers to the monthly maintenance cost required for exception handling and monitoring.
- Server infrastructure cost per month: It refers to the total Infrastructure cost of the RPA server per month.
- Total RPA cost: It refers to the total implementation cost of RPA.
- Enter the required details in the given fields and click on Save. The image is shown below.
- Now the process has been created.
- If the process is not live, we have to link this process to the robot to make it live.
- Each process is associated with one robot.
- As soon as you click on the save, you are navigating to the link your robot
- You can select the robots from the list and click on the Link Robots
- If you want to unlink any robot, then click on the Unlink Robots
- Once you unlink any process/robot then all the log details which is present inside the process will be deleted automatically.
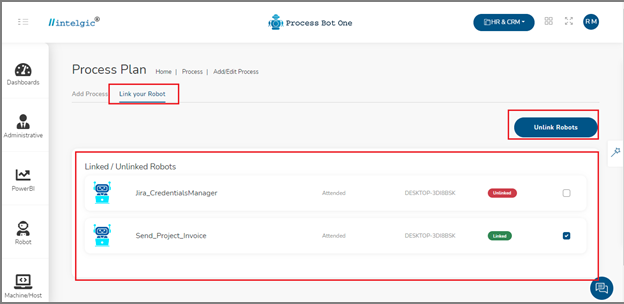
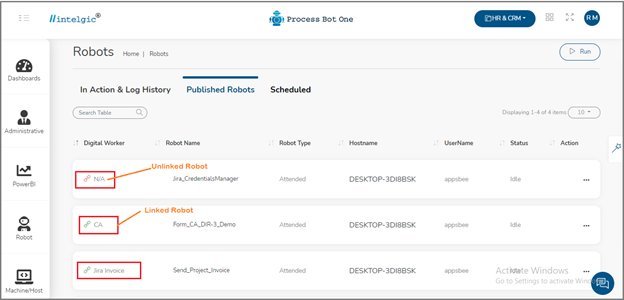
- To verify whether the robot is live or not, go to the published robot under Robot, you will find the green link mark before the digital worker name which is as shown below.
7.Cognitive Bot
In our next section, we have Cognitive Bot. Cognitive Bot is mainly used to train our bot to perform cognitive automation. Cognitive Automation Process is a pre-trained automation technology, it automates specific business processes and accepts less data before making an impact.
Once you click on Cognitive Bot, the below page will open:
Now let us see, how to create an instance of invoice and train your bot.
- Login to your Process Bot One using your login credentials.
- Click on the Cognitive Bot.
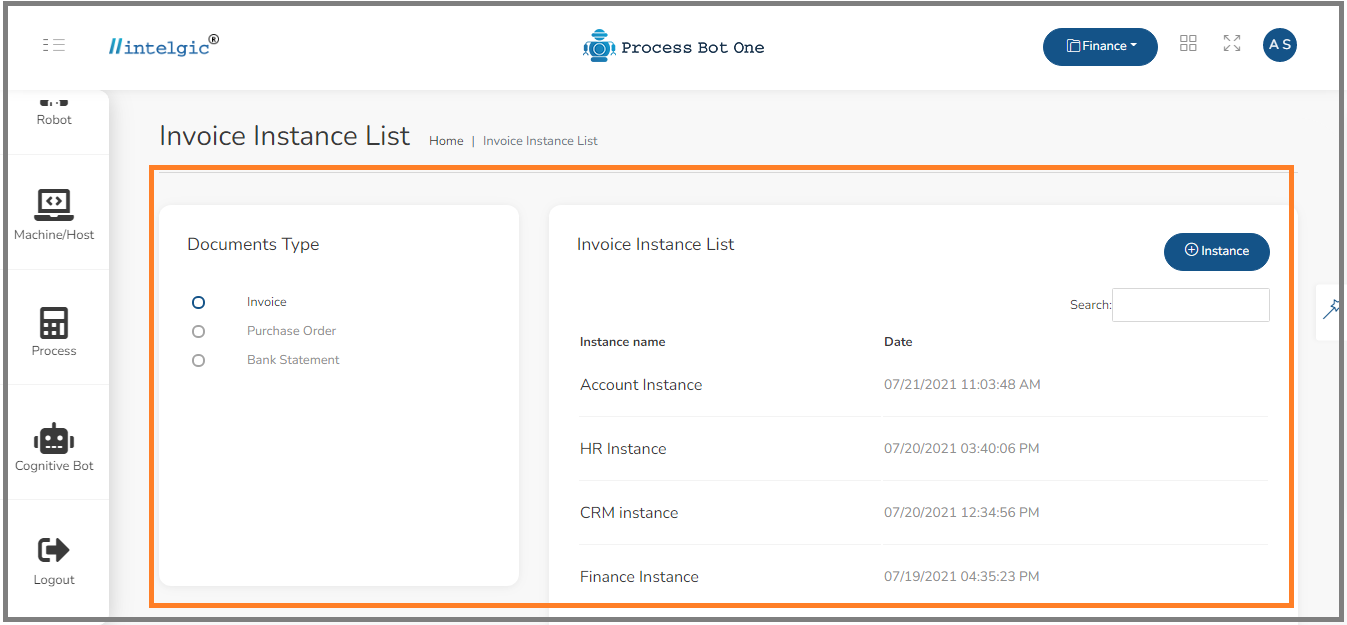
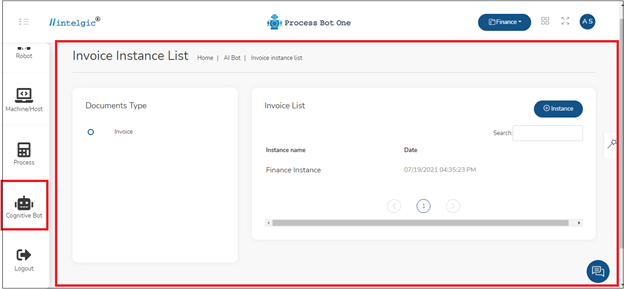
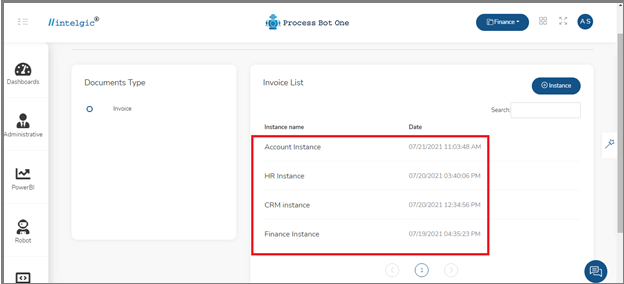
- Once you click on the Cognitive Bot, you will navigate to the Invoice Instance List, which is as shown below.
- To create a new instance, click on the
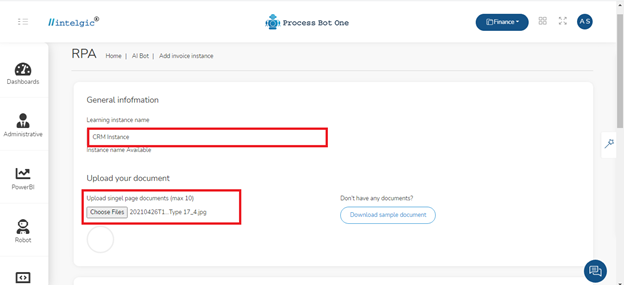
- Next, Add invoice instance page will open, which is as shown below.
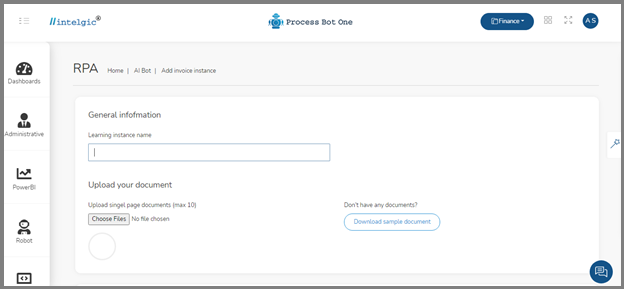
- Enter the name of the instance under the Learning Instance Name.
- Next, upload the sample invoice document, which you want to train to your bot.
- You can upload a maximum of 10 invoice documents at once to train your bot.
- In the image below, I have uploaded one invoice document.
- Scroll down the Add invoice instance page, you will find Standard Form Fields and Standard Table Fields
- Where the standard form fields are related to the invoice and the standard form field values are always unique. For example, Invoice Number, Invoice date, Invoice Owner, etc.
- And, the Standard table fields are related to the item/product. For example, Item description, Item quantity.
- Now, select the standard form fields which are present in your invoice document.
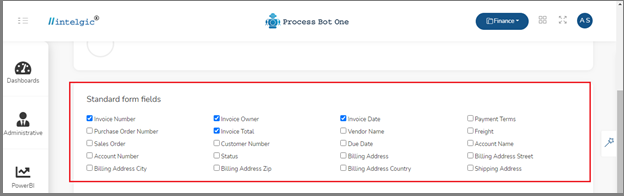
- In the below image I have selected the fields, which are present in my invoice document.
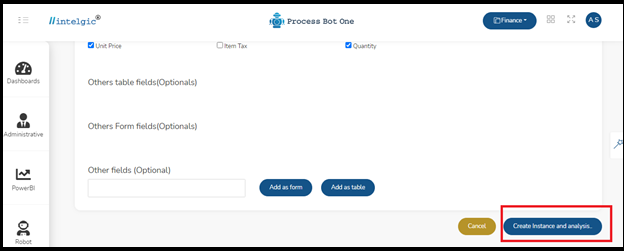
- In the same way, I have selected the standard table fields, which are as shown below.

- In case your invoice is having any standard form fields or standard table fields and if the option is not present in the orchestrator then you can mention that in the other fields(optional) and click on the Add as Form/ Add as Field
- After adding all the details click on the Create instance and analysis button, as shown in the image below.
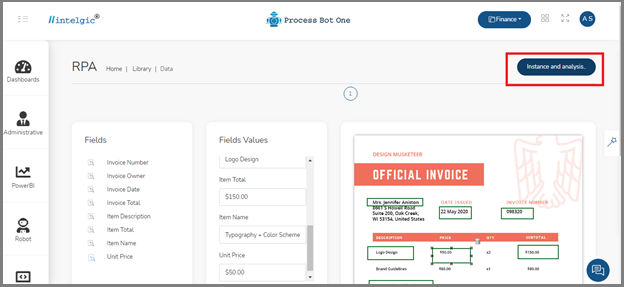
- Next, the Data page will open, which contains three parts as Fields, Fields Value, and an Invoice image that we have uploaded. Which is as shown below.

- Here, we are going to train our bot by creating an invoice instance. The first step is to select the field under the fields list.
- Next, select the field from the Fields list and,
- Then move your cursor on the invoice,
- And select the same field value in the image and draw a rectangle box,
- So that the value will be automatically added under the respective field in the Fields Values drop-down list.
- For example, if you select Invoice Number in the fields, then you have to draw a rectangle box on the invoice number in the invoice.
- In the below image you can see that I have selected the Invoice number and drawn a rectangle box on the invoice number in the invoice image, then automatically, the invoice number will be copied to the invoice number in the values of the field.
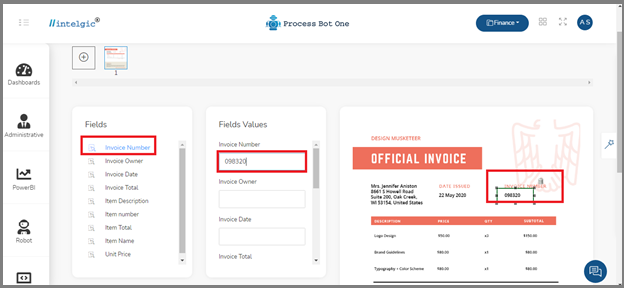
- As soon as you draw a rectangle on the invoice number, automatically the numbers will be captured under the Fields Values.
- Next, click on the Instance and Analysis, so that the details will be added to your bot.
Note: If you have multiple items in your invoice then, you can select either first or second row items to train your bot.
- Now, you can see the list of instances created. This is as shown in the below image.
- This is how you can create and train your bots.